
:max_bytes(150000):strip_icc():format(webp)/ps6-concept-trailer-64aac5b7323041ad93d7535eccf7df40.png)
New A Simple Way to Get KineMaster on Your Mac Download and Install for 2024
A Simple Way to Get KineMaster on Your Mac: Download and Install
KineMaster for Mac: Download Guide for You

Richard Bennett
Mar 27, 2024• Proven solutions
KineMaster is a powerful video editing app, which has some cool video editing features. This mobile video editor allows you to perform some exciting video editing tasks right from your smartphone. You can trim and cut videos without quality loss, and you add transitions, audio and other effects to make your videos attractive. And you can share your videos on social platform directly after editing.
Unfortunately, KineMaster is available only on iOS and Android devices. Even though KineMaster for Mac is unavailable yet, you can still download it on your Mac. Don’t know how? Don’t worry! This article provides a step-by-step guide to make sure you enjoy KineMaster on Mac. Let’s dive in to know better.
Part1: How to Download KineMaster on Mac
KineMaster is accessible just for mobile devices. To download it on Mac, you need the assistance of an Android Emulator. Android Emulator is an outsider software that allows running Google Play Store on MacBook. Let’s dive into the steps it requires to cover.
Step1: Download BlueStacks Emulator/NoxPlayer
BlueStacks Emulator and NoxPlayer both are great emulators, here we take BlueStacks as an example. Download and install BlueStacks on Mac, and Open it after.

Step2: Access Google Play
Access Play Store from the main screen of BlueStacks. And you need to Log in with Google Account.

Step3: Install KineMaster on Mac
Simply type KineMaster in the search bar and install KineMaster on Mac. There you go, you can edit with KineMaster on Mac now.

Part2: Best KineMaster for Mac Alternatives
KineMaster is basically for smartphones, it can likewise be introduced on your MacBook with our guide above. But here’s the kicker as you might find it ambiguous while dealing with some handy editing tasks. For that, we have picked two best video editor for beginners as alternatives to KineMaster for Mac. Let’s have a look into it.
1. Wondershare Filmora for Mac
The top-notch alternative to KineMaster for Mac is the Wondershare Filmora. It’s a feature-packed video editing tool that runs smoothly on MacBook without any third-party emulator. The user-friendly interface of Filmora permits you to edit video easily even without any prior experience. You can trim, crop, split and merge your videos within few clicks. What’s more, you can make your video more compelling with advanced tools like key framing, motion tracking, green screen and AR stickers.


Main Features:
- Basic editing features including trimming, cropping, and merging videos
- Advanced editing features including motion tracking, key framing, audio ducking and more
- Cloud-based effect library including filters, titles, transitions and more.
- You can also share your edited videos with YouTube and Vimeo.
- record your screen and camera for future video editing.
2. iMovie
Another best option in contrast to KineMaster is iMovie. This video editor for Mac permits users to conduct basic video editing quickly. You can also add build-in video effects, transitions to polish your video. iMovie is one cool video editor that can replace KineMaster whenever. This editor device accompanies an exceptionally easy-to-use interface that is friendly for beginners.

Main Features:
- Very simple interface
- Color matching for consistent movie looks
- Classy themes
- Great chroma-keying tool
- Lots of audio tools
- Excellent movie templates
Conclusion
KineMaster for Mac is a renowned video editing software that offers some pro-level features for both novice and expert. But still, it lacks some exciting features. Be that as it may, we recommend you to get Filmora for your video editing task. It is easy to use and you can edit like a pro quickly.
Richard Bennett
Richard Bennett is a writer and a lover of all things video.
Follow @Richard Bennett
Richard Bennett
Mar 27, 2024• Proven solutions
KineMaster is a powerful video editing app, which has some cool video editing features. This mobile video editor allows you to perform some exciting video editing tasks right from your smartphone. You can trim and cut videos without quality loss, and you add transitions, audio and other effects to make your videos attractive. And you can share your videos on social platform directly after editing.
Unfortunately, KineMaster is available only on iOS and Android devices. Even though KineMaster for Mac is unavailable yet, you can still download it on your Mac. Don’t know how? Don’t worry! This article provides a step-by-step guide to make sure you enjoy KineMaster on Mac. Let’s dive in to know better.
Part1: How to Download KineMaster on Mac
KineMaster is accessible just for mobile devices. To download it on Mac, you need the assistance of an Android Emulator. Android Emulator is an outsider software that allows running Google Play Store on MacBook. Let’s dive into the steps it requires to cover.
Step1: Download BlueStacks Emulator/NoxPlayer
BlueStacks Emulator and NoxPlayer both are great emulators, here we take BlueStacks as an example. Download and install BlueStacks on Mac, and Open it after.
Step2: Access Google Play
Access Play Store from the main screen of BlueStacks. And you need to Log in with Google Account.
Step3: Install KineMaster on Mac
Simply type KineMaster in the search bar and install KineMaster on Mac. There you go, you can edit with KineMaster on Mac now.
Part2: Best KineMaster for Mac Alternatives
KineMaster is basically for smartphones, it can likewise be introduced on your MacBook with our guide above. But here’s the kicker as you might find it ambiguous while dealing with some handy editing tasks. For that, we have picked two best video editor for beginners as alternatives to KineMaster for Mac. Let’s have a look into it.
1. Wondershare Filmora for Mac
The top-notch alternative to KineMaster for Mac is the Wondershare Filmora. It’s a feature-packed video editing tool that runs smoothly on MacBook without any third-party emulator. The user-friendly interface of Filmora permits you to edit video easily even without any prior experience. You can trim, crop, split and merge your videos within few clicks. What’s more, you can make your video more compelling with advanced tools like key framing, motion tracking, green screen and AR stickers.
Main Features:
- Basic editing features including trimming, cropping, and merging videos
- Advanced editing features including motion tracking, key framing, audio ducking and more
- Cloud-based effect library including filters, titles, transitions and more.
- You can also share your edited videos with YouTube and Vimeo.
- record your screen and camera for future video editing.
2. iMovie
Another best option in contrast to KineMaster is iMovie. This video editor for Mac permits users to conduct basic video editing quickly. You can also add build-in video effects, transitions to polish your video. iMovie is one cool video editor that can replace KineMaster whenever. This editor device accompanies an exceptionally easy-to-use interface that is friendly for beginners.
Main Features:
- Very simple interface
- Color matching for consistent movie looks
- Classy themes
- Great chroma-keying tool
- Lots of audio tools
- Excellent movie templates
Conclusion
KineMaster for Mac is a renowned video editing software that offers some pro-level features for both novice and expert. But still, it lacks some exciting features. Be that as it may, we recommend you to get Filmora for your video editing task. It is easy to use and you can edit like a pro quickly.
Richard Bennett
Richard Bennett is a writer and a lover of all things video.
Follow @Richard Bennett
Uncomplicate Your Workflow: 5 Free Online Tone Tools
5 Best Online Tone Generators for You

Liza Brown
Mar 27, 2024• Proven solutions
Conducting science experiments, calibrating the audio equipment, testing your hearing or tuning music instruments are just a few reasons why online tone generators can be useful in a wide range of contexts. Most of the tools that enable you to generate different tones on online platforms are easy to use and they won’t take you too much time to get a hold of them.
Furthermore, some of the online tone generators can even be used to improve health as some scientific studies have proven that a low-frequency tone can help treat the Alzheimer’s disease.
Regardless of the reason why you want to generate tones, these online tone generators will help you accomplish this task with ease.
You may also like: How to Add a Vignette Effect Online >>
Top 5 Online Tone Generators
Each of the online generators listed below will enable you to hear a pure tone, and let you adjust the tone’s frequency. Make sure that the volume on your headphones or the speakers is properly adjusted to avoid damaging the equipment and your hearing.
1. Online Tone Generator
You can find a number of different options on this website that range from the Pitch Shifter that allows you to change the Pitch of the files you upload to the Online Tone Generator platform to Binaural Beats and DTMF Signals. After you land on the website’s homepage, you’ll be able to see a tone generator that lets you select the frequency, volume and the waveform of a tone. The frequency will be set to 44.1 kHz and the wave type will be set to Sine by default.

You can insert any frequency value you want or choose between Sine, Square, Sawtooth and Triangle wave type options. The volume bar lets you control how loud the tone you’re generating is. The Play and Stop buttons enable you to start or pause the playback whenever you want, while the Save button lets you download the tone you created.
2. Audio Test File Generators

Generating Sweep, Dual or Sine tones with this online tool is easy, as you simply have to select the type of tone you want to generate. All sound files you can find on this platform are accurately calibrated, and you can adjust their frequency and amplitude. Clicking on any of the links available in the Tone Gen section of this website will take you to another page where you can adjust the properties of a tone before downloading it.

In the upper left corner of the new webpage, you’ll be able to see the Play button that lets you hear the default tone you selected. Directly below you can find the File Generator option where you can adjust the properties of the tone you’re generating. The displayed options depend on the type of tone you selected. Clicking on the Download button will save the tone you generated to your computer, but you won’t be able to save a tone if you inserted an incorrect value into one of the boxes.
3. Szynalski Online Tone Generator
Making tones on this online platform doesn’t require any effort at all since you can easily control the frequency of the tone using a large slider that is displayed across the entire page. Clicking on the Play button will play the tone under the current settings so you can make the necessary adjustments if you’re not happy with the results you’re getting. Several options that let you fine-tune the settings of the tone you’re generating can be found below the frequency slider.

The volume and balance are located on the right side of the screen and they allow you to determine how loud the tone is going to be or to choose to which channel the majority of the signal is going to be sent. The value in the middle of the screen displays the current frequency of the tone. The arrows also allow you to change the frequency value, while clicking on the wave type selector lets you choose between Sawtooth, Sine, Triangle, and Square options.
The tones you generate on this website can’t be downloaded to your computer, but you can use the Get Link option to send a tone to your email or to a friend.
4. Wavtones Audio Frequency Signal Generator
The free version of this website offers only a limited amount of tones that have a maximum duration of 5 seconds. Purchasing Basic, Pro or Corporate packages will grant you access to all types of tones this online tone generator offers, and the tones you download can last up to 300 seconds depending on the sample rate.

The WavtonesAudio Frequency Signal Generator allows you to alter the properties of each tone it offers, even if you’re using the free version, but you can’t listen to any of the available tones before you download them. This makes it a bit more difficult to generate a tone in accordance with your current demands. Furthermore, the Bit Depth of all tones the free version of this online tone generator provides is limited to 16-bit.
5. Gieson TonGen
If you are looking for an easy way to generate tones from your browser this may be one of the best options available. You can easily change the frequency of a tone by dragging the Hz slider, and the Fine Tune Hz slider enables you to find the perfect frequency of a tone.
There are four wave types you can choose from that generate different types of tones and you can change their tonality by clicking on one of the buttons located near the bottom of the tone generator.

Saving the tones you generate is not possible as Gieson TonGen website doesn’t offer this option. Using a link to send a tone you created is also not possible. This online tone generator is a perfect option if you’re looking for a way to quickly generate a tone directly from your web browser, but it can be hardly considered a great option if you want to generate a tone for professional purposes.
Conclusion
The scope of options different online tone generators provide can vary. That is the reason why your decision which of the tone-generating tools we covered in this article you are going to use depends on the reason why you’re creating a tone.
What is your favorite method of generating tones? Leave a comment below and let us know.
Liza Brown
Liza Brown is a writer and a lover of all things video.
Follow @Liza Brown
Liza Brown
Mar 27, 2024• Proven solutions
Conducting science experiments, calibrating the audio equipment, testing your hearing or tuning music instruments are just a few reasons why online tone generators can be useful in a wide range of contexts. Most of the tools that enable you to generate different tones on online platforms are easy to use and they won’t take you too much time to get a hold of them.
Furthermore, some of the online tone generators can even be used to improve health as some scientific studies have proven that a low-frequency tone can help treat the Alzheimer’s disease.
Regardless of the reason why you want to generate tones, these online tone generators will help you accomplish this task with ease.
You may also like: How to Add a Vignette Effect Online >>
Top 5 Online Tone Generators
Each of the online generators listed below will enable you to hear a pure tone, and let you adjust the tone’s frequency. Make sure that the volume on your headphones or the speakers is properly adjusted to avoid damaging the equipment and your hearing.
1. Online Tone Generator
You can find a number of different options on this website that range from the Pitch Shifter that allows you to change the Pitch of the files you upload to the Online Tone Generator platform to Binaural Beats and DTMF Signals. After you land on the website’s homepage, you’ll be able to see a tone generator that lets you select the frequency, volume and the waveform of a tone. The frequency will be set to 44.1 kHz and the wave type will be set to Sine by default.
You can insert any frequency value you want or choose between Sine, Square, Sawtooth and Triangle wave type options. The volume bar lets you control how loud the tone you’re generating is. The Play and Stop buttons enable you to start or pause the playback whenever you want, while the Save button lets you download the tone you created.
2. Audio Test File Generators
Generating Sweep, Dual or Sine tones with this online tool is easy, as you simply have to select the type of tone you want to generate. All sound files you can find on this platform are accurately calibrated, and you can adjust their frequency and amplitude. Clicking on any of the links available in the Tone Gen section of this website will take you to another page where you can adjust the properties of a tone before downloading it.
In the upper left corner of the new webpage, you’ll be able to see the Play button that lets you hear the default tone you selected. Directly below you can find the File Generator option where you can adjust the properties of the tone you’re generating. The displayed options depend on the type of tone you selected. Clicking on the Download button will save the tone you generated to your computer, but you won’t be able to save a tone if you inserted an incorrect value into one of the boxes.
3. Szynalski Online Tone Generator
Making tones on this online platform doesn’t require any effort at all since you can easily control the frequency of the tone using a large slider that is displayed across the entire page. Clicking on the Play button will play the tone under the current settings so you can make the necessary adjustments if you’re not happy with the results you’re getting. Several options that let you fine-tune the settings of the tone you’re generating can be found below the frequency slider.
The volume and balance are located on the right side of the screen and they allow you to determine how loud the tone is going to be or to choose to which channel the majority of the signal is going to be sent. The value in the middle of the screen displays the current frequency of the tone. The arrows also allow you to change the frequency value, while clicking on the wave type selector lets you choose between Sawtooth, Sine, Triangle, and Square options.
The tones you generate on this website can’t be downloaded to your computer, but you can use the Get Link option to send a tone to your email or to a friend.
4. Wavtones Audio Frequency Signal Generator
The free version of this website offers only a limited amount of tones that have a maximum duration of 5 seconds. Purchasing Basic, Pro or Corporate packages will grant you access to all types of tones this online tone generator offers, and the tones you download can last up to 300 seconds depending on the sample rate.
The WavtonesAudio Frequency Signal Generator allows you to alter the properties of each tone it offers, even if you’re using the free version, but you can’t listen to any of the available tones before you download them. This makes it a bit more difficult to generate a tone in accordance with your current demands. Furthermore, the Bit Depth of all tones the free version of this online tone generator provides is limited to 16-bit.
5. Gieson TonGen
If you are looking for an easy way to generate tones from your browser this may be one of the best options available. You can easily change the frequency of a tone by dragging the Hz slider, and the Fine Tune Hz slider enables you to find the perfect frequency of a tone.
There are four wave types you can choose from that generate different types of tones and you can change their tonality by clicking on one of the buttons located near the bottom of the tone generator.
Saving the tones you generate is not possible as Gieson TonGen website doesn’t offer this option. Using a link to send a tone you created is also not possible. This online tone generator is a perfect option if you’re looking for a way to quickly generate a tone directly from your web browser, but it can be hardly considered a great option if you want to generate a tone for professional purposes.
Conclusion
The scope of options different online tone generators provide can vary. That is the reason why your decision which of the tone-generating tools we covered in this article you are going to use depends on the reason why you’re creating a tone.
What is your favorite method of generating tones? Leave a comment below and let us know.
Liza Brown
Liza Brown is a writer and a lover of all things video.
Follow @Liza Brown
Want that Vintage Nostalgia Back in Your Photos? Well, Then You Need a VHS App, and You’re at the Right Place to Find One
VHS references the Video Home System video capture format created by the Japanese corporation JVC. It was a big step forward for consumers at the time, putting the ability to record and replay the video at the disposal of the general people, and it swiftly expanded into most houses.
Anyone who has possessed an old camcorder knows that the quality of the films and photographs it took was far inferior to what we are accustomed to with newer camcorders. However, such retro cameras are no longer in use. But, you may still achieve the impression of antique images by using a VHS app. A few of the excellent ones are reviewed by this article. Let’s get going!
In this article
01 Best VHS Apps to Apply Old VHS Effect to Your Videos on iPhone and Android
02 How to Get VHS Effects in Filmora Video Editor?
Part 1: Best VHS Apps to Apply Old VHS Effect to Your Videos on iPhone and Android
Vintage photography and videotapes are something modern technology can never replace. If you want to recreate the vintage-like footage, the following apps can help you:
1. Camcorder - Record VHS Home Videos
Supported OS: iOS

The first app on our list of the top smartphone VHS applications is Camcorder. This simple-to-use app with a great retro design approach for shooting camcorder-esque home recordings right to your iPhone.
You can import a file from your photo library to Camcorder. The filter and the oh-so-important date will automatically apply in the corner effect. This iOS app is now ad-free and free for use. It enables you to use the Front Flash when making a home video in selfie mode in low-light conditions.
Features
- It has a simple-to-use interface
- You can add a VHS effect to the video
- Lets you use the flash for selfie
2. Vaporgram: Vaporwave, VHS & Glitch Photo Editor
Supported OS: Android

VHS is a common effect in the steam wave aesthetic. If you want to create your images more visually appealing, you may use the Vaporgram app.
In addition to the VHS illusion, Vaporgram has various effects such as RGB, Glitches, 3D, and many others. You will be able to convert your images into authentic Polaroid photos, regaining popularity. Vaporgram mixes an old camera with various photo effects and other embellishments and labels that reflect the mood of the images.
Features
- Allows you to add glitches and 3D to the image
- Lets you add the stickers to your recordings
- The user interface is influenced by vintage computers
3. VHS Glitch Camcorder

Many celebrities utilize throwback filters on their movies, social media posts, and other media. VHS Glitch Camcorder is an app that will make you feel connected to famous individuals by allowing you to utilize the same effects they employ.
The VHS Glitch Camcorder program offers a plethora of capabilities to assist you in processing your images. VHS-style filming, adjusting the date shown on a picture or video, modifying a finished movie, and filming with immediate effects are all examples of these functions.
Features
- Allows you to add soundtracks to your videos
- The free plan offers several editing tools
- It has an easy-to-use interface
4. Rarevision VHS Lite

The Rarevision VHS Lite is widely regarded as one of the best VHS effect app utilized. The effect immediately submerges you in the ambiance of the 1980s, and you can appear just like you looked as a youngster.
Here, you may immediately begin making films with this effect — and then email them to your contacts. It may be a practical prank and a sleek and fascinating piece of material.
You may utilize your phone as an old camera by zooming in and out and shooting in reality mode. The free plan of Rarevision VHS Lite has a time restriction - if you buy a subscription, it will continuously shoot.
Features
- It lets you zoom in and out while recording
- Lets you email the video after editing
- You shoot the video in reality mode
5. VHS Cam - Retro Camcorder FX
Supported OS: iOS
This program has a straightforward UI that you will pick up on as you begin recording. Your iPhone will transform into an antique camera, recording everything that occurs around you.
With the VHS Cam app, you could either produce videos or add effects to existing ones. Because most vintage cameras feature a date display that shows the date and time of recording, it is also included here. You can edit the video as you see fit or delete it entirely from the image.
Features
- It has an easy-to-use interface
- feature a date display to show date and time
- Lets you alter the footage after recording

6. VHS Cam + 8mm
Supported OS: iOS

This simple program will quickly give your phone video a retro look. There aren’t as many frills and bells as you’ll find in a few other applications on our list, but this doesn’t require them. As you shoot, apply film grit, scraped film, and colorized effects to see how your footage will look.
The name 8mm VHS Camcorder is a lot. Still, it fits the criteria as a multi-purpose application that can add various photo filters and effects to your films for a total throwback atmosphere. So you get your VHS fill and other footage that appears to be 8mm.
Features
- Videos appear as an 8mm footage
- It lets you customize the effects
- It is a multi-purpose app
7. Glitch Video Effect
Supported OS: iOS

Glitch Video Effect provides over 100 VHS, Glitch, CRT, and more effects to distort your photos and videos artistically. It also contains a plethora of Retro and Vintage Filters. With a single swipe, you can transform an ordinary photo or video into a one-of-a-kind work of art.
With this app, you will be transported back to the 1980s and 1990s! Use the same antique home movie-type camcorder that your grandparents and parents used to capture and edit images and films. Not to add the fantastic Glitches and scratches that will give your films the screwed-up VHS look of the past!
Features
- It has various Vintage and Retro filters
- Allows you to add VHS with a single swipe
- Features glitches and scratched to add
8. VHS Cam: Vintage Video Filters
Supported OS: iOS

VHS Cam can enhance your images and videos with vintage camera effects. You’ll be able to make attractive retro films for social networks. Your pals will like your trendy videos with old effects and filters.
This VHS camera app will transform your iPhone camera into an 80s camcorder, giving your captured films a beautiful retro vibe that will make your footage appear more relaxed. When it comes to generating distinctive films for your social media profiles, the app’s different vintage filters and effects provide plenty of creative options.
Features
- Allows you to share to the social media
- You can import the video from your phone
- It helps you do the old videotape recordings
9. VHS Video Editor, Vintage Cam
Supported OS: iOS

There are several vintage filters available for use in movies and photos. You’ll also discover options for blending, combining, and adjusting various parts of each filter. The filter gives your photographs a realistic 1950s and 1960s look without entirely distorting them. There are other video effects like noise, distortion, and glitches.
Features
- It features a simple-to-use interface
- It includes multiple editing tools
- Allows you to add glitches and noise distortion
10. 1984 Cam
Supported OS: Android
1984 Cam is a unique program that provides various VHS-style video effects. Your shot will appear like a footage from an old tape you discovered in the attic.
The 1984 Cam will assist in recreating the lost ambiance of filming in the 1980s when the camcorder was an actual work of art. To obtain the ambient movie, you must first choose it from the library and record it ahead of time.
Features
- It has an easy-to-use interface
- feature a date display to show date and time
- Lets you alter the footage after recording
Part 2: How to Get VHS Effects in Filmora Video Editor?
For Win 7 or later (64-bit)
For macOS 10.14 or later
download filmora app for ios ](https://app.adjust.com/b0k9hf2%5F4bsu85t ) download filmora app for android ](https://app.adjust.com/b0k9hf2%5F4bsu85t )
Click here to get Filmora for PC by email
If you want to add VHS effects to video on your Windows or Mac computers, you can try Wondershare Filmora to get VHS effects easily. Filmora video editing software is a simple and effective video editing tool that provides lots of effects. Follow the instruction below to get VHS effects to videos using Filmora video editor:
Step 1: Launch Filmora video editor, and then click create a new project to start. Import the video in the Filmora media library and drag it to the timeline.

Step 2: Go to the Effects tab and the top, and search VHS in the search bar. You will see many VHS effects listed. Drag any of them above the video on the timeline. After that, drag it to the video’s length.

You can adjust the VHS settings as needed by double-clicking it in the timeline. See, adding VHS effects to video with Filmora is easy!
Conclusion
You may use VHS effects to add variety to the photographs and videos you upload to social media and create something unique. Designing to the past is always appropriate; the essential thing is to have an excellent concept and be in a good mood. With this article, we hope you discovered a helpful VHS app.
02 How to Get VHS Effects in Filmora Video Editor?
Part 1: Best VHS Apps to Apply Old VHS Effect to Your Videos on iPhone and Android
Vintage photography and videotapes are something modern technology can never replace. If you want to recreate the vintage-like footage, the following apps can help you:
1. Camcorder - Record VHS Home Videos
Supported OS: iOS
The first app on our list of the top smartphone VHS applications is Camcorder. This simple-to-use app with a great retro design approach for shooting camcorder-esque home recordings right to your iPhone.
You can import a file from your photo library to Camcorder. The filter and the oh-so-important date will automatically apply in the corner effect. This iOS app is now ad-free and free for use. It enables you to use the Front Flash when making a home video in selfie mode in low-light conditions.
Features
- It has a simple-to-use interface
- You can add a VHS effect to the video
- Lets you use the flash for selfie
2. Vaporgram: Vaporwave, VHS & Glitch Photo Editor
Supported OS: Android
VHS is a common effect in the steam wave aesthetic. If you want to create your images more visually appealing, you may use the Vaporgram app.
In addition to the VHS illusion, Vaporgram has various effects such as RGB, Glitches, 3D, and many others. You will be able to convert your images into authentic Polaroid photos, regaining popularity. Vaporgram mixes an old camera with various photo effects and other embellishments and labels that reflect the mood of the images.
Features
- Allows you to add glitches and 3D to the image
- Lets you add the stickers to your recordings
- The user interface is influenced by vintage computers
3. VHS Glitch Camcorder
Many celebrities utilize throwback filters on their movies, social media posts, and other media. VHS Glitch Camcorder is an app that will make you feel connected to famous individuals by allowing you to utilize the same effects they employ.
The VHS Glitch Camcorder program offers a plethora of capabilities to assist you in processing your images. VHS-style filming, adjusting the date shown on a picture or video, modifying a finished movie, and filming with immediate effects are all examples of these functions.
Features
- Allows you to add soundtracks to your videos
- The free plan offers several editing tools
- It has an easy-to-use interface
4. Rarevision VHS Lite
The Rarevision VHS Lite is widely regarded as one of the best VHS effect app utilized. The effect immediately submerges you in the ambiance of the 1980s, and you can appear just like you looked as a youngster.
Here, you may immediately begin making films with this effect — and then email them to your contacts. It may be a practical prank and a sleek and fascinating piece of material.
You may utilize your phone as an old camera by zooming in and out and shooting in reality mode. The free plan of Rarevision VHS Lite has a time restriction - if you buy a subscription, it will continuously shoot.
Features
- It lets you zoom in and out while recording
- Lets you email the video after editing
- You shoot the video in reality mode
5. VHS Cam - Retro Camcorder FX
Supported OS: iOS
This program has a straightforward UI that you will pick up on as you begin recording. Your iPhone will transform into an antique camera, recording everything that occurs around you.
With the VHS Cam app, you could either produce videos or add effects to existing ones. Because most vintage cameras feature a date display that shows the date and time of recording, it is also included here. You can edit the video as you see fit or delete it entirely from the image.
Features
- It has an easy-to-use interface
- feature a date display to show date and time
- Lets you alter the footage after recording
6. VHS Cam + 8mm
Supported OS: iOS
This simple program will quickly give your phone video a retro look. There aren’t as many frills and bells as you’ll find in a few other applications on our list, but this doesn’t require them. As you shoot, apply film grit, scraped film, and colorized effects to see how your footage will look.
The name 8mm VHS Camcorder is a lot. Still, it fits the criteria as a multi-purpose application that can add various photo filters and effects to your films for a total throwback atmosphere. So you get your VHS fill and other footage that appears to be 8mm.
Features
- Videos appear as an 8mm footage
- It lets you customize the effects
- It is a multi-purpose app
7. Glitch Video Effect
Supported OS: iOS
Glitch Video Effect provides over 100 VHS, Glitch, CRT, and more effects to distort your photos and videos artistically. It also contains a plethora of Retro and Vintage Filters. With a single swipe, you can transform an ordinary photo or video into a one-of-a-kind work of art.
With this app, you will be transported back to the 1980s and 1990s! Use the same antique home movie-type camcorder that your grandparents and parents used to capture and edit images and films. Not to add the fantastic Glitches and scratches that will give your films the screwed-up VHS look of the past!
Features
- It has various Vintage and Retro filters
- Allows you to add VHS with a single swipe
- Features glitches and scratched to add
8. VHS Cam: Vintage Video Filters
Supported OS: iOS
VHS Cam can enhance your images and videos with vintage camera effects. You’ll be able to make attractive retro films for social networks. Your pals will like your trendy videos with old effects and filters.
This VHS camera app will transform your iPhone camera into an 80s camcorder, giving your captured films a beautiful retro vibe that will make your footage appear more relaxed. When it comes to generating distinctive films for your social media profiles, the app’s different vintage filters and effects provide plenty of creative options.
Features
- Allows you to share to the social media
- You can import the video from your phone
- It helps you do the old videotape recordings
9. VHS Video Editor, Vintage Cam
Supported OS: iOS
There are several vintage filters available for use in movies and photos. You’ll also discover options for blending, combining, and adjusting various parts of each filter. The filter gives your photographs a realistic 1950s and 1960s look without entirely distorting them. There are other video effects like noise, distortion, and glitches.
Features
- It features a simple-to-use interface
- It includes multiple editing tools
- Allows you to add glitches and noise distortion
10. 1984 Cam
Supported OS: Android
1984 Cam is a unique program that provides various VHS-style video effects. Your shot will appear like a footage from an old tape you discovered in the attic.
The 1984 Cam will assist in recreating the lost ambiance of filming in the 1980s when the camcorder was an actual work of art. To obtain the ambient movie, you must first choose it from the library and record it ahead of time.
Features
- It has an easy-to-use interface
- feature a date display to show date and time
- Lets you alter the footage after recording
Part 2: How to Get VHS Effects in Filmora Video Editor?
For Win 7 or later (64-bit)
For macOS 10.14 or later
download filmora app for ios ](https://app.adjust.com/b0k9hf2%5F4bsu85t ) download filmora app for android ](https://app.adjust.com/b0k9hf2%5F4bsu85t )
Click here to get Filmora for PC by email
If you want to add VHS effects to video on your Windows or Mac computers, you can try Wondershare Filmora to get VHS effects easily. Filmora video editing software is a simple and effective video editing tool that provides lots of effects. Follow the instruction below to get VHS effects to videos using Filmora video editor:
Step 1: Launch Filmora video editor, and then click create a new project to start. Import the video in the Filmora media library and drag it to the timeline.
Step 2: Go to the Effects tab and the top, and search VHS in the search bar. You will see many VHS effects listed. Drag any of them above the video on the timeline. After that, drag it to the video’s length.
You can adjust the VHS settings as needed by double-clicking it in the timeline. See, adding VHS effects to video with Filmora is easy!
Conclusion
You may use VHS effects to add variety to the photographs and videos you upload to social media and create something unique. Designing to the past is always appropriate; the essential thing is to have an excellent concept and be in a good mood. With this article, we hope you discovered a helpful VHS app.
16 Top-Rated AVI Video Cutting Tools for Windows, MAC, Android, and iPhone
With the growing fame of video-sharing and social media applications like Twitter, Instagram, and TikTok, the demand for simple and fast video cutting and trimming tools has dramatically increased. Nowadays, you don’t have to play with complex video editing tools to produce high-quality videos.
Thanks to several user-friendly editing software to make things easy for everybody. However, finding the right programs to trim/cut videos is still challenging, especially in AVI format.
But, guess what? These top 16 AVI video cutters for Windows, MAC, Android, iPhone, and online will make video cutting and trimming fun, especially when you learn to do it using Filmora.
In this Article
Part 1: Best AVI Video Cutter to Trim/Cut AVI Video on Windows and MAC – Filmora Video Cutter [with steps}
Part 2: Top 3 Free AVI Video Cutter on Windows
Part 3: Top 3 Free AVI Video Cutter on MAC
Part 4: Top 3 Free AVI Video Cutter on Android
Part 5: Top 3 Free AVI Video Cutter on iPhone
Part 6: Top 3 Free AVI Video Cutter Online
Part 7: Bottom Line
Part 8: FAQs
Part 1: Best AVI Video Cutter to Trim/Cut AVI Video on Windows and MAC – Filmora Video Cutter [with steps]
Filmora by Wondershare is a star video editor with outstanding outcomes. Whether you have a MAC or Windows PC, you can download Filmora regardless of your operating system. The program best serves those who intend to make high-quality videos. The software provides editing support for all video formats, including AVI.
Although Filmora is an affordable editor with tons of audio and video editing options, you can still download the software for free and create projects if watermarks don’t bother you. Moreover, you can count this tool’s capabilities in cropping, resizing, and Chroma screen support. But that’s not the only sweet fruit.
In fact, Filmora is equipped with many jaw-dropping features, including preset templates, auto beat sync, split-screen, speed ramping, motion tracking, keyframing, creative transitions, titles, filters, and much more. And the best part is, you can learn and understand Filmora in no time. That’s why the program is loved and supported by all types of users.
So does Filmora helps cut and trim AVI videos? Yes! It does if you follow these steps correctly.
Step 1: Download Filmora Video Editor
First, download Filmora Video Editor by choosing your operating system, as seen in the screenshot below.
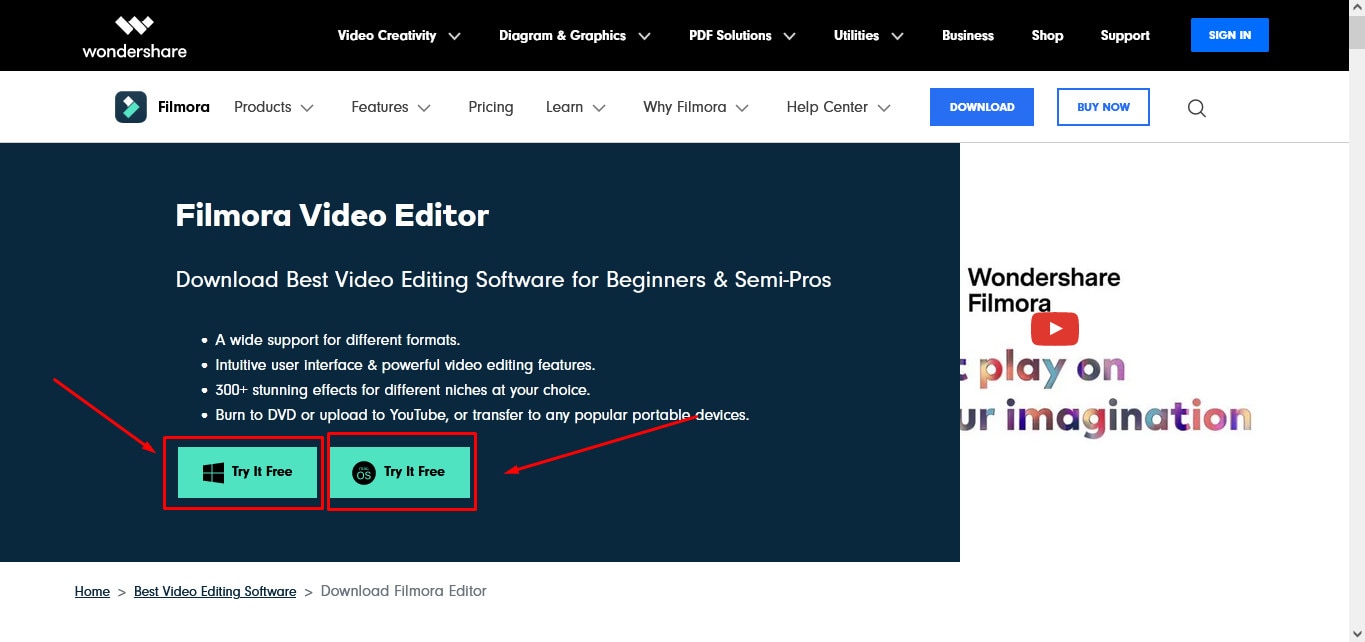
Run the setup and let it finish without any pause or break.
Step 2: Import Your Video to Filmora Video Editor
Importing your AVI video is a very simple process. Just click on the “Film Clip” icon.
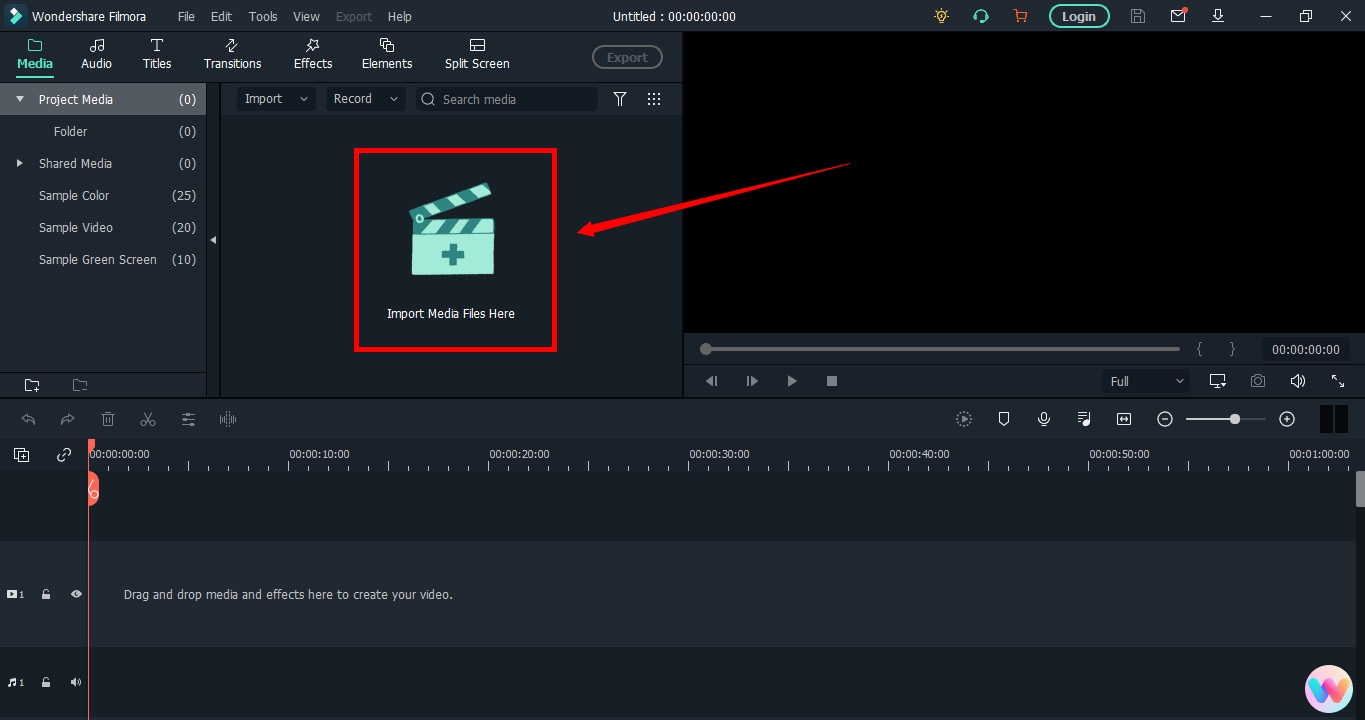
It will open a new window screen on your computer to select the video from the directory. Find the clip you want to import and cut. Use your mouse to select it and click the “Open” button.
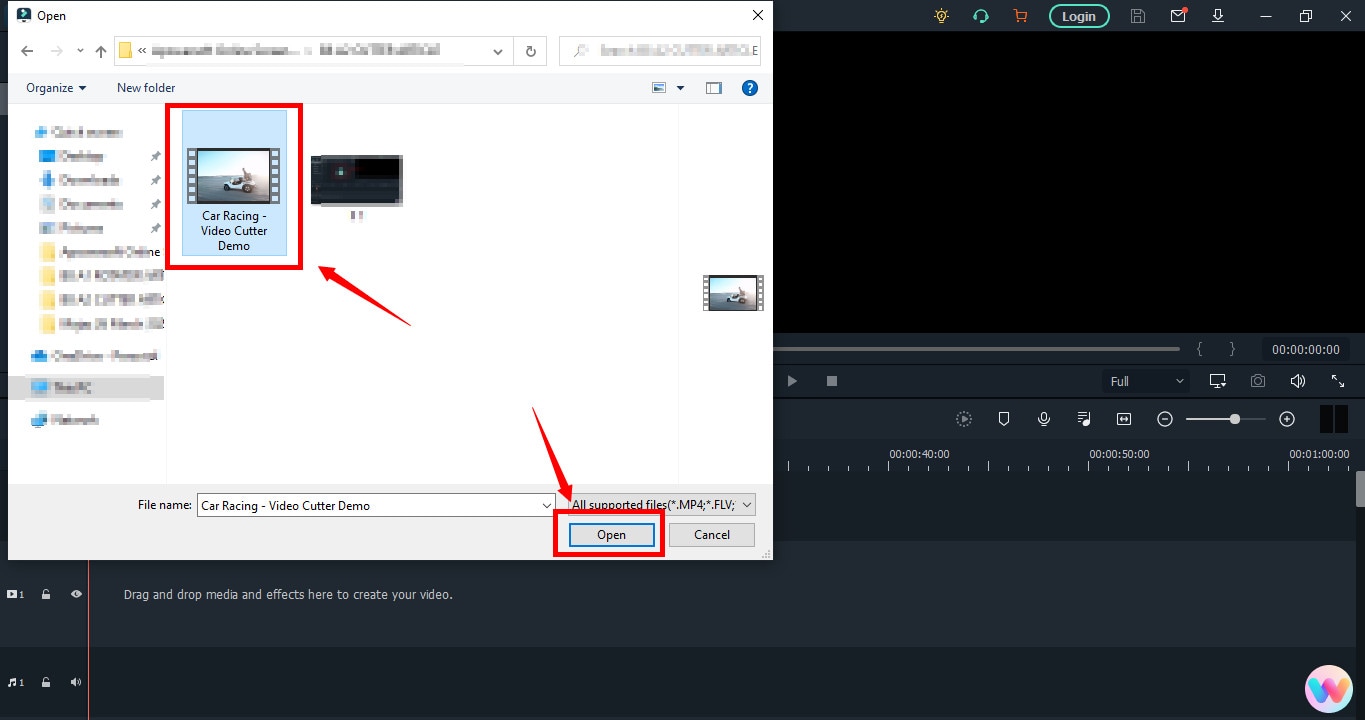
The video will be loaded in the “Media” folder of Filmora. The clip’s thumbnail should be visible to assure you have done everything correctly.
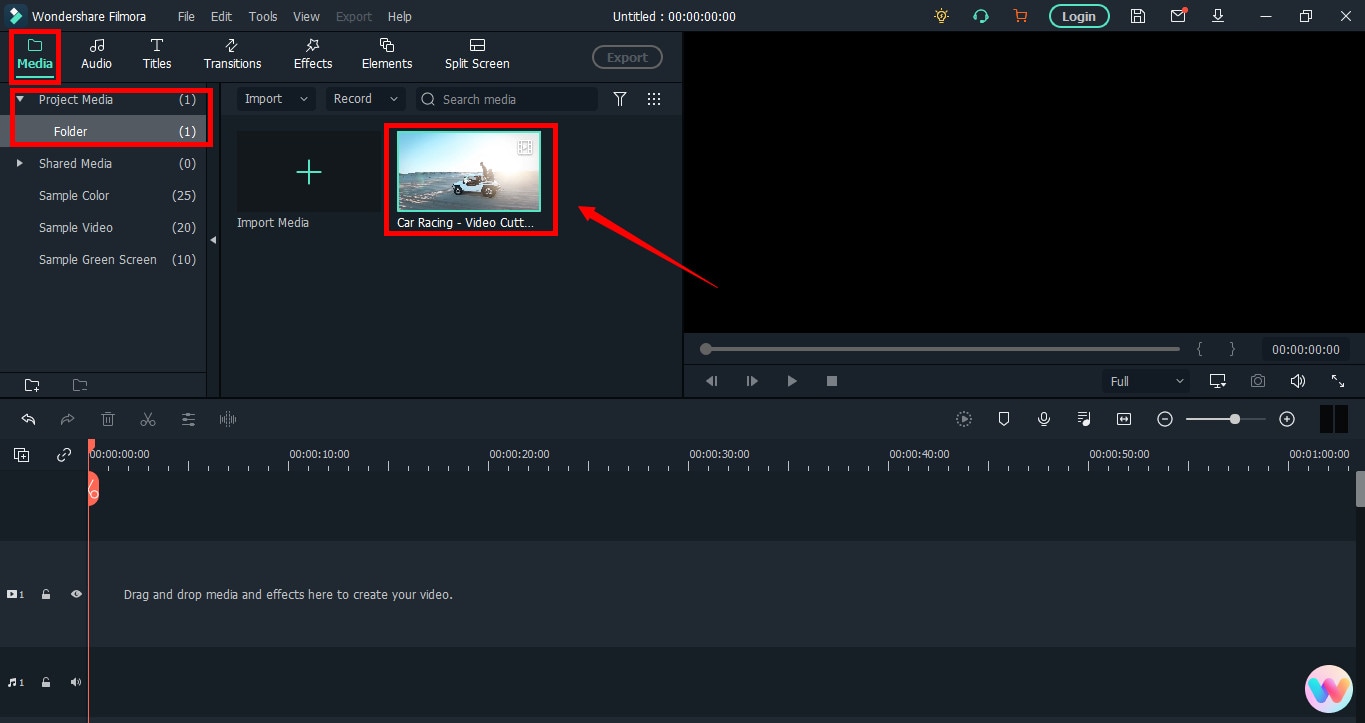
If you can see that, let’s go to the next step.
Step 3: Drag and Drop Video to Filmora’s Timeline
Select the video in the media folder by clicking over it once. Now, without leaving the hold of the left button of your mouse, slide the video down to the track in the timeline.
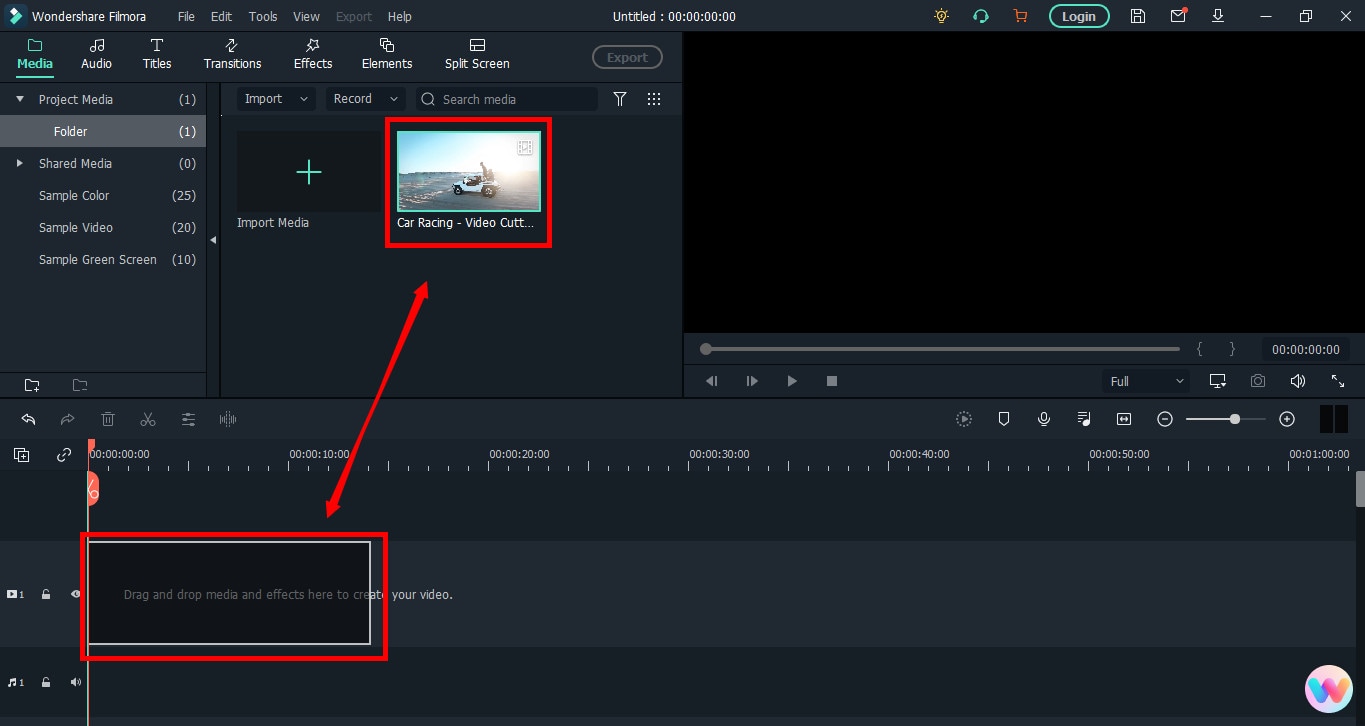
After that, a message will pop up, asking about your preference for the project settings. It is recommended to choose the “Match to Media” option unless you’re an experienced video editor who knows how to play with the resolution and frame rates.
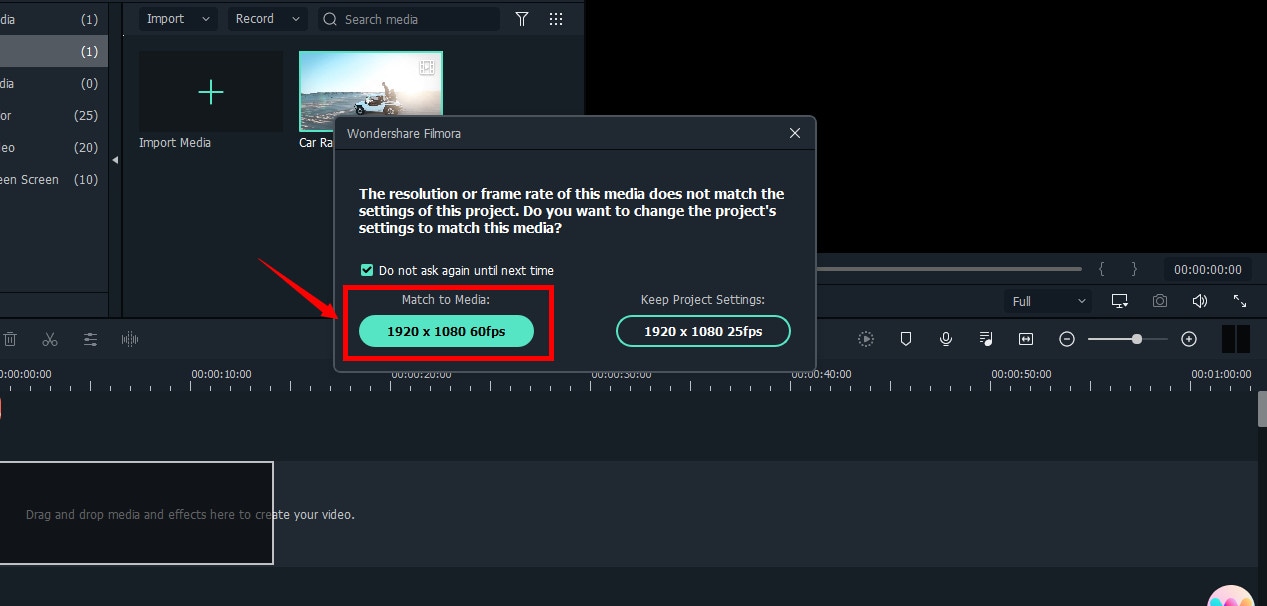
You will see the video on the timeline with its preview on the “Preview Screen” on the right side of the interface.
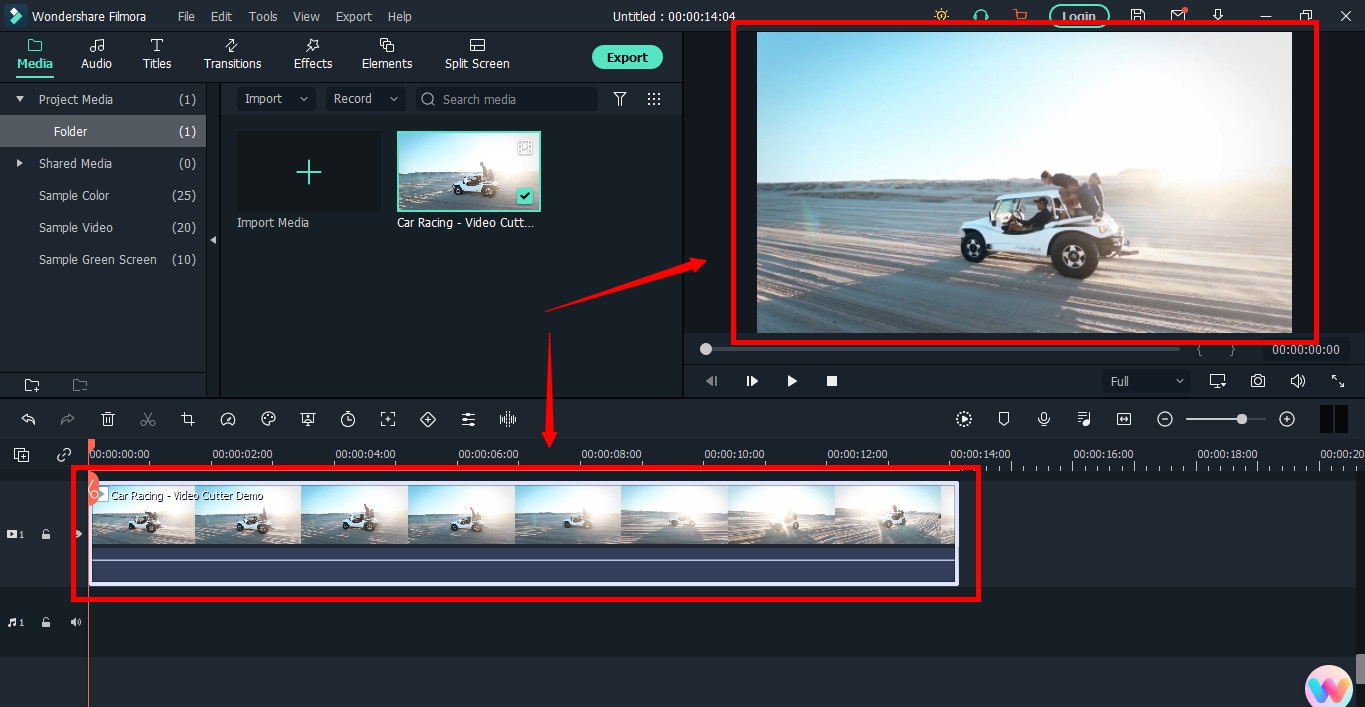
Step 4: Cutting Your Video in Filmora
Here comes the core step you have been waiting for. But before you go any further, you need to know about the “Playhead.”
Playhead is an orange-reddish marker you can find on the timeline.
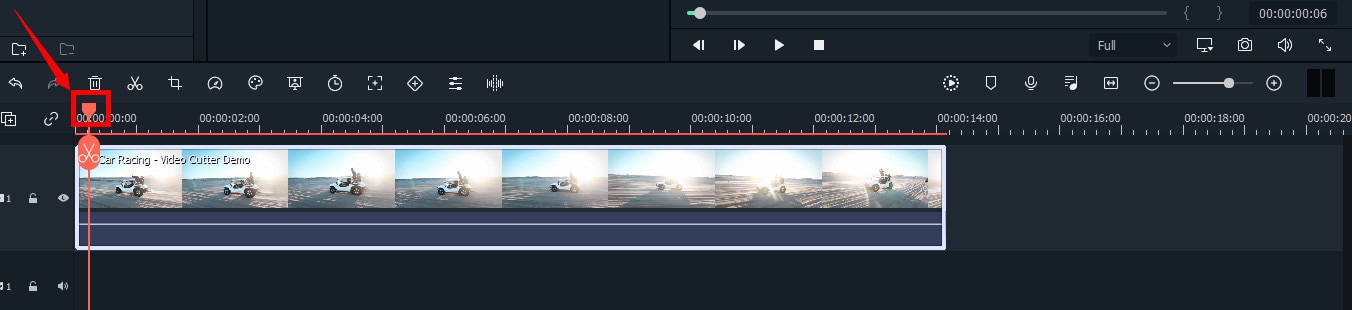
It has an important role in cutting your videos.
So, move the playhead to your desired frame and click on the “scissor” icon to make the “starting” cut.
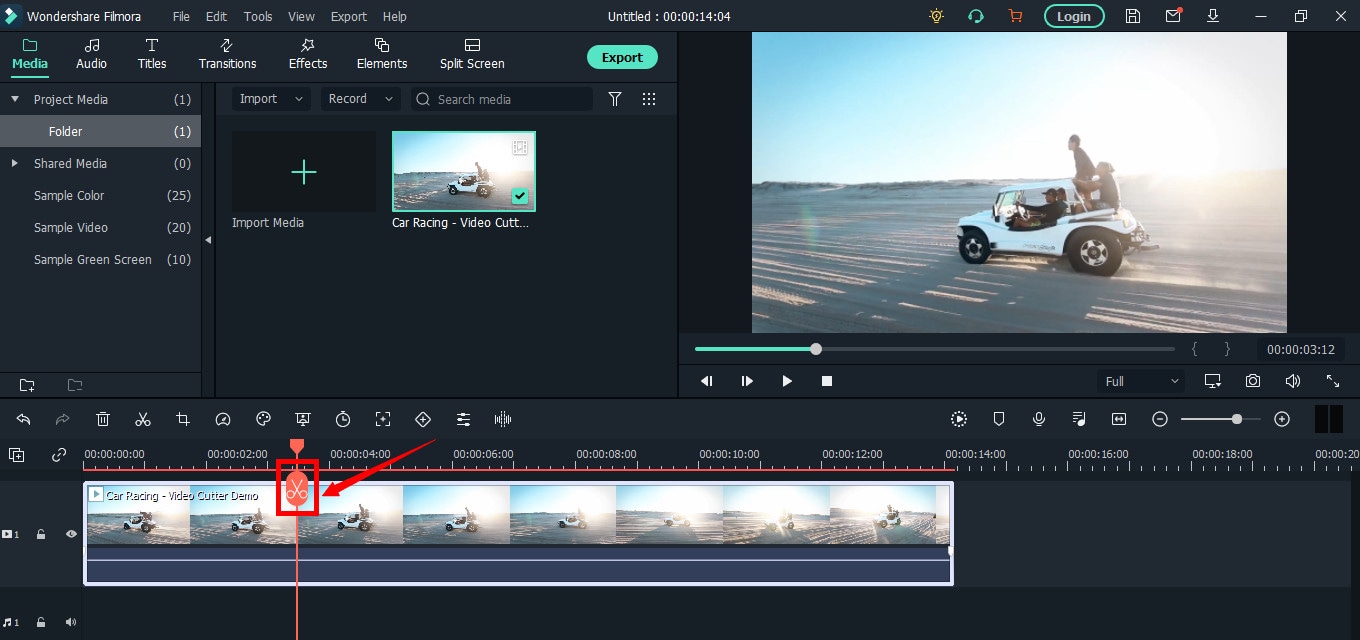
As soon as you do it, you will see that the single clip is now divided into two parts similar to this image.
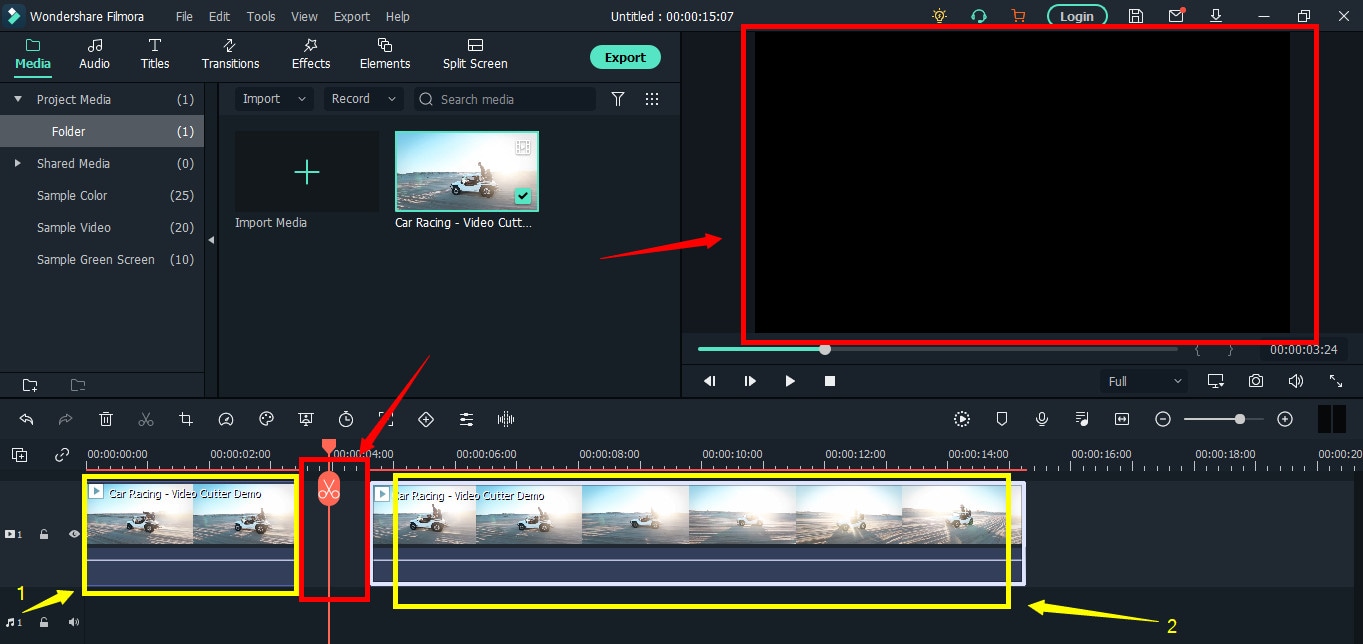
The “Red” marked area in the above screenshot ensures a gap between the clips on the timeline. The “Yellow” arrows confirm two separate clips of the same video.
Place the two clips together as seen in this “Green” area.
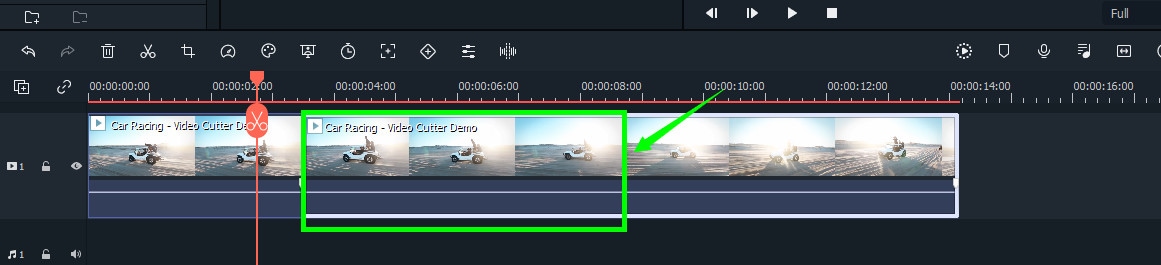
And place the playhead anywhere on the clip. And click on the “scissor” icon once again to make the “ending” cut (second cut).
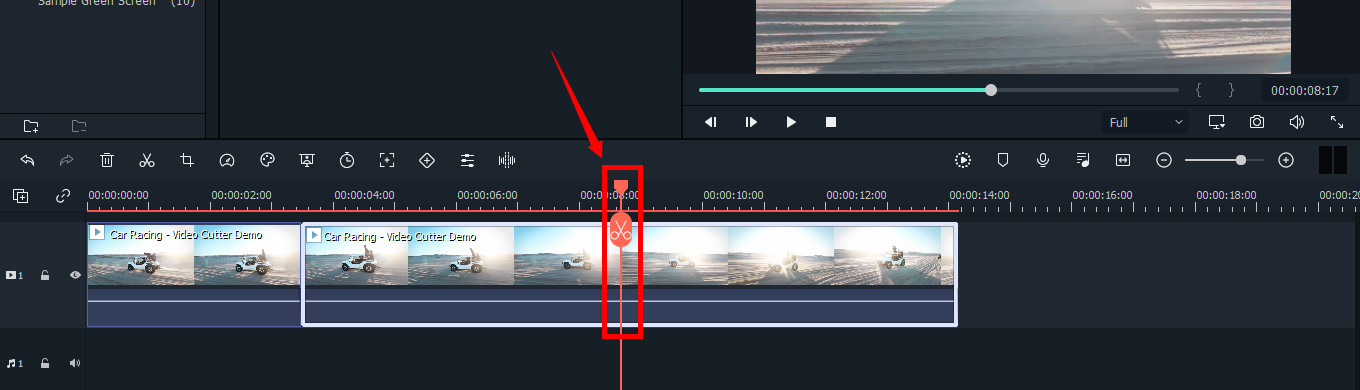
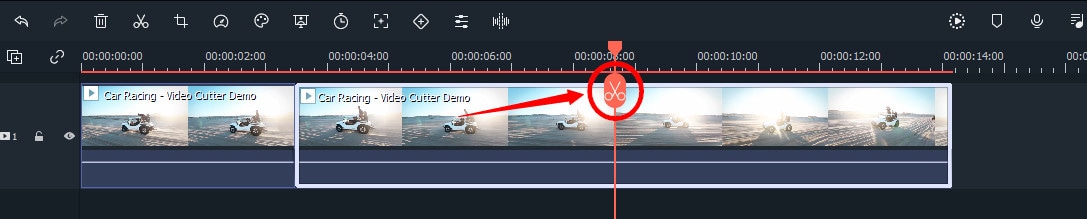
If done correctly, there should be three clips now of the same video, as you can observe in this screenshot.
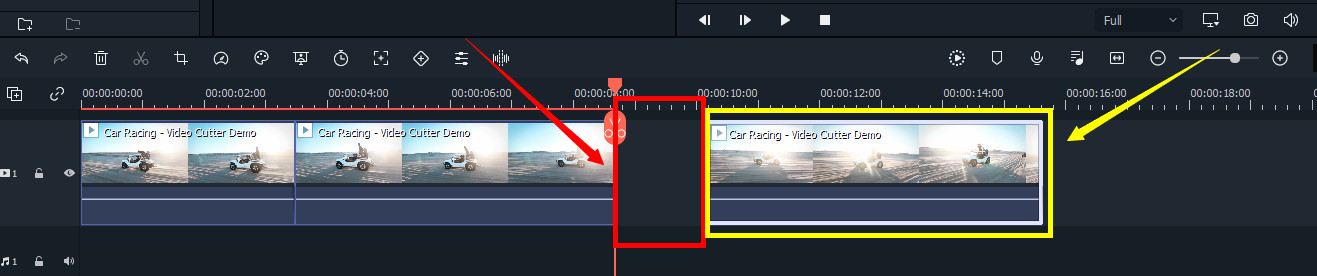
Again, the “Red” area in the above photo indicates the gap, and the “Yellow” area ensures a third segment of the video.
Note: The gaps you can see in the divided clips are made intentionally for understanding. Practically, Filmora doesn’t move the clip or make gaps in between after you have made the cuts.
Keep in mind that there are three clips on the timeline. Now, if you want to remove the second clip from the video, you need to select that portion first by clicking on it.
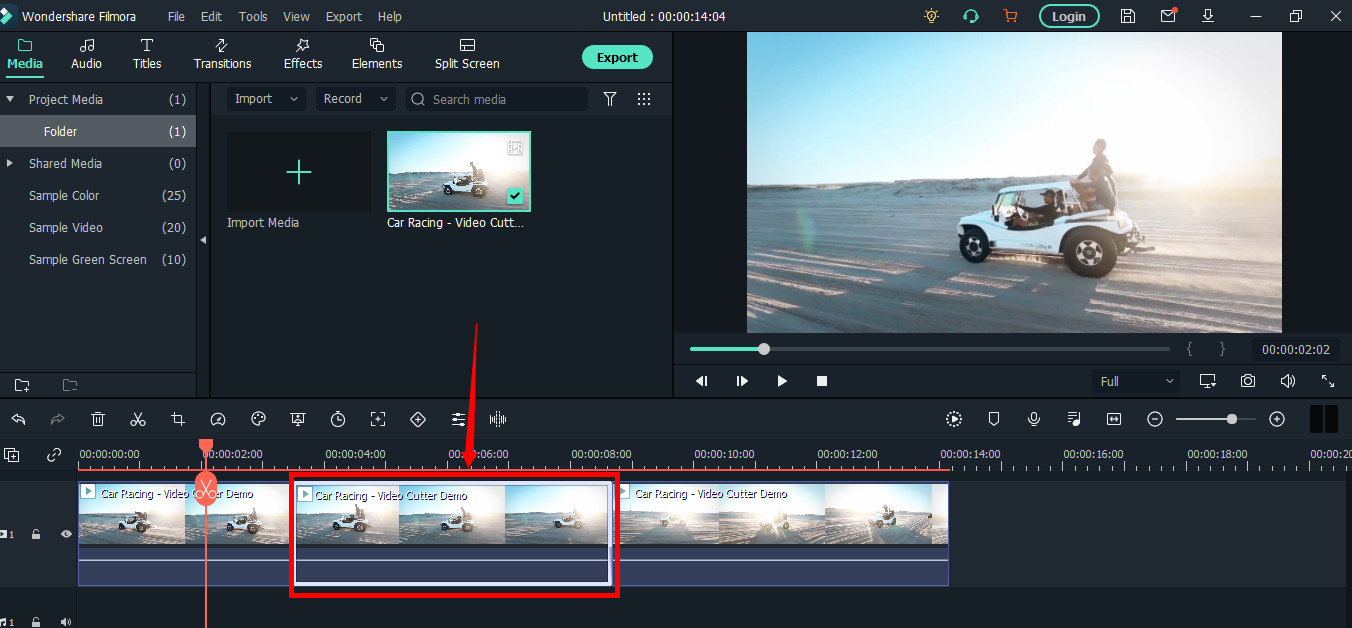
Then, right-click on the mouse and choose “Cut” from the menu.
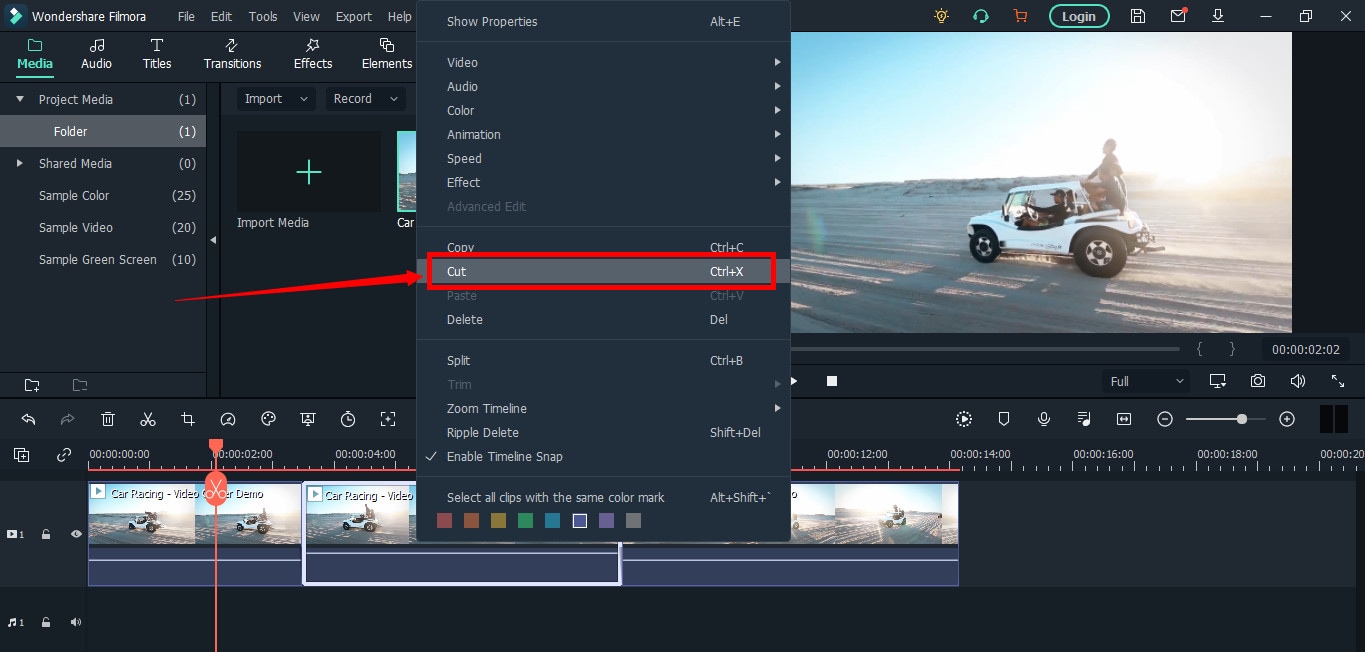
Within a semi-second, the selected portion will be removed from the timeline. And you will be able to see the remaining parts of the video. Now, pull the second clip using your mouse and place it at the end of the first clip without leaving a gap in between.
Then, click the “Play” button under the preview screen to see the results.
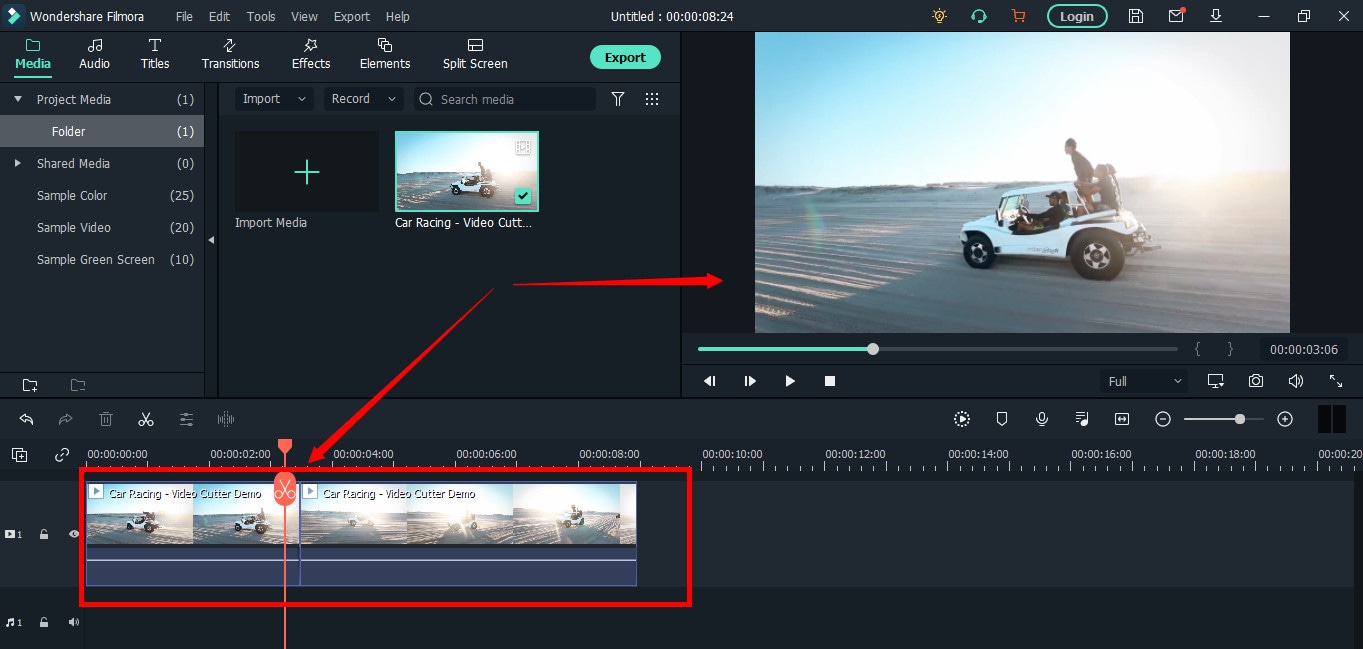
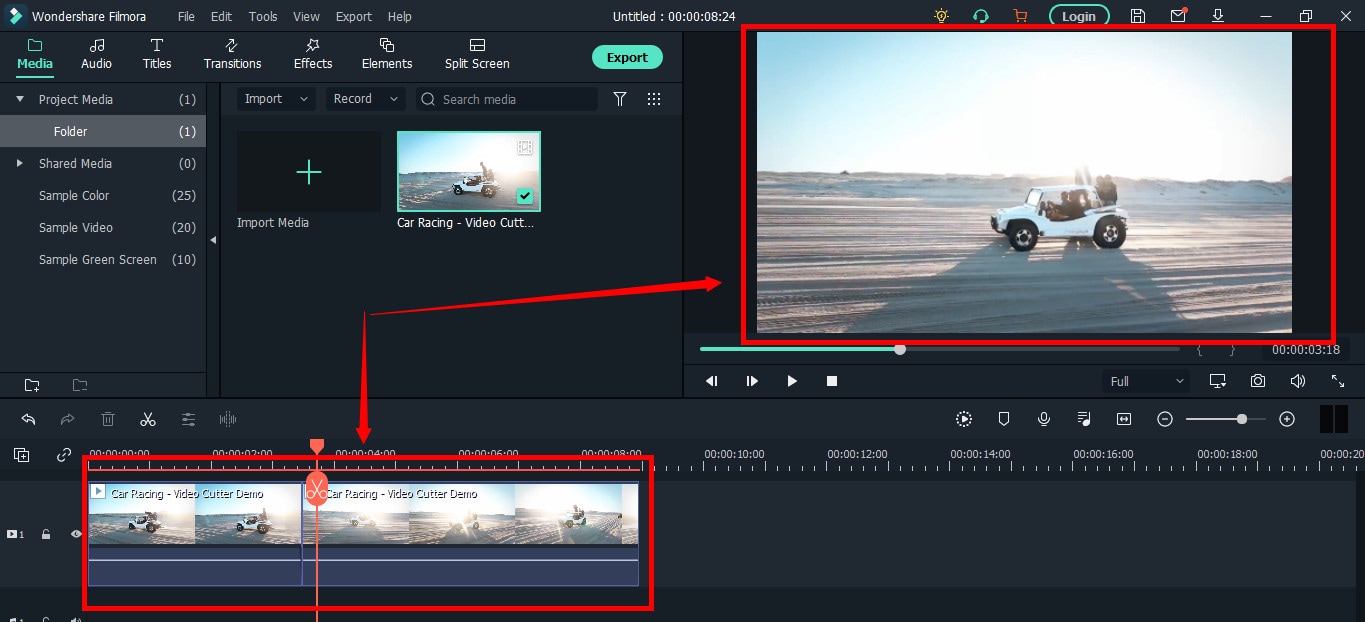
You can see in the above two screenshots that there’s a jump between the scenes due to cuts, confirming that video has been cut significantly.
Step 5: Trimming Your Video in Filmora
Remember that cutting and trimming in Filmora are two different things. Trimming allows you to remove a particular video part from visibility without deleting the portion.
So feel free to skip this step if you’re happy learning the cutting technique. But if you’re interested in trimming, here’s how you do it.
Take your mouse cursor at the beginning or end of the clip you want to trim. Keep holding the clip’s corner and slide the mouse back or front to trim the part
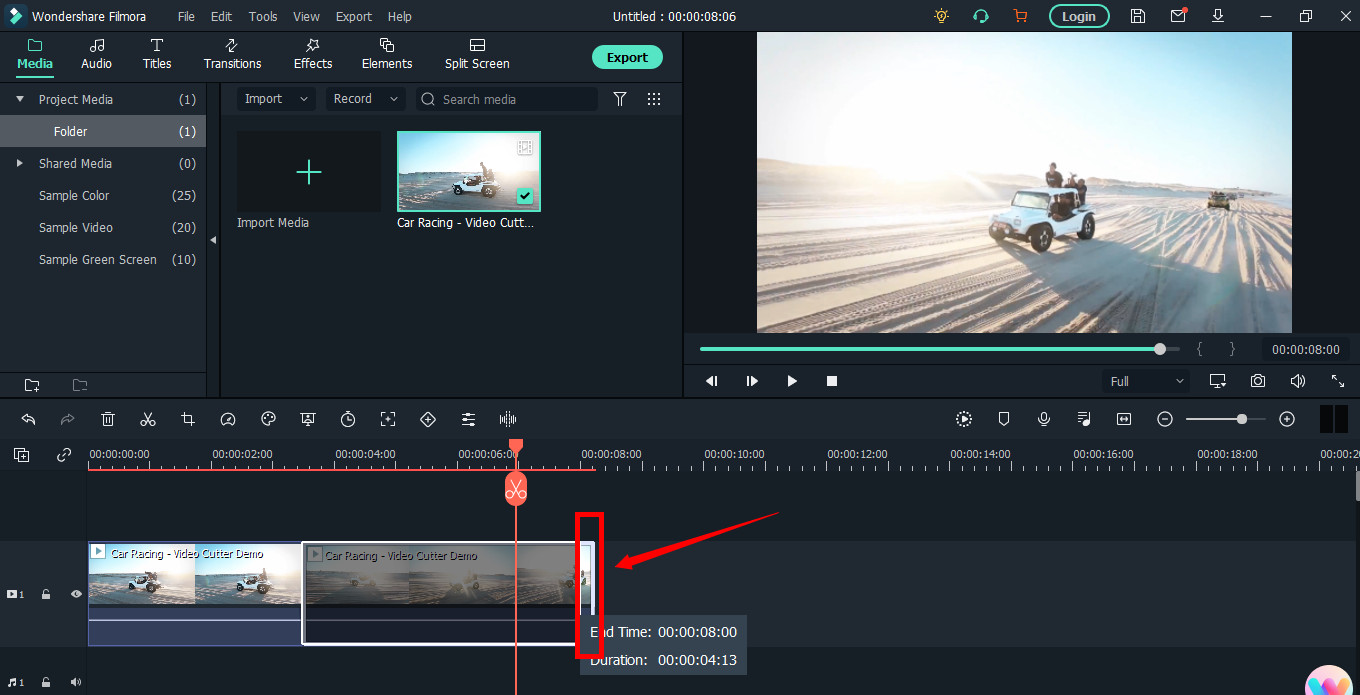
Note: Since the trim tool doesn’t delete the video, the final project based on trimming will be of a larger size. Therefore, it is advised to cut videos rather than trimming for fast rendering, better results, and small video size.
Step 6: Save Project and Export Your Cut/Trimmed AVI Video
Choose “Save Project” from the “File” menu.
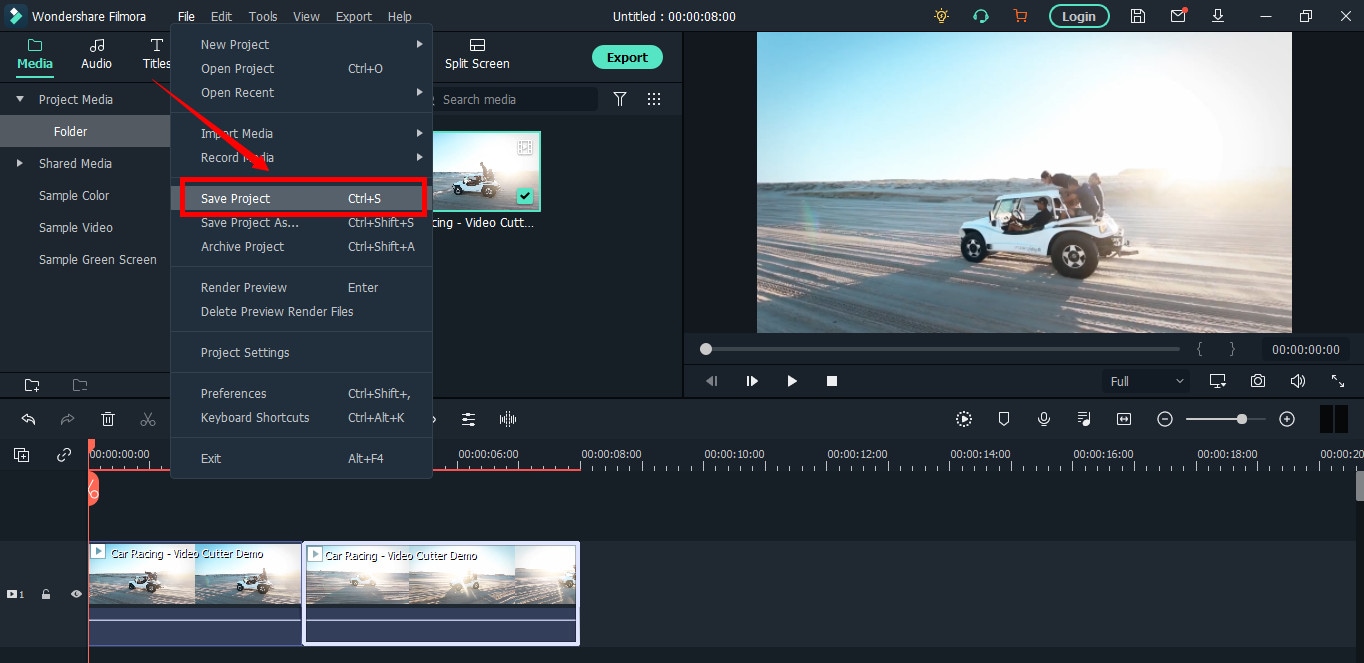
Select the directory to save the project, rename the new video, and click the “Save” button.

Click on the “Export” button to save the video in AVI or any other video format of your choice on your computer.
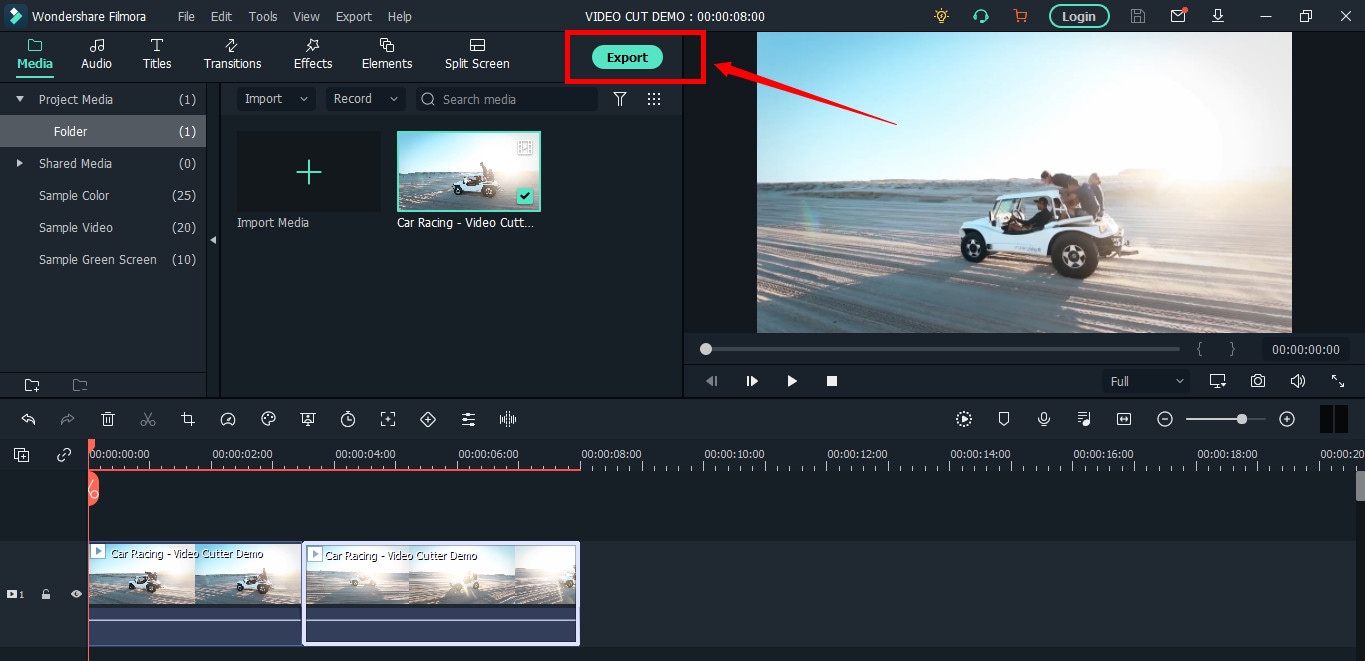
Part 2: Top 3 Free AVI Video Cutter on Windows
As a Windows user, finding an excellent video cutter is relatively easy. However, not all software permits importing AVI videos. In the same way, some video trimmers come at a price. So if you really don’t want to pay and enjoy cutting your AVI files, try using these three video cutting tools.
Microsoft Photos (Windows 10)
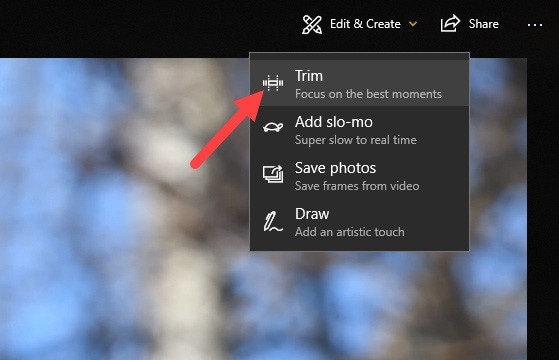
Microsoft Photos or Photo App is a free photo viewer and editor with your Windows 10. It offers incredible photo editing and enhancement along with different tools for organizing and editing videos in a very friendly way. Likewise, you can create drawings over the videos and add 3D effects and background music to your clips.
You can also trim AVI videos with Microsoft Photos quickly. All you need to do is open your clip with the Photo App, choose the “Trim” option, select a portion of the video you want to trim, and go ahead.
That’s it!
Features
- Quick video trimming
- Cool text effects
- 3D library and effects
- It has a clear interface
- You can find and tag people’s faces
- The program has 15+ filters for editing
- Motion tracking option for drawing on videos
- Allows you to view and organize your files easily
Pros
- Microsoft Photos is free for Windows users
- It automatically creates albums
- The program has a touch-friendly interface
- You can integrate your OneDrive with the software
Cons
- Lacks before and after view
- Not included in older Windows versions
- It doesn’t support selective focus or panorama stitching
Handbrake
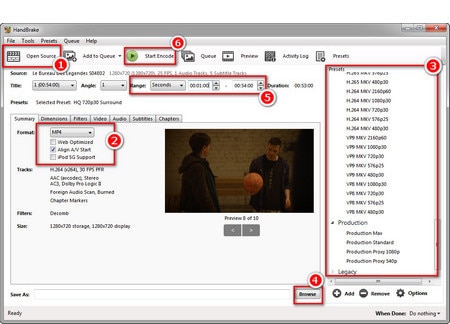
Handbrake is best-known for its video transcoding traits. Unlike typical video editors, this open-source tool includes limited options to rip Blu-rays and DVDs. Moreover, you can mix the 5.1 soundtracks and convert them to stereo to make the audio compatible with your TV speakers.
But the exciting thing about Handbrake is that you can use this software on your macOS 10.13 or later versions to cut AVI videos for free. However, it’s a bit technical process, as there’s no timeline to help you trim or make cuts on the clips directly with the help of your mouse.
You are required to mention a time range (seconds, minutes, or hours) to keep a specific part of the video while the software removes the non-ranged parts of the clip. For instance, you have a video of 10 seconds. You start the range from 5 seconds and end it at 10 seconds. So, the first four seconds of the video will be cut from the entire clip.
Features
- Video cutting, cropping, and resizing
- Low-quality and old video restoration
- Video conversion from any format to MKV or MP4
Pros
- Handbrake is free
- You can convert batch videos with ease
- It supports MAC, Windows, and Linux OS
- Allows you to import video files in all major formats
- The software comes with various video conversion presets
Cons
- Handbrake is not a user-friendly tool
- The video file output is limited to two formats (MKV and MP4) only
Gihosoft Video Cutter
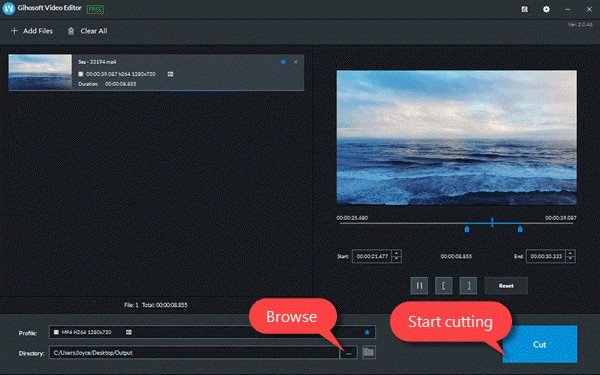
Gihosoft is a clean, free, lossless video cutter on your Windows PC. It’s a simple tool that helps you cut video files into various output formats. So be it AVI, MPEG, or any other file, with Gihosoft, everything becomes handy.
Another fascinating fact about this software is that it allows you to cut videos in three simple steps without losing the quality. So right after installing the program, you simply need to import your file, choose the start and end time, and click the “Cut” button to remove the part of the video.
Features
- Fast video and audio cutting
- Easy drag and drop audio/video files
- It supports most audio and video formats
Pros
- Free for both Windows and MAC operating systems
- The cutter saves video in original quality
Cons
- It does not include basic video editing features
Part 3: Top 3 Free AVI Video Cutter on MAC
Are you looking for a great AVI video cutter for your MAC? Sadly, you have limited product choices as compared to Windows users. But to ensure you don’t waste time looking for a suitable tool, here’s a list of three AVI video cutting programs you can use on your Macintosh.
iMovie
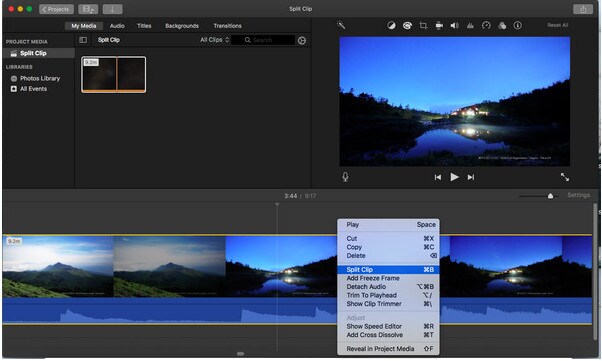
The first and foremost recommended software for free video cutting on MAC is Apple’s own tool, iMovie . It is a built-in program that comes with your system, so there is no need to spend extra on a video editor. iMovie allows you to browse and import most video files, including AVI, right from your computer. Also, this tool is equipped with multiple functions, such as audio editing, video quality enhancement, and much more.
This MAC’s video editor is ideal for beginners. Many home users and small business owners find this tool extremely simple, as they don’t like to be confused with complex features. So, if you want to make cuts to your video clips, start working on iMovie. And within a few clicks, you can trim or cut your videos for free.
Features
- Video cutting and trimming
- Cropping and rotation
- Effects and transitions
- Built-in themes
- HD and 4K video support
- Movie sharing
- Audio adjustments
- Chroma screen controls
- Character tracking
Pros
- Free to use for MAC users
- Clean timeline
- One-click video cutting and trimming
- Easy-to-remember keyboard shortcuts
- Direct share projects to your social media, like YouTube
Cons
- It takes a lot of time to export videos
- iMovie needs high HDD storage space
VideoPad by NCH

VideoPad by NCH is a beginner-level video editor with all the basic features. The software is specifically designed for home movie makers. That is why VideoPad is easy to understand and use.
VideoPad is entirely free of cost for non-commercial purposes, but it has limited features. On the other hand, if you want to enjoy full traits, you can purchase the tool.
VideoPad supports video files, including AVI, WMV, MPEG, MOV, MP4, ASF, and XviD. Likewise, you can also burn movies to Blu-ray, DVD, HD-DVD, or CD. And most importantly, you can easily cut or trim AVI videos on your MAC, as the software is available on both MAC and Windows systems.
Features
- Audio tools
- Video rotation
- Video sharing
- Visual effects
- Video transitions
- 3D Video editing
- Color correction
- Overlays and texts
- Video optimization
- Great plugin support
- Direct video uploading
- Multiple video resolutions
- Video cutting and trimming
- Files exportation to various devices
- Stereoscopic conversion from 2D to 3D
Pros
- You can use the basic tools for free
- Allows 360-degree video production
- It supports a wide range of video formats
- Compatible with MAC and Windows computers
Cons
- The auto speech feature performs poorly
- The free version has annoying notifications
Xilisoft Video Cutter
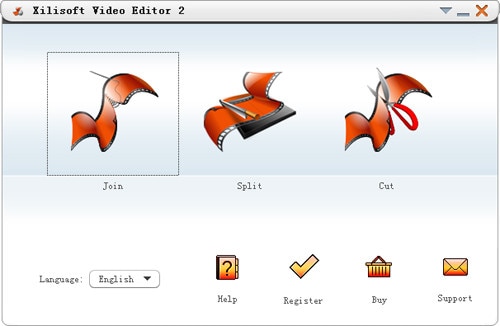
Xilisoft Video Cutter is the simplest tool to cut videos on MAC. This software has a straightforward option to cut the clip after importing it to the timeline. The program is fast and has a user-friendly interface.
Moreover, you can polish your videos by merging multiple clips or increasing the video quality once you’re done with the cutting process. At the same time, this video cutter allows you to import all video formats, including XviD, DivX, MOV, FLV, MP4, MPEG-4/, MKV, MPEG, WMV, and AVI.
Features
- Video joining
- Support multiple output video formats, including HD
Pros
- Easy video cutting and merging
- It doesn’t require a large storage space
- Extremely uncomplicated interface
- Real-time preview to make better cuts
- Available on both MAC and Windows systems
Cons
- The trial version is free to use but limits you from enjoying extra features
Part 4: Top 3 Free AVI Video Cutter on Android
After capturing nice videos with your Android mobile phone, you may need to cut unnecessary scenes to make your clips look professional. While there are numerous Android cutters, not all support the AVI format. So below, you will find the 3 best AVI video cutters for Android, which are free to use.
Quick – Video Editor & Maker
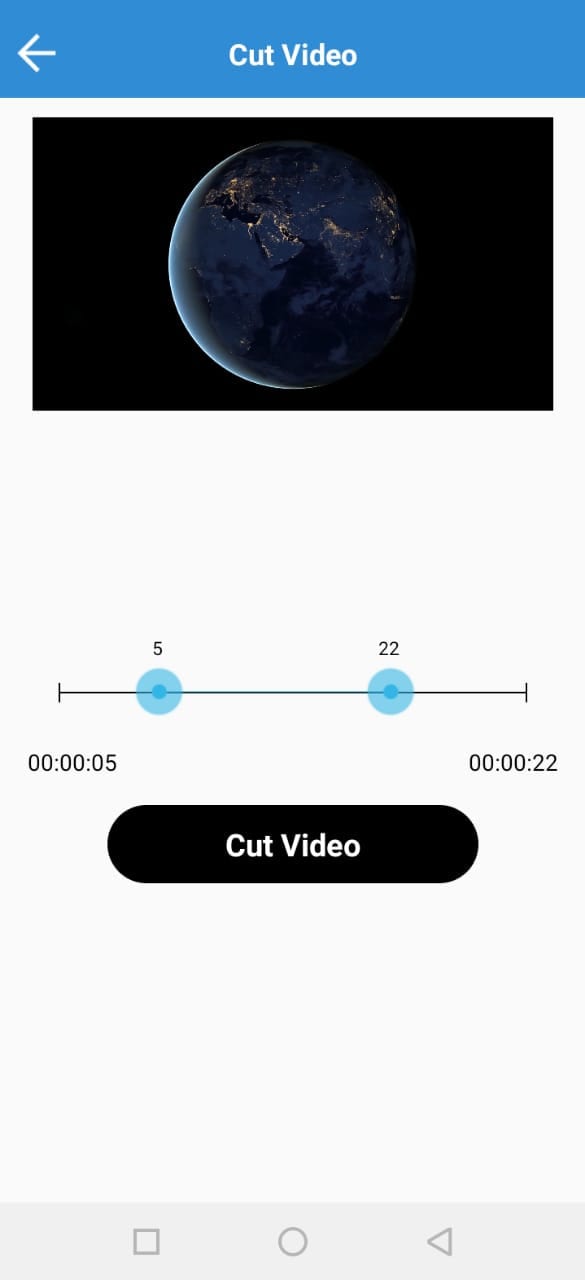
Quick – Video Editor & Maker is a free video editor with PRO results. Many photographers and vloggers love using this app to cut clips immediately. Furthermore, the application offers a wide range of options to assure you don’t have to look to any other tool to rotate or compress video. Quick – Video Editor & Maker lets you import videos in all major formats, including AVI, MPEG, WMA, and more.
Features
- Video cutting, fading, and rotation
- Speed control tools
- Conversion from video to GIF
Pros
- Free app
- Simple interface
Cons
- Lack of updates
- Some users complain about app crash
Funimate Video Editor & Maker
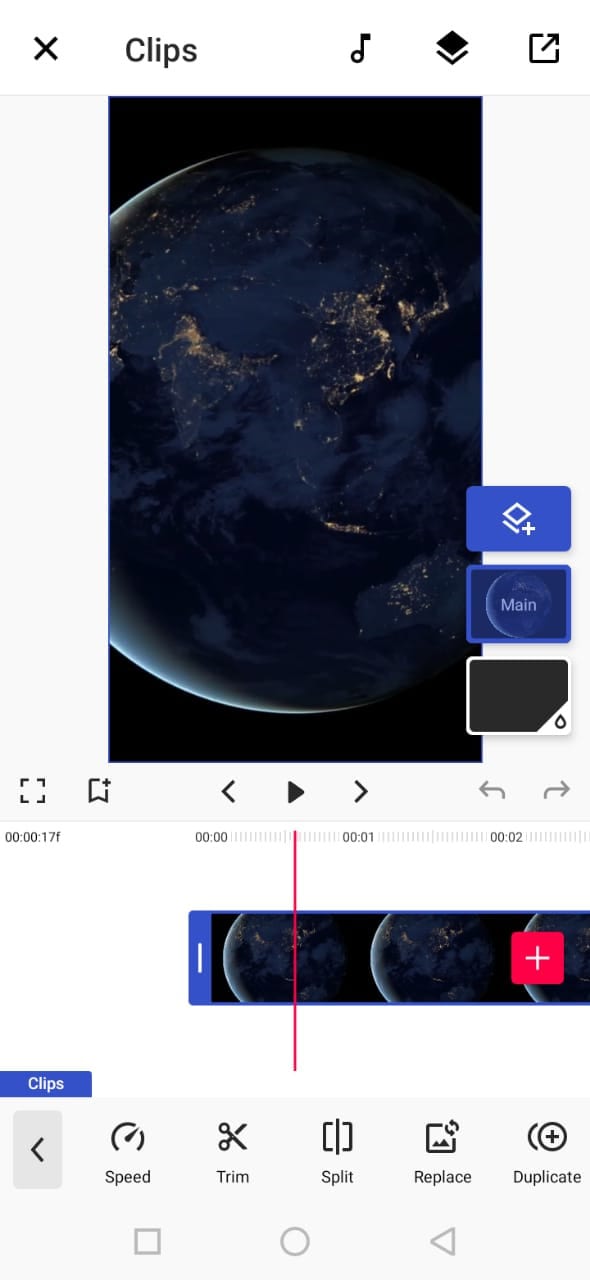
If you want to make some professional-grade video edits quickly, you are welcome to download and use Funimate Video Editor & Maker on your Android device. It’s a free tool to cut videos. It has an easy procedure, and you can cut AVI videos in a few seconds.
Plus, you can use the app to add custom animations, effects, and many other exciting elements. You can share your makes on social media like TikTok, Instagram, and other platforms. Contrarily, the app itself is a community with millions of Funimate-users who share their creations daily. You can also join or watch videos from other creators to learn more about new techniques and trends in video editing.
Features
- Video trimming and splitting
- Animation and cropping
- Filters and AI effects
- Speed adjustment
- Keyframing and video merging
Pros
- Free Android application with several editing tools
- Easy trimming, splitting, and cropping
- Aspect ratio, border, and color customization
- Direct social media sharing
Cons
- Free users cannot use templates
- The free version stamps watermarks on each project
Part 5: Top 3 Free AVI Video Cutter on iPhone
No wonder iPhone’s camera captures high-quality videos. But the problem begins when there’s no free app to cut AVI videos. So if you’re recording great spots, but deep inside, you really want to remove some parts, then these 3 free AVI video cutters will work smoothly on your iPhone.
Cut, Trim, Split Video Editor
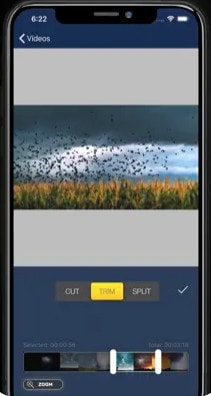
Download Cut, Trim, Split Video Editor on your iPhone to delete/cut unwanted portions of your video clips. The tool is also best for trimming iPhone-recorded clips without messing with the frames. Or, if you just want to split the video into multiple parts for your next WhatsApp status, this iPhone app can do that job for you.
The app supports multiple video file types, including MOV, MP4, AVI, MPEG, MPEG-2, and 3GPP
Features
- Easy trimming and cutting video clips
- Splitting big-sized videos into two smaller clips
- Import video from file-sharing platforms, like iCloud, using Wi-Fi
Pros
- Free app for fast video cutting and sharing
- Simple UI interface
Cons
- The free version shows advertisements
Splice - Video Editor & Maker
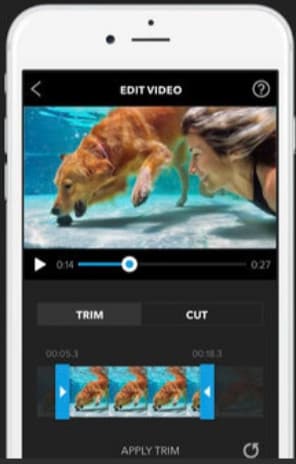
Splice is an extraordinary video editor that makes it easy to make fully customized and professional videos from your iPhone. The app is also best for video cutting. Besides, it has many interesting features, which you can use from your device.
Features
- Cutting, trimming, and cropping your videos
- Exposure, saturation, and exposure adjustment
- Slow and fast motion with speed ramping option
- Video masking and overlay
- Color correction and text overlays
Pros
- Free basic features, such as video cutting
- iTunes integration
- Supports AVI video input
- User-friendly application
- Access to the music library
- Quick and simple social sharing
Cons
- Output videos require high mobile storage space
Part 6: Top 3 Free AVI Video Cutter Online
Don’t want to install video cutters on your MAC, Windows, smartphone, or any other device? No problem! You can use online video cutters and trimmers to split, cut, or trim your clips for free.
However, the problem still exists in online tools, as not all web-based editors allow importing AVI files. So to save your time and energy, you can directly go to the following online AVI cutters to complete your tasks.
Kapwing
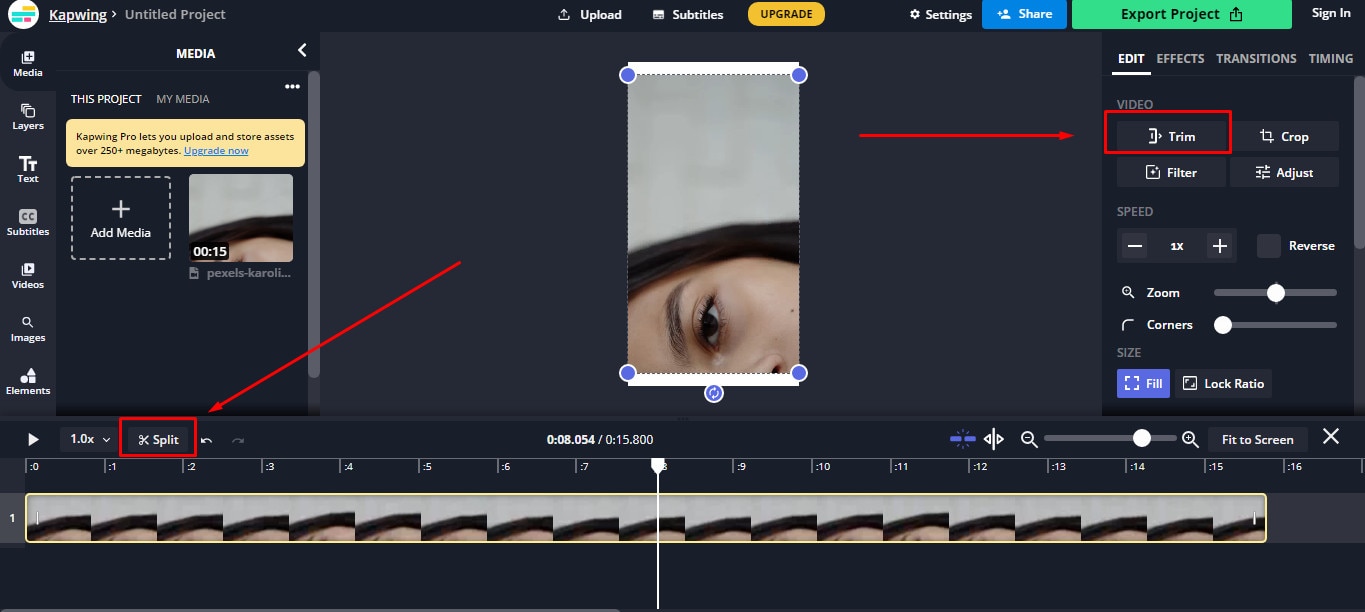
Kapwing is an online video editor best for casual creatives, such as Vloggers and YouTubers. You can use this web-based platform to cut your videos. Gladly, Kapwing supports all AVI incomings. You can upload your AVI video files to this platform and use its trim or split feature. To do that, you need to upload your AVI video and choose the “Trim” or “Split” tool to see the magic. Once done with the trimming process, you can explore Kapwing’s other incredible traits and apply them to your project.
Features
- Video splitting, trimming, and merging
- Audio capturing
- Speed adjustment
- Image and video library
- Text editing and overlay
- Auto-generated subtitles
- Several collaboration tools
- Video creation from scratch
- Templates, shapes, and emojis
- Simple drag-and-drop interface
- Video transitions, plugins, and elements
Pros
- Free online video trimmer
- User-friendly interface
- You can export 30-minutes long projects
- Allows you to export unlimited videos with a watermark
- One watermark-free video export is available each month
Cons
- Cannot export long videos with a free account
- Only 10 minutes transcription limit is available for free users
- You need to purchase a monthly or annual subscription to remove the watermark from multiple videos
Clideo
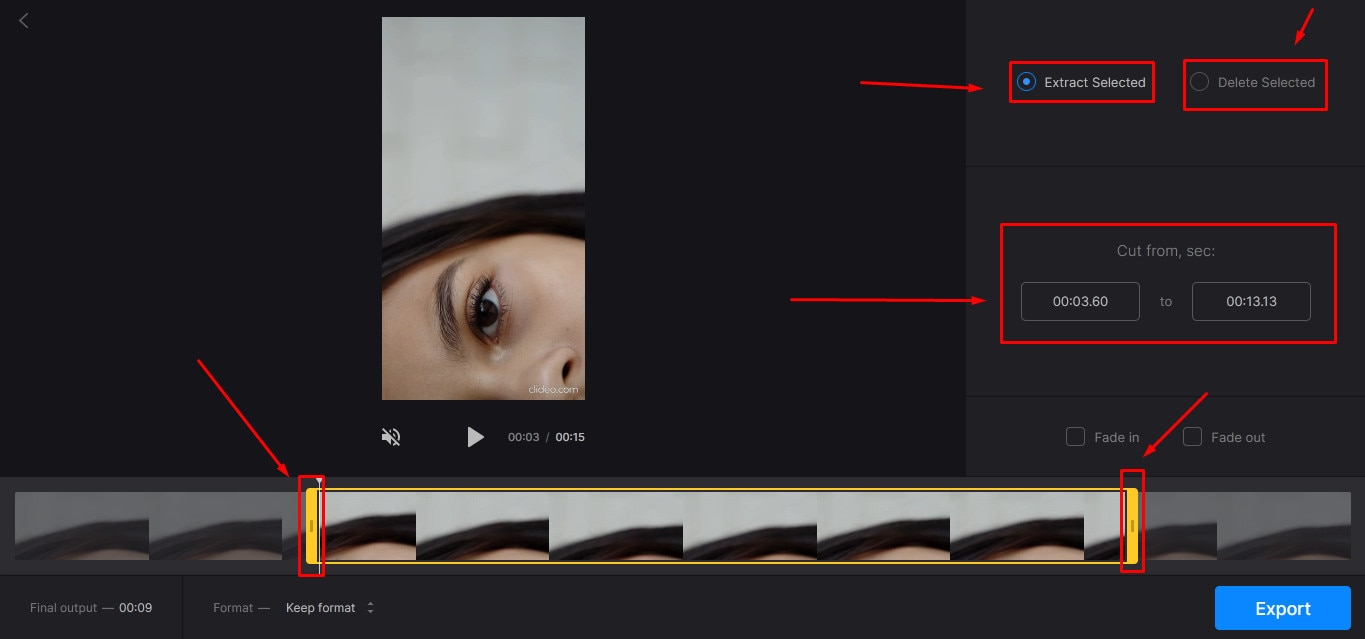
Clideo is not just a video cutter but an online solution to all your video editing problems. The tool is super popular, with 4 million+ users a month. And why not? This is one of those web-based platforms that allow AVI video files to be imported and exported without converting them into any other formats.
Nevertheless, if you’re only looking for video cutting options, this tool makes your life easy. Simply upload your video, and select the portion of it by setting start and end times. Choose whether you want to delete or extract the selected part from the clip, and hit the “Export” button.
And within a few moments, you can enjoy a trimmed video clip. And if you plan to be more creative, you can look for other Clideo features to make videos more fascinating.
Features
- Video combining and cutting
- Resize and crop clips
- Compress your videos
- Add text and subtitles
- Add music to your video files
- Filters and color correction tools
- Audio mute, cutting, and muting
- Video rotation, flipping, and speed adjustment
Pros
- Basic tools can be used for free
- Best for beginners and intermediate users
- Ideal for AVI videos and also supports other video formats
Cons
- You cannot use the free version regularly
Aspose
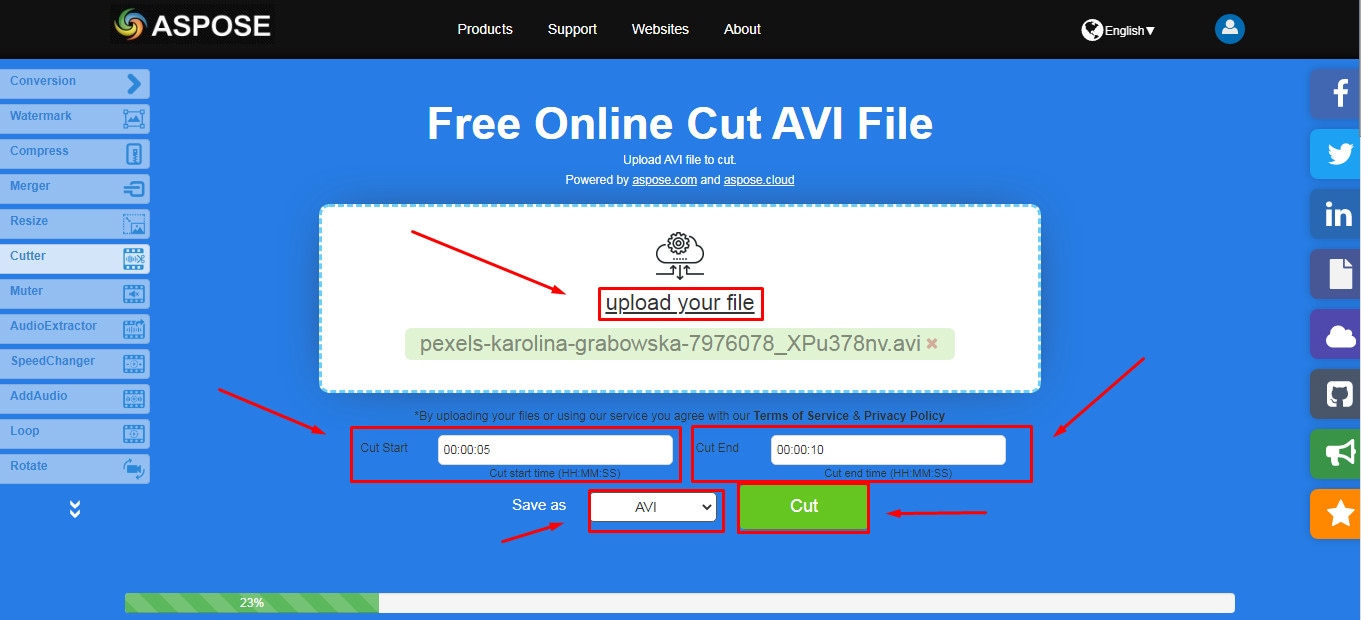
Aspose is a free web-based application to cut clips. You can use this tool on any operating system. It supports all major video file formats, including AVI, MKV, MOV, MP4, FLV, WMV, WEBM, and GIF. Additionally, you can use Aspose for various other reasons, such as audio extraction, video resizing, and more.
Features
- Video cutting and compressing
- Looping, rotation, and video merging
- Adding watermarks on videos
- Sound muting
- Speed change and audio addition
Pros
- Aspose is a free online tool
- It offers straightforward options to cut and edit videos
Cons
- No color correction option
- Slow video cutting process
- Lacks timeline and other valuable features
Part 7: Bottom Line
Tired of finding AVI cutters? Relax and try these top 16 AVI video cutters for Windows, MAC, iPhone, Android, and online. Almost all these tools are free to use and are extremely handy. On the other hand, if you want to cut and trim videos professionally, download Filmora and follow the step-by-step guide in this article for making clean cuts.
Part 8: FAQs
Q1. How do I trim an AVI video?
To trim an AVI video file, ensure that the software or tool you use supports AVI input. Generally, you need to upload or import a clip on the program, select the portion of the video, and apply the cut/trim feature to make it happen.
Q2. Which is the best online video cutter?
Kapwing and Clideo are the two best online video cutters you can use for free. Both web-based tools also allow you to cut your AVI videos.
Q3. Which is the best video cutter and joiner software?
Filmora, iMovie, and Kapwing are some of the best video cutters and joiner tools. These video editors are also free to use and come with different features.
Q4. How do I trim an AVI file in Windows 10?
Trimming an AVI video file in Windows 10 is very simple. Launch the Microsoft Photos (Photo App) application on your computer, add clip, and select the “Trim” tool to trim a specific video part.
Q5. How can I cut a video on my computer for free?
MAC and Windows users can download Filmora to cut videos for free. Filmora also offers a wide range of other features to make your clips exciting. Contrarily, Windows users can use the built-in Photo App in Windows 10 or download Gihosoft or Handbrake software to cut clips. Likewise, MAC users can download VideoPad, Xilisoft Video Cutter, or iMovie for free.
With the growing fame of video-sharing and social media applications like Twitter, Instagram, and TikTok, the demand for simple and fast video cutting and trimming tools has dramatically increased. Nowadays, you don’t have to play with complex video editing tools to produce high-quality videos.
Thanks to several user-friendly editing software to make things easy for everybody. However, finding the right programs to trim/cut videos is still challenging, especially in AVI format.
But, guess what? These top 16 AVI video cutters for Windows, MAC, Android, iPhone, and online will make video cutting and trimming fun, especially when you learn to do it using Filmora.
In this Article
Part 1: Best AVI Video Cutter to Trim/Cut AVI Video on Windows and MAC – Filmora Video Cutter [with steps}
Part 2: Top 3 Free AVI Video Cutter on Windows
Part 3: Top 3 Free AVI Video Cutter on MAC
Part 4: Top 3 Free AVI Video Cutter on Android
Part 5: Top 3 Free AVI Video Cutter on iPhone
Part 6: Top 3 Free AVI Video Cutter Online
Part 7: Bottom Line
Part 8: FAQs
Part 1: Best AVI Video Cutter to Trim/Cut AVI Video on Windows and MAC – Filmora Video Cutter [with steps]
Filmora by Wondershare is a star video editor with outstanding outcomes. Whether you have a MAC or Windows PC, you can download Filmora regardless of your operating system. The program best serves those who intend to make high-quality videos. The software provides editing support for all video formats, including AVI.
Although Filmora is an affordable editor with tons of audio and video editing options, you can still download the software for free and create projects if watermarks don’t bother you. Moreover, you can count this tool’s capabilities in cropping, resizing, and Chroma screen support. But that’s not the only sweet fruit.
In fact, Filmora is equipped with many jaw-dropping features, including preset templates, auto beat sync, split-screen, speed ramping, motion tracking, keyframing, creative transitions, titles, filters, and much more. And the best part is, you can learn and understand Filmora in no time. That’s why the program is loved and supported by all types of users.
So does Filmora helps cut and trim AVI videos? Yes! It does if you follow these steps correctly.
Step 1: Download Filmora Video Editor
First, download Filmora Video Editor by choosing your operating system, as seen in the screenshot below.
Run the setup and let it finish without any pause or break.
Step 2: Import Your Video to Filmora Video Editor
Importing your AVI video is a very simple process. Just click on the “Film Clip” icon.
It will open a new window screen on your computer to select the video from the directory. Find the clip you want to import and cut. Use your mouse to select it and click the “Open” button.
The video will be loaded in the “Media” folder of Filmora. The clip’s thumbnail should be visible to assure you have done everything correctly.
If you can see that, let’s go to the next step.
Step 3: Drag and Drop Video to Filmora’s Timeline
Select the video in the media folder by clicking over it once. Now, without leaving the hold of the left button of your mouse, slide the video down to the track in the timeline.
After that, a message will pop up, asking about your preference for the project settings. It is recommended to choose the “Match to Media” option unless you’re an experienced video editor who knows how to play with the resolution and frame rates.
You will see the video on the timeline with its preview on the “Preview Screen” on the right side of the interface.
Step 4: Cutting Your Video in Filmora
Here comes the core step you have been waiting for. But before you go any further, you need to know about the “Playhead.”
Playhead is an orange-reddish marker you can find on the timeline.
It has an important role in cutting your videos.
So, move the playhead to your desired frame and click on the “scissor” icon to make the “starting” cut.
As soon as you do it, you will see that the single clip is now divided into two parts similar to this image.
The “Red” marked area in the above screenshot ensures a gap between the clips on the timeline. The “Yellow” arrows confirm two separate clips of the same video.
Place the two clips together as seen in this “Green” area.
And place the playhead anywhere on the clip. And click on the “scissor” icon once again to make the “ending” cut (second cut).
If done correctly, there should be three clips now of the same video, as you can observe in this screenshot.
Again, the “Red” area in the above photo indicates the gap, and the “Yellow” area ensures a third segment of the video.
Note: The gaps you can see in the divided clips are made intentionally for understanding. Practically, Filmora doesn’t move the clip or make gaps in between after you have made the cuts.
Keep in mind that there are three clips on the timeline. Now, if you want to remove the second clip from the video, you need to select that portion first by clicking on it.
Then, right-click on the mouse and choose “Cut” from the menu.
Within a semi-second, the selected portion will be removed from the timeline. And you will be able to see the remaining parts of the video. Now, pull the second clip using your mouse and place it at the end of the first clip without leaving a gap in between.
Then, click the “Play” button under the preview screen to see the results.
You can see in the above two screenshots that there’s a jump between the scenes due to cuts, confirming that video has been cut significantly.
Step 5: Trimming Your Video in Filmora
Remember that cutting and trimming in Filmora are two different things. Trimming allows you to remove a particular video part from visibility without deleting the portion.
So feel free to skip this step if you’re happy learning the cutting technique. But if you’re interested in trimming, here’s how you do it.
Take your mouse cursor at the beginning or end of the clip you want to trim. Keep holding the clip’s corner and slide the mouse back or front to trim the part
Note: Since the trim tool doesn’t delete the video, the final project based on trimming will be of a larger size. Therefore, it is advised to cut videos rather than trimming for fast rendering, better results, and small video size.
Step 6: Save Project and Export Your Cut/Trimmed AVI Video
Choose “Save Project” from the “File” menu.
Select the directory to save the project, rename the new video, and click the “Save” button.
Click on the “Export” button to save the video in AVI or any other video format of your choice on your computer.
Part 2: Top 3 Free AVI Video Cutter on Windows
As a Windows user, finding an excellent video cutter is relatively easy. However, not all software permits importing AVI videos. In the same way, some video trimmers come at a price. So if you really don’t want to pay and enjoy cutting your AVI files, try using these three video cutting tools.
Microsoft Photos (Windows 10)
Microsoft Photos or Photo App is a free photo viewer and editor with your Windows 10. It offers incredible photo editing and enhancement along with different tools for organizing and editing videos in a very friendly way. Likewise, you can create drawings over the videos and add 3D effects and background music to your clips.
You can also trim AVI videos with Microsoft Photos quickly. All you need to do is open your clip with the Photo App, choose the “Trim” option, select a portion of the video you want to trim, and go ahead.
That’s it!
Features
- Quick video trimming
- Cool text effects
- 3D library and effects
- It has a clear interface
- You can find and tag people’s faces
- The program has 15+ filters for editing
- Motion tracking option for drawing on videos
- Allows you to view and organize your files easily
Pros
- Microsoft Photos is free for Windows users
- It automatically creates albums
- The program has a touch-friendly interface
- You can integrate your OneDrive with the software
Cons
- Lacks before and after view
- Not included in older Windows versions
- It doesn’t support selective focus or panorama stitching
Handbrake
Handbrake is best-known for its video transcoding traits. Unlike typical video editors, this open-source tool includes limited options to rip Blu-rays and DVDs. Moreover, you can mix the 5.1 soundtracks and convert them to stereo to make the audio compatible with your TV speakers.
But the exciting thing about Handbrake is that you can use this software on your macOS 10.13 or later versions to cut AVI videos for free. However, it’s a bit technical process, as there’s no timeline to help you trim or make cuts on the clips directly with the help of your mouse.
You are required to mention a time range (seconds, minutes, or hours) to keep a specific part of the video while the software removes the non-ranged parts of the clip. For instance, you have a video of 10 seconds. You start the range from 5 seconds and end it at 10 seconds. So, the first four seconds of the video will be cut from the entire clip.
Features
- Video cutting, cropping, and resizing
- Low-quality and old video restoration
- Video conversion from any format to MKV or MP4
Pros
- Handbrake is free
- You can convert batch videos with ease
- It supports MAC, Windows, and Linux OS
- Allows you to import video files in all major formats
- The software comes with various video conversion presets
Cons
- Handbrake is not a user-friendly tool
- The video file output is limited to two formats (MKV and MP4) only
Gihosoft Video Cutter
Gihosoft is a clean, free, lossless video cutter on your Windows PC. It’s a simple tool that helps you cut video files into various output formats. So be it AVI, MPEG, or any other file, with Gihosoft, everything becomes handy.
Another fascinating fact about this software is that it allows you to cut videos in three simple steps without losing the quality. So right after installing the program, you simply need to import your file, choose the start and end time, and click the “Cut” button to remove the part of the video.
Features
- Fast video and audio cutting
- Easy drag and drop audio/video files
- It supports most audio and video formats
Pros
- Free for both Windows and MAC operating systems
- The cutter saves video in original quality
Cons
- It does not include basic video editing features
Part 3: Top 3 Free AVI Video Cutter on MAC
Are you looking for a great AVI video cutter for your MAC? Sadly, you have limited product choices as compared to Windows users. But to ensure you don’t waste time looking for a suitable tool, here’s a list of three AVI video cutting programs you can use on your Macintosh.
iMovie
The first and foremost recommended software for free video cutting on MAC is Apple’s own tool, iMovie . It is a built-in program that comes with your system, so there is no need to spend extra on a video editor. iMovie allows you to browse and import most video files, including AVI, right from your computer. Also, this tool is equipped with multiple functions, such as audio editing, video quality enhancement, and much more.
This MAC’s video editor is ideal for beginners. Many home users and small business owners find this tool extremely simple, as they don’t like to be confused with complex features. So, if you want to make cuts to your video clips, start working on iMovie. And within a few clicks, you can trim or cut your videos for free.
Features
- Video cutting and trimming
- Cropping and rotation
- Effects and transitions
- Built-in themes
- HD and 4K video support
- Movie sharing
- Audio adjustments
- Chroma screen controls
- Character tracking
Pros
- Free to use for MAC users
- Clean timeline
- One-click video cutting and trimming
- Easy-to-remember keyboard shortcuts
- Direct share projects to your social media, like YouTube
Cons
- It takes a lot of time to export videos
- iMovie needs high HDD storage space
VideoPad by NCH
VideoPad by NCH is a beginner-level video editor with all the basic features. The software is specifically designed for home movie makers. That is why VideoPad is easy to understand and use.
VideoPad is entirely free of cost for non-commercial purposes, but it has limited features. On the other hand, if you want to enjoy full traits, you can purchase the tool.
VideoPad supports video files, including AVI, WMV, MPEG, MOV, MP4, ASF, and XviD. Likewise, you can also burn movies to Blu-ray, DVD, HD-DVD, or CD. And most importantly, you can easily cut or trim AVI videos on your MAC, as the software is available on both MAC and Windows systems.
Features
- Audio tools
- Video rotation
- Video sharing
- Visual effects
- Video transitions
- 3D Video editing
- Color correction
- Overlays and texts
- Video optimization
- Great plugin support
- Direct video uploading
- Multiple video resolutions
- Video cutting and trimming
- Files exportation to various devices
- Stereoscopic conversion from 2D to 3D
Pros
- You can use the basic tools for free
- Allows 360-degree video production
- It supports a wide range of video formats
- Compatible with MAC and Windows computers
Cons
- The auto speech feature performs poorly
- The free version has annoying notifications
Xilisoft Video Cutter
Xilisoft Video Cutter is the simplest tool to cut videos on MAC. This software has a straightforward option to cut the clip after importing it to the timeline. The program is fast and has a user-friendly interface.
Moreover, you can polish your videos by merging multiple clips or increasing the video quality once you’re done with the cutting process. At the same time, this video cutter allows you to import all video formats, including XviD, DivX, MOV, FLV, MP4, MPEG-4/, MKV, MPEG, WMV, and AVI.
Features
- Video joining
- Support multiple output video formats, including HD
Pros
- Easy video cutting and merging
- It doesn’t require a large storage space
- Extremely uncomplicated interface
- Real-time preview to make better cuts
- Available on both MAC and Windows systems
Cons
- The trial version is free to use but limits you from enjoying extra features
Part 4: Top 3 Free AVI Video Cutter on Android
After capturing nice videos with your Android mobile phone, you may need to cut unnecessary scenes to make your clips look professional. While there are numerous Android cutters, not all support the AVI format. So below, you will find the 3 best AVI video cutters for Android, which are free to use.
Quick – Video Editor & Maker
Quick – Video Editor & Maker is a free video editor with PRO results. Many photographers and vloggers love using this app to cut clips immediately. Furthermore, the application offers a wide range of options to assure you don’t have to look to any other tool to rotate or compress video. Quick – Video Editor & Maker lets you import videos in all major formats, including AVI, MPEG, WMA, and more.
Features
- Video cutting, fading, and rotation
- Speed control tools
- Conversion from video to GIF
Pros
- Free app
- Simple interface
Cons
- Lack of updates
- Some users complain about app crash
Funimate Video Editor & Maker
If you want to make some professional-grade video edits quickly, you are welcome to download and use Funimate Video Editor & Maker on your Android device. It’s a free tool to cut videos. It has an easy procedure, and you can cut AVI videos in a few seconds.
Plus, you can use the app to add custom animations, effects, and many other exciting elements. You can share your makes on social media like TikTok, Instagram, and other platforms. Contrarily, the app itself is a community with millions of Funimate-users who share their creations daily. You can also join or watch videos from other creators to learn more about new techniques and trends in video editing.
Features
- Video trimming and splitting
- Animation and cropping
- Filters and AI effects
- Speed adjustment
- Keyframing and video merging
Pros
- Free Android application with several editing tools
- Easy trimming, splitting, and cropping
- Aspect ratio, border, and color customization
- Direct social media sharing
Cons
- Free users cannot use templates
- The free version stamps watermarks on each project
Part 5: Top 3 Free AVI Video Cutter on iPhone
No wonder iPhone’s camera captures high-quality videos. But the problem begins when there’s no free app to cut AVI videos. So if you’re recording great spots, but deep inside, you really want to remove some parts, then these 3 free AVI video cutters will work smoothly on your iPhone.
Cut, Trim, Split Video Editor
Download Cut, Trim, Split Video Editor on your iPhone to delete/cut unwanted portions of your video clips. The tool is also best for trimming iPhone-recorded clips without messing with the frames. Or, if you just want to split the video into multiple parts for your next WhatsApp status, this iPhone app can do that job for you.
The app supports multiple video file types, including MOV, MP4, AVI, MPEG, MPEG-2, and 3GPP
Features
- Easy trimming and cutting video clips
- Splitting big-sized videos into two smaller clips
- Import video from file-sharing platforms, like iCloud, using Wi-Fi
Pros
- Free app for fast video cutting and sharing
- Simple UI interface
Cons
- The free version shows advertisements
Splice - Video Editor & Maker
Splice is an extraordinary video editor that makes it easy to make fully customized and professional videos from your iPhone. The app is also best for video cutting. Besides, it has many interesting features, which you can use from your device.
Features
- Cutting, trimming, and cropping your videos
- Exposure, saturation, and exposure adjustment
- Slow and fast motion with speed ramping option
- Video masking and overlay
- Color correction and text overlays
Pros
- Free basic features, such as video cutting
- iTunes integration
- Supports AVI video input
- User-friendly application
- Access to the music library
- Quick and simple social sharing
Cons
- Output videos require high mobile storage space
Part 6: Top 3 Free AVI Video Cutter Online
Don’t want to install video cutters on your MAC, Windows, smartphone, or any other device? No problem! You can use online video cutters and trimmers to split, cut, or trim your clips for free.
However, the problem still exists in online tools, as not all web-based editors allow importing AVI files. So to save your time and energy, you can directly go to the following online AVI cutters to complete your tasks.
Kapwing
Kapwing is an online video editor best for casual creatives, such as Vloggers and YouTubers. You can use this web-based platform to cut your videos. Gladly, Kapwing supports all AVI incomings. You can upload your AVI video files to this platform and use its trim or split feature. To do that, you need to upload your AVI video and choose the “Trim” or “Split” tool to see the magic. Once done with the trimming process, you can explore Kapwing’s other incredible traits and apply them to your project.
Features
- Video splitting, trimming, and merging
- Audio capturing
- Speed adjustment
- Image and video library
- Text editing and overlay
- Auto-generated subtitles
- Several collaboration tools
- Video creation from scratch
- Templates, shapes, and emojis
- Simple drag-and-drop interface
- Video transitions, plugins, and elements
Pros
- Free online video trimmer
- User-friendly interface
- You can export 30-minutes long projects
- Allows you to export unlimited videos with a watermark
- One watermark-free video export is available each month
Cons
- Cannot export long videos with a free account
- Only 10 minutes transcription limit is available for free users
- You need to purchase a monthly or annual subscription to remove the watermark from multiple videos
Clideo
Clideo is not just a video cutter but an online solution to all your video editing problems. The tool is super popular, with 4 million+ users a month. And why not? This is one of those web-based platforms that allow AVI video files to be imported and exported without converting them into any other formats.
Nevertheless, if you’re only looking for video cutting options, this tool makes your life easy. Simply upload your video, and select the portion of it by setting start and end times. Choose whether you want to delete or extract the selected part from the clip, and hit the “Export” button.
And within a few moments, you can enjoy a trimmed video clip. And if you plan to be more creative, you can look for other Clideo features to make videos more fascinating.
Features
- Video combining and cutting
- Resize and crop clips
- Compress your videos
- Add text and subtitles
- Add music to your video files
- Filters and color correction tools
- Audio mute, cutting, and muting
- Video rotation, flipping, and speed adjustment
Pros
- Basic tools can be used for free
- Best for beginners and intermediate users
- Ideal for AVI videos and also supports other video formats
Cons
- You cannot use the free version regularly
Aspose
Aspose is a free web-based application to cut clips. You can use this tool on any operating system. It supports all major video file formats, including AVI, MKV, MOV, MP4, FLV, WMV, WEBM, and GIF. Additionally, you can use Aspose for various other reasons, such as audio extraction, video resizing, and more.
Features
- Video cutting and compressing
- Looping, rotation, and video merging
- Adding watermarks on videos
- Sound muting
- Speed change and audio addition
Pros
- Aspose is a free online tool
- It offers straightforward options to cut and edit videos
Cons
- No color correction option
- Slow video cutting process
- Lacks timeline and other valuable features
Part 7: Bottom Line
Tired of finding AVI cutters? Relax and try these top 16 AVI video cutters for Windows, MAC, iPhone, Android, and online. Almost all these tools are free to use and are extremely handy. On the other hand, if you want to cut and trim videos professionally, download Filmora and follow the step-by-step guide in this article for making clean cuts.
Part 8: FAQs
Q1. How do I trim an AVI video?
To trim an AVI video file, ensure that the software or tool you use supports AVI input. Generally, you need to upload or import a clip on the program, select the portion of the video, and apply the cut/trim feature to make it happen.
Q2. Which is the best online video cutter?
Kapwing and Clideo are the two best online video cutters you can use for free. Both web-based tools also allow you to cut your AVI videos.
Q3. Which is the best video cutter and joiner software?
Filmora, iMovie, and Kapwing are some of the best video cutters and joiner tools. These video editors are also free to use and come with different features.
Q4. How do I trim an AVI file in Windows 10?
Trimming an AVI video file in Windows 10 is very simple. Launch the Microsoft Photos (Photo App) application on your computer, add clip, and select the “Trim” tool to trim a specific video part.
Q5. How can I cut a video on my computer for free?
MAC and Windows users can download Filmora to cut videos for free. Filmora also offers a wide range of other features to make your clips exciting. Contrarily, Windows users can use the built-in Photo App in Windows 10 or download Gihosoft or Handbrake software to cut clips. Likewise, MAC users can download VideoPad, Xilisoft Video Cutter, or iMovie for free.
Also read:
- Updated 2024 Approved Get Creative with Free Video Editing Software on Ubuntu Top 10 Picks
- Updated What You Dont Know About the 16X9 Ratio Calculator (But Should Learn)
- 2024 Approved Top-Rated Free Video Cutting Software for Divx Files
- New The Art of Flawless Conversion Video to MP3 without Quality Drop for 2024
- Updated 2024 Approved PowerDirector Color Grading Tips for Seamless Clip Integration
- New 2024 Approved MOD Video Editing on a Budget Top 5 Free Options
- New 2024 Approved Filmora Coupon Hunters Guide Uncover the Latest Deals and Discounts
- Updated 2024 Approved Say Goodbye to Grain Top-Rated Video Resolution Enhancers
- 2024 Approved Picking the Right AIFF Converter A Comprehensive Buying Guide
- New In 2024, Maximize Productivity Best Free Mac Apps for Converting Speech to Text (No Downloads or Costs)
- Updated 2024 Approved Transform Your Footage A Beginners Guide to Flipping Clips in FCP
- New Unleash Your Creativity The Top 10 Vlog Editor Apps for 2024
- Updated In 2024, Mastering MP4 Video Editing A Step-by-Step Guide for Mac and Windows
- New 2024 Approved From Hobbyist to Pro Why You Need to Upgrade From Final Cut Express
- New 2024 Approved The Top 10 Free MKV Cutter Tools You Should Try
- In 2024, How To Change Your Apple ID on iPhone 12 Pro With or Without Password
- In 2024, How to Unlock Nubia Red Magic 8S Pro Phone without Any Data Loss
- How to Bypass Google FRP Lock from Infinix Smart 8 Pro Devices
- Best 3 Oppo Reno 10 Pro+ 5G Emulator for Mac to Run Your Wanted Android Apps | Dr.fone
- 3 Easy Solutions to Hard Reset Xiaomi Redmi A2 | Dr.fone
- How to Change your Oppo A78 Location on Twitter | Dr.fone
- Why Your WhatsApp Live Location is Not Updating and How to Fix on your Samsung Galaxy F15 5G | Dr.fone
- 4 solution to get rid of pokemon fail to detect location On ZTE Nubia Z60 Ultra | Dr.fone
- In 2024, How can I get more stardust in pokemon go On Apple iPhone 8 Plus? | Dr.fone
- How to Reset Apple ID and Apple Password On Apple iPhone 11 Pro
- Title: New A Simple Way to Get KineMaster on Your Mac Download and Install for 2024
- Author: Isabella
- Created at : 2024-05-19 13:03:50
- Updated at : 2024-05-20 13:03:50
- Link: https://video-creation-software.techidaily.com/new-a-simple-way-to-get-kinemaster-on-your-mac-download-and-install-for-2024/
- License: This work is licensed under CC BY-NC-SA 4.0.
