
:max_bytes(150000):strip_icc():format(webp)/tropical-beach-wallpaper-beach-backgrounds-587fbb765f9b584db3241860.jpg)
New Steady Footing Best Video Stabilization Apps for iPhone and Android for 2024
Steady Footing: Best Video Stabilization Apps for iPhone and Android
Stabilize Shaky Videos After Recording Easily
Wondershare Filmora is one of the most popular video editing software among YouTubers , which provides the video stabilization tool to remove shake from videos within one-click. Download and have a try now.
Gone are the days when creating a movie or short video required a high level of technical expertise and the ability to handle video editing and related chores. With today’s smartphone cameras, anyone can shoot and capture video.
Following the introduction of these breakthrough technologies and their everyday applications, video editing has become a simple task, giving you an understanding of which video stabilizer to use. There are several free and premium video stabilizer software solutions available in the market.
These video editing programs have varied features, prices, and some are difficult to use. It doesn’t matter if you’re a beginner or an expert; there’s a lot of excellent software available. This article will give you a fast rundown of the best and most outstanding free and commercial Video Stabilizer App available.
In this article
01 What is Video Stabilization?
02 Best Video Stabilizer Apps for iPhone and Android
03 What Features Should I Look for in a Video Stabilizer App?
Part 1: What is Video Stabilization?
Video stabilization refers to algorithms that remove undesirable camera tremors and jitters caused by hand jiggling and the unintended camera panning to improve video quality.
Without affecting moving objects or purposeful camera panning, video stabilization technology is used to minimize visual quality loss by decreasing undesired shaking and twitches of an image/video capture equipment. This is especially important in portable imaging equipment, which is more susceptible to vibrations due to its smaller size.
Excessive hand wobbling and purposeful camera panning often result in inconsistent photos, while undesired camera position variations result in unstable image sequences. Video stabilization techniques maintain good visual clarity and steady video footage even under less-than-ideal settings.
It is not always feasible to re-enact a video, and in those cases, we must make amends with what we have. This approach will necessitate particular video stabilization software, which will increase the movie’s transparency, allowing more innovation and modification.
Part 2: Best Video Stabilizer Apps for iPhone and Android
Here are the best video stabilizer apps for iPhone and Android for you to choose from.
1. Emulsio

Emulsio is a fantastic iPhone and iPad video stabilizer software for smoothing down jittery footage. You may modify the stabilizer strength using the tool’s stabilization function. Without leaving the application, you may examine the stabilized footage to the original video. Emulsio provides tools for editing and cutting footage and repairing shaky films.
Emulsio allows you to import movies from any location. It offers camera motion correction in horizontal, vertical, and rotating directions and is capable of removing rolling shutter distortion.
Overall, this app provides accurate control as well as previewing capabilities. It offers time-editing capabilities as well as live comparison capabilities. Finally, you may send altered films by email or social media. However, if you want to remove the watermark, you need to pay.
Using Emulsio to stabilize video on iPhone is easy, all you need to do is importing the video to analyse, and the app will analyse the video for you automatically. After analysing, the video will be stabilized accordingly, and you can then modify it based on your needs.
Emulsio also provides some additional settings, such as stabilization profile, rolling shutter, avoid black borders, and discontinuity handling to improve the stabilization result.
2. Shaky Video Stabilizer

The second one on our list is the Shaky Video Stabilizer app for Android phones, which is simple to use and straightforwardly transforms your video into a much more stabilized one. You can now transform a shaky video into a smooth and motion-stabilized one. Watch the results, which seems like it was shot with a gimbal. There are no watermarks! It’s possible to share it right from your phone. A steady video is more enjoyable to view and post on social media.
It’s easy to use Shaky Video Stabilizer app to remove the shakiness. Choose a video from your library. Begin the process of stabilization, and use the Background or wait. After the video is stabilized, save the result. And now you can examine the video’s Before and After result.
3. VideoStabilizer for KineMaster

KineMaster is a common choice amongst expert YouTubers and social networking experts who want to incorporate more sophisticated editing tools into their films. The VideoStabilizer for KineMaster app is for iPhone and Android both, which makes your videos smoother! This app offers all of the essentials and a large selection of professional editing tools and effects not seen in other apps.
At KineMaster, you can change the color of your movies and improve their visual quality with the press of a button. Its loudness tools take your audio to a professional level, allowing you to easily add voice-overs, background music, and other sound effects.
Advanced capabilities include keyframe animation tools for adding movement to your layers and speed control and quality blending options. Your videos may be exported in 4K or 2160p and directly uploaded to social networking sites.
How to use KineMaster to stabilize video? Well, it is easy as well. Tap the Add button to add a video and then tap Next to continue. And this app will analyse the video automatically. After analysed, you will see the original and the stabilized result in the screen. Tap the Save button and set the quality to High from Medium or Low to Medium, depending on your preference.
4. PowerDirector

The PowerDirector app has many options that allow you to create the ideal film from beginning to end—all on your Android hone or tablet.
Speed adjustment, keyframe controls for transparency and placement, animated text and titles, and video stabilization are just a few of the easy-to-use editing capabilities included in PowerDirector.
You can create fantastic effects with filters, overlays, and blending modes, and the app’s green screen chroma-key editor allows altering your background very simple. This program also includes several fine-tuning tools for splicing sequences, rotating films, and adjusting brightness, color, and saturation. However, if you want to unlocks more complex templates and editing tools, you may need to pay for the premium plan.
Stabilizing videos with PowerDirector on Android phone is not complex. Follow the steps below to find out how.
Step 1: Install the PowerDirector app on your smartphone
Step 2: Launch the app, create a new project, then upload the video you wish to stabilize to it.
Step 3: Select the video from the Timeline and then hit the edit (pencil) icon in the upper-left corner.
Step 4: Simply click the Stabilizer button to discover an option to stabilize the video.
5. Deshake

Deshake offers desktop-quality video stabilization to your iPhone, iPad, and iPod touch, so you can fix all those shaky-hand movies of your favorite moments.
Choose a film from your picture gallery and tweak the parameters while seeing the results in real-time on your phone! It’s super-fast due to a next-generation stabilization technology that surpasses most pro programs and has been thoroughly tested on genuine home movies like yours.
6. LumaFusion

LumaFusion is among the “pro” iPad apps that people frequently request. The sophisticated video editor uses the Apple Pencil and touch screen for people who wish to edit on the move. At the same time, Apple has yet to confirm whether or not Final Cut will be released for iPadOS.
LumaFusion is so beautifully built that you can film and edit on an iPhone while on location and make professional-looking shows without having to transfer all of your clips to an iPad or Mac.
You would save a huge amount of time and work by filming and editing on the same device instead of transferring large video files to another place.
To stabilize video footage with LumaFusion, double tap on the footage in the timeline, and in the Clip Editor pane, tap on the Stabilize button to start stabilizing the video.
Part 3: What Features Should I Look for in a Video Stabilizer App?
There are a lot of features to look for when choosing a video stabilizer for your videos. The application for your iPhone or Android should be easy-to-use. It should also allow the stabilization strength adjustment. Further, never compromise on video quality. Choose one that produces high-quality video results.
The stabilizer app should offer a large variety of format support. Plus, it should have many other editing tools to enhance photos or videos for your future projects.
If you are editing videos on Windows and Mac computers, you can try Wondershare Filmora , which is an easy to use and powerful video editing software for all video content creators. Stabilize video in Filmora video editor is easy. All you need to do is import videos to timeline, enable the Video Stabilization tool, and the video is stabilized automatically.
For Win 7 or later (64-bit)
For macOS 10.12 or later
Conclusion
Well, there you have it – your ideal Video Stabilizer App. Oftentimes, your shaky videos kill the entertaining side of the video. If the video is too shaky, the viewer would lose interest soon and not watch the full video. But that’s not the case anymore. With the advanced technology and so many apps on the market, stabilizing a video has never been easier!
Gone are the days when creating a movie or short video required a high level of technical expertise and the ability to handle video editing and related chores. With today’s smartphone cameras, anyone can shoot and capture video.
Following the introduction of these breakthrough technologies and their everyday applications, video editing has become a simple task, giving you an understanding of which video stabilizer to use. There are several free and premium video stabilizer software solutions available in the market.
These video editing programs have varied features, prices, and some are difficult to use. It doesn’t matter if you’re a beginner or an expert; there’s a lot of excellent software available. This article will give you a fast rundown of the best and most outstanding free and commercial Video Stabilizer App available.
In this article
01 What is Video Stabilization?
02 Best Video Stabilizer Apps for iPhone and Android
03 What Features Should I Look for in a Video Stabilizer App?
Part 1: What is Video Stabilization?
Video stabilization refers to algorithms that remove undesirable camera tremors and jitters caused by hand jiggling and the unintended camera panning to improve video quality.
Without affecting moving objects or purposeful camera panning, video stabilization technology is used to minimize visual quality loss by decreasing undesired shaking and twitches of an image/video capture equipment. This is especially important in portable imaging equipment, which is more susceptible to vibrations due to its smaller size.
Excessive hand wobbling and purposeful camera panning often result in inconsistent photos, while undesired camera position variations result in unstable image sequences. Video stabilization techniques maintain good visual clarity and steady video footage even under less-than-ideal settings.
It is not always feasible to re-enact a video, and in those cases, we must make amends with what we have. This approach will necessitate particular video stabilization software, which will increase the movie’s transparency, allowing more innovation and modification.
Part 2: Best Video Stabilizer Apps for iPhone and Android
Here are the best video stabilizer apps for iPhone and Android for you to choose from.
1. Emulsio
Emulsio is a fantastic iPhone and iPad video stabilizer software for smoothing down jittery footage. You may modify the stabilizer strength using the tool’s stabilization function. Without leaving the application, you may examine the stabilized footage to the original video. Emulsio provides tools for editing and cutting footage and repairing shaky films.
Emulsio allows you to import movies from any location. It offers camera motion correction in horizontal, vertical, and rotating directions and is capable of removing rolling shutter distortion.
Overall, this app provides accurate control as well as previewing capabilities. It offers time-editing capabilities as well as live comparison capabilities. Finally, you may send altered films by email or social media. However, if you want to remove the watermark, you need to pay.
Using Emulsio to stabilize video on iPhone is easy, all you need to do is importing the video to analyse, and the app will analyse the video for you automatically. After analysing, the video will be stabilized accordingly, and you can then modify it based on your needs.
Emulsio also provides some additional settings, such as stabilization profile, rolling shutter, avoid black borders, and discontinuity handling to improve the stabilization result.
2. Shaky Video Stabilizer
The second one on our list is the Shaky Video Stabilizer app for Android phones, which is simple to use and straightforwardly transforms your video into a much more stabilized one. You can now transform a shaky video into a smooth and motion-stabilized one. Watch the results, which seems like it was shot with a gimbal. There are no watermarks! It’s possible to share it right from your phone. A steady video is more enjoyable to view and post on social media.
It’s easy to use Shaky Video Stabilizer app to remove the shakiness. Choose a video from your library. Begin the process of stabilization, and use the Background or wait. After the video is stabilized, save the result. And now you can examine the video’s Before and After result.
3. VideoStabilizer for KineMaster
KineMaster is a common choice amongst expert YouTubers and social networking experts who want to incorporate more sophisticated editing tools into their films. The VideoStabilizer for KineMaster app is for iPhone and Android both, which makes your videos smoother! This app offers all of the essentials and a large selection of professional editing tools and effects not seen in other apps.
At KineMaster, you can change the color of your movies and improve their visual quality with the press of a button. Its loudness tools take your audio to a professional level, allowing you to easily add voice-overs, background music, and other sound effects.
Advanced capabilities include keyframe animation tools for adding movement to your layers and speed control and quality blending options. Your videos may be exported in 4K or 2160p and directly uploaded to social networking sites.
How to use KineMaster to stabilize video? Well, it is easy as well. Tap the Add button to add a video and then tap Next to continue. And this app will analyse the video automatically. After analysed, you will see the original and the stabilized result in the screen. Tap the Save button and set the quality to High from Medium or Low to Medium, depending on your preference.
4. PowerDirector
The PowerDirector app has many options that allow you to create the ideal film from beginning to end—all on your Android hone or tablet.
Speed adjustment, keyframe controls for transparency and placement, animated text and titles, and video stabilization are just a few of the easy-to-use editing capabilities included in PowerDirector.
You can create fantastic effects with filters, overlays, and blending modes, and the app’s green screen chroma-key editor allows altering your background very simple. This program also includes several fine-tuning tools for splicing sequences, rotating films, and adjusting brightness, color, and saturation. However, if you want to unlocks more complex templates and editing tools, you may need to pay for the premium plan.
Stabilizing videos with PowerDirector on Android phone is not complex. Follow the steps below to find out how.
Step 1: Install the PowerDirector app on your smartphone
Step 2: Launch the app, create a new project, then upload the video you wish to stabilize to it.
Step 3: Select the video from the Timeline and then hit the edit (pencil) icon in the upper-left corner.
Step 4: Simply click the Stabilizer button to discover an option to stabilize the video.
5. Deshake
Deshake offers desktop-quality video stabilization to your iPhone, iPad, and iPod touch, so you can fix all those shaky-hand movies of your favorite moments.
Choose a film from your picture gallery and tweak the parameters while seeing the results in real-time on your phone! It’s super-fast due to a next-generation stabilization technology that surpasses most pro programs and has been thoroughly tested on genuine home movies like yours.
6. LumaFusion
LumaFusion is among the “pro” iPad apps that people frequently request. The sophisticated video editor uses the Apple Pencil and touch screen for people who wish to edit on the move. At the same time, Apple has yet to confirm whether or not Final Cut will be released for iPadOS.
LumaFusion is so beautifully built that you can film and edit on an iPhone while on location and make professional-looking shows without having to transfer all of your clips to an iPad or Mac.
You would save a huge amount of time and work by filming and editing on the same device instead of transferring large video files to another place.
To stabilize video footage with LumaFusion, double tap on the footage in the timeline, and in the Clip Editor pane, tap on the Stabilize button to start stabilizing the video.
Part 3: What Features Should I Look for in a Video Stabilizer App?
There are a lot of features to look for when choosing a video stabilizer for your videos. The application for your iPhone or Android should be easy-to-use. It should also allow the stabilization strength adjustment. Further, never compromise on video quality. Choose one that produces high-quality video results.
The stabilizer app should offer a large variety of format support. Plus, it should have many other editing tools to enhance photos or videos for your future projects.
If you are editing videos on Windows and Mac computers, you can try Wondershare Filmora , which is an easy to use and powerful video editing software for all video content creators. Stabilize video in Filmora video editor is easy. All you need to do is import videos to timeline, enable the Video Stabilization tool, and the video is stabilized automatically.
For Win 7 or later (64-bit)
For macOS 10.12 or later
Conclusion
Well, there you have it – your ideal Video Stabilizer App. Oftentimes, your shaky videos kill the entertaining side of the video. If the video is too shaky, the viewer would lose interest soon and not watch the full video. But that’s not the case anymore. With the advanced technology and so many apps on the market, stabilizing a video has never been easier!
The Difference Is in the Details: Final Cut Pro Vs. Final Cut Express
Why Final Cut Pro Beats Final Cut Express

Liza Brown
Mar 27, 2024• Proven solutions
Boring and unexciting videos may turn off your mode. You need something special or wonderful that could turn you on and make your memories worth watching.
To let users give a new look to their pictures and videos, Apple Inc. released its first video editing software Final Cut Express in 2003. Over the next few years, various improvements were made in its updated versions.

However, after multiple inconveniences, Apple Inc. discontinued Final Cut Express in 2011 and launched its new version Final Cut Pro with advanced video editing features. Final Cut Pro was customized for video editing professionals with advanced knowledge of video editing. It is available for just $299.99 with 90 days free trial.
Some alternatives to Final Cut Express are also available in the market such as Final Cut Pro of crouse, iMovie, a low-end alternative, and Filmora, popular among beginners and pros. Let’s look at these tools individually in this article.
Part 1: What is Final Cut Express?
Final Cut Express was a video editing software designed by Apple Inc. for advanced editing of digital and HD videos. It was a consumer version of Final Cut Pro liked by professional photographers, due to its better capabilities than iMovie.
Final Cut Express used to have many features like two-way color correction, dynamic RT, Chroma key, 99 audio tracks, split-screen, and picture-in-picture effects, motion path keyframing, 23 compositing modes, and opacity keyframing.
It also allowed the users to keyframe the filters and perform slide and blade edits. Eight years after its release, Apple discontinued Final Cut Express in 2011 in favor of Final Cut Pro X.

Part 2: Is Final Cut Express Still Available?
No, concurrent with the launch of Final Cut Pro X on June 21, 2011, Final Cut Express was discontinued and removed from the Apple online store.
You might be wondering what prompted Apple to do this. Well, the primary cause of the discontinuation of Final Cut Express was that Apple Inc. wanted to launch an advanced video editing software Final Cut Pro.
Besides, despite several attempts to improve the software’s performance, Final Cut Express kept on causing multiple inconveniences. The company eventually decided to discontinue Final Cut Express and introduce a new product to meet the ever-evolving needs of its customers.
As Final Cut Express withdrawal from the stage, many other editors still update to this day. For example, Filmora, an editor trusted by many beginners and pros, updates every month. Click download to try it for free!


Part 3: Major Differences between Final Cut Pro and Final Cut Express
Both Final Cut Express and Final Cut Pro were two high-performance, user-friendly, and advanced video editing software developed by Apple Inc. Both had amazing features and were liked by professional photographers, filmmakers, and editors. However, Apple Inc. discontinued Final Cut Express in 2011.
Today, Final Cut Pro incorporates all features of Final Cut Express plus some additional functions added by Apple Inc. later.
Given below are some of the key differences between these two software:
| Final Cut Pro | Final Cut Express |
|---|---|
| The software is currently available on Apple Store and is supported by all iOS devices. | The software was discontinued in 2011 and can no longer be downloaded from Apple Store. |
| Effectiveness is guaranteed as the user will receive application updates. | Untrusted and unreliable software because no application updates are available. |
| Original version with advanced features | The consumer version of Final Cut Pro with limited features |
| The application performance keeps improving with new versions | The application performance kept on declining due to downgraded features |
| Heavyweight editing tools for better results | Simple editing tools |
| Costs $299 | Costs $199 |
| Recommended for experts and professionals | Recommended for beginners |
| Requires a system with better hardware and enhanced performance | Compatible with systems with less-advanced hardware |
Part 4: iMovie, Final Cut Express, and Final Cut Pro, Which is the Best?
All these video editing software, iMovie, Final Cut Express, and Final Cut Pro are developed by Apple Inc. with different features and functions. However, they have different target audiences and offer diverse pricing plans according to the user’s needs.
The following table offers a detailed comparison of iMovie, Final Cut Express, and Final Cut Pro to help you choose the best one for advanced video editing.
| No. | Parameter of Comparison | iMovie | Final Cut Express | Final Cut Pro |
|---|---|---|---|---|
| 1 | Target Audience | It is aimed at home users and who are beginners with no video editing skills | It is ideal for a bit advanced users with moderate knowledge of video editing | It is a professional product and targets professional photographers and video editors. |
| 2 | Features | Automated video editing video support Audio & music editing HD & 4K Video color settings Crop & rotate video clip Stabilization Video effects & transitions Timeline Photo & music import Pre-built themes & backdrops simultaneously | Two-way color correction Dynamic RT Chroma key 99 audio tracks Split-screen Picture-in-picture effects Motion path keyframing 23 compositing modes Opacity keyframing | Moving & Trimming Clips Multicam Editing 360 Degree VR Editing Effects VR Headset Playback Advanced Color Grading HDR Video Support Motion Graphics Templates Asset Management Plug-Ins |
| 3 | Interface | User-friendly and easy to understand | Complicated for beginners | Very complicated |
| 4 | Skill Set Required | Beginner | Moderate | Advanced |
| 5 | Advanced Sharing | Yes | No | No |
| 6 | Text Implementation | Limited Tools | Limited Tools | Advanced tools for easy text customization |
| 7 | Compatible OS | Mac OS X 10.10.2 or later | Mac OS X 10.10.2 or later | Mac OS X 10.10.2 or later, 64-bit processor |
| 8 | Workflow | Advanced | Moderate | Advanced |
| 9 | Supported HD Format | 1080 | 1080 | UHD 4K |
| 10 | iCloud sync | Yes | No | No |
| 9 | Operating Speed | Fast due to limited tools | Fast due to limited tools | Moderate due to advanced tools and effects |
| 10 | Advanced Effects | Presets | Presets with moderate effects | An array of advanced effects |
| 11 | Plugins and Integrations | Limited | Limited | Several third-party plugins |
| 12 | Color Correction Features | Focus on Image Improvement | Small editing of pictures | Total customization to match the footage tone |
| 13 | Pricing | Free of Cost | $199 | 90 days free trial then $299.99 |
Part 5: Best Alternative to Final Cut Express
Now, as Final Cut Express is no longer available, you may want to try the other two editors of Apple. While iMovie mainly targeted beginners, Final Cut Express and Pro targeted users with moderate to advanced knowledge of video editing.
For those beginners who wanted to make professional-looking videos without any editing skills, Wondershare launched Filmora as an alternative to Final Cut Express and Pro.
This user-friendly made video editing as simple as ABC. From offering multiple hand-picked effects to advanced editing options, Filmora allows you to range markers, perfect your audio, group timeline clips, and perform detailed color correction with auto-correction and color wheels for free.
Key Features
- Advanced video editing options;
- 300+ free handcrafted effects
- User-friendly video editing tools; and
- Video conversion options to multiple formats.
Liza Brown
Liza Brown is a writer and a lover of all things video.
Follow @Liza Brown
Liza Brown
Mar 27, 2024• Proven solutions
Boring and unexciting videos may turn off your mode. You need something special or wonderful that could turn you on and make your memories worth watching.
To let users give a new look to their pictures and videos, Apple Inc. released its first video editing software Final Cut Express in 2003. Over the next few years, various improvements were made in its updated versions.
However, after multiple inconveniences, Apple Inc. discontinued Final Cut Express in 2011 and launched its new version Final Cut Pro with advanced video editing features. Final Cut Pro was customized for video editing professionals with advanced knowledge of video editing. It is available for just $299.99 with 90 days free trial.
Some alternatives to Final Cut Express are also available in the market such as Final Cut Pro of crouse, iMovie, a low-end alternative, and Filmora, popular among beginners and pros. Let’s look at these tools individually in this article.
Part 1: What is Final Cut Express?
Final Cut Express was a video editing software designed by Apple Inc. for advanced editing of digital and HD videos. It was a consumer version of Final Cut Pro liked by professional photographers, due to its better capabilities than iMovie.
Final Cut Express used to have many features like two-way color correction, dynamic RT, Chroma key, 99 audio tracks, split-screen, and picture-in-picture effects, motion path keyframing, 23 compositing modes, and opacity keyframing.
It also allowed the users to keyframe the filters and perform slide and blade edits. Eight years after its release, Apple discontinued Final Cut Express in 2011 in favor of Final Cut Pro X.
Part 2: Is Final Cut Express Still Available?
No, concurrent with the launch of Final Cut Pro X on June 21, 2011, Final Cut Express was discontinued and removed from the Apple online store.
You might be wondering what prompted Apple to do this. Well, the primary cause of the discontinuation of Final Cut Express was that Apple Inc. wanted to launch an advanced video editing software Final Cut Pro.
Besides, despite several attempts to improve the software’s performance, Final Cut Express kept on causing multiple inconveniences. The company eventually decided to discontinue Final Cut Express and introduce a new product to meet the ever-evolving needs of its customers.
As Final Cut Express withdrawal from the stage, many other editors still update to this day. For example, Filmora, an editor trusted by many beginners and pros, updates every month. Click download to try it for free!
Part 3: Major Differences between Final Cut Pro and Final Cut Express
Both Final Cut Express and Final Cut Pro were two high-performance, user-friendly, and advanced video editing software developed by Apple Inc. Both had amazing features and were liked by professional photographers, filmmakers, and editors. However, Apple Inc. discontinued Final Cut Express in 2011.
Today, Final Cut Pro incorporates all features of Final Cut Express plus some additional functions added by Apple Inc. later.
Given below are some of the key differences between these two software:
| Final Cut Pro | Final Cut Express |
|---|---|
| The software is currently available on Apple Store and is supported by all iOS devices. | The software was discontinued in 2011 and can no longer be downloaded from Apple Store. |
| Effectiveness is guaranteed as the user will receive application updates. | Untrusted and unreliable software because no application updates are available. |
| Original version with advanced features | The consumer version of Final Cut Pro with limited features |
| The application performance keeps improving with new versions | The application performance kept on declining due to downgraded features |
| Heavyweight editing tools for better results | Simple editing tools |
| Costs $299 | Costs $199 |
| Recommended for experts and professionals | Recommended for beginners |
| Requires a system with better hardware and enhanced performance | Compatible with systems with less-advanced hardware |
Part 4: iMovie, Final Cut Express, and Final Cut Pro, Which is the Best?
All these video editing software, iMovie, Final Cut Express, and Final Cut Pro are developed by Apple Inc. with different features and functions. However, they have different target audiences and offer diverse pricing plans according to the user’s needs.
The following table offers a detailed comparison of iMovie, Final Cut Express, and Final Cut Pro to help you choose the best one for advanced video editing.
| No. | Parameter of Comparison | iMovie | Final Cut Express | Final Cut Pro |
|---|---|---|---|---|
| 1 | Target Audience | It is aimed at home users and who are beginners with no video editing skills | It is ideal for a bit advanced users with moderate knowledge of video editing | It is a professional product and targets professional photographers and video editors. |
| 2 | Features | Automated video editing video support Audio & music editing HD & 4K Video color settings Crop & rotate video clip Stabilization Video effects & transitions Timeline Photo & music import Pre-built themes & backdrops simultaneously | Two-way color correction Dynamic RT Chroma key 99 audio tracks Split-screen Picture-in-picture effects Motion path keyframing 23 compositing modes Opacity keyframing | Moving & Trimming Clips Multicam Editing 360 Degree VR Editing Effects VR Headset Playback Advanced Color Grading HDR Video Support Motion Graphics Templates Asset Management Plug-Ins |
| 3 | Interface | User-friendly and easy to understand | Complicated for beginners | Very complicated |
| 4 | Skill Set Required | Beginner | Moderate | Advanced |
| 5 | Advanced Sharing | Yes | No | No |
| 6 | Text Implementation | Limited Tools | Limited Tools | Advanced tools for easy text customization |
| 7 | Compatible OS | Mac OS X 10.10.2 or later | Mac OS X 10.10.2 or later | Mac OS X 10.10.2 or later, 64-bit processor |
| 8 | Workflow | Advanced | Moderate | Advanced |
| 9 | Supported HD Format | 1080 | 1080 | UHD 4K |
| 10 | iCloud sync | Yes | No | No |
| 9 | Operating Speed | Fast due to limited tools | Fast due to limited tools | Moderate due to advanced tools and effects |
| 10 | Advanced Effects | Presets | Presets with moderate effects | An array of advanced effects |
| 11 | Plugins and Integrations | Limited | Limited | Several third-party plugins |
| 12 | Color Correction Features | Focus on Image Improvement | Small editing of pictures | Total customization to match the footage tone |
| 13 | Pricing | Free of Cost | $199 | 90 days free trial then $299.99 |
Part 5: Best Alternative to Final Cut Express
Now, as Final Cut Express is no longer available, you may want to try the other two editors of Apple. While iMovie mainly targeted beginners, Final Cut Express and Pro targeted users with moderate to advanced knowledge of video editing.
For those beginners who wanted to make professional-looking videos without any editing skills, Wondershare launched Filmora as an alternative to Final Cut Express and Pro.
This user-friendly made video editing as simple as ABC. From offering multiple hand-picked effects to advanced editing options, Filmora allows you to range markers, perfect your audio, group timeline clips, and perform detailed color correction with auto-correction and color wheels for free.
Key Features
- Advanced video editing options;
- 300+ free handcrafted effects
- User-friendly video editing tools; and
- Video conversion options to multiple formats.
Liza Brown
Liza Brown is a writer and a lover of all things video.
Follow @Liza Brown
AVI Video Trimming Made Easy: 16 Best Tools for Windows, MAC, and Android Devices
With the growing fame of video-sharing and social media applications like Twitter, Instagram, and TikTok, the demand for simple and fast video cutting and trimming tools has dramatically increased. Nowadays, you don’t have to play with complex video editing tools to produce high-quality videos.
Thanks to several user-friendly editing software to make things easy for everybody. However, finding the right programs to trim/cut videos is still challenging, especially in AVI format.
But, guess what? These top 16 AVI video cutters for Windows, MAC, Android, iPhone, and online will make video cutting and trimming fun, especially when you learn to do it using Filmora.
In this Article
Part 1: Best AVI Video Cutter to Trim/Cut AVI Video on Windows and MAC – Filmora Video Cutter [with steps}
Part 2: Top 3 Free AVI Video Cutter on Windows
Part 3: Top 3 Free AVI Video Cutter on MAC
Part 4: Top 3 Free AVI Video Cutter on Android
Part 5: Top 3 Free AVI Video Cutter on iPhone
Part 6: Top 3 Free AVI Video Cutter Online
Part 7: Bottom Line
Part 8: FAQs
Part 1: Best AVI Video Cutter to Trim/Cut AVI Video on Windows and MAC – Filmora Video Cutter [with steps]
Filmora by Wondershare is a star video editor with outstanding outcomes. Whether you have a MAC or Windows PC, you can download Filmora regardless of your operating system. The program best serves those who intend to make high-quality videos. The software provides editing support for all video formats, including AVI.
Although Filmora is an affordable editor with tons of audio and video editing options, you can still download the software for free and create projects if watermarks don’t bother you. Moreover, you can count this tool’s capabilities in cropping, resizing, and Chroma screen support. But that’s not the only sweet fruit.
In fact, Filmora is equipped with many jaw-dropping features, including preset templates, auto beat sync, split-screen, speed ramping, motion tracking, keyframing, creative transitions, titles, filters, and much more. And the best part is, you can learn and understand Filmora in no time. That’s why the program is loved and supported by all types of users.
So does Filmora helps cut and trim AVI videos? Yes! It does if you follow these steps correctly.
Step 1: Download Filmora Video Editor
First, download Filmora Video Editor by choosing your operating system, as seen in the screenshot below.
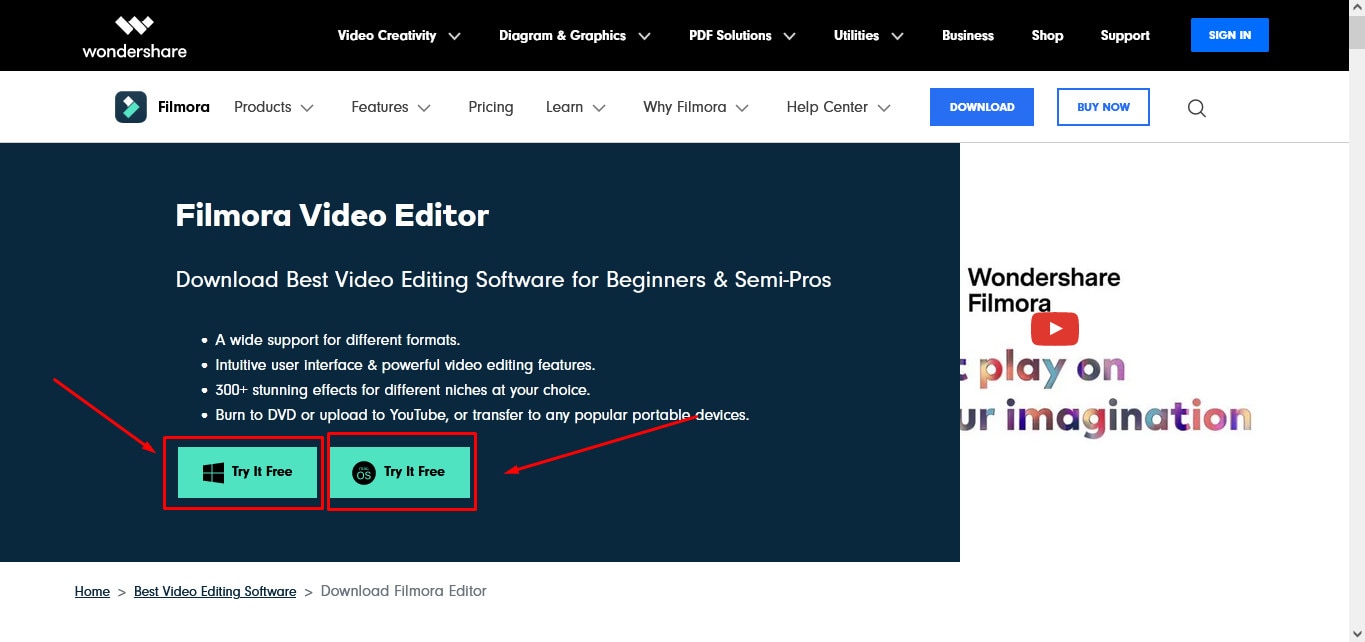
Run the setup and let it finish without any pause or break.
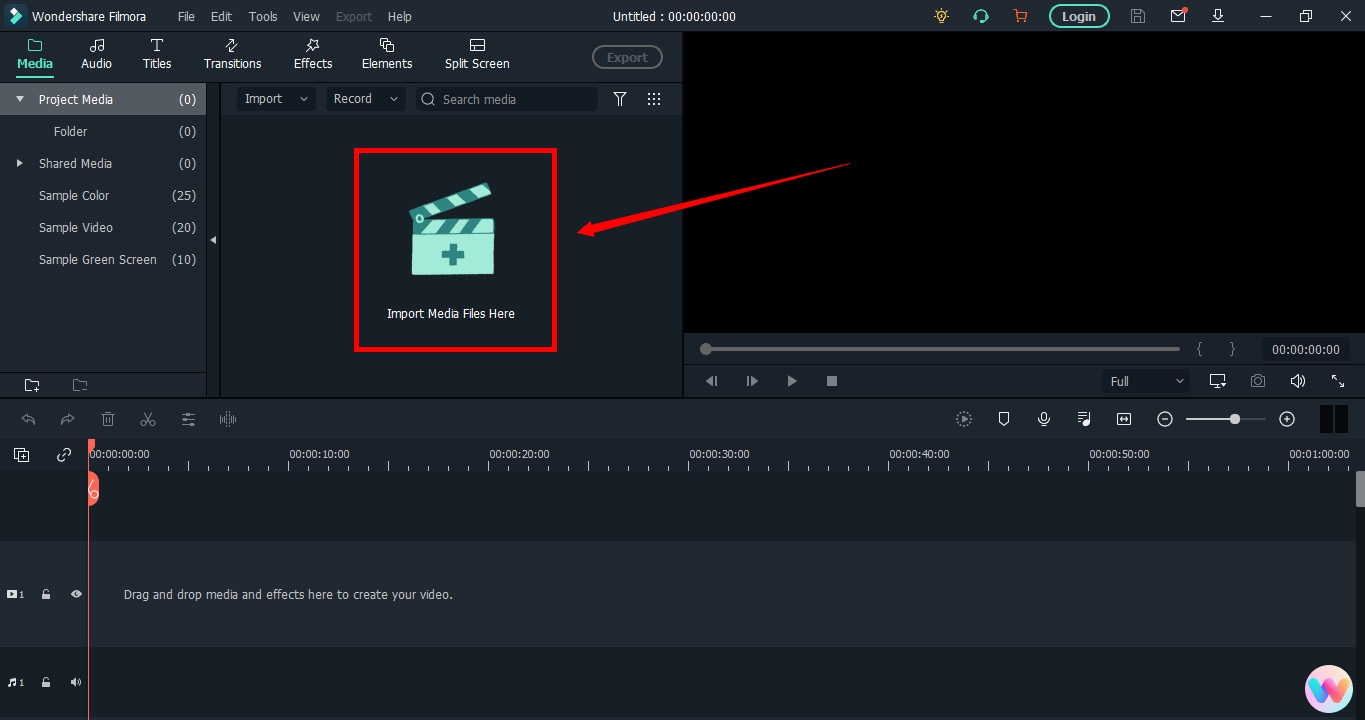
Step 2: Import Your Video to Filmora Video Editor
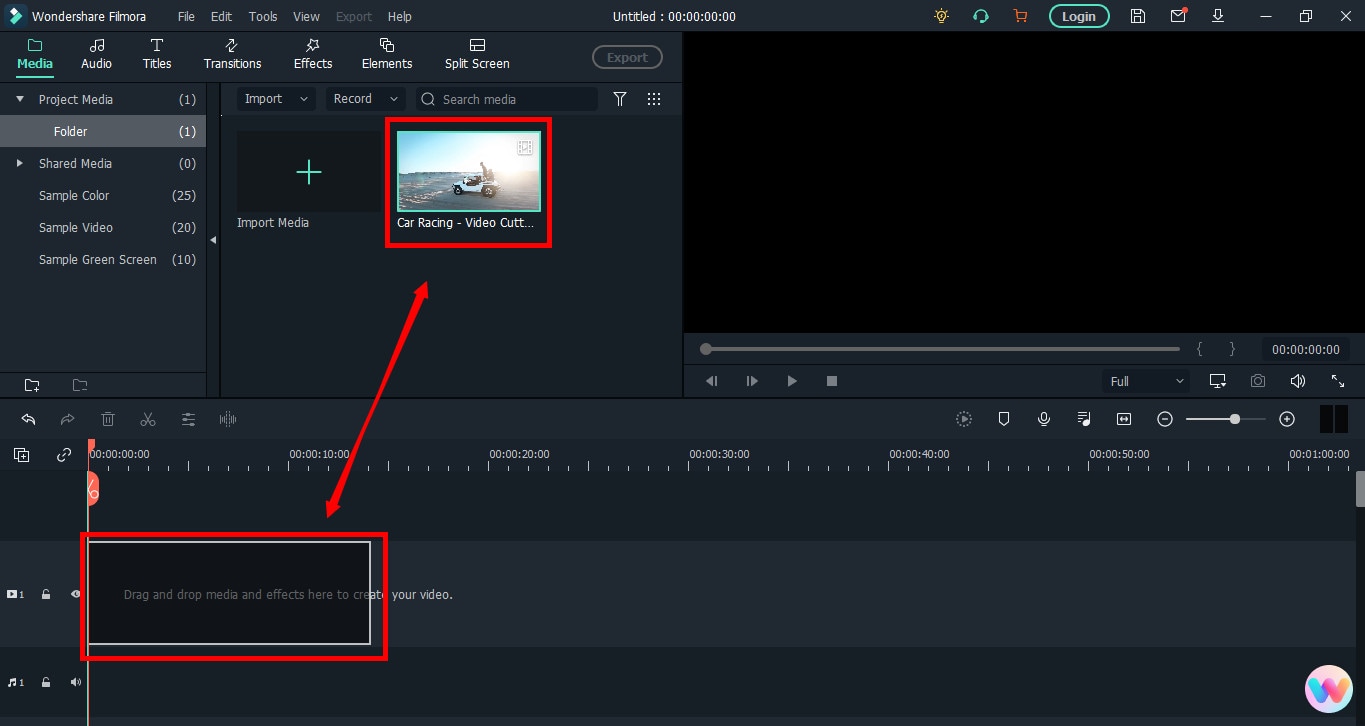
Importing your AVI video is a very simple process. Just click on the “Film Clip” icon.
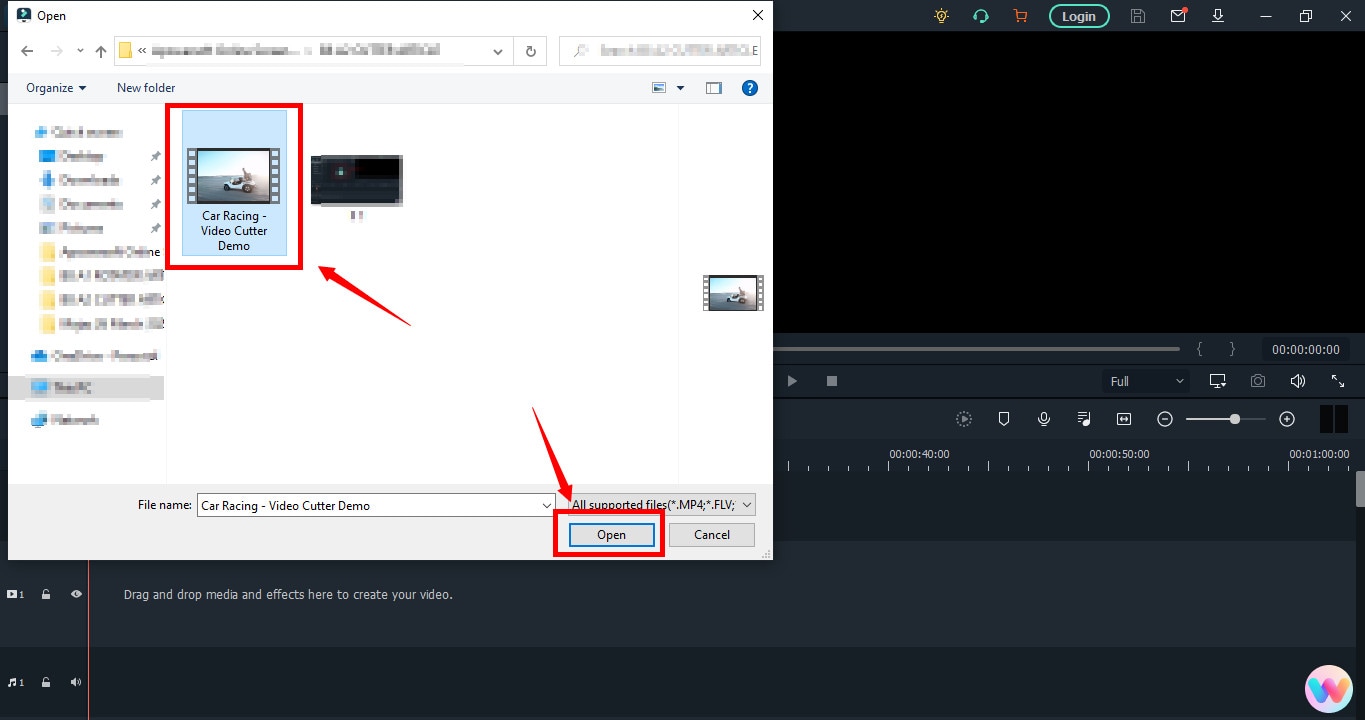
It will open a new window screen on your computer to select the video from the directory. Find the clip you want to import and cut. Use your mouse to select it and click the “Open” button.
The video will be loaded in the “Media” folder of Filmora. The clip’s thumbnail should be visible to assure you have done everything correctly.
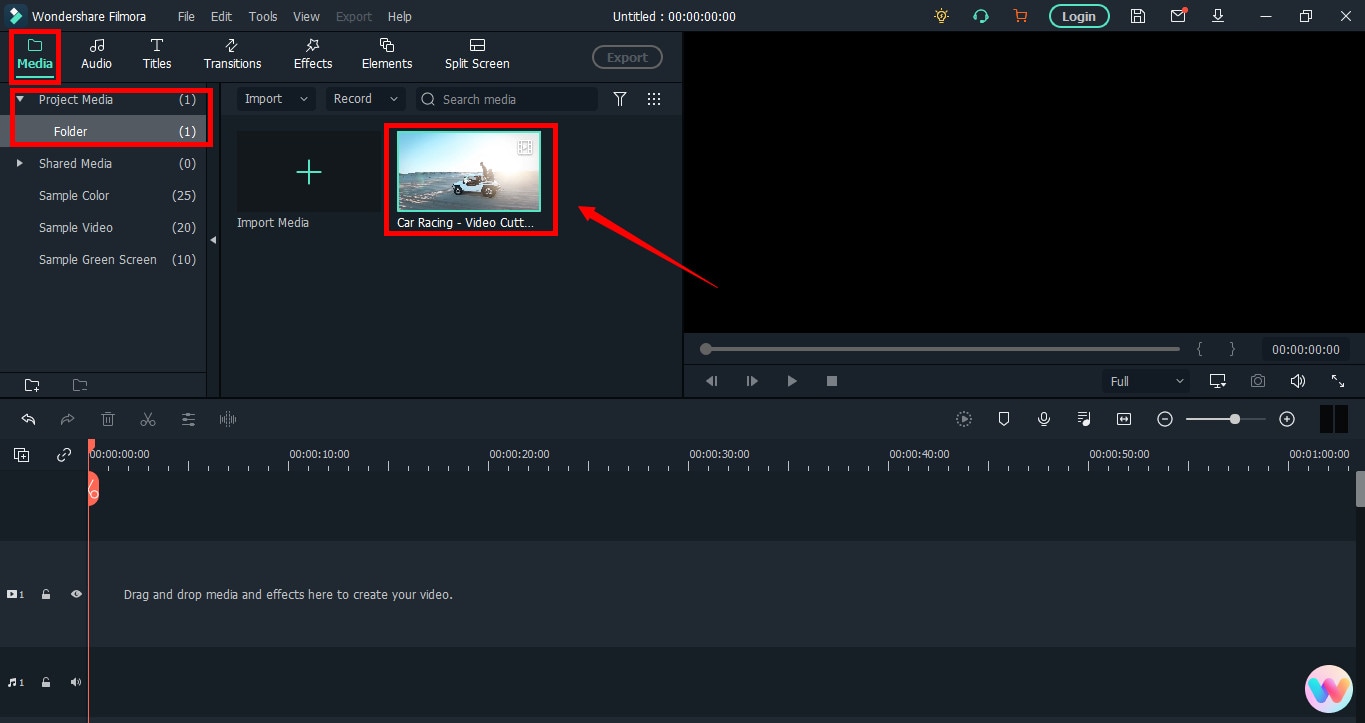
If you can see that, let’s go to the next step.
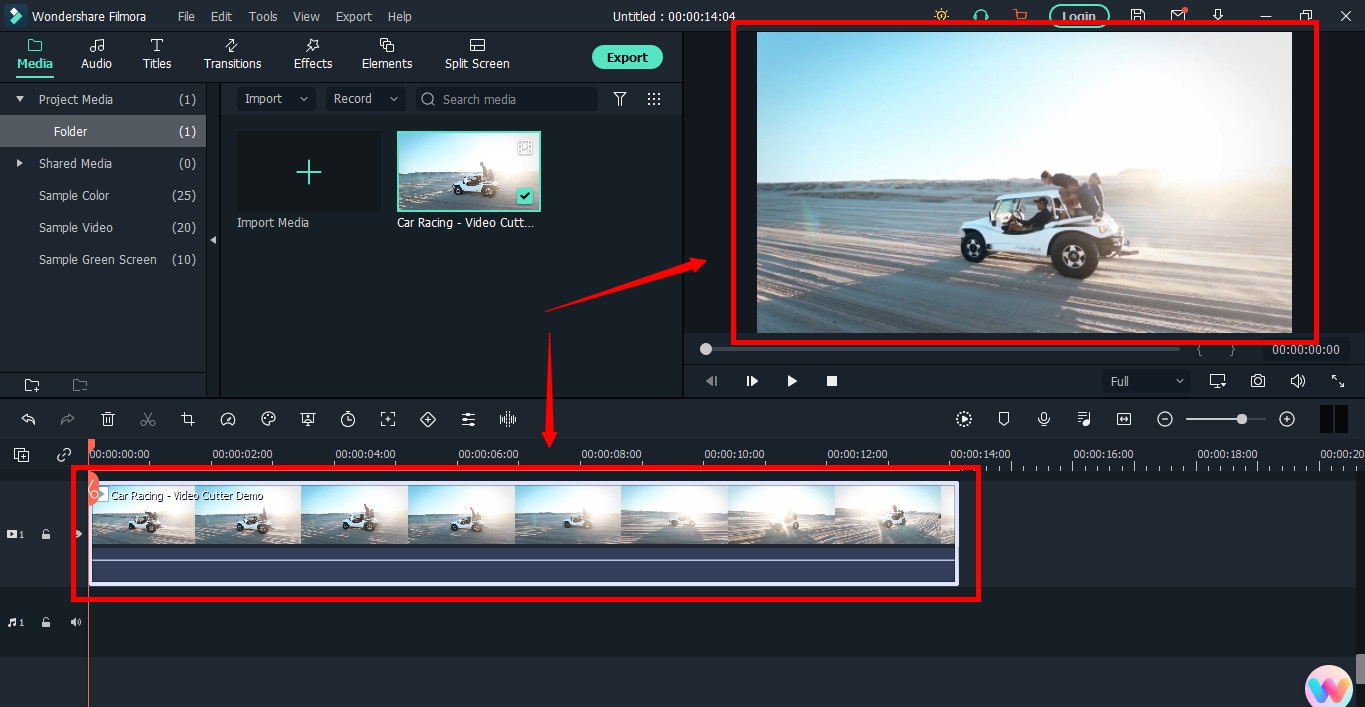
Step 3: Drag and Drop Video to Filmora’s Timeline
Select the video in the media folder by clicking over it once. Now, without leaving the hold of the left button of your mouse, slide the video down to the track in the timeline.
After that, a message will pop up, asking about your preference for the project settings. It is recommended to choose the “Match to Media” option unless you’re an experienced video editor who knows how to play with the resolution and frame rates.
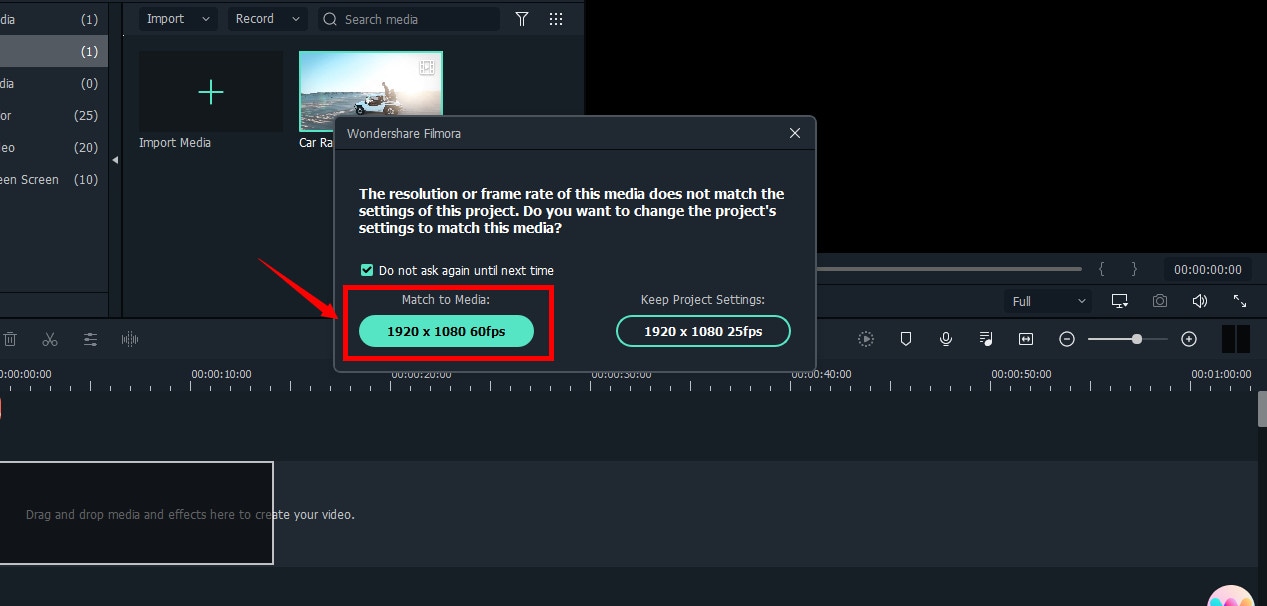
You will see the video on the timeline with its preview on the “Preview Screen” on the right side of the interface.
Step 4: Cutting Your Video in Filmora
Here comes the core step you have been waiting for. But before you go any further, you need to know about the “Playhead.”
Playhead is an orange-reddish marker you can find on the timeline.
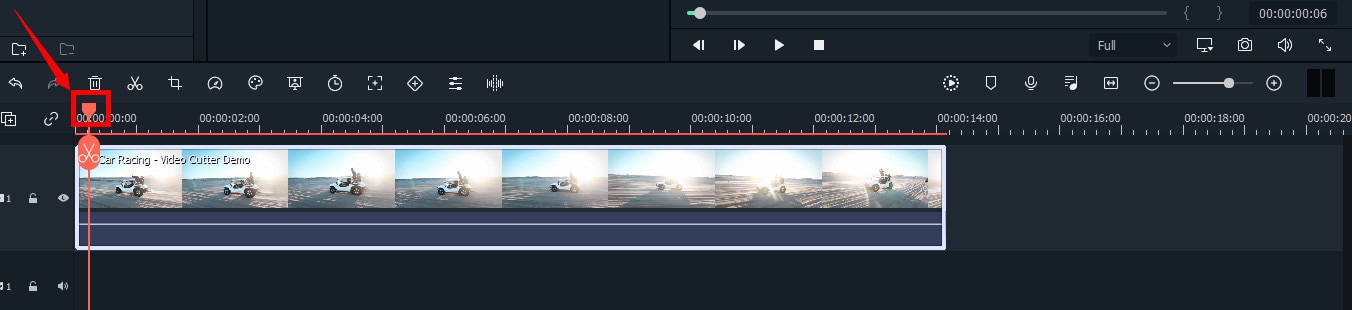
It has an important role in cutting your videos.
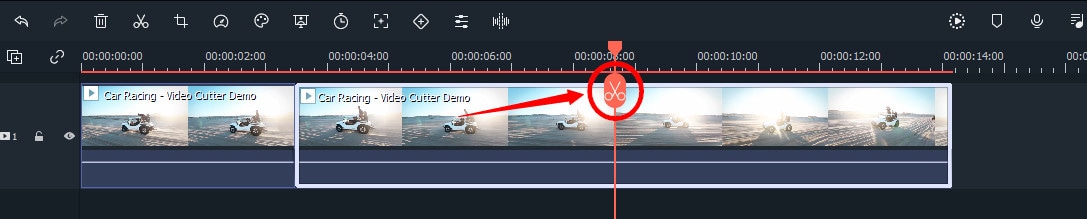
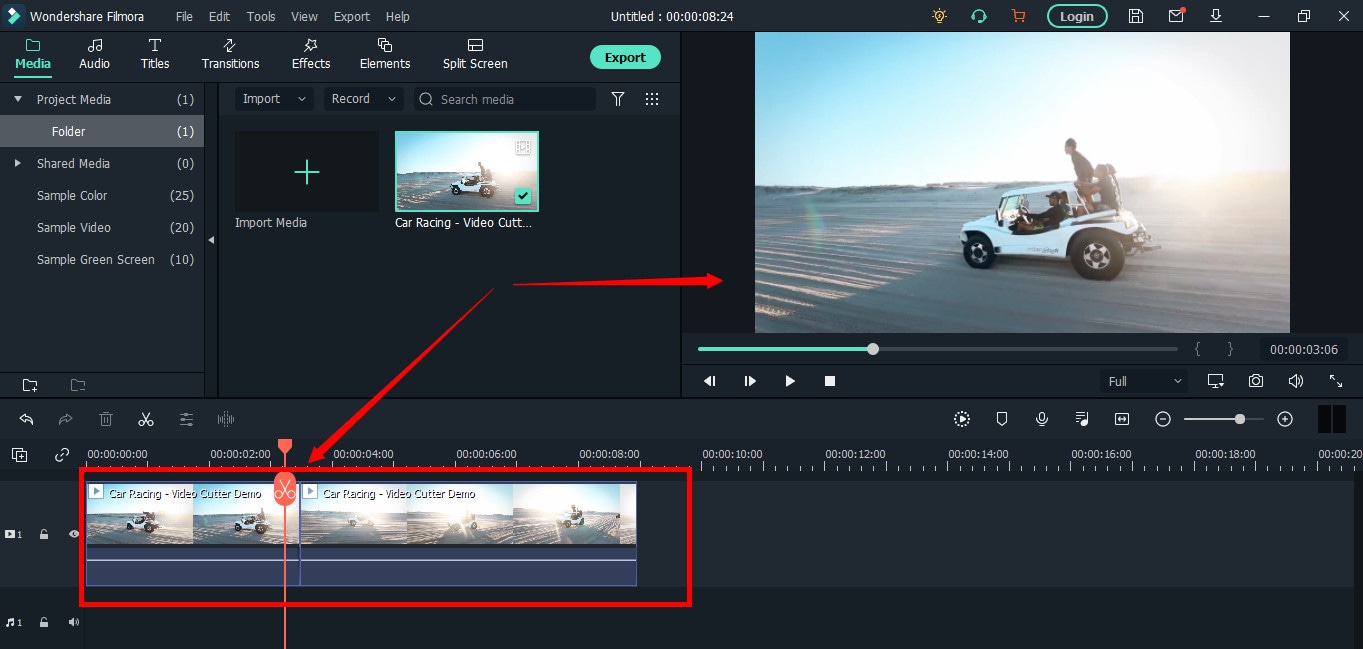
So, move the playhead to your desired frame and click on the “scissor” icon to make the “starting” cut.
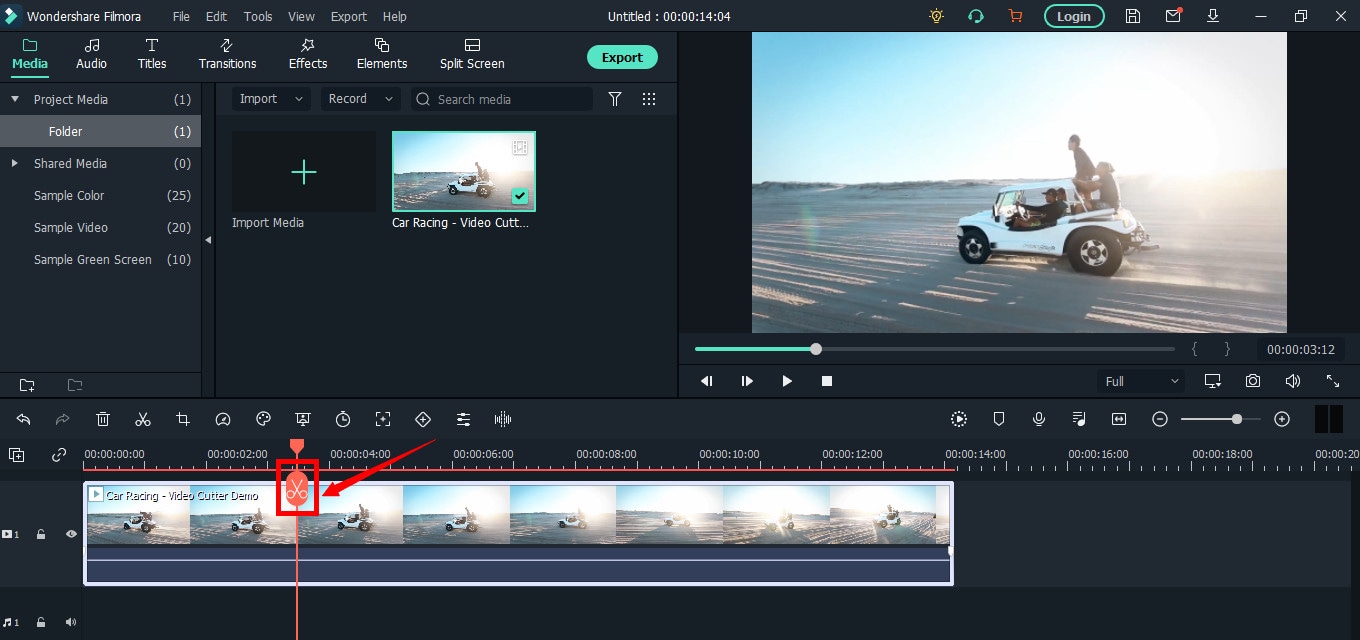
As soon as you do it, you will see that the single clip is now divided into two parts similar to this image.
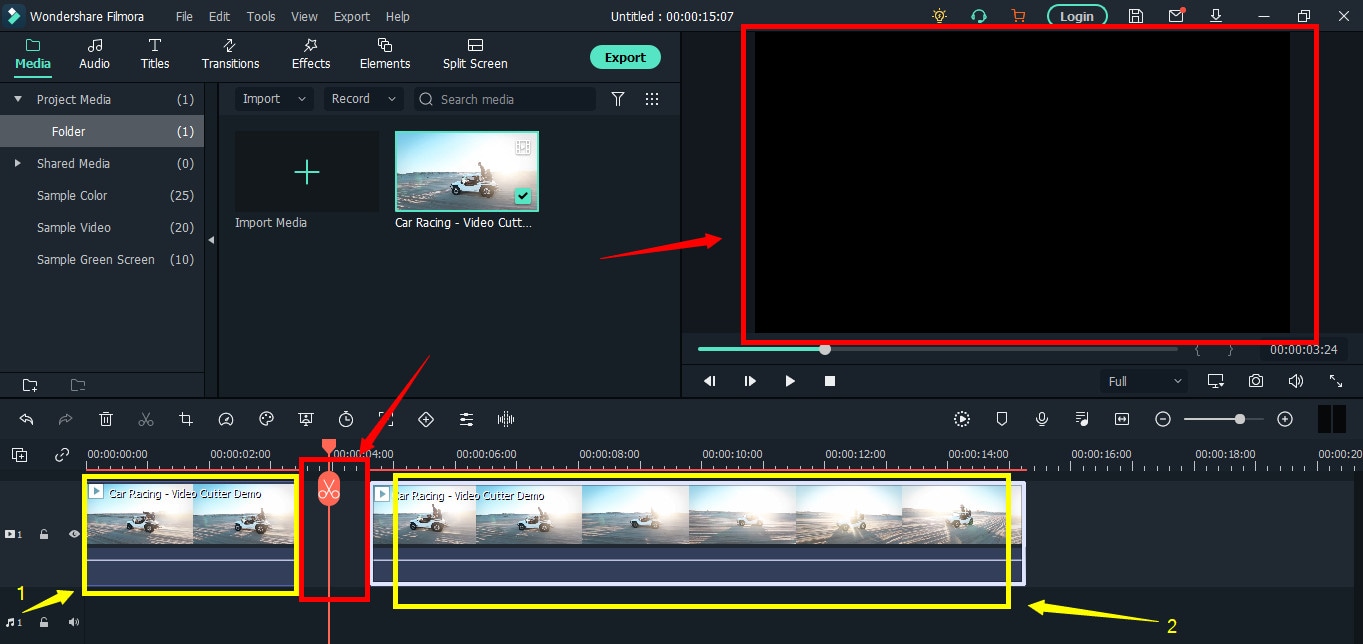
The “Red” marked area in the above screenshot ensures a gap between the clips on the timeline. The “Yellow” arrows confirm two separate clips of the same video.
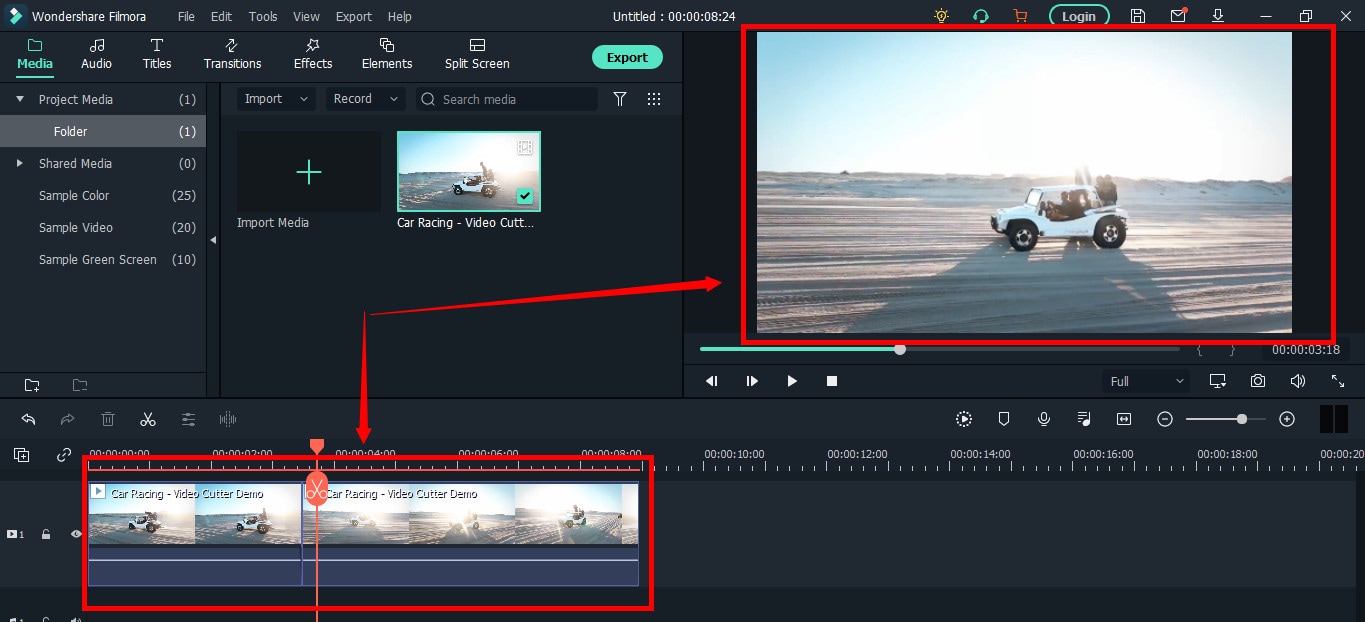
Place the two clips together as seen in this “Green” area.
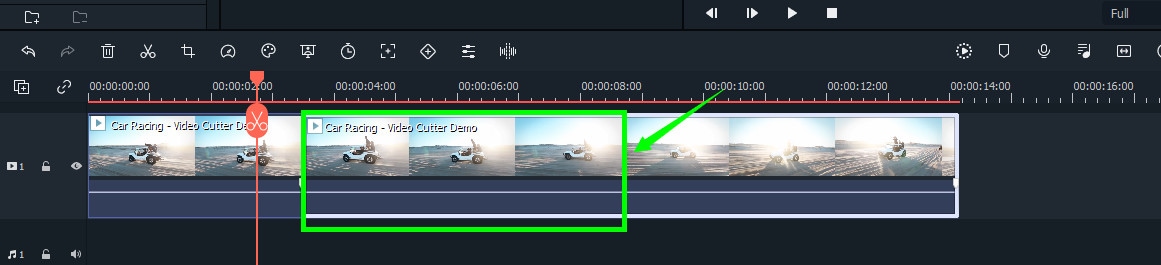
And place the playhead anywhere on the clip. And click on the “scissor” icon once again to make the “ending” cut (second cut).
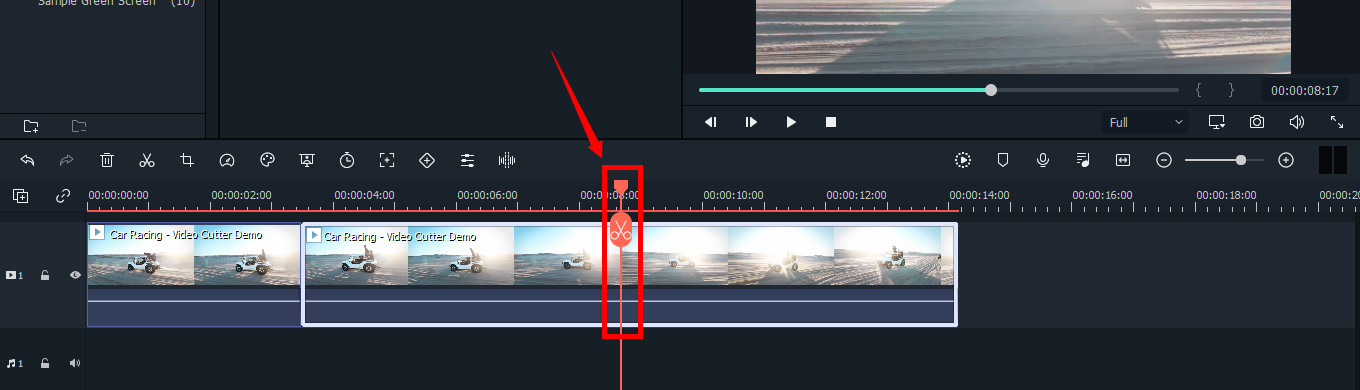
If done correctly, there should be three clips now of the same video, as you can observe in this screenshot.
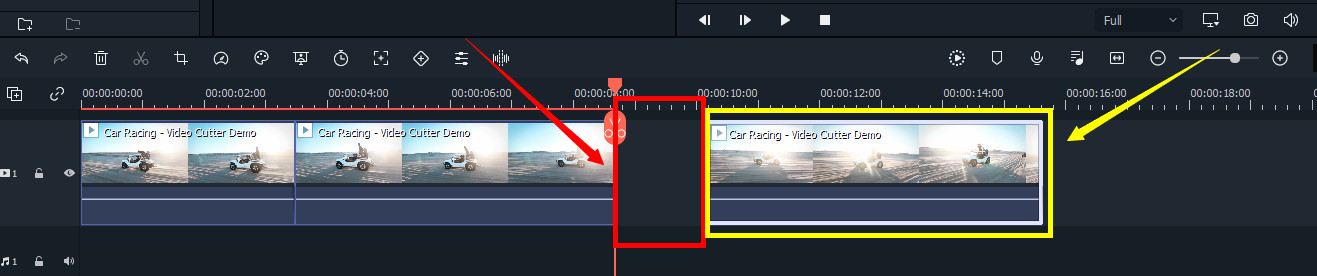
Again, the “Red” area in the above photo indicates the gap, and the “Yellow” area ensures a third segment of the video.
Note: The gaps you can see in the divided clips are made intentionally for understanding. Practically, Filmora doesn’t move the clip or make gaps in between after you have made the cuts.
Keep in mind that there are three clips on the timeline. Now, if you want to remove the second clip from the video, you need to select that portion first by clicking on it.
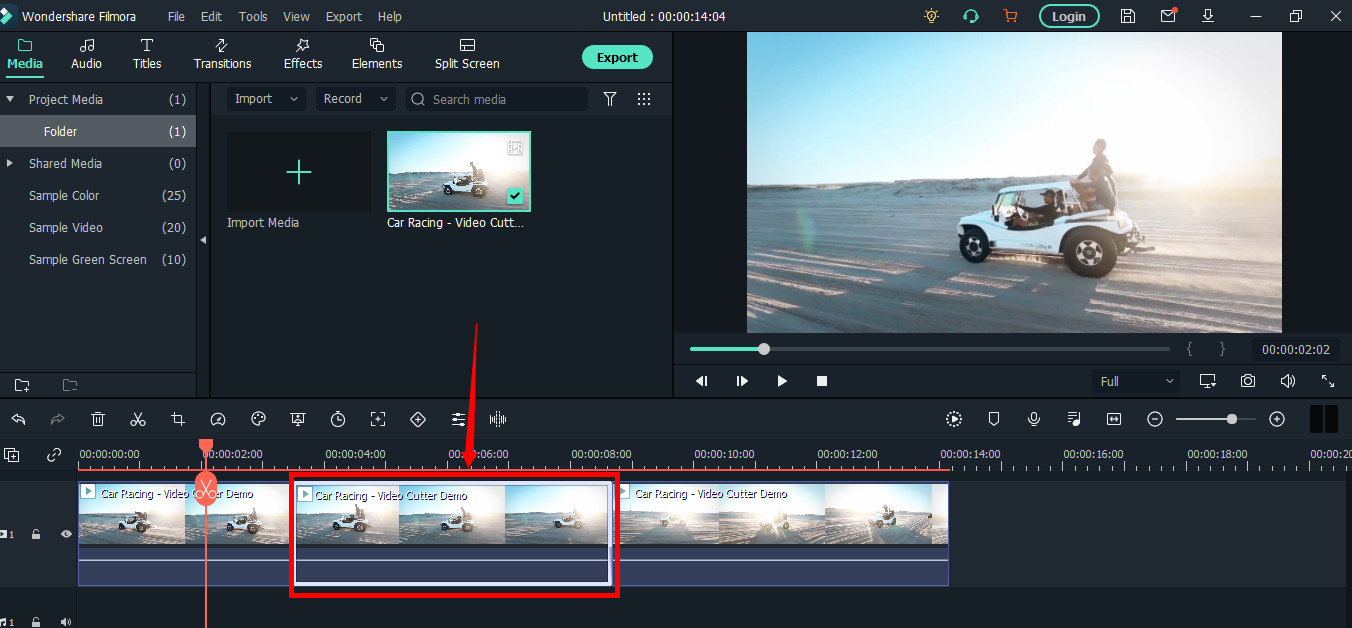
Then, right-click on the mouse and choose “Cut” from the menu.
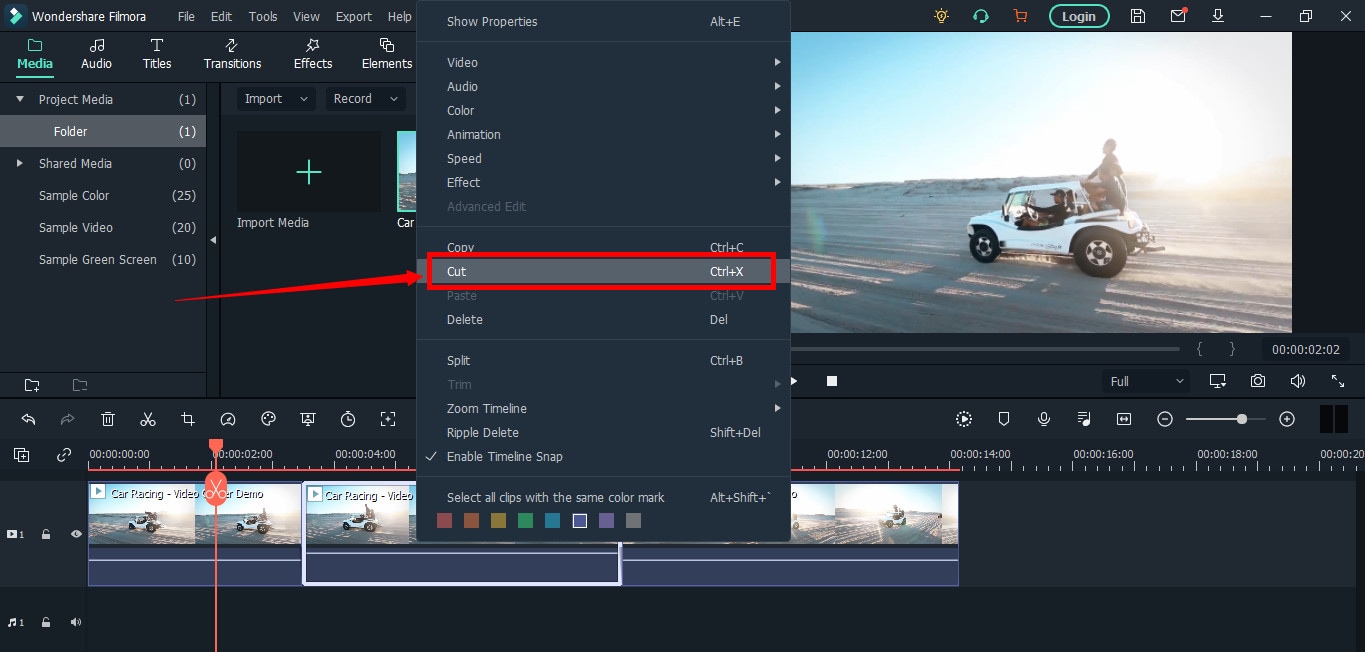
Within a semi-second, the selected portion will be removed from the timeline. And you will be able to see the remaining parts of the video. Now, pull the second clip using your mouse and place it at the end of the first clip without leaving a gap in between.
Then, click the “Play” button under the preview screen to see the results.
You can see in the above two screenshots that there’s a jump between the scenes due to cuts, confirming that video has been cut significantly.
Step 5: Trimming Your Video in Filmora
Remember that cutting and trimming in Filmora are two different things. Trimming allows you to remove a particular video part from visibility without deleting the portion.
So feel free to skip this step if you’re happy learning the cutting technique. But if you’re interested in trimming, here’s how you do it.
Take your mouse cursor at the beginning or end of the clip you want to trim. Keep holding the clip’s corner and slide the mouse back or front to trim the part
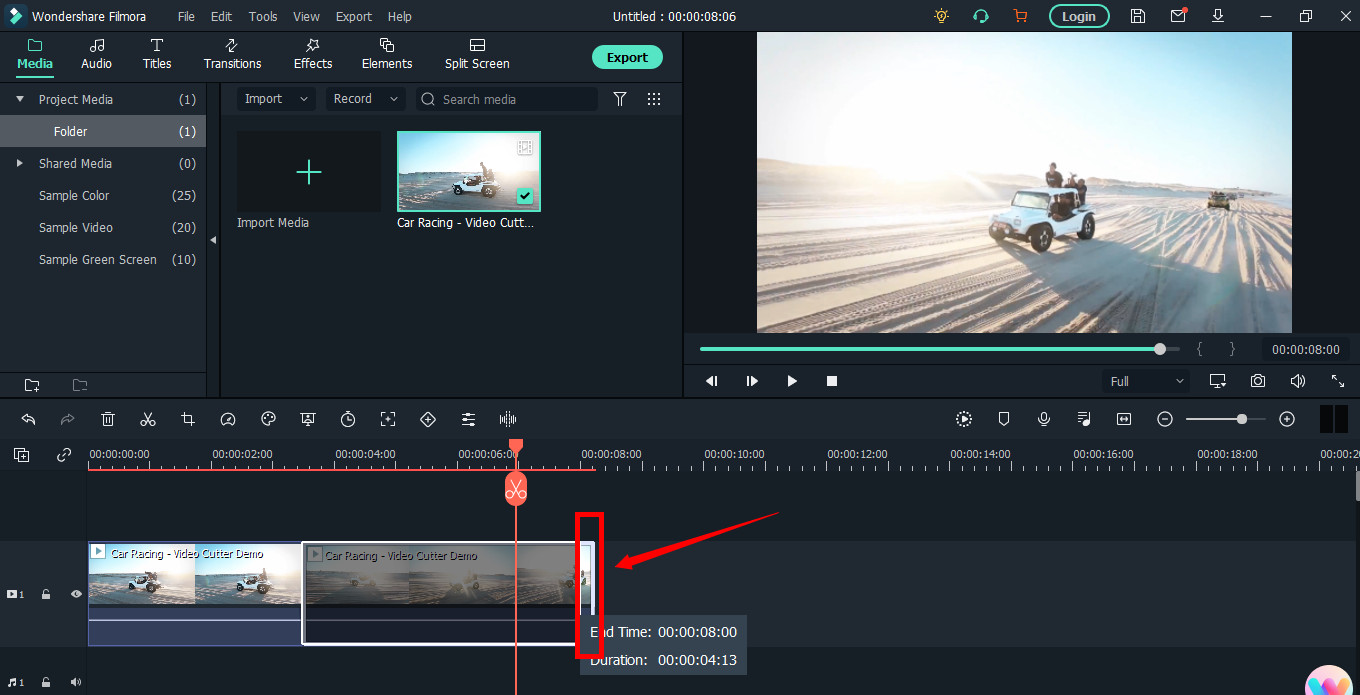
Note: Since the trim tool doesn’t delete the video, the final project based on trimming will be of a larger size. Therefore, it is advised to cut videos rather than trimming for fast rendering, better results, and small video size.
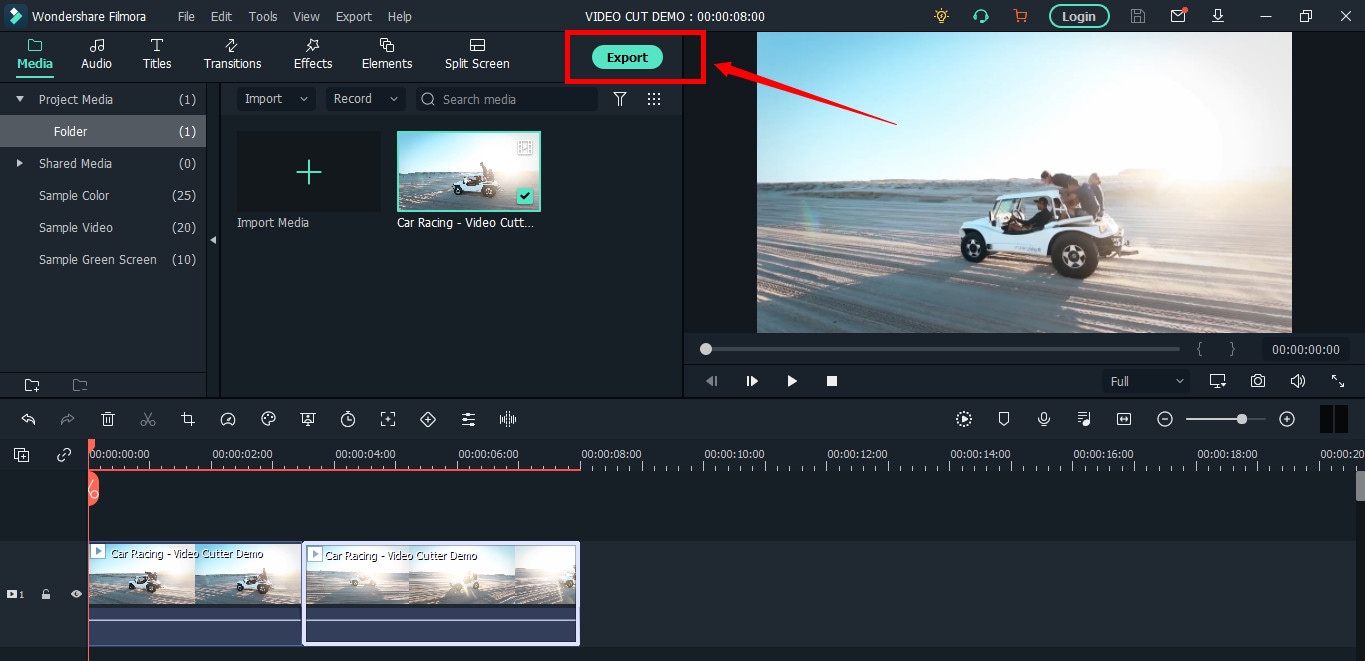
Step 6: Save Project and Export Your Cut/Trimmed AVI Video
Choose “Save Project” from the “File” menu.
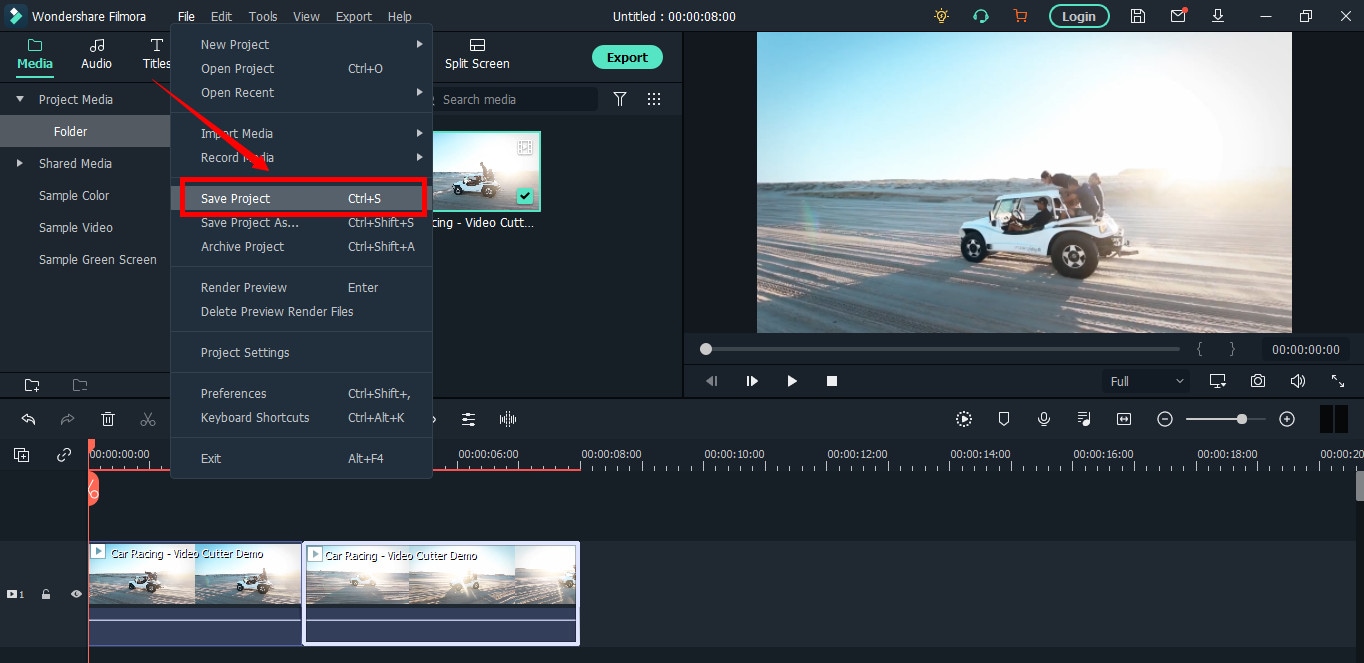
Select the directory to save the project, rename the new video, and click the “Save” button.

Click on the “Export” button to save the video in AVI or any other video format of your choice on your computer.
Part 2: Top 3 Free AVI Video Cutter on Windows
As a Windows user, finding an excellent video cutter is relatively easy. However, not all software permits importing AVI videos. In the same way, some video trimmers come at a price. So if you really don’t want to pay and enjoy cutting your AVI files, try using these three video cutting tools.
Microsoft Photos (Windows 10)
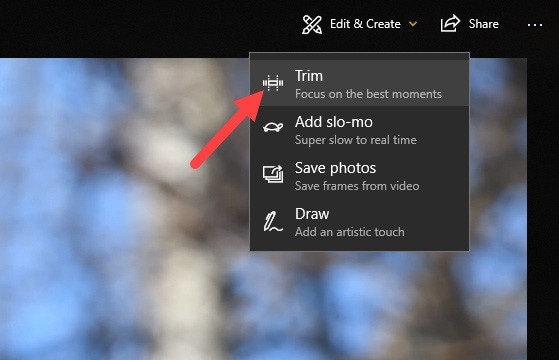
Microsoft Photos or Photo App is a free photo viewer and editor with your Windows 10. It offers incredible photo editing and enhancement along with different tools for organizing and editing videos in a very friendly way. Likewise, you can create drawings over the videos and add 3D effects and background music to your clips.
You can also trim AVI videos with Microsoft Photos quickly. All you need to do is open your clip with the Photo App, choose the “Trim” option, select a portion of the video you want to trim, and go ahead.
That’s it!
Features
- Quick video trimming
- Cool text effects
- 3D library and effects
- It has a clear interface
- You can find and tag people’s faces
- The program has 15+ filters for editing
- Motion tracking option for drawing on videos
- Allows you to view and organize your files easily
Pros
- Microsoft Photos is free for Windows users
- It automatically creates albums
- The program has a touch-friendly interface
- You can integrate your OneDrive with the software
Cons
- Lacks before and after view
- Not included in older Windows versions
- It doesn’t support selective focus or panorama stitching
Handbrake
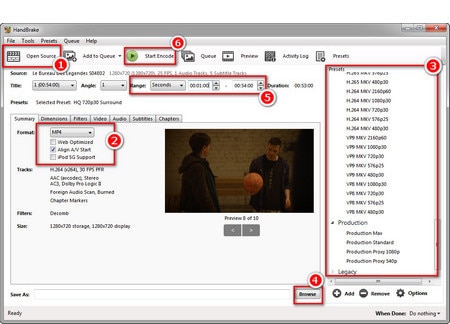
Handbrake is best-known for its video transcoding traits. Unlike typical video editors, this open-source tool includes limited options to rip Blu-rays and DVDs. Moreover, you can mix the 5.1 soundtracks and convert them to stereo to make the audio compatible with your TV speakers.
But the exciting thing about Handbrake is that you can use this software on your macOS 10.13 or later versions to cut AVI videos for free. However, it’s a bit technical process, as there’s no timeline to help you trim or make cuts on the clips directly with the help of your mouse.
You are required to mention a time range (seconds, minutes, or hours) to keep a specific part of the video while the software removes the non-ranged parts of the clip. For instance, you have a video of 10 seconds. You start the range from 5 seconds and end it at 10 seconds. So, the first four seconds of the video will be cut from the entire clip.
Features
- Video cutting, cropping, and resizing
- Low-quality and old video restoration
- Video conversion from any format to MKV or MP4
Pros
- Handbrake is free
- You can convert batch videos with ease
- It supports MAC, Windows, and Linux OS
- Allows you to import video files in all major formats
- The software comes with various video conversion presets
Cons
- Handbrake is not a user-friendly tool
- The video file output is limited to two formats (MKV and MP4) only
Gihosoft Video Cutter
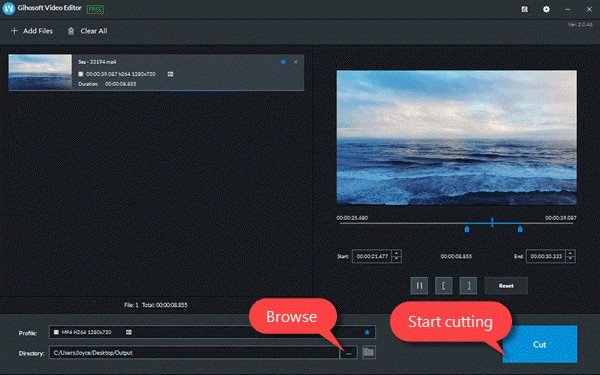
Gihosoft is a clean, free, lossless video cutter on your Windows PC. It’s a simple tool that helps you cut video files into various output formats. So be it AVI, MPEG, or any other file, with Gihosoft, everything becomes handy.
Another fascinating fact about this software is that it allows you to cut videos in three simple steps without losing the quality. So right after installing the program, you simply need to import your file, choose the start and end time, and click the “Cut” button to remove the part of the video.
Features
- Fast video and audio cutting
- Easy drag and drop audio/video files
- It supports most audio and video formats
Pros
- Free for both Windows and MAC operating systems
- The cutter saves video in original quality
Cons
- It does not include basic video editing features
Part 3: Top 3 Free AVI Video Cutter on MAC
Are you looking for a great AVI video cutter for your MAC? Sadly, you have limited product choices as compared to Windows users. But to ensure you don’t waste time looking for a suitable tool, here’s a list of three AVI video cutting programs you can use on your Macintosh.
iMovie
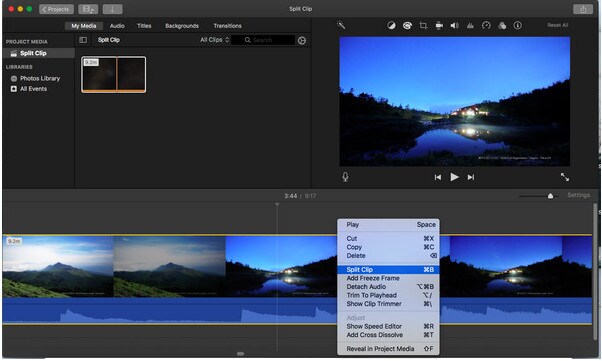
The first and foremost recommended software for free video cutting on MAC is Apple’s own tool, iMovie . It is a built-in program that comes with your system, so there is no need to spend extra on a video editor. iMovie allows you to browse and import most video files, including AVI, right from your computer. Also, this tool is equipped with multiple functions, such as audio editing, video quality enhancement, and much more.
This MAC’s video editor is ideal for beginners. Many home users and small business owners find this tool extremely simple, as they don’t like to be confused with complex features. So, if you want to make cuts to your video clips, start working on iMovie. And within a few clicks, you can trim or cut your videos for free.
Features
- Video cutting and trimming
- Cropping and rotation
- Effects and transitions
- Built-in themes
- HD and 4K video support
- Movie sharing
- Audio adjustments
- Chroma screen controls
- Character tracking
Pros
- Free to use for MAC users
- Clean timeline
- One-click video cutting and trimming
- Easy-to-remember keyboard shortcuts
- Direct share projects to your social media, like YouTube
Cons
- It takes a lot of time to export videos
- iMovie needs high HDD storage space
VideoPad by NCH

VideoPad by NCH is a beginner-level video editor with all the basic features. The software is specifically designed for home movie makers. That is why VideoPad is easy to understand and use.
VideoPad is entirely free of cost for non-commercial purposes, but it has limited features. On the other hand, if you want to enjoy full traits, you can purchase the tool.
VideoPad supports video files, including AVI, WMV, MPEG, MOV, MP4, ASF, and XviD. Likewise, you can also burn movies to Blu-ray, DVD, HD-DVD, or CD. And most importantly, you can easily cut or trim AVI videos on your MAC, as the software is available on both MAC and Windows systems.
Features
- Audio tools
- Video rotation
- Video sharing
- Visual effects
- Video transitions
- 3D Video editing
- Color correction
- Overlays and texts
- Video optimization
- Great plugin support
- Direct video uploading
- Multiple video resolutions
- Video cutting and trimming
- Files exportation to various devices
- Stereoscopic conversion from 2D to 3D
Pros
- You can use the basic tools for free
- Allows 360-degree video production
- It supports a wide range of video formats
- Compatible with MAC and Windows computers
Cons
- The auto speech feature performs poorly
- The free version has annoying notifications
Xilisoft Video Cutter
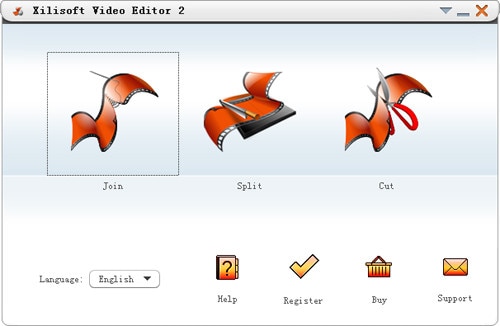
Xilisoft Video Cutter is the simplest tool to cut videos on MAC. This software has a straightforward option to cut the clip after importing it to the timeline. The program is fast and has a user-friendly interface.
Moreover, you can polish your videos by merging multiple clips or increasing the video quality once you’re done with the cutting process. At the same time, this video cutter allows you to import all video formats, including XviD, DivX, MOV, FLV, MP4, MPEG-4/, MKV, MPEG, WMV, and AVI.
Features
- Video joining
- Support multiple output video formats, including HD
Pros
- Easy video cutting and merging
- It doesn’t require a large storage space
- Extremely uncomplicated interface
- Real-time preview to make better cuts
- Available on both MAC and Windows systems
Cons
- The trial version is free to use but limits you from enjoying extra features
Part 4: Top 3 Free AVI Video Cutter on Android
After capturing nice videos with your Android mobile phone, you may need to cut unnecessary scenes to make your clips look professional. While there are numerous Android cutters, not all support the AVI format. So below, you will find the 3 best AVI video cutters for Android, which are free to use.
Quick – Video Editor & Maker
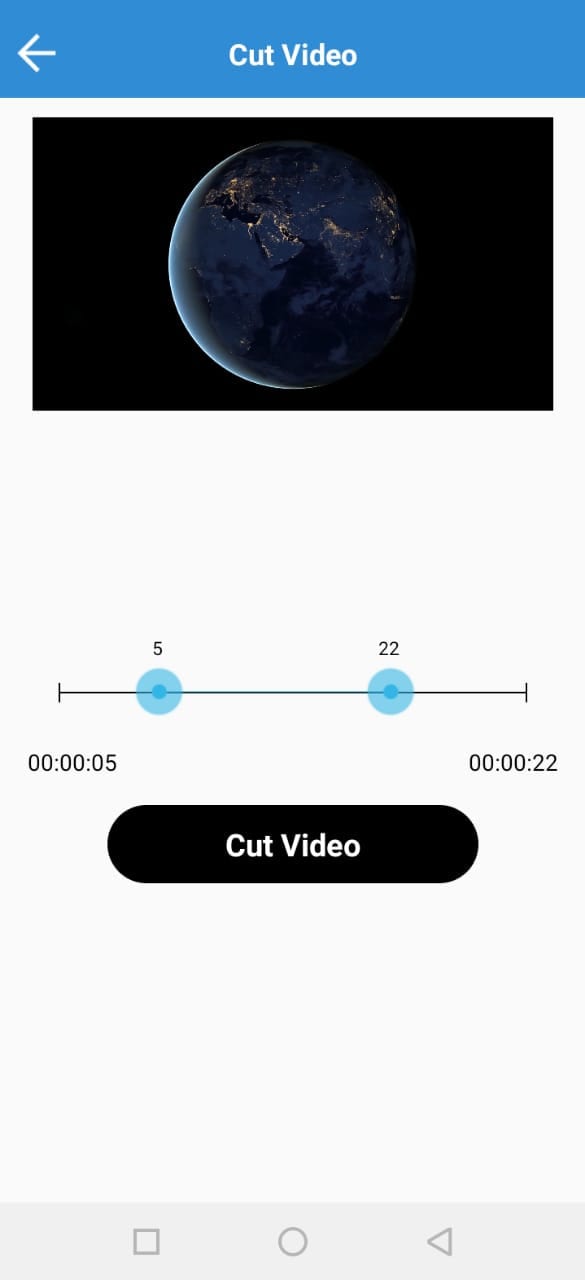
Quick – Video Editor & Maker is a free video editor with PRO results. Many photographers and vloggers love using this app to cut clips immediately. Furthermore, the application offers a wide range of options to assure you don’t have to look to any other tool to rotate or compress video. Quick – Video Editor & Maker lets you import videos in all major formats, including AVI, MPEG, WMA, and more.
Features
- Video cutting, fading, and rotation
- Speed control tools
- Conversion from video to GIF
Pros
- Free app
- Simple interface
Cons
- Lack of updates
- Some users complain about app crash
Funimate Video Editor & Maker
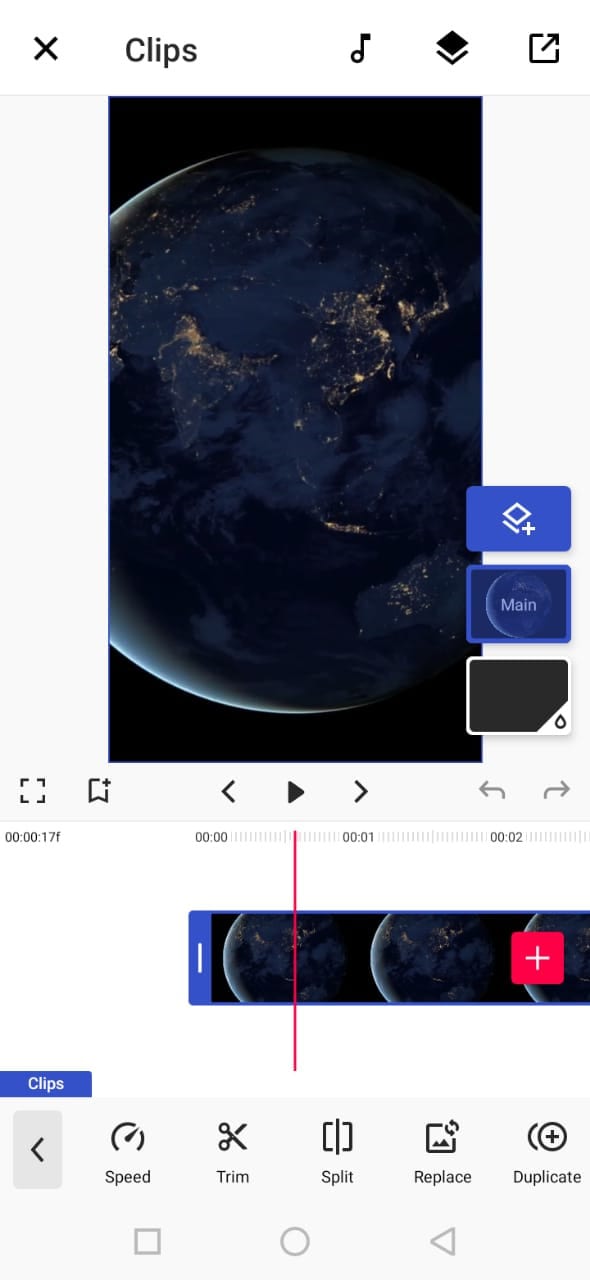
If you want to make some professional-grade video edits quickly, you are welcome to download and use Funimate Video Editor & Maker on your Android device. It’s a free tool to cut videos. It has an easy procedure, and you can cut AVI videos in a few seconds.
Plus, you can use the app to add custom animations, effects, and many other exciting elements. You can share your makes on social media like TikTok, Instagram, and other platforms. Contrarily, the app itself is a community with millions of Funimate-users who share their creations daily. You can also join or watch videos from other creators to learn more about new techniques and trends in video editing.
Features
- Video trimming and splitting
- Animation and cropping
- Filters and AI effects
- Speed adjustment
- Keyframing and video merging
Pros
- Free Android application with several editing tools
- Easy trimming, splitting, and cropping
- Aspect ratio, border, and color customization
- Direct social media sharing
Cons
- Free users cannot use templates
- The free version stamps watermarks on each project
Part 5: Top 3 Free AVI Video Cutter on iPhone
No wonder iPhone’s camera captures high-quality videos. But the problem begins when there’s no free app to cut AVI videos. So if you’re recording great spots, but deep inside, you really want to remove some parts, then these 3 free AVI video cutters will work smoothly on your iPhone.
Cut, Trim, Split Video Editor
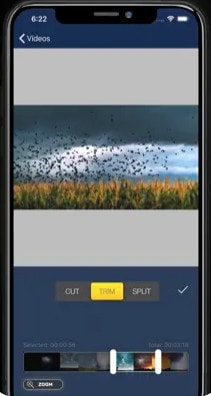
Download Cut, Trim, Split Video Editor on your iPhone to delete/cut unwanted portions of your video clips. The tool is also best for trimming iPhone-recorded clips without messing with the frames. Or, if you just want to split the video into multiple parts for your next WhatsApp status, this iPhone app can do that job for you.
The app supports multiple video file types, including MOV, MP4, AVI, MPEG, MPEG-2, and 3GPP
Features
- Easy trimming and cutting video clips
- Splitting big-sized videos into two smaller clips
- Import video from file-sharing platforms, like iCloud, using Wi-Fi
Pros
- Free app for fast video cutting and sharing
- Simple UI interface
Cons
- The free version shows advertisements
Splice - Video Editor & Maker
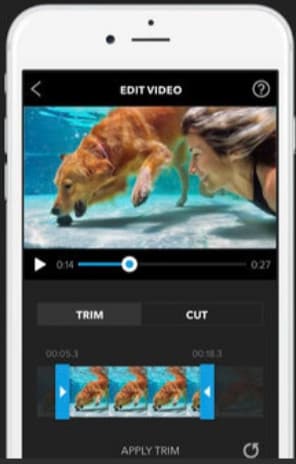
Splice is an extraordinary video editor that makes it easy to make fully customized and professional videos from your iPhone. The app is also best for video cutting. Besides, it has many interesting features, which you can use from your device.
Features
- Cutting, trimming, and cropping your videos
- Exposure, saturation, and exposure adjustment
- Slow and fast motion with speed ramping option
- Video masking and overlay
- Color correction and text overlays
Pros
- Free basic features, such as video cutting
- iTunes integration
- Supports AVI video input
- User-friendly application
- Access to the music library
- Quick and simple social sharing
Cons
- Output videos require high mobile storage space
Part 6: Top 3 Free AVI Video Cutter Online
Don’t want to install video cutters on your MAC, Windows, smartphone, or any other device? No problem! You can use online video cutters and trimmers to split, cut, or trim your clips for free.
However, the problem still exists in online tools, as not all web-based editors allow importing AVI files. So to save your time and energy, you can directly go to the following online AVI cutters to complete your tasks.
Kapwing
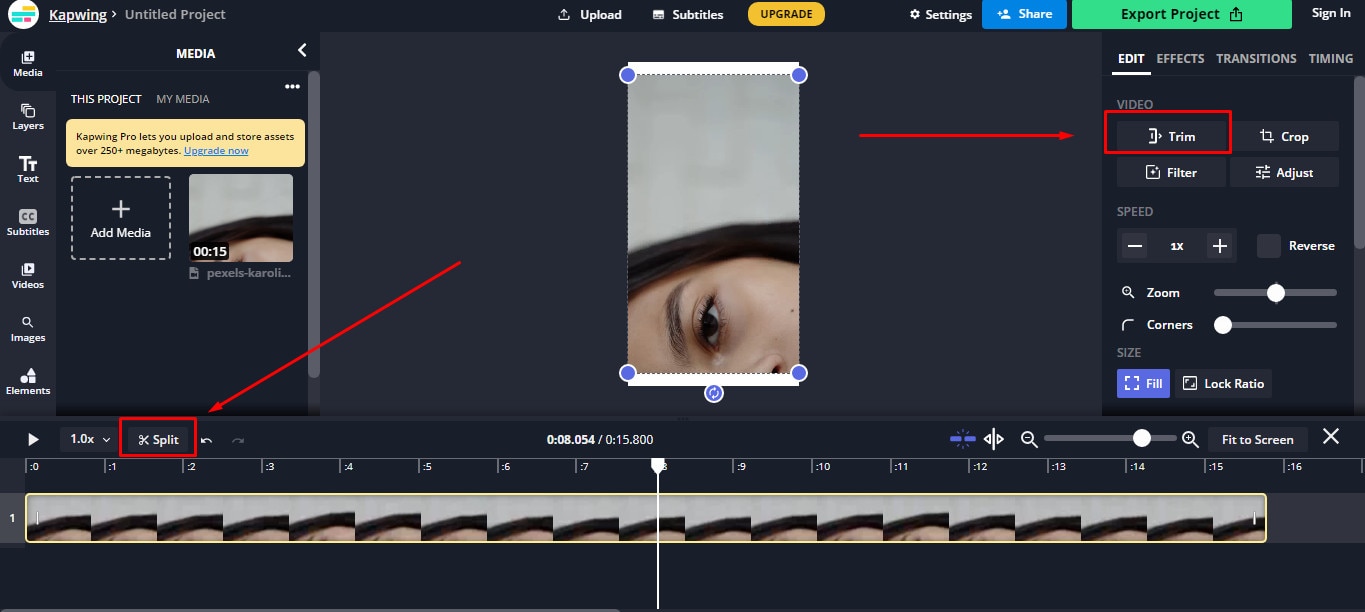
Kapwing is an online video editor best for casual creatives, such as Vloggers and YouTubers. You can use this web-based platform to cut your videos. Gladly, Kapwing supports all AVI incomings. You can upload your AVI video files to this platform and use its trim or split feature. To do that, you need to upload your AVI video and choose the “Trim” or “Split” tool to see the magic. Once done with the trimming process, you can explore Kapwing’s other incredible traits and apply them to your project.
Features
- Video splitting, trimming, and merging
- Audio capturing
- Speed adjustment
- Image and video library
- Text editing and overlay
- Auto-generated subtitles
- Several collaboration tools
- Video creation from scratch
- Templates, shapes, and emojis
- Simple drag-and-drop interface
- Video transitions, plugins, and elements
Pros
- Free online video trimmer
- User-friendly interface
- You can export 30-minutes long projects
- Allows you to export unlimited videos with a watermark
- One watermark-free video export is available each month
Cons
- Cannot export long videos with a free account
- Only 10 minutes transcription limit is available for free users
- You need to purchase a monthly or annual subscription to remove the watermark from multiple videos
Clideo
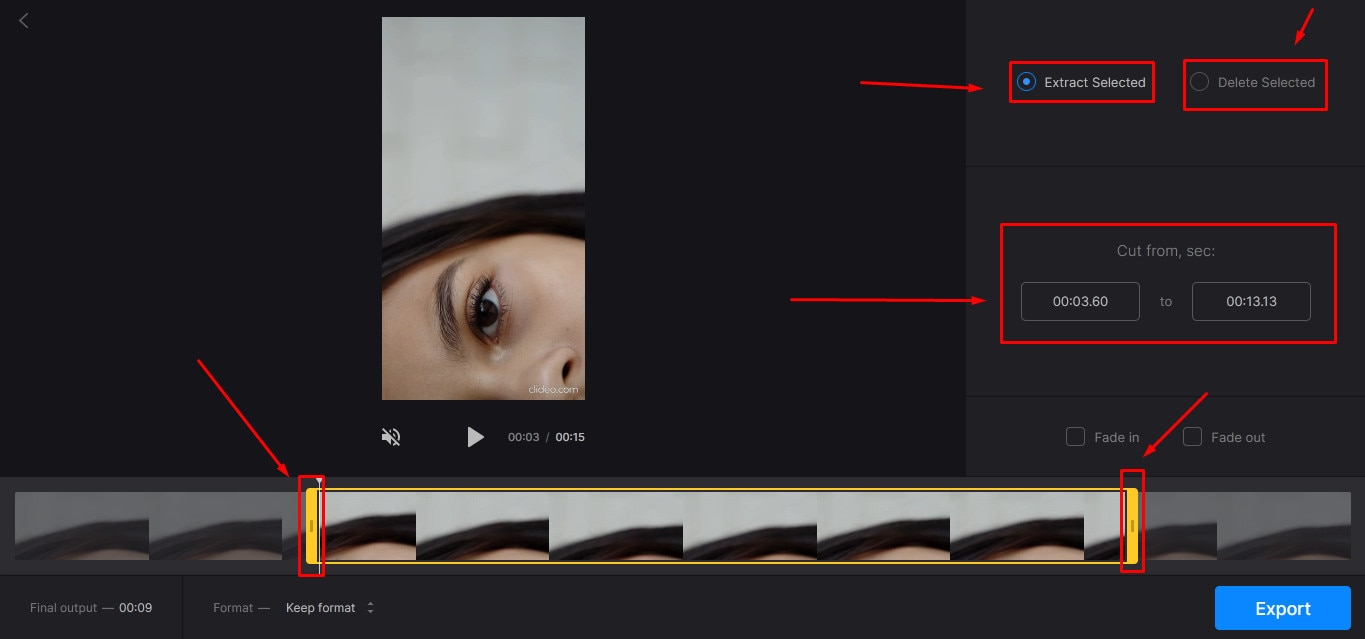
Clideo is not just a video cutter but an online solution to all your video editing problems. The tool is super popular, with 4 million+ users a month. And why not? This is one of those web-based platforms that allow AVI video files to be imported and exported without converting them into any other formats.
Nevertheless, if you’re only looking for video cutting options, this tool makes your life easy. Simply upload your video, and select the portion of it by setting start and end times. Choose whether you want to delete or extract the selected part from the clip, and hit the “Export” button.
And within a few moments, you can enjoy a trimmed video clip. And if you plan to be more creative, you can look for other Clideo features to make videos more fascinating.
Features
- Video combining and cutting
- Resize and crop clips
- Compress your videos
- Add text and subtitles
- Add music to your video files
- Filters and color correction tools
- Audio mute, cutting, and muting
- Video rotation, flipping, and speed adjustment
Pros
- Basic tools can be used for free
- Best for beginners and intermediate users
- Ideal for AVI videos and also supports other video formats
Cons
- You cannot use the free version regularly
Aspose
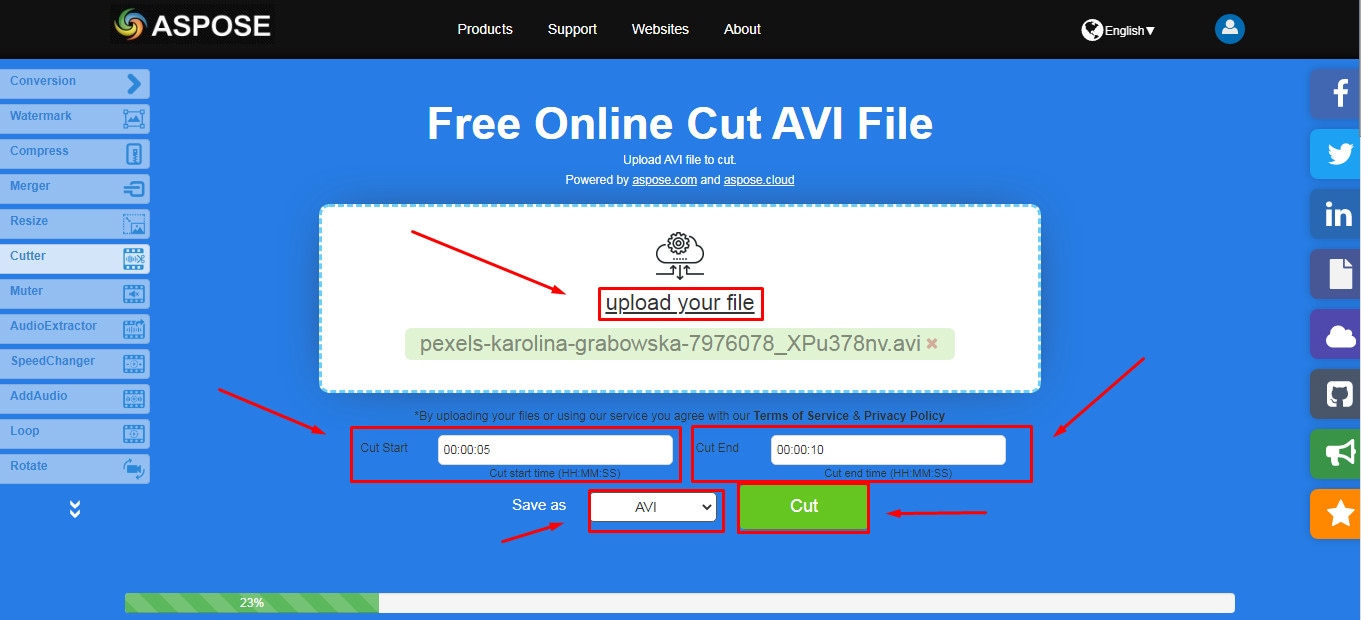
Aspose is a free web-based application to cut clips. You can use this tool on any operating system. It supports all major video file formats, including AVI, MKV, MOV, MP4, FLV, WMV, WEBM, and GIF. Additionally, you can use Aspose for various other reasons, such as audio extraction, video resizing, and more.
Features
- Video cutting and compressing
- Looping, rotation, and video merging
- Adding watermarks on videos
- Sound muting
- Speed change and audio addition
Pros
- Aspose is a free online tool
- It offers straightforward options to cut and edit videos
Cons
- No color correction option
- Slow video cutting process
- Lacks timeline and other valuable features
Part 7: Bottom Line
Tired of finding AVI cutters? Relax and try these top 16 AVI video cutters for Windows, MAC, iPhone, Android, and online. Almost all these tools are free to use and are extremely handy. On the other hand, if you want to cut and trim videos professionally, download Filmora and follow the step-by-step guide in this article for making clean cuts.
Part 8: FAQs
Q1. How do I trim an AVI video?
To trim an AVI video file, ensure that the software or tool you use supports AVI input. Generally, you need to upload or import a clip on the program, select the portion of the video, and apply the cut/trim feature to make it happen.
Q2. Which is the best online video cutter?
Kapwing and Clideo are the two best online video cutters you can use for free. Both web-based tools also allow you to cut your AVI videos.
Q3. Which is the best video cutter and joiner software?
Filmora, iMovie, and Kapwing are some of the best video cutters and joiner tools. These video editors are also free to use and come with different features.
Q4. How do I trim an AVI file in Windows 10?
Trimming an AVI video file in Windows 10 is very simple. Launch the Microsoft Photos (Photo App) application on your computer, add clip, and select the “Trim” tool to trim a specific video part.
Q5. How can I cut a video on my computer for free?
MAC and Windows users can download Filmora to cut videos for free. Filmora also offers a wide range of other features to make your clips exciting. Contrarily, Windows users can use the built-in Photo App in Windows 10 or download Gihosoft or Handbrake software to cut clips. Likewise, MAC users can download VideoPad, Xilisoft Video Cutter, or iMovie for free.
With the growing fame of video-sharing and social media applications like Twitter, Instagram, and TikTok, the demand for simple and fast video cutting and trimming tools has dramatically increased. Nowadays, you don’t have to play with complex video editing tools to produce high-quality videos.
Thanks to several user-friendly editing software to make things easy for everybody. However, finding the right programs to trim/cut videos is still challenging, especially in AVI format.
But, guess what? These top 16 AVI video cutters for Windows, MAC, Android, iPhone, and online will make video cutting and trimming fun, especially when you learn to do it using Filmora.
In this Article
Part 1: Best AVI Video Cutter to Trim/Cut AVI Video on Windows and MAC – Filmora Video Cutter [with steps}
Part 2: Top 3 Free AVI Video Cutter on Windows
Part 3: Top 3 Free AVI Video Cutter on MAC
Part 4: Top 3 Free AVI Video Cutter on Android
Part 5: Top 3 Free AVI Video Cutter on iPhone
Part 6: Top 3 Free AVI Video Cutter Online
Part 7: Bottom Line
Part 8: FAQs
Part 1: Best AVI Video Cutter to Trim/Cut AVI Video on Windows and MAC – Filmora Video Cutter [with steps]
Filmora by Wondershare is a star video editor with outstanding outcomes. Whether you have a MAC or Windows PC, you can download Filmora regardless of your operating system. The program best serves those who intend to make high-quality videos. The software provides editing support for all video formats, including AVI.
Although Filmora is an affordable editor with tons of audio and video editing options, you can still download the software for free and create projects if watermarks don’t bother you. Moreover, you can count this tool’s capabilities in cropping, resizing, and Chroma screen support. But that’s not the only sweet fruit.
In fact, Filmora is equipped with many jaw-dropping features, including preset templates, auto beat sync, split-screen, speed ramping, motion tracking, keyframing, creative transitions, titles, filters, and much more. And the best part is, you can learn and understand Filmora in no time. That’s why the program is loved and supported by all types of users.
So does Filmora helps cut and trim AVI videos? Yes! It does if you follow these steps correctly.
Step 1: Download Filmora Video Editor
First, download Filmora Video Editor by choosing your operating system, as seen in the screenshot below.
Run the setup and let it finish without any pause or break.
Step 2: Import Your Video to Filmora Video Editor
Importing your AVI video is a very simple process. Just click on the “Film Clip” icon.
It will open a new window screen on your computer to select the video from the directory. Find the clip you want to import and cut. Use your mouse to select it and click the “Open” button.
The video will be loaded in the “Media” folder of Filmora. The clip’s thumbnail should be visible to assure you have done everything correctly.
If you can see that, let’s go to the next step.
Step 3: Drag and Drop Video to Filmora’s Timeline
Select the video in the media folder by clicking over it once. Now, without leaving the hold of the left button of your mouse, slide the video down to the track in the timeline.
After that, a message will pop up, asking about your preference for the project settings. It is recommended to choose the “Match to Media” option unless you’re an experienced video editor who knows how to play with the resolution and frame rates.
You will see the video on the timeline with its preview on the “Preview Screen” on the right side of the interface.
Step 4: Cutting Your Video in Filmora
Here comes the core step you have been waiting for. But before you go any further, you need to know about the “Playhead.”
Playhead is an orange-reddish marker you can find on the timeline.
It has an important role in cutting your videos.
So, move the playhead to your desired frame and click on the “scissor” icon to make the “starting” cut.
As soon as you do it, you will see that the single clip is now divided into two parts similar to this image.
The “Red” marked area in the above screenshot ensures a gap between the clips on the timeline. The “Yellow” arrows confirm two separate clips of the same video.
Place the two clips together as seen in this “Green” area.
And place the playhead anywhere on the clip. And click on the “scissor” icon once again to make the “ending” cut (second cut).
If done correctly, there should be three clips now of the same video, as you can observe in this screenshot.
Again, the “Red” area in the above photo indicates the gap, and the “Yellow” area ensures a third segment of the video.
Note: The gaps you can see in the divided clips are made intentionally for understanding. Practically, Filmora doesn’t move the clip or make gaps in between after you have made the cuts.
Keep in mind that there are three clips on the timeline. Now, if you want to remove the second clip from the video, you need to select that portion first by clicking on it.
Then, right-click on the mouse and choose “Cut” from the menu.
Within a semi-second, the selected portion will be removed from the timeline. And you will be able to see the remaining parts of the video. Now, pull the second clip using your mouse and place it at the end of the first clip without leaving a gap in between.
Then, click the “Play” button under the preview screen to see the results.
You can see in the above two screenshots that there’s a jump between the scenes due to cuts, confirming that video has been cut significantly.
Step 5: Trimming Your Video in Filmora
Remember that cutting and trimming in Filmora are two different things. Trimming allows you to remove a particular video part from visibility without deleting the portion.
So feel free to skip this step if you’re happy learning the cutting technique. But if you’re interested in trimming, here’s how you do it.
Take your mouse cursor at the beginning or end of the clip you want to trim. Keep holding the clip’s corner and slide the mouse back or front to trim the part
Note: Since the trim tool doesn’t delete the video, the final project based on trimming will be of a larger size. Therefore, it is advised to cut videos rather than trimming for fast rendering, better results, and small video size.
Step 6: Save Project and Export Your Cut/Trimmed AVI Video
Choose “Save Project” from the “File” menu.
Select the directory to save the project, rename the new video, and click the “Save” button.
Click on the “Export” button to save the video in AVI or any other video format of your choice on your computer.
Part 2: Top 3 Free AVI Video Cutter on Windows
As a Windows user, finding an excellent video cutter is relatively easy. However, not all software permits importing AVI videos. In the same way, some video trimmers come at a price. So if you really don’t want to pay and enjoy cutting your AVI files, try using these three video cutting tools.
Microsoft Photos (Windows 10)
Microsoft Photos or Photo App is a free photo viewer and editor with your Windows 10. It offers incredible photo editing and enhancement along with different tools for organizing and editing videos in a very friendly way. Likewise, you can create drawings over the videos and add 3D effects and background music to your clips.
You can also trim AVI videos with Microsoft Photos quickly. All you need to do is open your clip with the Photo App, choose the “Trim” option, select a portion of the video you want to trim, and go ahead.
That’s it!
Features
- Quick video trimming
- Cool text effects
- 3D library and effects
- It has a clear interface
- You can find and tag people’s faces
- The program has 15+ filters for editing
- Motion tracking option for drawing on videos
- Allows you to view and organize your files easily
Pros
- Microsoft Photos is free for Windows users
- It automatically creates albums
- The program has a touch-friendly interface
- You can integrate your OneDrive with the software
Cons
- Lacks before and after view
- Not included in older Windows versions
- It doesn’t support selective focus or panorama stitching
Handbrake
Handbrake is best-known for its video transcoding traits. Unlike typical video editors, this open-source tool includes limited options to rip Blu-rays and DVDs. Moreover, you can mix the 5.1 soundtracks and convert them to stereo to make the audio compatible with your TV speakers.
But the exciting thing about Handbrake is that you can use this software on your macOS 10.13 or later versions to cut AVI videos for free. However, it’s a bit technical process, as there’s no timeline to help you trim or make cuts on the clips directly with the help of your mouse.
You are required to mention a time range (seconds, minutes, or hours) to keep a specific part of the video while the software removes the non-ranged parts of the clip. For instance, you have a video of 10 seconds. You start the range from 5 seconds and end it at 10 seconds. So, the first four seconds of the video will be cut from the entire clip.
Features
- Video cutting, cropping, and resizing
- Low-quality and old video restoration
- Video conversion from any format to MKV or MP4
Pros
- Handbrake is free
- You can convert batch videos with ease
- It supports MAC, Windows, and Linux OS
- Allows you to import video files in all major formats
- The software comes with various video conversion presets
Cons
- Handbrake is not a user-friendly tool
- The video file output is limited to two formats (MKV and MP4) only
Gihosoft Video Cutter
Gihosoft is a clean, free, lossless video cutter on your Windows PC. It’s a simple tool that helps you cut video files into various output formats. So be it AVI, MPEG, or any other file, with Gihosoft, everything becomes handy.
Another fascinating fact about this software is that it allows you to cut videos in three simple steps without losing the quality. So right after installing the program, you simply need to import your file, choose the start and end time, and click the “Cut” button to remove the part of the video.
Features
- Fast video and audio cutting
- Easy drag and drop audio/video files
- It supports most audio and video formats
Pros
- Free for both Windows and MAC operating systems
- The cutter saves video in original quality
Cons
- It does not include basic video editing features
Part 3: Top 3 Free AVI Video Cutter on MAC
Are you looking for a great AVI video cutter for your MAC? Sadly, you have limited product choices as compared to Windows users. But to ensure you don’t waste time looking for a suitable tool, here’s a list of three AVI video cutting programs you can use on your Macintosh.
iMovie
The first and foremost recommended software for free video cutting on MAC is Apple’s own tool, iMovie . It is a built-in program that comes with your system, so there is no need to spend extra on a video editor. iMovie allows you to browse and import most video files, including AVI, right from your computer. Also, this tool is equipped with multiple functions, such as audio editing, video quality enhancement, and much more.
This MAC’s video editor is ideal for beginners. Many home users and small business owners find this tool extremely simple, as they don’t like to be confused with complex features. So, if you want to make cuts to your video clips, start working on iMovie. And within a few clicks, you can trim or cut your videos for free.
Features
- Video cutting and trimming
- Cropping and rotation
- Effects and transitions
- Built-in themes
- HD and 4K video support
- Movie sharing
- Audio adjustments
- Chroma screen controls
- Character tracking
Pros
- Free to use for MAC users
- Clean timeline
- One-click video cutting and trimming
- Easy-to-remember keyboard shortcuts
- Direct share projects to your social media, like YouTube
Cons
- It takes a lot of time to export videos
- iMovie needs high HDD storage space
VideoPad by NCH
VideoPad by NCH is a beginner-level video editor with all the basic features. The software is specifically designed for home movie makers. That is why VideoPad is easy to understand and use.
VideoPad is entirely free of cost for non-commercial purposes, but it has limited features. On the other hand, if you want to enjoy full traits, you can purchase the tool.
VideoPad supports video files, including AVI, WMV, MPEG, MOV, MP4, ASF, and XviD. Likewise, you can also burn movies to Blu-ray, DVD, HD-DVD, or CD. And most importantly, you can easily cut or trim AVI videos on your MAC, as the software is available on both MAC and Windows systems.
Features
- Audio tools
- Video rotation
- Video sharing
- Visual effects
- Video transitions
- 3D Video editing
- Color correction
- Overlays and texts
- Video optimization
- Great plugin support
- Direct video uploading
- Multiple video resolutions
- Video cutting and trimming
- Files exportation to various devices
- Stereoscopic conversion from 2D to 3D
Pros
- You can use the basic tools for free
- Allows 360-degree video production
- It supports a wide range of video formats
- Compatible with MAC and Windows computers
Cons
- The auto speech feature performs poorly
- The free version has annoying notifications
Xilisoft Video Cutter
Xilisoft Video Cutter is the simplest tool to cut videos on MAC. This software has a straightforward option to cut the clip after importing it to the timeline. The program is fast and has a user-friendly interface.
Moreover, you can polish your videos by merging multiple clips or increasing the video quality once you’re done with the cutting process. At the same time, this video cutter allows you to import all video formats, including XviD, DivX, MOV, FLV, MP4, MPEG-4/, MKV, MPEG, WMV, and AVI.
Features
- Video joining
- Support multiple output video formats, including HD
Pros
- Easy video cutting and merging
- It doesn’t require a large storage space
- Extremely uncomplicated interface
- Real-time preview to make better cuts
- Available on both MAC and Windows systems
Cons
- The trial version is free to use but limits you from enjoying extra features
Part 4: Top 3 Free AVI Video Cutter on Android
After capturing nice videos with your Android mobile phone, you may need to cut unnecessary scenes to make your clips look professional. While there are numerous Android cutters, not all support the AVI format. So below, you will find the 3 best AVI video cutters for Android, which are free to use.
Quick – Video Editor & Maker
Quick – Video Editor & Maker is a free video editor with PRO results. Many photographers and vloggers love using this app to cut clips immediately. Furthermore, the application offers a wide range of options to assure you don’t have to look to any other tool to rotate or compress video. Quick – Video Editor & Maker lets you import videos in all major formats, including AVI, MPEG, WMA, and more.
Features
- Video cutting, fading, and rotation
- Speed control tools
- Conversion from video to GIF
Pros
- Free app
- Simple interface
Cons
- Lack of updates
- Some users complain about app crash
Funimate Video Editor & Maker
If you want to make some professional-grade video edits quickly, you are welcome to download and use Funimate Video Editor & Maker on your Android device. It’s a free tool to cut videos. It has an easy procedure, and you can cut AVI videos in a few seconds.
Plus, you can use the app to add custom animations, effects, and many other exciting elements. You can share your makes on social media like TikTok, Instagram, and other platforms. Contrarily, the app itself is a community with millions of Funimate-users who share their creations daily. You can also join or watch videos from other creators to learn more about new techniques and trends in video editing.
Features
- Video trimming and splitting
- Animation and cropping
- Filters and AI effects
- Speed adjustment
- Keyframing and video merging
Pros
- Free Android application with several editing tools
- Easy trimming, splitting, and cropping
- Aspect ratio, border, and color customization
- Direct social media sharing
Cons
- Free users cannot use templates
- The free version stamps watermarks on each project
Part 5: Top 3 Free AVI Video Cutter on iPhone
No wonder iPhone’s camera captures high-quality videos. But the problem begins when there’s no free app to cut AVI videos. So if you’re recording great spots, but deep inside, you really want to remove some parts, then these 3 free AVI video cutters will work smoothly on your iPhone.
Cut, Trim, Split Video Editor
Download Cut, Trim, Split Video Editor on your iPhone to delete/cut unwanted portions of your video clips. The tool is also best for trimming iPhone-recorded clips without messing with the frames. Or, if you just want to split the video into multiple parts for your next WhatsApp status, this iPhone app can do that job for you.
The app supports multiple video file types, including MOV, MP4, AVI, MPEG, MPEG-2, and 3GPP
Features
- Easy trimming and cutting video clips
- Splitting big-sized videos into two smaller clips
- Import video from file-sharing platforms, like iCloud, using Wi-Fi
Pros
- Free app for fast video cutting and sharing
- Simple UI interface
Cons
- The free version shows advertisements
Splice - Video Editor & Maker
Splice is an extraordinary video editor that makes it easy to make fully customized and professional videos from your iPhone. The app is also best for video cutting. Besides, it has many interesting features, which you can use from your device.
Features
- Cutting, trimming, and cropping your videos
- Exposure, saturation, and exposure adjustment
- Slow and fast motion with speed ramping option
- Video masking and overlay
- Color correction and text overlays
Pros
- Free basic features, such as video cutting
- iTunes integration
- Supports AVI video input
- User-friendly application
- Access to the music library
- Quick and simple social sharing
Cons
- Output videos require high mobile storage space
Part 6: Top 3 Free AVI Video Cutter Online
Don’t want to install video cutters on your MAC, Windows, smartphone, or any other device? No problem! You can use online video cutters and trimmers to split, cut, or trim your clips for free.
However, the problem still exists in online tools, as not all web-based editors allow importing AVI files. So to save your time and energy, you can directly go to the following online AVI cutters to complete your tasks.
Kapwing
Kapwing is an online video editor best for casual creatives, such as Vloggers and YouTubers. You can use this web-based platform to cut your videos. Gladly, Kapwing supports all AVI incomings. You can upload your AVI video files to this platform and use its trim or split feature. To do that, you need to upload your AVI video and choose the “Trim” or “Split” tool to see the magic. Once done with the trimming process, you can explore Kapwing’s other incredible traits and apply them to your project.
Features
- Video splitting, trimming, and merging
- Audio capturing
- Speed adjustment
- Image and video library
- Text editing and overlay
- Auto-generated subtitles
- Several collaboration tools
- Video creation from scratch
- Templates, shapes, and emojis
- Simple drag-and-drop interface
- Video transitions, plugins, and elements
Pros
- Free online video trimmer
- User-friendly interface
- You can export 30-minutes long projects
- Allows you to export unlimited videos with a watermark
- One watermark-free video export is available each month
Cons
- Cannot export long videos with a free account
- Only 10 minutes transcription limit is available for free users
- You need to purchase a monthly or annual subscription to remove the watermark from multiple videos
Clideo
Clideo is not just a video cutter but an online solution to all your video editing problems. The tool is super popular, with 4 million+ users a month. And why not? This is one of those web-based platforms that allow AVI video files to be imported and exported without converting them into any other formats.
Nevertheless, if you’re only looking for video cutting options, this tool makes your life easy. Simply upload your video, and select the portion of it by setting start and end times. Choose whether you want to delete or extract the selected part from the clip, and hit the “Export” button.
And within a few moments, you can enjoy a trimmed video clip. And if you plan to be more creative, you can look for other Clideo features to make videos more fascinating.
Features
- Video combining and cutting
- Resize and crop clips
- Compress your videos
- Add text and subtitles
- Add music to your video files
- Filters and color correction tools
- Audio mute, cutting, and muting
- Video rotation, flipping, and speed adjustment
Pros
- Basic tools can be used for free
- Best for beginners and intermediate users
- Ideal for AVI videos and also supports other video formats
Cons
- You cannot use the free version regularly
Aspose
Aspose is a free web-based application to cut clips. You can use this tool on any operating system. It supports all major video file formats, including AVI, MKV, MOV, MP4, FLV, WMV, WEBM, and GIF. Additionally, you can use Aspose for various other reasons, such as audio extraction, video resizing, and more.
Features
- Video cutting and compressing
- Looping, rotation, and video merging
- Adding watermarks on videos
- Sound muting
- Speed change and audio addition
Pros
- Aspose is a free online tool
- It offers straightforward options to cut and edit videos
Cons
- No color correction option
- Slow video cutting process
- Lacks timeline and other valuable features
Part 7: Bottom Line
Tired of finding AVI cutters? Relax and try these top 16 AVI video cutters for Windows, MAC, iPhone, Android, and online. Almost all these tools are free to use and are extremely handy. On the other hand, if you want to cut and trim videos professionally, download Filmora and follow the step-by-step guide in this article for making clean cuts.
Part 8: FAQs
Q1. How do I trim an AVI video?
To trim an AVI video file, ensure that the software or tool you use supports AVI input. Generally, you need to upload or import a clip on the program, select the portion of the video, and apply the cut/trim feature to make it happen.
Q2. Which is the best online video cutter?
Kapwing and Clideo are the two best online video cutters you can use for free. Both web-based tools also allow you to cut your AVI videos.
Q3. Which is the best video cutter and joiner software?
Filmora, iMovie, and Kapwing are some of the best video cutters and joiner tools. These video editors are also free to use and come with different features.
Q4. How do I trim an AVI file in Windows 10?
Trimming an AVI video file in Windows 10 is very simple. Launch the Microsoft Photos (Photo App) application on your computer, add clip, and select the “Trim” tool to trim a specific video part.
Q5. How can I cut a video on my computer for free?
MAC and Windows users can download Filmora to cut videos for free. Filmora also offers a wide range of other features to make your clips exciting. Contrarily, Windows users can use the built-in Photo App in Windows 10 or download Gihosoft or Handbrake software to cut clips. Likewise, MAC users can download VideoPad, Xilisoft Video Cutter, or iMovie for free.
Wav Converter 101: A Step-by-Step Tutorial
The Only Guide You’ll Ever Need to Learn About Wav Converter
An easy yet powerful editor
Numerous effects to choose from
Detailed tutorials provided by the official channel
Nowadays, people are more addicted to making reels, short videos, YouTube shorts, etc. This is where the WAV converter comes in.
It is the most versatile audio format that is compatible with almost all devices. WAV audio format is very useful for digital content creators. So, without any further ado, let’s dive into detailed facts and benefits of WAV audio format:

In this article
01 [Basic Knowledge About the WAV Format](#Part 1)
02 [The Best 6 Fast and Easy WAV Converter Online Free ](#Part 2)
03 [5 Quick Ways to Convert MP4 to WAV Audio Files Online and Offline](#Part 3)
04 [5 Best YouTube to WAV Converter](#Part 4)
Part 1 Basic Knowledge About the WAV Format
01What is a WAV file?
WAV is an audio format that is developed by IBM & Microsoft. This audio file format is specially created to be used for uncompressed audio files on Microsoft Windows systems. It is used for storing audio bitstreams on PCs, which are encoded in the Linear Pulse-Code Modulation (LPCM) format.
02What’s the WAV audio format?
WAV audio file format is also known as Waveform audio file format. It is a subset of Microsoft’s RIFF specification. This audio format starts with a file header, which is followed by data chunks. There are three main types of chunks in a WAV file, which are given as follows:
● ‘fmt” chunk – This chunk is used to specify the data format.
● ‘data” chunk – This chunk contains the actual sample of data.
● ‘RIFF” chunk – This chunk is mainly used to identify a WAV file.
03Advantages of Using WAV
There are the following advantages of using a WAV audio file format:
● WAV audio file gives the best sound quality, which resembles the sound coming from the original source of the sound.
● WAV files are primarily used for storing the recordings.
● WAV files can efficiently be converted into other different audio formats like MP3, and AIFF.
● This audio file format also allows the developers to move audio files between different computer platforms easily and freely.
● WAV file provides the benefit of easy editing to developers, podcasters, and other digital content creators.
04Is WAV Format Better than MP3?
Yes, WAV format is way better than MP3. It provides a better audio quality as compared to the MP3 file. Although MP3 files are smaller in size, they lack a good sound quality. Another major difference between a WAV file and an MP3 file is that the MP3 file enables easy editing and storage of compressed files, while on the other hand, the WAV file enables easy editing and storage of uncompressed audio files. Uncompressed files can always be easily converted into compressed files, which also helps in retaining the sound quality.
Part 2 The Best 6 Fast and Easy WAV Converter Online Free
There are numerous online tools that can be used to convert different audio file formats into WAV audio file format and vice versa. The best 6 tools that can be used for free to convert audio to WAV are given below:
● Zamzar : Zamzar is a free online tool that supports almost all types of audio files like MP3, MP4, WAV, etc. It allows the users to convert any type of audio file quickly and easily. The best part about this WAV converter is that it doesn’t require any additional software to be installed. Its simple user interface makes it easy for anyone to convert audio files into different formats.
● File ZigZag : This is an online WAV converter and supports many types of audio formats like MP2, MP3, M4A, WAV, etc. You just require to upload an audio file in this online tool and once it is converted into your desired format you will receive it through the mail.
● Free Audio Converter : This is a practical transcoding tool for audio files, capable of converting a sound file to multiple formats like MP3, OGG, WAV, and WMA, etc. It is an extremely easy-to-use interface and offers you the batch processing of files. It is one of the most demanded audio converters because of its ability to convert M4A to WAV.
● Online Audio Converter : Online audio converter is a free online app that can be used to convert audio files to other formats. This app supports all types of audio formats. This app also allows you to extract audio from a video.
● 3CX : Being one of the easiest programs used for conversion of files and formats it is widely used for the same. The most prominent advantage of this is that it can even convert the unsupported audio files to WAV format.
● To video WAV Converter: For mac, this audio converter is one of the best. It is easy to use and along with that, it supports a lot of different audio formats like MP3, M4A, WAV, etc. The finest thing about this converter is that it can process a large number of files and folders simultaneously.
Part 3 5 Quick Ways to Convert MP4 to WAV Audio Files Online and Offline
MP4 is the most familiar and widely used audio format, as it is compatible with almost every device nowadays. But podcasters and other digital content creators require to convert these files into WAV audio file format to retain the best sound quality. Here are some of the quick ways that can be used to convert MP4 to WAV format both online and offline:
● MediaHuman Audio Converter : This is software that can be used to convert MP4 to WAV format very easily. It has a drag and drops functionality that makes it easier to use. This software can be downloaded for free and is available for both Microsoft and MAC versions.
● Online uniconverter : Being one of the most popularly used online audio converters online uniconverter is extremely simple to use. This program not only converts MP4 to WAV but also supports other file formats like MP3, WAV, WMA, etc. It entitles you to select the quality of the output file.
● Cool Utilis: Another online converter that comprises a simple interface. It is widely available in 13 languages. The program supports the conversion of many other File types and formats. With this, you can also add files from google drive.
● ByClick Downloader : This is an amazing converter tool for Windows systems, which you can use to convert your file to WAV formats. With this downloader, you can also extract audio from YouTube videos. This tool also supports multiple formats like HD, MP3, MP4, AVI, etc.
● Switch Sound File Converter : It is one of the most suitable, easy to use, and comprehensive multi-format audio converters available out there. This supports different file formats and converts different files in seconds. The converter allows you to convert MP4 to WAV
Part 4 5 Best YouTube to WAV Converter
No matter your go-to genre, YouTube has always been the best place to listen to your choice. Since YouTube has practically endless content, which cannot be used for other tasks in their format, so here are a few tools that can be used to convert the format from YouTube to WAV:
● iTubeGo: This software comprises a wide variety of features that can allow you to perform multiple stuff on YouTube videos. This tool can simply be used to convert the YouTube video to any other format you wish to use it in.

● Ontiva: This web-based platform allows you to download as well as convert your YouTube videos to WAV audio format in an easy way. All you ought to do is just copy the URL of the video and paste it into the box given on this platform to convert its format.

● Freemake: Freemake is another tool that can convert your YouTube video to a WAV format in just three simple steps. All you need to do is copy and paste the URL from YouTube to Freemake and then the conversion will become a piece of cake.

● to: If you are someone, who is tired of converting your favorite YouTube video into WAV format at a slow speed? Then this is a solution to your problem, the tool offers you a high-speed conversion of YouTube video to WAV format.

● CoConvert: Another impressive web-based platform that allows you to convert YouTube video to the WAV format. This can be done in easy steps like copying and pasting the URL of the video.

Key Takeaways from This Episode
● The WAV file is an audio format that many digital content creators prefer because of its various advantages like high-quality sound.
● An enormous tech approach is that now it has become formally easier to convert multiple formats to WAV through multiple converters.
● These converters can easily be used to convert MP4 to WAV, M4A to WAV, soundcloud to WAV, and even YouTube videos to WAV format.
● In addition to this, many online and offline tools are used to convert these audio files very easily and quickly.
Nowadays, people are more addicted to making reels, short videos, YouTube shorts, etc. This is where the WAV converter comes in.
It is the most versatile audio format that is compatible with almost all devices. WAV audio format is very useful for digital content creators. So, without any further ado, let’s dive into detailed facts and benefits of WAV audio format:
In this article
01 [Basic Knowledge About the WAV Format](#Part 1)
02 [The Best 6 Fast and Easy WAV Converter Online Free ](#Part 2)
03 [5 Quick Ways to Convert MP4 to WAV Audio Files Online and Offline](#Part 3)
04 [5 Best YouTube to WAV Converter](#Part 4)
Part 1 Basic Knowledge About the WAV Format
01What is a WAV file?
WAV is an audio format that is developed by IBM & Microsoft. This audio file format is specially created to be used for uncompressed audio files on Microsoft Windows systems. It is used for storing audio bitstreams on PCs, which are encoded in the Linear Pulse-Code Modulation (LPCM) format.
02What’s the WAV audio format?
WAV audio file format is also known as Waveform audio file format. It is a subset of Microsoft’s RIFF specification. This audio format starts with a file header, which is followed by data chunks. There are three main types of chunks in a WAV file, which are given as follows:
● ‘fmt” chunk – This chunk is used to specify the data format.
● ‘data” chunk – This chunk contains the actual sample of data.
● ‘RIFF” chunk – This chunk is mainly used to identify a WAV file.
03Advantages of Using WAV
There are the following advantages of using a WAV audio file format:
● WAV audio file gives the best sound quality, which resembles the sound coming from the original source of the sound.
● WAV files are primarily used for storing the recordings.
● WAV files can efficiently be converted into other different audio formats like MP3, and AIFF.
● This audio file format also allows the developers to move audio files between different computer platforms easily and freely.
● WAV file provides the benefit of easy editing to developers, podcasters, and other digital content creators.
04Is WAV Format Better than MP3?
Yes, WAV format is way better than MP3. It provides a better audio quality as compared to the MP3 file. Although MP3 files are smaller in size, they lack a good sound quality. Another major difference between a WAV file and an MP3 file is that the MP3 file enables easy editing and storage of compressed files, while on the other hand, the WAV file enables easy editing and storage of uncompressed audio files. Uncompressed files can always be easily converted into compressed files, which also helps in retaining the sound quality.
Part 2 The Best 6 Fast and Easy WAV Converter Online Free
There are numerous online tools that can be used to convert different audio file formats into WAV audio file format and vice versa. The best 6 tools that can be used for free to convert audio to WAV are given below:
● Zamzar : Zamzar is a free online tool that supports almost all types of audio files like MP3, MP4, WAV, etc. It allows the users to convert any type of audio file quickly and easily. The best part about this WAV converter is that it doesn’t require any additional software to be installed. Its simple user interface makes it easy for anyone to convert audio files into different formats.
● File ZigZag : This is an online WAV converter and supports many types of audio formats like MP2, MP3, M4A, WAV, etc. You just require to upload an audio file in this online tool and once it is converted into your desired format you will receive it through the mail.
● Free Audio Converter : This is a practical transcoding tool for audio files, capable of converting a sound file to multiple formats like MP3, OGG, WAV, and WMA, etc. It is an extremely easy-to-use interface and offers you the batch processing of files. It is one of the most demanded audio converters because of its ability to convert M4A to WAV.
● Online Audio Converter : Online audio converter is a free online app that can be used to convert audio files to other formats. This app supports all types of audio formats. This app also allows you to extract audio from a video.
● 3CX : Being one of the easiest programs used for conversion of files and formats it is widely used for the same. The most prominent advantage of this is that it can even convert the unsupported audio files to WAV format.
● To video WAV Converter: For mac, this audio converter is one of the best. It is easy to use and along with that, it supports a lot of different audio formats like MP3, M4A, WAV, etc. The finest thing about this converter is that it can process a large number of files and folders simultaneously.
Part 3 5 Quick Ways to Convert MP4 to WAV Audio Files Online and Offline
MP4 is the most familiar and widely used audio format, as it is compatible with almost every device nowadays. But podcasters and other digital content creators require to convert these files into WAV audio file format to retain the best sound quality. Here are some of the quick ways that can be used to convert MP4 to WAV format both online and offline:
● MediaHuman Audio Converter : This is software that can be used to convert MP4 to WAV format very easily. It has a drag and drops functionality that makes it easier to use. This software can be downloaded for free and is available for both Microsoft and MAC versions.
● Online uniconverter : Being one of the most popularly used online audio converters online uniconverter is extremely simple to use. This program not only converts MP4 to WAV but also supports other file formats like MP3, WAV, WMA, etc. It entitles you to select the quality of the output file.
● Cool Utilis: Another online converter that comprises a simple interface. It is widely available in 13 languages. The program supports the conversion of many other File types and formats. With this, you can also add files from google drive.
● ByClick Downloader : This is an amazing converter tool for Windows systems, which you can use to convert your file to WAV formats. With this downloader, you can also extract audio from YouTube videos. This tool also supports multiple formats like HD, MP3, MP4, AVI, etc.
● Switch Sound File Converter : It is one of the most suitable, easy to use, and comprehensive multi-format audio converters available out there. This supports different file formats and converts different files in seconds. The converter allows you to convert MP4 to WAV
Part 4 5 Best YouTube to WAV Converter
No matter your go-to genre, YouTube has always been the best place to listen to your choice. Since YouTube has practically endless content, which cannot be used for other tasks in their format, so here are a few tools that can be used to convert the format from YouTube to WAV:
● iTubeGo: This software comprises a wide variety of features that can allow you to perform multiple stuff on YouTube videos. This tool can simply be used to convert the YouTube video to any other format you wish to use it in.
● Ontiva: This web-based platform allows you to download as well as convert your YouTube videos to WAV audio format in an easy way. All you ought to do is just copy the URL of the video and paste it into the box given on this platform to convert its format.
● Freemake: Freemake is another tool that can convert your YouTube video to a WAV format in just three simple steps. All you need to do is copy and paste the URL from YouTube to Freemake and then the conversion will become a piece of cake.
● to: If you are someone, who is tired of converting your favorite YouTube video into WAV format at a slow speed? Then this is a solution to your problem, the tool offers you a high-speed conversion of YouTube video to WAV format.
● CoConvert: Another impressive web-based platform that allows you to convert YouTube video to the WAV format. This can be done in easy steps like copying and pasting the URL of the video.
Key Takeaways from This Episode
● The WAV file is an audio format that many digital content creators prefer because of its various advantages like high-quality sound.
● An enormous tech approach is that now it has become formally easier to convert multiple formats to WAV through multiple converters.
● These converters can easily be used to convert MP4 to WAV, M4A to WAV, soundcloud to WAV, and even YouTube videos to WAV format.
● In addition to this, many online and offline tools are used to convert these audio files very easily and quickly.
Also read:
- New In 2024, Videopad Video Editor Is It Worth the Investment?
- New 2024 Approved Intro Makers Galore 10 Top Picks
- Updated In 2024, Which Way to Go? A Comparison of Adobe Premiere and After Effects for Video Creators
- 2024 Approved PC Video Trimming Simplified Top 10 Desktop and Online Options
- Updated Discover the Best 8 Windows 10 Photos Alternatives for 2024
- New Taking It to the Next Level 5 Expert-Approved Hacks for 16X9 Ratio Calculators
- 2024 Approved Top MP4 Editor for Windows 8 Professional Video Editing Made Easy
- Updated Top Movie Making Tools Convert Memories Into Professional DVDs for 2024
- Updated 2024 Approved Resize Images Quickly and Easily with These Online Tools
- New Ditch Premiere Rush Top Alternative Video Editing Software for 2024
- New Best VSDC Video Editor Substitutes for macOS for 2024
- New Windows Movie Maker Replacements The Best of the Rest
- New The Only Guide Youll Need to Learn About Wav Converter for 2024
- 2024 Approved The Ultimate FCPX Plugin Troubleshooting Checklist (Updated 2023)
- In 2024, Optimize Image Proportions
- New Top WhatsApp Status Video Creator Tools Free & Premium Options for 2024
- New In 2024, Unlock Filmora for Free Safe and Legal Alternatives
- In 2024, Is GSM Flasher ADB Legit? Full Review To Bypass Your Vivo X90SFRP Lock
- In 2024, How to Fix iPad or Apple iPhone 12 Pro Stuck On Activation Lock?
- 5 Best Route Generator Apps You Should Try On Oppo A59 5G | Dr.fone
- Updated Top 11 Deepfake Voice Apps and Software You Need to Know About for 2024
- In 2024, 10 Exceptional Linux Video Editors That Rival Adobe Premiere
- The Best iSpoofer Alternative to Try On Samsung Galaxy M54 5G | Dr.fone
- Full guide to Apple iPhone 15 Plus iCloud Bypass
- Will iSpoofer update On Lenovo ThinkPhone | Dr.fone
- Life360 Learn How Everything Works On Motorola Edge 40 Pro | Dr.fone
- Hard Resetting an Vivo V27 Device Made Easy | Dr.fone
- New 2024 Approved Correct Your Video Orientation with These 16 Free AVI Rotators
- Complete guide for recovering pictures files on Sony Xperia 1 V.
- In 2024, How to Mirror Nokia C12 to Mac? | Dr.fone
- How to Transfer Photos from Honor 90 GT to Laptop Without USB | Dr.fone
- Life360 Circle Everything You Need to Know On Honor 80 Pro Straight Screen Edition | Dr.fone
- Title: New Steady Footing Best Video Stabilization Apps for iPhone and Android for 2024
- Author: Isabella
- Created at : 2024-04-29 12:49:31
- Updated at : 2024-04-30 12:49:31
- Link: https://video-creation-software.techidaily.com/new-steady-footing-best-video-stabilization-apps-for-iphone-and-android-for-2024/
- License: This work is licensed under CC BY-NC-SA 4.0.
