
:max_bytes(150000):strip_icc():format(webp)/man-measuring-tv-size-102761115-getty-5bf8513246e0fb008321de5f.jpg)
Transform WebM Into MP3 Best Conversion Methods Revealed for 2024
Transform WebM Into MP3: Best Conversion Methods Revealed
Top Ten WebM to MP3 Converters

Liza Brown
Mar 27, 2024• Proven solutions
The days of silent cinema are long gone, and today sound is an inseparable part of a video, no matter how long or short it may be. The videos you discover on the Internet sometimes have great soundtracks, but they are not saved in file formats that are suitable for playback in audio media players .
Converting a WebM video to MP3 is probably one of the easiest ways to turn videos you find online into audio files you can listen to whenever you want. In this article, we are going to take a look at the top ten WebM to MP3 converters you can either install on your PC or Mac computer or use online.
You may also like: Convert MP4 to MP3
The Top Ten WebM to MP3 Converters
The file conversion process is simple, regardless of the tool you are using to change the format of a file. However, converting low-resolution WebM files to MP3 can result in low quality of the output files, which is why it is better to create audio files from high-resolution WebM videos. Here are the top ten WebM to MP3 converters.
1. Any Video Converter Ultimate
Price: Free
Compatibility: macOS, Windows

Converting a WebM video to MP3 with Any Video Converter Ultimate is a simple three-step process. After you’ve installed this cross-platform app on your Mac or PC computer, you just have to import the video file you would like to convert, select MP3 as the output file format and click on the Convert button.
Head over to the Output Folder after the conversion to get your newly generated MP3 file and play it in order to make sure that you like the results. Besides MP3 files, you can also use Any Video Converter Ultimate to convert WebM videos to MP4 , MOV, AVI and other common video file formats.
2. Pazera Free Audio Extractor
Price: Free
Compatibility: Windows, Linux
All video files contain an audio track regardless of the format in which they are saved. Pazera Free Audio Extractor is a tool that enables you to save a video’s audio track as a separate file without any quality loss. In addition to MP3, you can also save audio files in FLAC, WMA and a number of other audio file formats.

You can download it from here: http://www.pazera-software.com/products/webm-to-mp3/
The software supports more than seventy video and audio formats, so you can just drag and drop a WebM video into Pazera Free Audio Extractor’s main window, choose a preset profile and hit the Convert button. What’s more, you can adjust the encoding settings manually and fine-tune audio volume, sampling frequency or bitrate values.
Want to learn more about extracting audio from video? Check the best online tools to extract audio from video files .
3. Online UniConverter
Price: Free, pricing plans start at $2.95
Compatibility: Web-based

In case you are looking for a powerful video conversion tool you can use from a web browser, then Wondershare’s Online UniConverter is probably one of the best options you have. In order to convert a WebM video to MP3, you have to go through a simple four-step process. First, you need to upload a file you would like to convert, then set the output format to MP3, click on the Convert button and finally download the audio file you created to your computer. The size of a WebM video cannot exceed 100MB, but if you want to convert larger video files you can install the desktop version of this video converter on your Mac or PC computer.
4. CloudConvert
Price: Free
Compatibility: Web-based

This platform offers a number of file conversion tools you can use to change the file format of archives, images, vectors or videos. CloudConvert lets you import WebM videos via URLs, from cloud storage services like OneDrive, Dropbox or Google Drive and from a local hard drive. Optionally you can set the start and end times for the MP3 file you’re creating, adjust its volume or change the audio bitrate. Clicking on the Convert button will start the file conversion process, and once the WebM file is processed, you should download the MP3 file to your computer.
5. Convertio
Price: Free, pricing plans start at $9.99
Compatibility: Web-based

The fact that over five terabytes of files were converted through the Convertio platform shows you how popular and efficient this online file conversion platform actually is. Besides video files, you can also convert fonts, images or eBooks with Convertio. In order to turn a WebM video into an MP3 file you just have to upload it either from cloud storage or a local hard drive. Optionally, you can click on the Settings icon if you want to customize the bitrate, frequency or volume values. In addition, Convertio enables you to convert only a segment of a WebM video, as you can choose how much of that video you want to cut, by inserting the time in the video where the conversion should start and end.
6. Zamzar
Price: Free, pricing options start at $9.00 per month
Compatibility: Web-based

This is yet another popular destination for all Internet users who convert images, videos, audio files or different types of documents on a daily basis. After you add a WebM video to Zamzar, you just have to set the output format to MP3 and click on the Convert button. Uploading a video file larger than 150MB to the free version of Zamzar is not possible and you must purchase one of the subscription models if you would like to convert WebM videos that have up to 2GB. Moreover, uploading files from the cloud isn’t an option, since Zamzar only allows its users to add files via URL or from their computers.
7. FreeFileConvert
Price: Free
Compatibility: Web-based

This online file conversion platform enables you to turn a WebM video into an MP3 file in just a few minutes. You can upload up to five WebM files not larger than 300 MB to FreeFileConvert either from the cloud, a URL or your computer’s hard drive. When done, you should choose MP3 as the output format and initiate the conversion process by hitting the Convert button. The file you converted cannot be saved on the cloud or downloaded more than five times. All files you convert with FreeFileConvert are going to be deleted from the platform’s servers within one day after the conversion.
8. File-Converter-Online
Price: Free
Compatibility: Web-based

Anyone can convert a WebM video to MP3 with File-Converter-Online because the file conversion process is remarkably easy. All you need to do is choose a file from your hard drive you would like to convert, select MP3 as the output file type and click on the Start Converting button. The download process will start automatically, once the WebM file is converted to MP3, although you won’t be able to store your freshly generated audio file on the cloud directly from this platform. There are no video size limits, which enables you to convert all WebM files regardless of how large or small they are.
9. OnlineConvertFree
Price: Free, pricing plans start at $6.99 per month
Compatibility: Web-based

This is a simple but efficient file conversion tool that enables you to convert multiple WebM videos at the same time. However, if you are using the free version of the platform you won’t be able to convert more than two WebM files to MP3 simultaneously. Furthermore, the maximum size of a video file you can convert with this platform is limited to just 500MB regardless of the subscription plan you have. Opting for any of the available subscription plans will grant you access to unlimited conversion hours so that you can convert as many WebM videos as you want each day.
10. VLC - The Best WebM to MP3 Converter for macOS and Windows 10

The simplest and by far the fastest way to convert a WebM video to an MP3 file on PC and Mac computers is to use the VLC media player. After you installed and launched VLC you should click on the Media menu and select the Convert/Save option.
The Open Media window will pop up on the screen, and you just have to click on the Add button located in the File Selection section of the screen in order to import a WebM video into VLC. Afterward, you should click on the Convert/Save button to gain access to the Convert window. Change the Profile setting to Audio – MP3 and click on the Browse button in the Destination section of the window if you want to choose the location on your hard drive where the converted file is going to be saved. After you click on the Start button, VLC will convert you WebM video to MP3 and place the converted file to the folder you specified.
Conclusion
Each video saved in WebM file format can be easily converted into an MP3 audio file you can add to your music library. Online WebM to MP3 converters often have size limits, even if you purchase a subscription. That is why it is much easier and less expensive to install VLC media player on your Mac or PC computer if you want to convert WebM videos to MP3 files frequently. What is your favorite WebM to MP3 converter? Let us know in the comments.
Liza Brown
Liza Brown is a writer and a lover of all things video.
Follow @Liza Brown
Liza Brown
Mar 27, 2024• Proven solutions
The days of silent cinema are long gone, and today sound is an inseparable part of a video, no matter how long or short it may be. The videos you discover on the Internet sometimes have great soundtracks, but they are not saved in file formats that are suitable for playback in audio media players .
Converting a WebM video to MP3 is probably one of the easiest ways to turn videos you find online into audio files you can listen to whenever you want. In this article, we are going to take a look at the top ten WebM to MP3 converters you can either install on your PC or Mac computer or use online.
You may also like: Convert MP4 to MP3
The Top Ten WebM to MP3 Converters
The file conversion process is simple, regardless of the tool you are using to change the format of a file. However, converting low-resolution WebM files to MP3 can result in low quality of the output files, which is why it is better to create audio files from high-resolution WebM videos. Here are the top ten WebM to MP3 converters.
1. Any Video Converter Ultimate
Price: Free
Compatibility: macOS, Windows
Converting a WebM video to MP3 with Any Video Converter Ultimate is a simple three-step process. After you’ve installed this cross-platform app on your Mac or PC computer, you just have to import the video file you would like to convert, select MP3 as the output file format and click on the Convert button.
Head over to the Output Folder after the conversion to get your newly generated MP3 file and play it in order to make sure that you like the results. Besides MP3 files, you can also use Any Video Converter Ultimate to convert WebM videos to MP4 , MOV, AVI and other common video file formats.
2. Pazera Free Audio Extractor
Price: Free
Compatibility: Windows, Linux
All video files contain an audio track regardless of the format in which they are saved. Pazera Free Audio Extractor is a tool that enables you to save a video’s audio track as a separate file without any quality loss. In addition to MP3, you can also save audio files in FLAC, WMA and a number of other audio file formats.
You can download it from here: http://www.pazera-software.com/products/webm-to-mp3/
The software supports more than seventy video and audio formats, so you can just drag and drop a WebM video into Pazera Free Audio Extractor’s main window, choose a preset profile and hit the Convert button. What’s more, you can adjust the encoding settings manually and fine-tune audio volume, sampling frequency or bitrate values.
Want to learn more about extracting audio from video? Check the best online tools to extract audio from video files .
3. Online UniConverter
Price: Free, pricing plans start at $2.95
Compatibility: Web-based
In case you are looking for a powerful video conversion tool you can use from a web browser, then Wondershare’s Online UniConverter is probably one of the best options you have. In order to convert a WebM video to MP3, you have to go through a simple four-step process. First, you need to upload a file you would like to convert, then set the output format to MP3, click on the Convert button and finally download the audio file you created to your computer. The size of a WebM video cannot exceed 100MB, but if you want to convert larger video files you can install the desktop version of this video converter on your Mac or PC computer.
4. CloudConvert
Price: Free
Compatibility: Web-based
This platform offers a number of file conversion tools you can use to change the file format of archives, images, vectors or videos. CloudConvert lets you import WebM videos via URLs, from cloud storage services like OneDrive, Dropbox or Google Drive and from a local hard drive. Optionally you can set the start and end times for the MP3 file you’re creating, adjust its volume or change the audio bitrate. Clicking on the Convert button will start the file conversion process, and once the WebM file is processed, you should download the MP3 file to your computer.
5. Convertio
Price: Free, pricing plans start at $9.99
Compatibility: Web-based
The fact that over five terabytes of files were converted through the Convertio platform shows you how popular and efficient this online file conversion platform actually is. Besides video files, you can also convert fonts, images or eBooks with Convertio. In order to turn a WebM video into an MP3 file you just have to upload it either from cloud storage or a local hard drive. Optionally, you can click on the Settings icon if you want to customize the bitrate, frequency or volume values. In addition, Convertio enables you to convert only a segment of a WebM video, as you can choose how much of that video you want to cut, by inserting the time in the video where the conversion should start and end.
6. Zamzar
Price: Free, pricing options start at $9.00 per month
Compatibility: Web-based
This is yet another popular destination for all Internet users who convert images, videos, audio files or different types of documents on a daily basis. After you add a WebM video to Zamzar, you just have to set the output format to MP3 and click on the Convert button. Uploading a video file larger than 150MB to the free version of Zamzar is not possible and you must purchase one of the subscription models if you would like to convert WebM videos that have up to 2GB. Moreover, uploading files from the cloud isn’t an option, since Zamzar only allows its users to add files via URL or from their computers.
7. FreeFileConvert
Price: Free
Compatibility: Web-based
This online file conversion platform enables you to turn a WebM video into an MP3 file in just a few minutes. You can upload up to five WebM files not larger than 300 MB to FreeFileConvert either from the cloud, a URL or your computer’s hard drive. When done, you should choose MP3 as the output format and initiate the conversion process by hitting the Convert button. The file you converted cannot be saved on the cloud or downloaded more than five times. All files you convert with FreeFileConvert are going to be deleted from the platform’s servers within one day after the conversion.
8. File-Converter-Online
Price: Free
Compatibility: Web-based
Anyone can convert a WebM video to MP3 with File-Converter-Online because the file conversion process is remarkably easy. All you need to do is choose a file from your hard drive you would like to convert, select MP3 as the output file type and click on the Start Converting button. The download process will start automatically, once the WebM file is converted to MP3, although you won’t be able to store your freshly generated audio file on the cloud directly from this platform. There are no video size limits, which enables you to convert all WebM files regardless of how large or small they are.
9. OnlineConvertFree
Price: Free, pricing plans start at $6.99 per month
Compatibility: Web-based
This is a simple but efficient file conversion tool that enables you to convert multiple WebM videos at the same time. However, if you are using the free version of the platform you won’t be able to convert more than two WebM files to MP3 simultaneously. Furthermore, the maximum size of a video file you can convert with this platform is limited to just 500MB regardless of the subscription plan you have. Opting for any of the available subscription plans will grant you access to unlimited conversion hours so that you can convert as many WebM videos as you want each day.
10. VLC - The Best WebM to MP3 Converter for macOS and Windows 10
The simplest and by far the fastest way to convert a WebM video to an MP3 file on PC and Mac computers is to use the VLC media player. After you installed and launched VLC you should click on the Media menu and select the Convert/Save option.
The Open Media window will pop up on the screen, and you just have to click on the Add button located in the File Selection section of the screen in order to import a WebM video into VLC. Afterward, you should click on the Convert/Save button to gain access to the Convert window. Change the Profile setting to Audio – MP3 and click on the Browse button in the Destination section of the window if you want to choose the location on your hard drive where the converted file is going to be saved. After you click on the Start button, VLC will convert you WebM video to MP3 and place the converted file to the folder you specified.
Conclusion
Each video saved in WebM file format can be easily converted into an MP3 audio file you can add to your music library. Online WebM to MP3 converters often have size limits, even if you purchase a subscription. That is why it is much easier and less expensive to install VLC media player on your Mac or PC computer if you want to convert WebM videos to MP3 files frequently. What is your favorite WebM to MP3 converter? Let us know in the comments.
Liza Brown
Liza Brown is a writer and a lover of all things video.
Follow @Liza Brown
Vegas Pro Not Your Cup of Tea? Try These 10 Mac Alternatives (Fre
For creating high-grade dynamic videos, simply shooting or recording a clip is not enough. Finding the best Sony Ve gas alternatives for Mac is essential since the software mainly targets Windows users.
Thanks to developers, there are many free and paid options to start your video editing journey on a Mac. Let’s first have a look at alternative software you could consider.
- Lightworks
- Wondershare Filmora
- Adobe Premiere Pro
- HitFilm Express
- Kdenlive
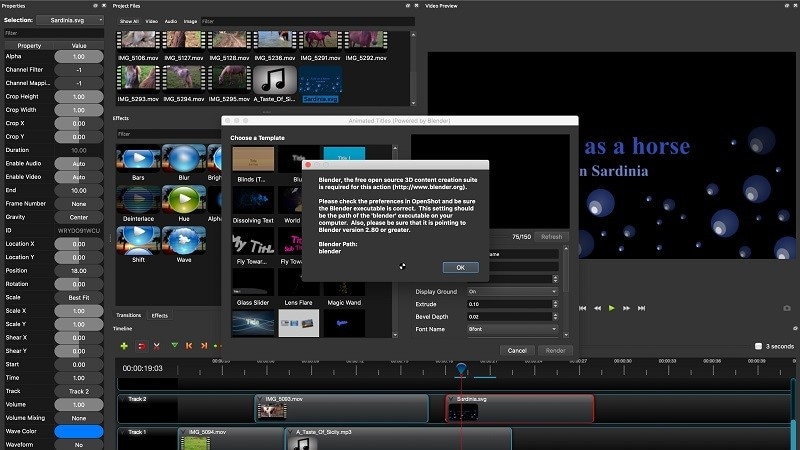
- OpenShot
- Blender
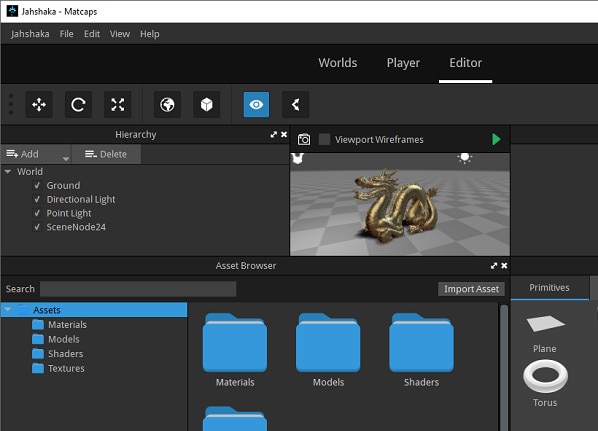
- Jahshaka
- Final Cut Pro
- Cyberlink PowerDirector 365
- What are the limitations when using Sony Vegas (Vegas Pro) on Mac?
- Hot FAQs about Vegas Pro Alternatives
Part 1: Sony Vegas Pro Alternatives & Competitors Overview
Here is a list of the top 10 tools we found after research. For an easier understanding, the following are the essential points of difference between alternative video editing software types for Sony Vegas Pro in a tabular form.
| Software | Supported OS | Price | Editor’s Verdict |
|---|---|---|---|
| Lightworks | Windows, Mac, Linux | Create-$9.99/month, Pro-$23.99/month | Medium-Difficult |
| Wondershare Filmora | Windows, Mac | Annual-$49.99, Perpetual-$79.99 | Easy |
| Adobe Premiere Pro | Windows, Mac | $20.99/month | Easy-Medium |
| HitFilm Express | Windows, Mac | Free | Easy |
| Kdenlive | Windows, Mac, Linux | Free | Medium-Difficult |
| OpenShot | Windows, Mac, Linux, OsX | Free | Medium-Difficult |
| Blender | Windows, Mac, Linux | Free | Easy |
| Jahshaka | Windows, Linux, OsX | Free | Easy-Medium |
| Final Cut Pro | Mac | Lifetime-$299.99 | Easy-Medium |
| Cyberlink PowerDirector 365 | Windows, Mac | Lifetime-$52.50 | Easy-Medium |
Part 2: Top 10 Sony Vegas (Vegas Pro) Alternatives & Competitors
Now that you know the primary differences between the Sony Vegas Pro alternatives. Are you find anything you like? Let’s move on to more details for your further consideration.
1. Lightworks
With Lightworks, using the independent timeline codec, format, and resolution alteration in videos is extremely simple. In addition, you can use the multi-cam editing feature for real-time, high-quality editing work. Moreover, drag and drop elements into videos for optimized video editing work, including pre-existing Storyboard points.
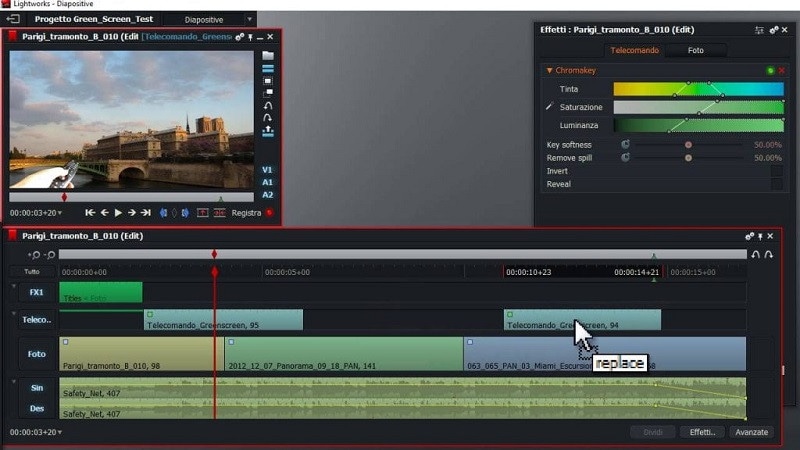
Main Features:
- Industry-grade features like QC, transcoding, and automated transfer are available.
- Edit files at different FPS limits and use three-point editing for recording/source files.
- Insert files and overwrite on a new project, replace, backfill, and fit to fill your video clips.
- Attach Storyboard tiles and match-frame clips/sub-clips easily.
Pros
- Flexible functionality and speedy transfers
- Edit files with professional movie-like quality
- Auto Sync feature for automatic timeline re-syncing is available
Cons
- Direct X is only available on the Windows version
- TotalFX plugin is not available for free- you have to upgrade to use them
OS Compatibility: Windows , Mac , Linux
Best For: Editing experts creating visually animated and professional-looking short videos can work with Lightworks.
What users say:
For professional-level video editing work, Lightworks brings a lot of resources and elements to users. According to reviews , people who have tried it have experienced better video editing functionality with these resources.
2. Wondershare Filmora
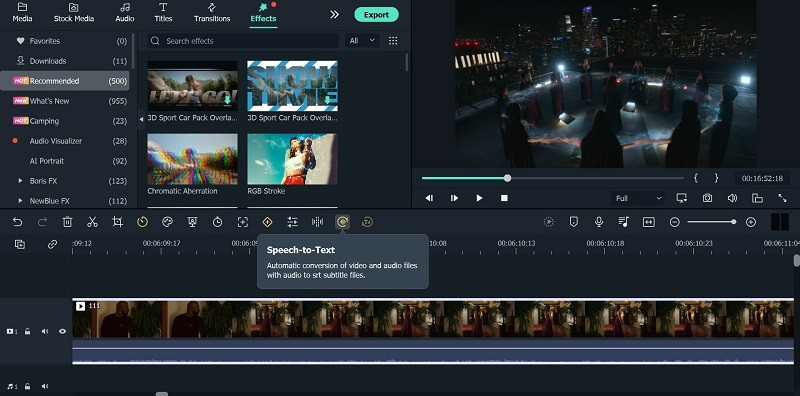
The top Vegas Pro alternative that both Windows and Mac users can opt for is Filmora. The software has advanced AI-incorporated editing functions for automated editing work, including preset effects from FX plugins. Besides that, you can easily add pre-set transitions, audio clips, text, images, and more.
Beginners find it simple to navigate through its interface and can opt for the Instant Mode function for automatic video edits .
Free Download For Win 7 or later(64-bit)
Free Download For macOS 10.14 or later

For a better idea of how this works, you should check out this tutorial video: https://filmora.wondershare.com/get-creative/make-a-video-quickly.html
Main Features:
- Instant Mode is available for automatic video/audio project editing out of 6 shorter clips.
- Support Advanced editing tools like Chroma Key and AI Portrait.
- Record voiceover, apply speech-to-text/text-to-speech functions, and more audio editing features.
- OpenFX plugins like BorisFX and NewBlue FX for a better list of pre-set effects.
Pros
- Simple to use and navigate on the editor timeline, especially with drag-and-drop support
- Output your editing files in different video/audio formats
- Quickly share the file on Vimeo or YouTube, besides downloading it on the local hard drive
Cons
- Free trial users cannot bring their Instant Mode-created videos into the editor timeline
- 4K support only with selected MKV, MOV, M4V (for Mac), and MP4 codecs
OS Compatibility: Windows , Mac
G2 Rating: 4.4 out of 5
Best For: All types of users like educators, students, homeowners, businesses, and video editors for comprehensive video editing tools and uses.
What users say:
Filmora is extremely simple to use, with advanced features available for top-level video editing work. Users mention in reviews how they have benefitted from the simple functionality and dynamic AI-based features available here for video editing.
3. Adobe Premiere Pro
If you are looking for high-quality programs like Sony Vegas, Adobe Premiere Pro is a reliable choice. This editing software allows you to easily create, delete, and move big video projects. Moreover, you can work on multiple files simultaneously and use shortcuts for faster editing work.
Preset filters and editing features are also available here, especially if they choose the Adobe Creative Cloud option.
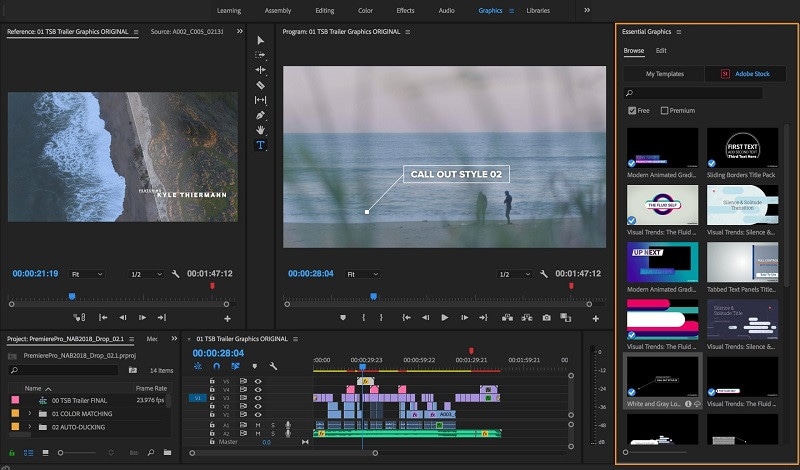
Main Features:
- Multiple pre-set transitions and effects are available for quick thematic changes.
- Add graphics, titles, and captions.
- Color grading and correction tools are available.
- It is possible to add keyframing and animation elements.
Pros
- Opting for group plans for video editing practice and learning using Adobe Premiere Pro is possible
- Aligns audio with videos instantly during editing
- Utilize Quick Export functionality for video files in some taps
Cons
- Windows High Contrast Mode is supported but to a limited extent, like with menus and title bars
- HDR workflows can only be handled on the Windows version with DisplayHDR 400 support
OS Compatibility: Windows , Mac
G2 Rating: 4.5 out of 5
Best For: Professional editors and trainers can use the various plans under Adobe Premiere Pro for video/audio editing.
What users say:
Advertisers and videographers enjoy high-grade video editing features and like the simple effects and interface quality. The motion graphics support in Adobe Premiere Pro is high-grade as well.
4. HitFilm Express
A capable Sony Vegas free alternative that you should check out is HitFilm Express. With this, you can expect many prepared designs for quick video edits. Additionally, you can manually customize the video files you are working on with high-grade personalization features available in the timeline.

Main Features:
- Pre-set customizable designs are available.
- Built-in sound effects and soundtracks are usable for free.
- Cache renders in timelines are optimized.
- The New Grade Clips feature allows users to apply varying effects to many video clips.
Pros
- Stable process of switching between timelines with an active orbit tool
- Easy to switch between 2D/3D timelines while using the text tool
- Simple to use for an unlimited period
Cons
- Does not work on older versions than Windows 10 and macOS 10.14
- Users cannot integrate this with Vegas Pro like before
OS Compatibility: Windows , Mac
TechRadar Rating: 4.5 out of 5
Best For: This software is a high-quality video editor for custom video editing work, fit for beginners and professionals alike.
What users say:
HitFilm Express is easy to use and efficient in the market for professional-level editing. The tutorial is available here for quick learning about the steps, and expandable features are well-admired by users.
5. Kdenlive
A high-quality Sony Vegas open-source variety that you should seriously consider is Kdenlive. The video editor comes with MLT framework support and holds many tools for optimizing video editing.
To simplify, you can arrange and adjust various video/audio tracks and mute or lock specific ones as needed. Add everything from filters, texts, and transitions using this editor for high-grade video projects.
Main Features:
- Get an automatic backup of your video project while you are editing it.
- Use proxy editing to create low-resolution source clip copies and render them later on computers.
- Multiple video/audio scopes are available for monitoring projects like vectorscope, waveform, and RDB Parade.
- Many transition and effect choices to use.
Pros
- Flexibility with themes to add with multiple options
- Pre-render specific timeline parts for preview
- Effects are simple to use with keyframing quality
Cons
- Complex for completely non-technical users to adapt to
- Only supports 64-bit versions in regards to Windows-based compatibility
Trustpilot Rating: 3.7 out of 5
Best For: High-level editing experts who need strong video editing and monitoring features in an open-source platform.
What users say:
Kdenlive, as an open-source video editing software, assures quick and straightforward usability with projects. Per reviews , users like the ability to make simple video edits without bugs in this editor and quickly export finished projects.
6. OpenShot
OpenShot is a high-quality cross-platform video editor that you can use on different devices for quick but dynamic video project edits. Use keyframing ability here to adjust the animated elements you add to the file.
Moreover, cut the videos with simple steps and add many audio tracks/background videos/watermarks in layers. Also, get several video effects to optimize the video look easily.
Main Features:
- Adjust video speed in reverse motion, fast forward, and slow motion.
- Render effects and 3D animated elements into the video project.
- Get title templates and edit them as needed.
- Visualize the background audio beats with waveform support.
Pros
- Very user-friendly interface with a simple navigation guarantee
- Supports more than 70 languages that you can translate as well using LaunchPad
- Drag-and-drop functionality is supported for adding images, audio, and videos into the OpenShot editor timeline
Cons
- Some bug issues can occur
- Slightly complex learning curve
OS Compatibility: Windows , Linux , OsX
G2 Rating: 4.4 out of 5
Best For: Professional-level video editing experts can opt for this cross-platform free software for high-quality video creations.
What users say:
The OpenShot software is suitable for high-quality video editing across different devices and operating systems. Users like the lack of automated watermarks on all videos, its simple dashboard, and its multi-track editing ability, all available for free.
7. Blender
Blender is free video editing software like Sony Vegas that users can use for video editing, but it is also effective for game development with animations. Indeed, you can create and render dynamic-looking scenes with features like Cycles.
Furthermore, the software has a rich modelling toolset with solutions like curves and sculpting tools.

Main Features:
- Completely customization-friendly UI, shortcuts, and window layout here.
- Customization and scripting are possible to do with this software due to the Python API support.
- Supports access and integration of many pipeline tools for projects.
- Comes with advanced simulation-based features available in MantaFlow and Bullet libraries.
Pros
- Basic and advanced tools for quick video edits
- Strong composition and masking ability with object-based motion tracking benefits
- Easily create short animations with Blender
Cons
- Data under the standalone games created here fall under GPL conditions
- Strict licensing rules are applicable here
OS Compatibility: Windows , Mac , Linux
G2 Rating: 4.5 out of 5
Best For: Game developers and videographers for companies can use this open-source platform for creation and editing.
What users say:
Blender is a capable software for animation-based editing, with high-quality game-based features and interactive elements that make editing simple. As per reviews , users like the simple animation-based tools and fast rendering it offers.
8. Jahshaka
Users of Jahshaka can experience an inclusive, collaborative environment for metaverse-level editing work. This free editing software, like Sony Vegas, focuses mainly on VR-based editing functions and comes with powerful tools for project management and content creation.
Take the help of other team members to collaborate on dynamic virtual world building, editing, and publishing.
Main Features:
- Compatible player for different desktop and mobile devices.
- Create diversified worlds and scenes with one comprehensive platform.
- Immersive software 3D video development.
- Access to pre-built content and libraries of scenes and assets
Pros
- Easily share and distribute your virtual projects
- Deliver final projects offline and online
- An interactive multi-user engine is available
Cons
- Usable for a niche audience and does not include standard video editing tools
- Jahshaka V2 legacy support is no longer active
OS Compatibility: Windows , Linux , OsX
SourceForge Rating: 4.4 out of 5
Best For: Professional video editors who want a collaborative experience in VR-based development and publishing.
What users say:
Jahshaka is a suitable program for optimized VR-based editing with many preset features and themes to choose from. Most users enjoy the new features and worlds and can work with them efficiently.
9. Final Cut Pro
One of the top Sony Vegas alternatives Mac users can safely turn to is Final Cut Pro, which has powerful modern video editing features. With this software, you will access Cinematic Mode, which you can use to create stylish and thematic video scenes.
Similarly, the Object Tracker features utilize ML technology to automatically detect objects and faces in moving videos. It can align effects and titles accurately with the graphical elements in videos.

Main Features:
- Object Tracker feature for using color correction and adding texts into moving videos.
- Accelerated functional for motion tracking with Apple Neural Engine.
- Add high-quality effects and titles into videos with Cinematic Mode support.
- Preset audio tracks and royalty-free sound effects are available for editing.
Pros
- Handle color grading for optimized scene quality
- Adjust the field depth and focus depth in clips
- Share projects across iOS and macOS platforms
Cons
- Not valid for Windows users
- Relatively high cost to avail the paid version with all advanced features
OS Compatibility: Mac
TrustRadius Rating: 4.8 out of 5
Best For: Professional video editors, students, and filmmakers who want to create cinematic-quality video projects.
What users say:
Final Cut Pro is an efficient Mac-based video editing tool with easy sharing and editing capabilities, rich effects/transitions options, and fast rendering ability. Customers enjoy the intuitive non-linear editor, easy accessibility to social media platforms for file exporting, and live scrubbing, as noted in one review .
10. Cyberlink PowerDirector 365
Another Sony Vegas mac alternative for Windows you should give a try is PowerDirector 365 from Cyberlink. This software removes or compiles video clips and uses masking features like image/custom masks.
Preset special effects, blending modes, and sound effects are available here for quick editing. Additionally, the AI-powered Motion Tracking traces objects in clips and adds graphics, animations, and text quickly in line with it.

Main Features:
- You can create and remove videos with masking features.
- Drag and drop the pre-set effects and texts into videos.
- Adjust video clips with tools for border, gradation, and shadowing.
- Multiple animations, callouts, graphics, and stickers to add to videos.
Pros
- Use green screen functionality for quick background removal or editing
- Automatic audio mastering and mixing functionality are available
- Keyframing benefits for customized animations like scaling and positioning
Cons
- Dolby Digital-centric audio codec is not available for users
- Users can try features like Room Echo Removal and NVIDIA A/V Denoise only on Windows 11
OS Compatibility: Windows
TechRadar Rating: 4.5 out of 5
Best For: Professional videographers and regular users who want a Windows-based video editing software for standard video clip editing.
What users say:
Cyberlink PowerDirector is a powerful video editor with standard editing functions many users have tried and benefited from. According to customers , the program has high-quality video and audio editing benefits for presentations, with additional effects/splitting/cropping features.
Part 3: What are the limitations when using Sony Vegas (Vegas Pro) on Mac?
Yes, with the given Sony Vegas alternatives, Mac and Windows users can benefit heavily. But why is it important to try for a replacement when Sony Vegas Pro is relatively efficient software?
To know the answer, you should take the time to understand its limitations, which do exist.
It only works for Windows users
The Sony Vegas Pro software is not available for Mac or other operating systems besides Windows. In addition, it’ll be really complex and time-consuming, even if you opt for virtual machine software or handle dual booting techniques to configure the software on your Mac or Linux.
You need to invest in other hardware
Sony Vegas Pro does do not work within one comprehensive platform like other capable video editing software types, like Wondershare Filmora . You have to acquire a powerful PC and tools to operate it separately. The software works very slowly on older devices.
Not incredibly unique
The functions of Sony Vegas Pro match somewhat with other options in the market. So, users would not expect much value in purchasing this software’s plans that they want to upgrade from their previous system, but on the other hand, the available features are mostly standard-level in functionality as well.
Hot FAQs about Vegas Pro Alternatives
After knowing these details, many users still have specific common queries about opting for a Sony Vegas Pro alternatively. So these are some common FAQs about this- answered.
1. Can Sony Vegas be used on a Mac?
No, it is impossible to directly use Sony Vegas on macOS devices since it does not support it. Instead, you have to separately use a dual boot strategy or virtual machine software to activate the video editor on Mac devices, but the process for that is complex.
2. Is Wondershare Filmora or Vegas Pro better?
Wondershare Filmora and Vegas Pro are top-level options in video and audio editing projects with professional-level editing accuracy. However, Filmora has a cohesive ecosystem with rich AI and standard functions and comes with Mac/Windows support. So, in that sense, Filmora is comparatively a better choice.
Final Words
In place of Sony Vegas Pro, any of these options would also give you a great user experience. Out of them, Filmora is one that we will recommend due to its multi-faceted benefits and features for Mac and Windows users. Ultimately, make your decision based on your particular needs.
Free Download For Win 7 or later(64-bit)
Free Download For macOS 10.14 or later
Part 1: Sony Vegas Pro Alternatives & Competitors Overview
Here is a list of the top 10 tools we found after research. For an easier understanding, the following are the essential points of difference between alternative video editing software types for Sony Vegas Pro in a tabular form.
| Software | Supported OS | Price | Editor’s Verdict |
|---|---|---|---|
| Lightworks | Windows, Mac, Linux | Create-$9.99/month, Pro-$23.99/month | Medium-Difficult |
| Wondershare Filmora | Windows, Mac | Annual-$49.99, Perpetual-$79.99 | Easy |
| Adobe Premiere Pro | Windows, Mac | $20.99/month | Easy-Medium |
| HitFilm Express | Windows, Mac | Free | Easy |
| Kdenlive | Windows, Mac, Linux | Free | Medium-Difficult |
| OpenShot | Windows, Mac, Linux, OsX | Free | Medium-Difficult |
| Blender | Windows, Mac, Linux | Free | Easy |
| Jahshaka | Windows, Linux, OsX | Free | Easy-Medium |
| Final Cut Pro | Mac | Lifetime-$299.99 | Easy-Medium |
| Cyberlink PowerDirector 365 | Windows, Mac | Lifetime-$52.50 | Easy-Medium |
Part 2: Top 10 Sony Vegas (Vegas Pro) Alternatives & Competitors
Now that you know the primary differences between the Sony Vegas Pro alternatives. Are you find anything you like? Let’s move on to more details for your further consideration.
1. Lightworks
With Lightworks, using the independent timeline codec, format, and resolution alteration in videos is extremely simple. In addition, you can use the multi-cam editing feature for real-time, high-quality editing work. Moreover, drag and drop elements into videos for optimized video editing work, including pre-existing Storyboard points.
Main Features:
- Industry-grade features like QC, transcoding, and automated transfer are available.
- Edit files at different FPS limits and use three-point editing for recording/source files.
- Insert files and overwrite on a new project, replace, backfill, and fit to fill your video clips.
- Attach Storyboard tiles and match-frame clips/sub-clips easily.
Pros
- Flexible functionality and speedy transfers
- Edit files with professional movie-like quality
- Auto Sync feature for automatic timeline re-syncing is available
Cons
- Direct X is only available on the Windows version
- TotalFX plugin is not available for free- you have to upgrade to use them
OS Compatibility: Windows , Mac , Linux
Best For: Editing experts creating visually animated and professional-looking short videos can work with Lightworks.
What users say:
For professional-level video editing work, Lightworks brings a lot of resources and elements to users. According to reviews , people who have tried it have experienced better video editing functionality with these resources.
2. Wondershare Filmora
The top Vegas Pro alternative that both Windows and Mac users can opt for is Filmora. The software has advanced AI-incorporated editing functions for automated editing work, including preset effects from FX plugins. Besides that, you can easily add pre-set transitions, audio clips, text, images, and more.
Beginners find it simple to navigate through its interface and can opt for the Instant Mode function for automatic video edits .
Free Download For Win 7 or later(64-bit)
Free Download For macOS 10.14 or later
For a better idea of how this works, you should check out this tutorial video: https://filmora.wondershare.com/get-creative/make-a-video-quickly.html
Main Features:
- Instant Mode is available for automatic video/audio project editing out of 6 shorter clips.
- Support Advanced editing tools like Chroma Key and AI Portrait.
- Record voiceover, apply speech-to-text/text-to-speech functions, and more audio editing features.
- OpenFX plugins like BorisFX and NewBlue FX for a better list of pre-set effects.
Pros
- Simple to use and navigate on the editor timeline, especially with drag-and-drop support
- Output your editing files in different video/audio formats
- Quickly share the file on Vimeo or YouTube, besides downloading it on the local hard drive
Cons
- Free trial users cannot bring their Instant Mode-created videos into the editor timeline
- 4K support only with selected MKV, MOV, M4V (for Mac), and MP4 codecs
OS Compatibility: Windows , Mac
G2 Rating: 4.4 out of 5
Best For: All types of users like educators, students, homeowners, businesses, and video editors for comprehensive video editing tools and uses.
What users say:
Filmora is extremely simple to use, with advanced features available for top-level video editing work. Users mention in reviews how they have benefitted from the simple functionality and dynamic AI-based features available here for video editing.
3. Adobe Premiere Pro
If you are looking for high-quality programs like Sony Vegas, Adobe Premiere Pro is a reliable choice. This editing software allows you to easily create, delete, and move big video projects. Moreover, you can work on multiple files simultaneously and use shortcuts for faster editing work.
Preset filters and editing features are also available here, especially if they choose the Adobe Creative Cloud option.
Main Features:
- Multiple pre-set transitions and effects are available for quick thematic changes.
- Add graphics, titles, and captions.
- Color grading and correction tools are available.
- It is possible to add keyframing and animation elements.
Pros
- Opting for group plans for video editing practice and learning using Adobe Premiere Pro is possible
- Aligns audio with videos instantly during editing
- Utilize Quick Export functionality for video files in some taps
Cons
- Windows High Contrast Mode is supported but to a limited extent, like with menus and title bars
- HDR workflows can only be handled on the Windows version with DisplayHDR 400 support
OS Compatibility: Windows , Mac
G2 Rating: 4.5 out of 5
Best For: Professional editors and trainers can use the various plans under Adobe Premiere Pro for video/audio editing.
What users say:
Advertisers and videographers enjoy high-grade video editing features and like the simple effects and interface quality. The motion graphics support in Adobe Premiere Pro is high-grade as well.
4. HitFilm Express
A capable Sony Vegas free alternative that you should check out is HitFilm Express. With this, you can expect many prepared designs for quick video edits. Additionally, you can manually customize the video files you are working on with high-grade personalization features available in the timeline.
Main Features:
- Pre-set customizable designs are available.
- Built-in sound effects and soundtracks are usable for free.
- Cache renders in timelines are optimized.
- The New Grade Clips feature allows users to apply varying effects to many video clips.
Pros
- Stable process of switching between timelines with an active orbit tool
- Easy to switch between 2D/3D timelines while using the text tool
- Simple to use for an unlimited period
Cons
- Does not work on older versions than Windows 10 and macOS 10.14
- Users cannot integrate this with Vegas Pro like before
OS Compatibility: Windows , Mac
TechRadar Rating: 4.5 out of 5
Best For: This software is a high-quality video editor for custom video editing work, fit for beginners and professionals alike.
What users say:
HitFilm Express is easy to use and efficient in the market for professional-level editing. The tutorial is available here for quick learning about the steps, and expandable features are well-admired by users.
5. Kdenlive
A high-quality Sony Vegas open-source variety that you should seriously consider is Kdenlive. The video editor comes with MLT framework support and holds many tools for optimizing video editing.
To simplify, you can arrange and adjust various video/audio tracks and mute or lock specific ones as needed. Add everything from filters, texts, and transitions using this editor for high-grade video projects.
Main Features:
- Get an automatic backup of your video project while you are editing it.
- Use proxy editing to create low-resolution source clip copies and render them later on computers.
- Multiple video/audio scopes are available for monitoring projects like vectorscope, waveform, and RDB Parade.
- Many transition and effect choices to use.
Pros
- Flexibility with themes to add with multiple options
- Pre-render specific timeline parts for preview
- Effects are simple to use with keyframing quality
Cons
- Complex for completely non-technical users to adapt to
- Only supports 64-bit versions in regards to Windows-based compatibility
Trustpilot Rating: 3.7 out of 5
Best For: High-level editing experts who need strong video editing and monitoring features in an open-source platform.
What users say:
Kdenlive, as an open-source video editing software, assures quick and straightforward usability with projects. Per reviews , users like the ability to make simple video edits without bugs in this editor and quickly export finished projects.
6. OpenShot
OpenShot is a high-quality cross-platform video editor that you can use on different devices for quick but dynamic video project edits. Use keyframing ability here to adjust the animated elements you add to the file.
Moreover, cut the videos with simple steps and add many audio tracks/background videos/watermarks in layers. Also, get several video effects to optimize the video look easily.
Main Features:
- Adjust video speed in reverse motion, fast forward, and slow motion.
- Render effects and 3D animated elements into the video project.
- Get title templates and edit them as needed.
- Visualize the background audio beats with waveform support.
Pros
- Very user-friendly interface with a simple navigation guarantee
- Supports more than 70 languages that you can translate as well using LaunchPad
- Drag-and-drop functionality is supported for adding images, audio, and videos into the OpenShot editor timeline
Cons
- Some bug issues can occur
- Slightly complex learning curve
OS Compatibility: Windows , Linux , OsX
G2 Rating: 4.4 out of 5
Best For: Professional-level video editing experts can opt for this cross-platform free software for high-quality video creations.
What users say:
The OpenShot software is suitable for high-quality video editing across different devices and operating systems. Users like the lack of automated watermarks on all videos, its simple dashboard, and its multi-track editing ability, all available for free.
7. Blender
Blender is free video editing software like Sony Vegas that users can use for video editing, but it is also effective for game development with animations. Indeed, you can create and render dynamic-looking scenes with features like Cycles.
Furthermore, the software has a rich modelling toolset with solutions like curves and sculpting tools.
Main Features:
- Completely customization-friendly UI, shortcuts, and window layout here.
- Customization and scripting are possible to do with this software due to the Python API support.
- Supports access and integration of many pipeline tools for projects.
- Comes with advanced simulation-based features available in MantaFlow and Bullet libraries.
Pros
- Basic and advanced tools for quick video edits
- Strong composition and masking ability with object-based motion tracking benefits
- Easily create short animations with Blender
Cons
- Data under the standalone games created here fall under GPL conditions
- Strict licensing rules are applicable here
OS Compatibility: Windows , Mac , Linux
G2 Rating: 4.5 out of 5
Best For: Game developers and videographers for companies can use this open-source platform for creation and editing.
What users say:
Blender is a capable software for animation-based editing, with high-quality game-based features and interactive elements that make editing simple. As per reviews , users like the simple animation-based tools and fast rendering it offers.
8. Jahshaka
Users of Jahshaka can experience an inclusive, collaborative environment for metaverse-level editing work. This free editing software, like Sony Vegas, focuses mainly on VR-based editing functions and comes with powerful tools for project management and content creation.
Take the help of other team members to collaborate on dynamic virtual world building, editing, and publishing.
Main Features:
- Compatible player for different desktop and mobile devices.
- Create diversified worlds and scenes with one comprehensive platform.
- Immersive software 3D video development.
- Access to pre-built content and libraries of scenes and assets
Pros
- Easily share and distribute your virtual projects
- Deliver final projects offline and online
- An interactive multi-user engine is available
Cons
- Usable for a niche audience and does not include standard video editing tools
- Jahshaka V2 legacy support is no longer active
OS Compatibility: Windows , Linux , OsX
SourceForge Rating: 4.4 out of 5
Best For: Professional video editors who want a collaborative experience in VR-based development and publishing.
What users say:
Jahshaka is a suitable program for optimized VR-based editing with many preset features and themes to choose from. Most users enjoy the new features and worlds and can work with them efficiently.
9. Final Cut Pro
One of the top Sony Vegas alternatives Mac users can safely turn to is Final Cut Pro, which has powerful modern video editing features. With this software, you will access Cinematic Mode, which you can use to create stylish and thematic video scenes.
Similarly, the Object Tracker features utilize ML technology to automatically detect objects and faces in moving videos. It can align effects and titles accurately with the graphical elements in videos.
Main Features:
- Object Tracker feature for using color correction and adding texts into moving videos.
- Accelerated functional for motion tracking with Apple Neural Engine.
- Add high-quality effects and titles into videos with Cinematic Mode support.
- Preset audio tracks and royalty-free sound effects are available for editing.
Pros
- Handle color grading for optimized scene quality
- Adjust the field depth and focus depth in clips
- Share projects across iOS and macOS platforms
Cons
- Not valid for Windows users
- Relatively high cost to avail the paid version with all advanced features
OS Compatibility: Mac
TrustRadius Rating: 4.8 out of 5
Best For: Professional video editors, students, and filmmakers who want to create cinematic-quality video projects.
What users say:
Final Cut Pro is an efficient Mac-based video editing tool with easy sharing and editing capabilities, rich effects/transitions options, and fast rendering ability. Customers enjoy the intuitive non-linear editor, easy accessibility to social media platforms for file exporting, and live scrubbing, as noted in one review .
10. Cyberlink PowerDirector 365
Another Sony Vegas mac alternative for Windows you should give a try is PowerDirector 365 from Cyberlink. This software removes or compiles video clips and uses masking features like image/custom masks.
Preset special effects, blending modes, and sound effects are available here for quick editing. Additionally, the AI-powered Motion Tracking traces objects in clips and adds graphics, animations, and text quickly in line with it.
Main Features:
- You can create and remove videos with masking features.
- Drag and drop the pre-set effects and texts into videos.
- Adjust video clips with tools for border, gradation, and shadowing.
- Multiple animations, callouts, graphics, and stickers to add to videos.
Pros
- Use green screen functionality for quick background removal or editing
- Automatic audio mastering and mixing functionality are available
- Keyframing benefits for customized animations like scaling and positioning
Cons
- Dolby Digital-centric audio codec is not available for users
- Users can try features like Room Echo Removal and NVIDIA A/V Denoise only on Windows 11
OS Compatibility: Windows
TechRadar Rating: 4.5 out of 5
Best For: Professional videographers and regular users who want a Windows-based video editing software for standard video clip editing.
What users say:
Cyberlink PowerDirector is a powerful video editor with standard editing functions many users have tried and benefited from. According to customers , the program has high-quality video and audio editing benefits for presentations, with additional effects/splitting/cropping features.
Part 3: What are the limitations when using Sony Vegas (Vegas Pro) on Mac?
Yes, with the given Sony Vegas alternatives, Mac and Windows users can benefit heavily. But why is it important to try for a replacement when Sony Vegas Pro is relatively efficient software?
To know the answer, you should take the time to understand its limitations, which do exist.
It only works for Windows users
The Sony Vegas Pro software is not available for Mac or other operating systems besides Windows. In addition, it’ll be really complex and time-consuming, even if you opt for virtual machine software or handle dual booting techniques to configure the software on your Mac or Linux.
You need to invest in other hardware
Sony Vegas Pro does do not work within one comprehensive platform like other capable video editing software types, like Wondershare Filmora . You have to acquire a powerful PC and tools to operate it separately. The software works very slowly on older devices.
Not incredibly unique
The functions of Sony Vegas Pro match somewhat with other options in the market. So, users would not expect much value in purchasing this software’s plans that they want to upgrade from their previous system, but on the other hand, the available features are mostly standard-level in functionality as well.
Hot FAQs about Vegas Pro Alternatives
After knowing these details, many users still have specific common queries about opting for a Sony Vegas Pro alternatively. So these are some common FAQs about this- answered.
1. Can Sony Vegas be used on a Mac?
No, it is impossible to directly use Sony Vegas on macOS devices since it does not support it. Instead, you have to separately use a dual boot strategy or virtual machine software to activate the video editor on Mac devices, but the process for that is complex.
2. Is Wondershare Filmora or Vegas Pro better?
Wondershare Filmora and Vegas Pro are top-level options in video and audio editing projects with professional-level editing accuracy. However, Filmora has a cohesive ecosystem with rich AI and standard functions and comes with Mac/Windows support. So, in that sense, Filmora is comparatively a better choice.
Final Words
In place of Sony Vegas Pro, any of these options would also give you a great user experience. Out of them, Filmora is one that we will recommend due to its multi-faceted benefits and features for Mac and Windows users. Ultimately, make your decision based on your particular needs.
Free Download For Win 7 or later(64-bit)
Free Download For macOS 10.14 or later
Fixing the Wobble: A Beginner’s Guide to Video Stabilization in Adobe Premiere Pro
Stabilize Shaky Videos After Recording Easily
Wondershare Filmora is one of the most popular video editing software among YouTubers , which provides the video stabilization tool to remove shake from videos within one-click. Download and have a try now.
Most of the photos or videos we shoot on our cameras feel shaky and a bit too jarring. Also, a camera shake is imminent when filming a video, especially while we’re zooming in to get an ideal shot. In this situation, we don’t need to go to a professional to stabilize the videos or look right. Fortunately, Adobe Premiere Pro has some valuable tools to help you take the shake out of your videos or photos, giving you stabilized and smooth footage.
The Adobe Premiere Pro is a professional video editor that can fix unwanted camera shake in just a few clicks, giving fine-tuning to the footage – exactly the feel and looks you want! So, here in this article, we’re going to describe the guideline about Adobe Premiere Pro stabilization.
In this article
01 Why Should You Stabilize Your Video?
03 How to Stabilize A Shaky Video In Premiere Pro with Warp Stabilizer?
04 Top 5 Warp Stabilizer Tips and Troubleshooting:
05 How to Stabilize Shaky Footage Without Using Warp Stabilizer?
Part 1: Why Should You Stabilize Your Video?
Being an artistic or aesthetic choice, we might love a slightly shaken photo or video. But if it looks a little more shrill or jerky, we need to smooth it out! There are many reasons you might want to fix your irregular or shaky videos.
Generally, the shaky videos are due to our unintended movements during shooting. It can make your footage look less polished, sparkle, and glossy. Moreover, it can lower your photos or videos’ overall production quality and status. Therefore, this can be extremely disturbing for the viewers, creating a sense of mistrust.
Part 2: What Is Warp Stabilizer?
Warp Stabilizer is the effect in the Adobe Premiere Pro and Adobe After Effects that can quickly smooth out your jittery footage with just a few clicks. It can save your work – fix the smaller shakes while you’re strolling or standing still. So, now you can stabilize motion by using the Warp Stabilizer effect in Adobe Premiere Pro. However, the premiere stabilization is not a substitute for all – you may require some other program for your clips as you may also observe some lost details on the edges of the footage frame. Now let’s have a look at the benefits of Warp Stabilizer!
- It’s a built-in tool in Adobe Premiere Pro, so you don’t need to install additional software or plugin.
- You can easily remove jerkiness and jitter from your footage caused by your camera movement and convert them into smooth and steady shots.
- The results are fast, quick, and automatic.
Further, there are three more parameters to consider while using a Warp stabilizer for stabilizing the shaky footage.
- Process ( an algorithm that can analyze and track the footage)
- Smoothness ( called the strength of the effect)
- Framing ( it can handle the edges of the clips)
Part 3: How to Stabilize A Shaky Video In Premiere Pro with Warp Stabilizer?
Many filmmakers or shooters rely on handheld capture as it’s a fast, cheap, and usually intimate method. But do you know how they handle shaky footage? A handy Warp stabilizer tool in Adobe Premiere Pro lets you smooth your shaky videos or photos in minutes! So, if you find yourself dealing with photos or clips with a noticeable amount of shake, stabilize video premiere is your solution! Let’s discuss the process in detail about how Warp Stabilizer work in Adobe Premiere Pro to stabilize the footage.
Step 1: Choose the video clip you want to stabilize. Add it to your timeline and move to your “Effects” workspace. Hit on the Effects panel.
Step 2: Open the “Video Effects” folder and go to the ‘’Distort’’ option. Scroll down to ‘’Warp Stabilizer’’ and double click on it. Or search warp and you will see the Warp Stabilizer option under Video Effects.

Step 3: Wait for some time until Adobe Premiere Pro analyzes your video clip for Stabilization.
Step 4: Adjust the ‘’Smoothness’’ parameter of the video clip to modify the overall amount of Stabilization.

Step 5: Choose Stabilization> Result > No motion for creating the effect of a stationary camera with zero movements or select Smooth motion for only removing the shakiness of the video. And then click on Analyze to assess your video film.

Part 4: Top 5 Warp Stabilizer Tips and Troubleshooting
Premiere Pro stabilize is a powerful tool, but it also carries some limitations. Let’s check them out!
1. Consider warp stabilize during shooting:
If you keep in mind the warp stabilizer function while filming your videos or photos, you’ll get rid of fixing problems after the work. So, if you want glossy touch in your shots with zero access to a gimbal, you should consider filming with a faster shutter speed or a wider frame. In this way, you’ll get more convenience while applying the effect in the edit.
2. Modify extra cropping in your footage:
Warp stabilizer is a tool that can provide you stable footage and crop your shot as well. It can crop out the edges of your photos or videos, giving you a smooth and clean shot. To adjust the cropping in your clips, go to advanced settings and then click on Crop less <-> Smooth More Slider.
3. Analyze the effect of Warp stabilizer:
Always check the order of effects in the ‘’Effect Controls’’ folder. If you ever lost some stabilization after editing your shot, ensure not to change the Warp Stabilizer analysis source. Further, you should always re-analyze your clip after a quick color fix.
4. Nest your clips:
Sometimes we got an error message in the form of a red banner across our footage while trying to modify the speed on premiere stabilize video. Basically, we can’t use a Warp stabilizer to alter the speed of the same clip. But no worries! There is an easy fix – click on the altered clip and then click on Nest. Now, you can fix the nested sequence without any trouble.
5. Save your favorite settings as a preset:
If you’ve found a setting that gives you a happy result, you can save it as a preset for future use. In this way, you can speed up your work nicely while working with numerous shaky clips. Also, it can help if you want to make a similar effect to your multiple projects. Moreover, keep in mind that the Warp stabilizer needs to assess each clip frame by frame because it is not a one-size model that can fit all footage. Therefore, remember to click the ‘’Analyze’’ button even after putting the preset to turn it on.
Part 5: How to Stabilize Shaky Footage Without Using Warp Stabilizer?
Sometimes, the shakiness of clips is too extreme, and the Warp Stabilizer effect can’t handle it. Moreover, the filter algorithm incorrectly compensates for the camera moves. So what strategy should apply in this condition? Luckily, there is a method that can be used to stabilize your clips without using a warp stabilizer. Moreover, this process can give a hyper-realistic effect to your footage!
Step1: Import your clip into Premiere Pro Project and add it to your timeline. Hit on the “clip”, choose “Replace with After Effects Composition” to import the clip.
Step 2: Tap on the ‘’Tracker panel’’ from the right side of the screen. Scroll down to the ‘’Track Motion’’ option and open it.
Step 3: Pick the tracker marker, drag it to an area of contrasting subject and adjust it accordingly.

Tip: Remember not to make the outer box too large as After Effects can have a hard time performing the track.
Step 4: Hit the play button in the ‘’Tracker panel’’ to initiate the After Effects. Create a new ‘’Null Object’’ after the tracking process is complete.
Step 5: Move to the Tracker panel, click on “Edit Target,” choose your “Null Object” and click “OK.”
Step 6: Create a new camera and parent it to the null object for applying the stabilization effect to your clips. Enable the 3D option on both the footage layer and the null object.
Step 7: Extend your footage to compensate for any black bars that can occur as the camera pays for the shakiness. That’s it!
Conclusion:
Shaky footage is almost inescapable once you go handheld. If you don’t have a manual stabilizer like a gimbal, a tripod, or a glide cam – your work can fall victim to running, wind, walking, or other elements. In this article, we’ve introduced a quick and fast antidote for shaky footage – a Warp Stabilizer effect in the Adobe Premiere Pro. It can smooth out your shaky photos or videos with just a few clicks. So, do you know how to stabilize video premiere pro? Read out the article!
Most of the photos or videos we shoot on our cameras feel shaky and a bit too jarring. Also, a camera shake is imminent when filming a video, especially while we’re zooming in to get an ideal shot. In this situation, we don’t need to go to a professional to stabilize the videos or look right. Fortunately, Adobe Premiere Pro has some valuable tools to help you take the shake out of your videos or photos, giving you stabilized and smooth footage.
The Adobe Premiere Pro is a professional video editor that can fix unwanted camera shake in just a few clicks, giving fine-tuning to the footage – exactly the feel and looks you want! So, here in this article, we’re going to describe the guideline about Adobe Premiere Pro stabilization.
In this article
01 Why Should You Stabilize Your Video?
03 How to Stabilize A Shaky Video In Premiere Pro with Warp Stabilizer?
04 Top 5 Warp Stabilizer Tips and Troubleshooting:
05 How to Stabilize Shaky Footage Without Using Warp Stabilizer?
Part 1: Why Should You Stabilize Your Video?
Being an artistic or aesthetic choice, we might love a slightly shaken photo or video. But if it looks a little more shrill or jerky, we need to smooth it out! There are many reasons you might want to fix your irregular or shaky videos.
Generally, the shaky videos are due to our unintended movements during shooting. It can make your footage look less polished, sparkle, and glossy. Moreover, it can lower your photos or videos’ overall production quality and status. Therefore, this can be extremely disturbing for the viewers, creating a sense of mistrust.
Part 2: What Is Warp Stabilizer?
Warp Stabilizer is the effect in the Adobe Premiere Pro and Adobe After Effects that can quickly smooth out your jittery footage with just a few clicks. It can save your work – fix the smaller shakes while you’re strolling or standing still. So, now you can stabilize motion by using the Warp Stabilizer effect in Adobe Premiere Pro. However, the premiere stabilization is not a substitute for all – you may require some other program for your clips as you may also observe some lost details on the edges of the footage frame. Now let’s have a look at the benefits of Warp Stabilizer!
- It’s a built-in tool in Adobe Premiere Pro, so you don’t need to install additional software or plugin.
- You can easily remove jerkiness and jitter from your footage caused by your camera movement and convert them into smooth and steady shots.
- The results are fast, quick, and automatic.
Further, there are three more parameters to consider while using a Warp stabilizer for stabilizing the shaky footage.
- Process ( an algorithm that can analyze and track the footage)
- Smoothness ( called the strength of the effect)
- Framing ( it can handle the edges of the clips)
Part 3: How to Stabilize A Shaky Video In Premiere Pro with Warp Stabilizer?
Many filmmakers or shooters rely on handheld capture as it’s a fast, cheap, and usually intimate method. But do you know how they handle shaky footage? A handy Warp stabilizer tool in Adobe Premiere Pro lets you smooth your shaky videos or photos in minutes! So, if you find yourself dealing with photos or clips with a noticeable amount of shake, stabilize video premiere is your solution! Let’s discuss the process in detail about how Warp Stabilizer work in Adobe Premiere Pro to stabilize the footage.
Step 1: Choose the video clip you want to stabilize. Add it to your timeline and move to your “Effects” workspace. Hit on the Effects panel.
Step 2: Open the “Video Effects” folder and go to the ‘’Distort’’ option. Scroll down to ‘’Warp Stabilizer’’ and double click on it. Or search warp and you will see the Warp Stabilizer option under Video Effects.
Step 3: Wait for some time until Adobe Premiere Pro analyzes your video clip for Stabilization.
Step 4: Adjust the ‘’Smoothness’’ parameter of the video clip to modify the overall amount of Stabilization.
Step 5: Choose Stabilization> Result > No motion for creating the effect of a stationary camera with zero movements or select Smooth motion for only removing the shakiness of the video. And then click on Analyze to assess your video film.
Part 4: Top 5 Warp Stabilizer Tips and Troubleshooting
Premiere Pro stabilize is a powerful tool, but it also carries some limitations. Let’s check them out!
1. Consider warp stabilize during shooting:
If you keep in mind the warp stabilizer function while filming your videos or photos, you’ll get rid of fixing problems after the work. So, if you want glossy touch in your shots with zero access to a gimbal, you should consider filming with a faster shutter speed or a wider frame. In this way, you’ll get more convenience while applying the effect in the edit.
2. Modify extra cropping in your footage:
Warp stabilizer is a tool that can provide you stable footage and crop your shot as well. It can crop out the edges of your photos or videos, giving you a smooth and clean shot. To adjust the cropping in your clips, go to advanced settings and then click on Crop less <-> Smooth More Slider.
3. Analyze the effect of Warp stabilizer:
Always check the order of effects in the ‘’Effect Controls’’ folder. If you ever lost some stabilization after editing your shot, ensure not to change the Warp Stabilizer analysis source. Further, you should always re-analyze your clip after a quick color fix.
4. Nest your clips:
Sometimes we got an error message in the form of a red banner across our footage while trying to modify the speed on premiere stabilize video. Basically, we can’t use a Warp stabilizer to alter the speed of the same clip. But no worries! There is an easy fix – click on the altered clip and then click on Nest. Now, you can fix the nested sequence without any trouble.
5. Save your favorite settings as a preset:
If you’ve found a setting that gives you a happy result, you can save it as a preset for future use. In this way, you can speed up your work nicely while working with numerous shaky clips. Also, it can help if you want to make a similar effect to your multiple projects. Moreover, keep in mind that the Warp stabilizer needs to assess each clip frame by frame because it is not a one-size model that can fit all footage. Therefore, remember to click the ‘’Analyze’’ button even after putting the preset to turn it on.
Part 5: How to Stabilize Shaky Footage Without Using Warp Stabilizer?
Sometimes, the shakiness of clips is too extreme, and the Warp Stabilizer effect can’t handle it. Moreover, the filter algorithm incorrectly compensates for the camera moves. So what strategy should apply in this condition? Luckily, there is a method that can be used to stabilize your clips without using a warp stabilizer. Moreover, this process can give a hyper-realistic effect to your footage!
Step1: Import your clip into Premiere Pro Project and add it to your timeline. Hit on the “clip”, choose “Replace with After Effects Composition” to import the clip.
Step 2: Tap on the ‘’Tracker panel’’ from the right side of the screen. Scroll down to the ‘’Track Motion’’ option and open it.
Step 3: Pick the tracker marker, drag it to an area of contrasting subject and adjust it accordingly.
Tip: Remember not to make the outer box too large as After Effects can have a hard time performing the track.
Step 4: Hit the play button in the ‘’Tracker panel’’ to initiate the After Effects. Create a new ‘’Null Object’’ after the tracking process is complete.
Step 5: Move to the Tracker panel, click on “Edit Target,” choose your “Null Object” and click “OK.”
Step 6: Create a new camera and parent it to the null object for applying the stabilization effect to your clips. Enable the 3D option on both the footage layer and the null object.
Step 7: Extend your footage to compensate for any black bars that can occur as the camera pays for the shakiness. That’s it!
Conclusion:
Shaky footage is almost inescapable once you go handheld. If you don’t have a manual stabilizer like a gimbal, a tripod, or a glide cam – your work can fall victim to running, wind, walking, or other elements. In this article, we’ve introduced a quick and fast antidote for shaky footage – a Warp Stabilizer effect in the Adobe Premiere Pro. It can smooth out your shaky photos or videos with just a few clicks. So, do you know how to stabilize video premiere pro? Read out the article!
Convert MP4 to MP3 on the Go: Best Apps for iPhone and Android
Best MP4 to MP3 Apps for iOS and Android Devices

Ollie Mattison
Mar 27, 2024• Proven solutions
Most Smartphones capture videos in the MP4 file format that is compatible with nearly all video editing apps and media players. In addition, iPhones and Android phones are also equipped with microphones that enable you to record sound alongside the video. Storing all the videos you create on your phone’s SD card can be difficult, as a single MP4 file can easily occupy more than a gigabyte of storage space. Converting an MP4 file into MP3 is a great way of conserving space on your memory card if you only want to save its audio. So, in this article, we are going to take you through some of the best MP4 to MP3 apps for iOS and Android devices.
Best Free MP4 to MP3 Apps for Android Devices
Recording videos in high resolution is no longer a far-fetched dream because there are quite a few models on the market capable of producing crispy-sharp images. Converting a video file into an audio file doesn’t require too much effort because there are quite a few third-party apps that let you accomplish this task in just a few moments. Here are some of the best MP4 to MP3 apps for Android devices.
1. Video to MP3 Converter
Price: Free

Extracting audio from video is just one out of many functionalities this app offers. Video to MP3 Converter features both Simple and Advanced MP3 conversion modes so that you can have complete control over the audio extraction process. The app provides support for MP4, WMW or AVI video file formats among numerous others, while its Video Cutter tool enables you to remove all segments of a video clip you don’t want others to see. Video to MP3 converter also features the audio cutting tool that lets you create a new ringtone for your phone effortlessly. You can also control the bitrate of the audio files you’re making because the app lets you generate files with bitrates that vary from just 48 kb/s to 320 kb/s.
2. MP4 to MP3 - Convert Video to Audio
Price: Free

Converting MP4, AVI or MKV video files into MP3s is a fun and easy process. In addition, this app lets you add metadata to each new MP3 file you create which makes organizing huge music libraries painless. What’s more, this MP4 to MP3 converter allows you to cut both audio and video files which makes it a perfect tool for making unique ringtones. The batch conversion feature enables you to convert multiple MP4 files into MP3s at the same time. Even though the MP4 to MP3 app is free, getting rid of ads currently isn’t possible.
3. Video to MP3 Converter
Price: Free

Video to MP3 Converter is compatible with all devices running on Android 4.0 or later versions of the OS. You can use it to convert all video files on your phone to audio files, in just a few steps. Simply pick a video you’d like to convert, choose MP3 output formats, add the metadata like the name of the artist or the song’s title, specify the preferred bitrate and tap on the Convert button. After the conversion, you can merge multiple MP3s into a single audio file, but unfortunately, you won’t be able to convert several video files simultaneously.
4. MP3 Video Converter
Price: Free

This is a simple and powerful file conversion tool that lets you convert video files saved in formats like MP4, 3GP or FlV to MP3 audio files. Selecting a bitrate of the output file or adding the title of a song and an album won’t take too much of your time. However, the MP3 Video Converter doesn’t offer audio or video editing tools, so you can’t cut or merge several audio files together. What’s more, your device needs ARMv7 in order to run this app, which means that you won’t be able to use it on older models of Android phones.
5. Video to MP3 Converter – MP3 Cutter and Merger
Price: Free

Android users in need of a fast and efficient app that is capable of much more than converting MP4 files to MP3s should look no further. This app provides support for nearly all popular video file formats, which means that you can convert video files regardless of the format in which they are saved. It also offers several different output formats enabling you to choose the one that is the best fit your demands. In addition Video to MP3 Converter lets you convert up to 15 video files to MP3 simultaneously and it grants you access to both Audio and Video Cutter tools.
You may also like:
Free YouTube to MP3 Downloader for Android>>
Best MP4 to MP3 Apps for iPhones and iPad
Selecting an MP4 to MP3 app for iPhone can be a bit complicated because there are so many apps to choose from. We’ve narrowed down the selection to just five apps in order to make the selection process easier for you, so let’s take a look at some of the best MP4 to MP3 apps you can find at the App Store.
1. Video to MP3 Music Player
Price: Free, but offers-in app purchases

Converting an MP4 file from your video library into a high-quality MP3 audio file with this app is a simple 3-step process. You just have to tap on the + button, select a file you want to convert and hit the Convert button. You can also specify the time intervals at which you would like the file conversions to take place and create MP3 files without any quality loss. The app supports all frequently used video file formats, so you can convert videos that are saved in a broad range of formats. As its name indicates, Video to MP3 Music Player lets you play music, and it also enables you to share MP3 files to WhatsApp, Messenger, and other apps.
2. The Audio Converter
Price: Free, but offers-in app purchases

The Audio Converter app lets you convert both video and audio files to a broad range of audio file formats. You can convert MP4, m4v, amr, MPEG files formats among numerous others to MP3, FLAC, WAV, OGG, and other audio file formats. All conversions take place on a cloud server, which means that you can’t use The Audio Converter while your iPhone is offline. Keep in mind that the free version of the app offers only limited functionalities and you must purchase either Premium Pass or Lifetime Pass if you want to use it to convert MP4 to MP3 on a constant basis.
3. Video to MP3 – Convert Audio
Price: Free, but offers in-app purchases

iPhone owners in need of an app that can convert MP4 to MP3 in fifteen seconds should consider installing this app on their devices. You can convert all videos stored on your phone’s camera roll or you can import a video from Dropbox, One Drive, iCloud and other online file hosting platforms. Video to MP3 – Convert Audio lets you set the starting and ending points of the new audio file, which means that you can convert only a portion of an MP4 video file to MP3. All videos you convert to MP3 can be shared on social media or messaging apps and you can transfer all converted files to a computer using the iTunes File Sharing feature.
4. MP3 Converter – Audio Extractor
Price: Free, but offers in-app purchases

Converting a video saved on your phone’s camera roll to MP3 with the MP3 Converter – Audio Extractor requires you to just select a file and start the conversion process. You won’t even have to specify the output format, because MP3 is the app’s default output format. After the conversion, you can listen to the file you created to make sure that its quality is at a satisfying level. However, you won’t have any control over the bitrate of the output file or any other settings that can increase the quality of the MP3 you’re generating. Moreover, the app offers only modest file-sharing options, and you have to make an in-app purchase if you want to gain access to all features the MP3 Converter – Audio Extractor has to offer.
5. Media Converter – Video to MP3
Price: Free, but offers in-app purchases

Besides extracting audio from video, you can use the app’s built-in media player to watch videos or listen to music. Media Converter – Video to MP3 supports a broad range of input file formats and it lets you convert them to MP3, M4A, WAV, and other audio file formats. This app lacks more advanced MP4 to MP3 file conversion options since you can’t select the preferred bitrate of the output files or add tags to them. The app contains ads, and you must make an in-app purchase in order to remove them. Even the Pro version of the Media Converter – Video to MP3 doesn’t offer the file-sharing options.
You may also like:
Tools to Convert YouTube to MP3 for Your iPhone>>
Conclusion
Each of the apps we featured in the article makes creating impressive audio libraries from the videos you record with your iPhone or Android phone look easy. However, since the number of file conversion tools these apps offer can vary, choosing an MP4 to MP3 app is a bit more complicated.
If you get a PC or Mac on your hand, It would be easier to make it on them. With Filmora , within a few seconds, you’re good to go.
For Win 7 or later (64-bit)
 Secure Download
For macOS 10.14 or later
Secure Download
Click here to get Filmora for PC by email
or Try Filmora App for mobile >>>
download filmora app for ios ](https://app.adjust.com/b0k9hf2%5F4bsu85t ) download filmora app for android ](https://app.adjust.com/b0k9hf2%5F4bsu85t )
Ollie Mattison
Ollie Mattison is a writer and a lover of all things video.
Follow @Ollie Mattison
Ollie Mattison
Mar 27, 2024• Proven solutions
Most Smartphones capture videos in the MP4 file format that is compatible with nearly all video editing apps and media players. In addition, iPhones and Android phones are also equipped with microphones that enable you to record sound alongside the video. Storing all the videos you create on your phone’s SD card can be difficult, as a single MP4 file can easily occupy more than a gigabyte of storage space. Converting an MP4 file into MP3 is a great way of conserving space on your memory card if you only want to save its audio. So, in this article, we are going to take you through some of the best MP4 to MP3 apps for iOS and Android devices.
Best Free MP4 to MP3 Apps for Android Devices
Recording videos in high resolution is no longer a far-fetched dream because there are quite a few models on the market capable of producing crispy-sharp images. Converting a video file into an audio file doesn’t require too much effort because there are quite a few third-party apps that let you accomplish this task in just a few moments. Here are some of the best MP4 to MP3 apps for Android devices.
1. Video to MP3 Converter
Price: Free
Extracting audio from video is just one out of many functionalities this app offers. Video to MP3 Converter features both Simple and Advanced MP3 conversion modes so that you can have complete control over the audio extraction process. The app provides support for MP4, WMW or AVI video file formats among numerous others, while its Video Cutter tool enables you to remove all segments of a video clip you don’t want others to see. Video to MP3 converter also features the audio cutting tool that lets you create a new ringtone for your phone effortlessly. You can also control the bitrate of the audio files you’re making because the app lets you generate files with bitrates that vary from just 48 kb/s to 320 kb/s.
2. MP4 to MP3 - Convert Video to Audio
Price: Free
Converting MP4, AVI or MKV video files into MP3s is a fun and easy process. In addition, this app lets you add metadata to each new MP3 file you create which makes organizing huge music libraries painless. What’s more, this MP4 to MP3 converter allows you to cut both audio and video files which makes it a perfect tool for making unique ringtones. The batch conversion feature enables you to convert multiple MP4 files into MP3s at the same time. Even though the MP4 to MP3 app is free, getting rid of ads currently isn’t possible.
3. Video to MP3 Converter
Price: Free
Video to MP3 Converter is compatible with all devices running on Android 4.0 or later versions of the OS. You can use it to convert all video files on your phone to audio files, in just a few steps. Simply pick a video you’d like to convert, choose MP3 output formats, add the metadata like the name of the artist or the song’s title, specify the preferred bitrate and tap on the Convert button. After the conversion, you can merge multiple MP3s into a single audio file, but unfortunately, you won’t be able to convert several video files simultaneously.
4. MP3 Video Converter
Price: Free
This is a simple and powerful file conversion tool that lets you convert video files saved in formats like MP4, 3GP or FlV to MP3 audio files. Selecting a bitrate of the output file or adding the title of a song and an album won’t take too much of your time. However, the MP3 Video Converter doesn’t offer audio or video editing tools, so you can’t cut or merge several audio files together. What’s more, your device needs ARMv7 in order to run this app, which means that you won’t be able to use it on older models of Android phones.
5. Video to MP3 Converter – MP3 Cutter and Merger
Price: Free
Android users in need of a fast and efficient app that is capable of much more than converting MP4 files to MP3s should look no further. This app provides support for nearly all popular video file formats, which means that you can convert video files regardless of the format in which they are saved. It also offers several different output formats enabling you to choose the one that is the best fit your demands. In addition Video to MP3 Converter lets you convert up to 15 video files to MP3 simultaneously and it grants you access to both Audio and Video Cutter tools.
You may also like:
Free YouTube to MP3 Downloader for Android>>
Best MP4 to MP3 Apps for iPhones and iPad
Selecting an MP4 to MP3 app for iPhone can be a bit complicated because there are so many apps to choose from. We’ve narrowed down the selection to just five apps in order to make the selection process easier for you, so let’s take a look at some of the best MP4 to MP3 apps you can find at the App Store.
1. Video to MP3 Music Player
Price: Free, but offers-in app purchases
Converting an MP4 file from your video library into a high-quality MP3 audio file with this app is a simple 3-step process. You just have to tap on the + button, select a file you want to convert and hit the Convert button. You can also specify the time intervals at which you would like the file conversions to take place and create MP3 files without any quality loss. The app supports all frequently used video file formats, so you can convert videos that are saved in a broad range of formats. As its name indicates, Video to MP3 Music Player lets you play music, and it also enables you to share MP3 files to WhatsApp, Messenger, and other apps.
2. The Audio Converter
Price: Free, but offers-in app purchases
The Audio Converter app lets you convert both video and audio files to a broad range of audio file formats. You can convert MP4, m4v, amr, MPEG files formats among numerous others to MP3, FLAC, WAV, OGG, and other audio file formats. All conversions take place on a cloud server, which means that you can’t use The Audio Converter while your iPhone is offline. Keep in mind that the free version of the app offers only limited functionalities and you must purchase either Premium Pass or Lifetime Pass if you want to use it to convert MP4 to MP3 on a constant basis.
3. Video to MP3 – Convert Audio
Price: Free, but offers in-app purchases
iPhone owners in need of an app that can convert MP4 to MP3 in fifteen seconds should consider installing this app on their devices. You can convert all videos stored on your phone’s camera roll or you can import a video from Dropbox, One Drive, iCloud and other online file hosting platforms. Video to MP3 – Convert Audio lets you set the starting and ending points of the new audio file, which means that you can convert only a portion of an MP4 video file to MP3. All videos you convert to MP3 can be shared on social media or messaging apps and you can transfer all converted files to a computer using the iTunes File Sharing feature.
4. MP3 Converter – Audio Extractor
Price: Free, but offers in-app purchases
Converting a video saved on your phone’s camera roll to MP3 with the MP3 Converter – Audio Extractor requires you to just select a file and start the conversion process. You won’t even have to specify the output format, because MP3 is the app’s default output format. After the conversion, you can listen to the file you created to make sure that its quality is at a satisfying level. However, you won’t have any control over the bitrate of the output file or any other settings that can increase the quality of the MP3 you’re generating. Moreover, the app offers only modest file-sharing options, and you have to make an in-app purchase if you want to gain access to all features the MP3 Converter – Audio Extractor has to offer.
5. Media Converter – Video to MP3
Price: Free, but offers in-app purchases
Besides extracting audio from video, you can use the app’s built-in media player to watch videos or listen to music. Media Converter – Video to MP3 supports a broad range of input file formats and it lets you convert them to MP3, M4A, WAV, and other audio file formats. This app lacks more advanced MP4 to MP3 file conversion options since you can’t select the preferred bitrate of the output files or add tags to them. The app contains ads, and you must make an in-app purchase in order to remove them. Even the Pro version of the Media Converter – Video to MP3 doesn’t offer the file-sharing options.
You may also like:
Tools to Convert YouTube to MP3 for Your iPhone>>
Conclusion
Each of the apps we featured in the article makes creating impressive audio libraries from the videos you record with your iPhone or Android phone look easy. However, since the number of file conversion tools these apps offer can vary, choosing an MP4 to MP3 app is a bit more complicated.
If you get a PC or Mac on your hand, It would be easier to make it on them. With Filmora , within a few seconds, you’re good to go.
For Win 7 or later (64-bit)
Secure Download
For macOS 10.14 or later
Secure Download
Click here to get Filmora for PC by email
or Try Filmora App for mobile >>>
download filmora app for ios ](https://app.adjust.com/b0k9hf2%5F4bsu85t ) download filmora app for android ](https://app.adjust.com/b0k9hf2%5F4bsu85t )
Ollie Mattison
Ollie Mattison is a writer and a lover of all things video.
Follow @Ollie Mattison
Also read:
- New In 2024, Professional Online Video Montage Editors
- New The Best Glitch Video Editors for 2024
- New 2024 Approved The Ultimate FCP Voice Over Guide Tips, Tricks, and Best Practices
- Updated In 2024, No-Download Zone 10 Top Free Online Video Compressors
- Updated S Leading Video Editors for Music and Sound Effects for 2024
- Updated Unleash Your Creativity QuickTime Video Editing on Mac for Beginners
- Updated 2024 Approved Get Splice Video Editing Software for macOS
- Updated In 2024, Hands-On with Splice A Detailed Review of the Video Editing App
- Updated Mastering Color Grading in Final Cut Pro for 2024
- New In 2024, The Freebie Frenzy Top Online Video Editors Reviewed
- 2024 Approved PowerDirector Not Your Cup of Tea? Try These Alternatives for Android & iOS
- Updated In 2024, Edit FLV Videos on Windows 8 with Ease A Beginner-Friendly Editor
- Updated Windows Movie Maker Tutorial From Beginner to Pro for 2024
- Updated Unleash Your Creative Potential Top Audio Editing Software for Pros
- New 2024 Approved Mastering Titles in FCPX Essential Skills for Video Editors
- New In 2024, Master Video Editing on Mac VN Video Editor and Its Competitors
- New Chromebook Video Editing Hacks Using Windows and Mac OS Apps for 2024
- In 2024, No-Cost Video Editing Top Picks Without Watermarks
- Updated Revolutionize Your Video Content How to Convert Videos Into Cartoons in Minutes for 2024
- The Ultimate Guide to Free iPhone Video Rotators Top 5 for 2024
- Updated Need a VirtualDub Replacement? Check Out These Amazing Options for 2024
- Say Goodbye to Shaky Cam Video Stabilization Tips for Premiere Pro Users for 2024
- Updated Mastering Time in FCPX Freeze Frames, Slow-Mo, and More
- Updated Resize with Ease A Detailed Guide to Image Ratio Adjustment
- Updated Movie Magic on Your Mobile Top 10 Trailer Apps for iPhone and iPad for 2024
- New 2024 Approved Revolutionize Your Workflow Top-Rated Mac Speech to Text Tools You Might Be Missing Free & Instant Access
- New 2024 Approved Top FCPX Learning Resources Top Channels and Sites
- Updated 2024 Approved The Ultimate List of WhatsApp Status Video Editors
- Updated Capture the Speed of Life 2 Easy Ways to Create Stunning Time Lapse Videos for 2024
- 2024 Approved Unmarked and Unbeatable Top Free Video Editing Software
- New 2024 Approved What Apps Can You Use to Blur the Face or the Background on the Video? In This Article, I Will Share some of the Best Video Blur Apps that You Can Use to Blur Any Part of the Video on iPhone or Android Phones
- New Online Video Reverse Software Top Picks
- New Discover the Best Public Domain Images Top 10 Sites for 2024
- How to Track Oppo A59 5G Location by Number | Dr.fone
- Easy steps to recover deleted videos from Huawei Nova Y71
- Unlock Your Poco M6 Pro 5Gs Potential The Top 20 Lock Screen Apps You Need to Try
- Process of Screen Sharing Oppo A38 to PC- Detailed Steps | Dr.fone
- Top 10 Telegram Spy Tools On Oppo A1x 5G for Parents | Dr.fone
- Ultimate Guide on Apple iPhone 6 iCloud Activation Lock Bypass
- How To Remove the Two Factor Authentication On Apple iPhone SE (2022)
- In 2024, How to Unlock iPhone 12 Pro Max with/without SIM Card
- In 2024, Apple ID is Greyed Out On Apple iPhone SE How to Bypass?
- Learn How To Lock Stolen Your Apple iPhone 15 Properly | Dr.fone
- Updated Instagram Video Formatting Tips and Tricks for Success for 2024
- Updated In 2024, Virtualdub A Review and Comparison of Top Video Editing Software
- In 2024, How to Fake Snapchat Location without Jailbreak On Samsung Galaxy A25 5G | Dr.fone
- In 2024, What to do if your iPhone XS Max has bad ESN or blacklisted IMEI?
- Ultimate Guide to Free PPTP VPN For Beginners On Motorola Moto G14 | Dr.fone
- Factory Reset iPhone 11 | Dr.fone
- In 2024, CatchEmAll Celebrate National Pokémon Day with Virtual Location On Realme Narzo N53 | Dr.fone
- In 2024, How to Fix Pokemon Go Route Not Working On Tecno Pop 7 Pro? | Dr.fone
- 2024 Approved Top 10 Best Video Speed Changing Apps for FREE iOS and Android
- In 2024, A Quick Guide to Itel A60 FRP Bypass Instantly
- New 2024 Approved Best 7 Ways to Promote Twitch Stream
- In 2024, Remove the Lock Screen Fingerprint Of Your Oppo Reno 11 5G
- Reasons why Pokémon GPS does not Work On Tecno Camon 20? | Dr.fone
- How to Reset Gmail Password on Realme C51 Devices
- Installation and Registration | Wondershare Virbo
- What You Need To Know To Improve Your Oppo Reno 11 Pro 5G Hard Reset | Dr.fone
- 7 Fixes for Unfortunately, Phone Has Stopped on Google Pixel 8 Pro | Dr.fone
- Hassle-Free Ways to Remove FRP Lock on Samsung Galaxy S24+ Phones with/without a PC
- In 2024, How Can We Bypass Vivo V29 FRP?
- How PGSharp Save You from Ban While Spoofing Pokemon Go On Vivo V27e? | Dr.fone
- Title: Transform WebM Into MP3 Best Conversion Methods Revealed for 2024
- Author: Isabella
- Created at : 2024-05-19 13:03:33
- Updated at : 2024-05-20 13:03:33
- Link: https://video-creation-software.techidaily.com/transform-webm-into-mp3-best-conversion-methods-revealed-for-2024/
- License: This work is licensed under CC BY-NC-SA 4.0.
