
Updated 2024 Approved Adding Titles in FCPX A Beginners Guide to Professional Results
Adding Titles in FCPX: A Beginner’s Guide to Professional Results
How to Add Titles in Final Cut Pro X

Benjamin Arango
Mar 27, 2024• Proven solutions
We add text titles to our projects to tell the audience something they can’t figure out on their own, such as the title of our program, the name of the person speaking, or technical details about a subject.
This is a basic tutorial about Apple Final Cut Pro X, professional video editing software. However, if video editing is new to you, consider Wondershare Filmora for Mac . This is a powerful but easy-to-use tool for users just starting out. Download the free trial version below.
 Download Mac Version ](https://tools.techidaily.com/wondershare/filmora/download/ )
Final Cut Pro X has almost 200 different text effects that we can add, but the process of adding titles is essentially the same. Adding titles is what this article is about.
DEFINITIONS
Just to keep us all on the same page, here are my definitions of key terms related to text:
- Text or titles. Words placed on the screen. I use these terms interchangeably.
- Superimpose. Text displayed on the the screen with other video below it. These are also called “supers” or “keys.”
- Full-screen. Text which occupies the entire screen.
- Lower-third. Text which fits below a person talking; in the “lower-third” of the screen.
- Info-graphics. Full-screen text which is superimposed on a graphic, generally used to convey technical information. Typical uses are sports statistics or other information which is easier to convey using text than having someone read the words.
JUST THE BASICS

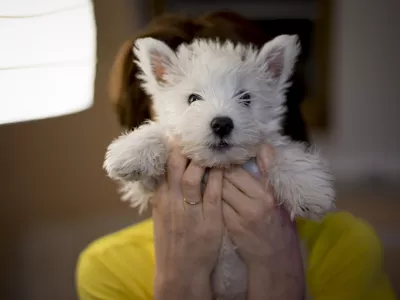
I’d like to introduce “Yertle,” he’s a sea turtle and the star of this article. (Footage courtesy of Jim Walker and Lobsters Gone Wild Productions.)
At its simplest, we use titles to display his (its?) name.

In the Timeline, put the playhead where you want a title to appear and type Shift+Control+T. This inserts the default lower-third title at the position of the playhead. The title, like almost all titles, has a default duration of 10:00 seconds.

Look at the Browser and see the results of your work. A lower-third title is superimposed over the video in the lower left corner. (I’ll talk about formatting the text in a few paragraphs.)
NOTE: The big limitation of this lower-third title is that it can only be positioned in the left corner. Moving it to the center or right corner requires manual adjustment.
You position or trim a title the same as any video clip: drag the clip to a different location, or drag an edge to change its duration.
Select that title and delete it by pressing the Delete key.

This time, type Control+T and the default full-screen title appears in the center of the screen. Again, this has a default duration of 10 seconds.

If you look right in the center of the screen, you’ll see the word “Title.” Yes, its darn near invisible. And, yes, it looks, um, ugly. However, we have a TON of formatting control to make this look however we want.
Select and delete that full-screen title.
There’s one more way to apply a title: dragging from the Titles Browser.

Click the Title icon in the Toolbar. This displays the contents of the Title Browser. The column on the left displays title categories, the icons on the right indicate individual titles, the search box at the bottom allows you to search for specific titles by name, while the number in the lower right indicates the number of titles currently displayed. (Your number may not match mine because I’ve added a few custom titles to my system.)

Let’s add a totally ridiculous title to our turtle - drag Clouds from the Title Browser and place it above the clip at the point where you want a title to appear.
NOTE: I’m using a marker in the Timeline to help me find the same place in a clip so my screen shots are consistent. Markers are not needed in any way for titles.

Um, yeah. So, some titles look more professional than others… You can delete this title now.
So, we:
- Add titles using keyboard shortcuts
- Drag titles from the Title Browser
- Change position by dragging the title
- Change duration by dragging the edge of the clip
- Delete a title by selecting it and pressing the Delete key
CHANGING TEXT

Add a new full-screen title (type Control+T) to the Timeline. To change the text in a title, double-click it in the Viewer. Here, I’ve changed my title to “An Undersea Adventure.”
NOTE: We can also change the text using the Inspector. I’ll show you how in a few paragraphs. Pick whichever method is easiest for you.
All text, in any title, can be changed by double-clicking it in the Viewer to select it, then typing the new text you want to use.
FORMATTING TEXT

You can format any text that you can select. This means that you can format entire phrases, words, or individual letters differently. For this article, I will format everything the same, because once you know how this works, you can experiment on your own.
Here, I selected my entire title and opened the Inspector (shortcut Cmd+4). Click the Text tab at the top. This section of the Inspector allows you to format the text.
NOTE: The text box near the top of the panel is the second place you can select text for formatting.
If you want a fast way to format text, click the word “Normal” at the top. This displays a menu filled with different text formats. Some of these formats look pretty dreadful; the rest look worse.
NOTE: You can create your own text styles. Refer to the Help for information on how.

The Basic section of the Inspector allows you to change fonts, size, alignment… all the standard font settings we see in other programs. Here, I’ve changed the font to Hobo Std, at 167 points.
While many of these settings you already know there are a few you may not:
- Line spacing. Adjusts the vertical distance between lines within the same paragraph.
- Tracking. Adjusts the horizontal spacing between letters.
- Baseline. Adjusts the vertical spacing of text compared to the horizontal line running thru the center of the white circle in the Viewer.

The Face section allows us to change font color, opacity and blue. Outline and Glow allows us to add, not surprisingly, outlines and glows. You can adjust these as you see fit - I tend not to add outlines or glows.

However, I STRONGLY recommend adding drop shadows to all text that you want viewers to read. Video, even HD video, is low resolution compared to print. Drop shadows make your text much easier to read. These are the settings I recommend for drop shadows.

After making a few changes in the Inspector, here’s the final result. Very cool - and very different from where we started!
ACTION SAFE/TITLE SAFE ZONES
Since television was first invented, we needed to compensate for the differences in TV sets by designing graphics to stay within Action Safe and Title Safe boundaries.
While much of today’s video is designed for the web, your titles will look the best if you follow the same guidelines.
Titles015

Go to the Switch in the Viewer and select “Show Action Safe/Title Safe Zones.”

This displays two pale rectangles in the frame. The outer rectangle is called “Action Safe,” the inner one is called “Title Safe.” Action Safe is 5% in from all edges; Title Safe is 10% in from all edges.
When designing text and graphics for the web, keep all essential elements inside the outer rectangle. When designing graphics and text for broadcast or cable, keep all essential elements inside the inner rectangle.
Here, for example, notice that my title is fully contained within Action Safe.
SUMMARY
Titles give our programs character and personality, plus they explain what’s going on to the audience. Final Cut Pro X provides a wealth of formatting options to make our text look great.
Benjamin Arango
Benjamin Arango is a writer and a lover of all things video.
Follow @Benjamin Arango
Benjamin Arango
Mar 27, 2024• Proven solutions
We add text titles to our projects to tell the audience something they can’t figure out on their own, such as the title of our program, the name of the person speaking, or technical details about a subject.
This is a basic tutorial about Apple Final Cut Pro X, professional video editing software. However, if video editing is new to you, consider Wondershare Filmora for Mac . This is a powerful but easy-to-use tool for users just starting out. Download the free trial version below.
Download Mac Version ](https://tools.techidaily.com/wondershare/filmora/download/ )
Final Cut Pro X has almost 200 different text effects that we can add, but the process of adding titles is essentially the same. Adding titles is what this article is about.
DEFINITIONS
Just to keep us all on the same page, here are my definitions of key terms related to text:
- Text or titles. Words placed on the screen. I use these terms interchangeably.
- Superimpose. Text displayed on the the screen with other video below it. These are also called “supers” or “keys.”
- Full-screen. Text which occupies the entire screen.
- Lower-third. Text which fits below a person talking; in the “lower-third” of the screen.
- Info-graphics. Full-screen text which is superimposed on a graphic, generally used to convey technical information. Typical uses are sports statistics or other information which is easier to convey using text than having someone read the words.
JUST THE BASICS
I’d like to introduce “Yertle,” he’s a sea turtle and the star of this article. (Footage courtesy of Jim Walker and Lobsters Gone Wild Productions.)
At its simplest, we use titles to display his (its?) name.
In the Timeline, put the playhead where you want a title to appear and type Shift+Control+T. This inserts the default lower-third title at the position of the playhead. The title, like almost all titles, has a default duration of 10:00 seconds.
Look at the Browser and see the results of your work. A lower-third title is superimposed over the video in the lower left corner. (I’ll talk about formatting the text in a few paragraphs.)
NOTE: The big limitation of this lower-third title is that it can only be positioned in the left corner. Moving it to the center or right corner requires manual adjustment.
You position or trim a title the same as any video clip: drag the clip to a different location, or drag an edge to change its duration.
Select that title and delete it by pressing the Delete key.
This time, type Control+T and the default full-screen title appears in the center of the screen. Again, this has a default duration of 10 seconds.
If you look right in the center of the screen, you’ll see the word “Title.” Yes, its darn near invisible. And, yes, it looks, um, ugly. However, we have a TON of formatting control to make this look however we want.
Select and delete that full-screen title.
There’s one more way to apply a title: dragging from the Titles Browser.
Click the Title icon in the Toolbar. This displays the contents of the Title Browser. The column on the left displays title categories, the icons on the right indicate individual titles, the search box at the bottom allows you to search for specific titles by name, while the number in the lower right indicates the number of titles currently displayed. (Your number may not match mine because I’ve added a few custom titles to my system.)
Let’s add a totally ridiculous title to our turtle - drag Clouds from the Title Browser and place it above the clip at the point where you want a title to appear.
NOTE: I’m using a marker in the Timeline to help me find the same place in a clip so my screen shots are consistent. Markers are not needed in any way for titles.
Um, yeah. So, some titles look more professional than others… You can delete this title now.
So, we:
- Add titles using keyboard shortcuts
- Drag titles from the Title Browser
- Change position by dragging the title
- Change duration by dragging the edge of the clip
- Delete a title by selecting it and pressing the Delete key
CHANGING TEXT
Add a new full-screen title (type Control+T) to the Timeline. To change the text in a title, double-click it in the Viewer. Here, I’ve changed my title to “An Undersea Adventure.”
NOTE: We can also change the text using the Inspector. I’ll show you how in a few paragraphs. Pick whichever method is easiest for you.
All text, in any title, can be changed by double-clicking it in the Viewer to select it, then typing the new text you want to use.
FORMATTING TEXT
You can format any text that you can select. This means that you can format entire phrases, words, or individual letters differently. For this article, I will format everything the same, because once you know how this works, you can experiment on your own.
Here, I selected my entire title and opened the Inspector (shortcut Cmd+4). Click the Text tab at the top. This section of the Inspector allows you to format the text.
NOTE: The text box near the top of the panel is the second place you can select text for formatting.
If you want a fast way to format text, click the word “Normal” at the top. This displays a menu filled with different text formats. Some of these formats look pretty dreadful; the rest look worse.
NOTE: You can create your own text styles. Refer to the Help for information on how.
The Basic section of the Inspector allows you to change fonts, size, alignment… all the standard font settings we see in other programs. Here, I’ve changed the font to Hobo Std, at 167 points.
While many of these settings you already know there are a few you may not:
- Line spacing. Adjusts the vertical distance between lines within the same paragraph.
- Tracking. Adjusts the horizontal spacing between letters.
- Baseline. Adjusts the vertical spacing of text compared to the horizontal line running thru the center of the white circle in the Viewer.
The Face section allows us to change font color, opacity and blue. Outline and Glow allows us to add, not surprisingly, outlines and glows. You can adjust these as you see fit - I tend not to add outlines or glows.
However, I STRONGLY recommend adding drop shadows to all text that you want viewers to read. Video, even HD video, is low resolution compared to print. Drop shadows make your text much easier to read. These are the settings I recommend for drop shadows.
After making a few changes in the Inspector, here’s the final result. Very cool - and very different from where we started!
ACTION SAFE/TITLE SAFE ZONES
Since television was first invented, we needed to compensate for the differences in TV sets by designing graphics to stay within Action Safe and Title Safe boundaries.
While much of today’s video is designed for the web, your titles will look the best if you follow the same guidelines.
Titles015
Go to the Switch in the Viewer and select “Show Action Safe/Title Safe Zones.”
This displays two pale rectangles in the frame. The outer rectangle is called “Action Safe,” the inner one is called “Title Safe.” Action Safe is 5% in from all edges; Title Safe is 10% in from all edges.
When designing text and graphics for the web, keep all essential elements inside the outer rectangle. When designing graphics and text for broadcast or cable, keep all essential elements inside the inner rectangle.
Here, for example, notice that my title is fully contained within Action Safe.
SUMMARY
Titles give our programs character and personality, plus they explain what’s going on to the audience. Final Cut Pro X provides a wealth of formatting options to make our text look great.
Benjamin Arango
Benjamin Arango is a writer and a lover of all things video.
Follow @Benjamin Arango
Animate On-the-Go: Top Free Mobile Apps for 3D Animation Enthusiasts
Best 3D Animation Apps for Android and iPhone (Free Download)

Shanoon Cox
Mar 27, 2024• Proven solutions

You don’t need to use your desktop to create exciting, fun, and thought-provoking 3D animations.
In fact, more and more people are moving from using animation software on desktop and producing outstanding 3D animation videos through their apps.
There are many great reasons for making your photo 3D cartoon videos on your phone or tablet. You don’t need to carry your laptop around with you all the time or use your desktop to get the results that you require.
Read on to learn more about six of the very best 3D animation apps for your phone.
- Part 1: Best 3D Animation App for iPhone
- Part 2: Best 3D Animation App for Android
- Part 3: FAQ about 3D Animation Apps
Recommended 3D animation software - Filmora
It is true that you can make animation on your phone, but editing 3D animation on the desktop is necessary if you want to have more controls on an animation video. Here we recommend using Filmora.
You can use it to make 3D animation or 2D animation by adding keyframes , so the animation will be smooth and natural. You just need to build a white plane to easily start making animation.
Besides, color correction/grading and audio mixer will raise up your animation video to a new level.
Free download it to have a try!
Note: The light flare effects of Filmora will make 3D animation to a new level.
Below is a comparison table of 3D animation apps. It is a quick introduction of these 6 3D animation software on Android and iPhone. Take a look.
| Support OS | Features | Pros | Cons | |
|---|---|---|---|---|
| Bot3D Editor | iPhone | Make 3D pose as you want; Lip-sync to recorded voices | User-friendly interface; You can make all kinds of gestures | Impossible to download characters |
| Toontastic 3D | iPhone/Android | Liked by Common Sense Media; Mix audio with song | You can customize the color of the characters | Users want more props |
| Maya For 3D Animation | Android | Integrate your work with Maya | Upload your work to Maya for future editing | Some bugs will appear |
| Animate It! | iPhone/Android | Change playback speed as you want | Onion skinning is fun to use for us | Not all characters are free to use |
| Animate Me | iPhone/Android | Easy to use for beginners and higher end users | Regular audio update; Share unlimited 3D animation | Vague icons may cause misunderstanding |
| Anim8 | iPhone/Android | Simple to use with friendly interface | Make full-body animation at one time | Only two characters are available |
Part 1: Best 3D Animation App for iPhone
1. Bot3D Editor
This best 3D animation app promises to give you “everything you need at your fingertips” and is one of the most efficient smartphone and tablet 3D animation editors on the market.
It’s easy to export and share your work when it is finished, and the app is compatible with iPhones and iPads.
You can create poses within moments and animate them immediately. Key features include the Full Body Inverse Kinematics Algorithm, the importing of sound data and a HandEditor, Face Editor and SceneEditor.
You can also import your own photos and create characters that can lip-sync to voices. The app allows you to create vertical and horizontal videos.
Pros:
- Customization is good to use
- Easy to use and make your pose
- Various emotions to use
Cons:
- You can’t download your own characters
- Limited combination and they can’t be mixed up
2. Toontastic 3D
This app allows you to draw, animate, and narrate cartoons. Toontastic is the best 3D animation app that can record your voice and animations and store your animations on your device.
Many people are using the app to create photo albums, put together news reports, and create adventures, and much more.

The animation maker has received glowing reviews from many leading media outlets and was even named the Best Kids App of the Year for 2017. Download the app to create pirates, villains, robots, and all sorts of different characters. Built-in songs are available, and there are three Story Arcs to choose from. You can even add yourself to your stories.
Pros:
- It has a Parents’ Choice Gold Award
- You can design your own 3D drawing tools
- Directly upload it to Photos library
Cons:
- Needs more characters in one scene
- More props or extra sound effects are required
Part 2: Best 3D Animation App for Android
1. Maya For 3D Animation
Maya is developed by Autodesk, Inc and can be used to produce interactive 3D applications such as visual effects, animated films, video games, and more.
3D assets created in Maya have been seen in various films, TV series, and games. Those seeking a reliable 3D modeling, animation, rendering, and imaging solution should feel well catered-for by Maya.
Pros:
- This 3D animation maker is easy to make
- You can import your work to Maya
Cons:
- Some bugs appear for many times

2. Animate It!
Animate It! It comes with a host of useful features for the ambitious animators of today. The animation app allows you to create sketches and poses on your tablet and smartphone whenever inspiration strikes.
It offers simple, intuitive controls, and you can perform various actions by finger touching, touching and dragging, and more.
The app can even be used by children to create animations, though it is also a favorite with students, game developers, and professional animators.
There are various skins available for your characters, as well as props and land creation facilities.
Pros:
- You can select your characters easily
- You can add user skins up to 10 PNG images
Cons:
- No tutorial or instruction offers
- Icons are vague

3. Animate Me
This 3D animation app is perfect for kids in particular but is ideal for adults too. Kids across the world have been using Animate Me to create exciting 3D animations and upload them to YouTube.
The app comes with in-built cartoon characters that help kids and those new to the world of animation to get to grips with the basics. It’s possible to make characters perform various actions, including walking, running, jumping, and talking with the app.
There are also video tutorials that will help you get more out of the app. The Everyplay feature enables you to share your work across all kinds of online platforms, including not only YouTube but Facebook and Twitter too.
Pros:
- Make 3D cartoons move quickly and easily
- Include video tutorials for beginners
Cons:
- You have to buy other characters

4. Anim8
If you’re looking for a tool that will let you gain a deeper understanding of 3D and character animation, Anim8 may well be the perfect solution.
You can use the app to pose five existing characters in a 3D environment, with the controls being highly intuitive and efficient. Many people are drawn to this app because of its simplicity.
The app has been designed by leading character animators, and you can start animating within just a few minutes once you have downloaded it. Full body animation is possible thanks to the advanced articulation on offer, and you can sketch out key poses with the drawing tool.
The onion skin feature will help you plan out poses and time in a precise manner, and you can easily upload your work to a plethora of online platforms, including Facebook, Twitter, and YouTube. There are more than 30 points of articulation, and you can also import audio with ease.
Pros:
- Easy to use interface in Anim8
- You can sketch your key poses every time
Cons:
- Sometimes you can share your 3D animation
- Not all characters are free to use

Part 3: FAQ about 3D Animation Apps
1. What is the best app for animation?
For the 3D animation app, we suggest using the Bot3D Editor. It is an easy-to-use anime editor that only needs dragging to complete your editing. If you know how to use keyframes, it will give you more control over animation. For example, you can make poses in many ways by keyframes.
2. How do you animate a 3D object?
The best way to animate a 3D object is by using keyframes and built-in templates. As a beginner, you may not know how to make a 3D object, but with templates, you just need to choose one and start customizing it.
3. Where can I animate for free?
There are so many free-to-use animation software to use. Pencil2D is a reliable tool to make animation easy. You just need to download it on the desktop to animate objects. However, it’d be best if you have a basic understanding of how to make animation. Otherwise, you may need some time to learn it first.
Conclusion
3D animation apps are ideal for those wishing to learn new skills and heighten their creativity. No matter what you’re looking for, we’re confident that you’ll find an app that meets your needs above. You can also use leading tools such as Filmora to edit your video and add extra effects to add an extra touch of magic to your work. Why not get started right now?
Shanoon Cox
Shanoon Cox is a writer and a lover of all things video.
Follow @Shanoon Cox
Shanoon Cox
Mar 27, 2024• Proven solutions
You don’t need to use your desktop to create exciting, fun, and thought-provoking 3D animations.
In fact, more and more people are moving from using animation software on desktop and producing outstanding 3D animation videos through their apps.
There are many great reasons for making your photo 3D cartoon videos on your phone or tablet. You don’t need to carry your laptop around with you all the time or use your desktop to get the results that you require.
Read on to learn more about six of the very best 3D animation apps for your phone.
- Part 1: Best 3D Animation App for iPhone
- Part 2: Best 3D Animation App for Android
- Part 3: FAQ about 3D Animation Apps
Recommended 3D animation software - Filmora
It is true that you can make animation on your phone, but editing 3D animation on the desktop is necessary if you want to have more controls on an animation video. Here we recommend using Filmora.
You can use it to make 3D animation or 2D animation by adding keyframes , so the animation will be smooth and natural. You just need to build a white plane to easily start making animation.
Besides, color correction/grading and audio mixer will raise up your animation video to a new level.
Free download it to have a try!
Note: The light flare effects of Filmora will make 3D animation to a new level.
Below is a comparison table of 3D animation apps. It is a quick introduction of these 6 3D animation software on Android and iPhone. Take a look.
| Support OS | Features | Pros | Cons | |
|---|---|---|---|---|
| Bot3D Editor | iPhone | Make 3D pose as you want; Lip-sync to recorded voices | User-friendly interface; You can make all kinds of gestures | Impossible to download characters |
| Toontastic 3D | iPhone/Android | Liked by Common Sense Media; Mix audio with song | You can customize the color of the characters | Users want more props |
| Maya For 3D Animation | Android | Integrate your work with Maya | Upload your work to Maya for future editing | Some bugs will appear |
| Animate It! | iPhone/Android | Change playback speed as you want | Onion skinning is fun to use for us | Not all characters are free to use |
| Animate Me | iPhone/Android | Easy to use for beginners and higher end users | Regular audio update; Share unlimited 3D animation | Vague icons may cause misunderstanding |
| Anim8 | iPhone/Android | Simple to use with friendly interface | Make full-body animation at one time | Only two characters are available |
Part 1: Best 3D Animation App for iPhone
1. Bot3D Editor
This best 3D animation app promises to give you “everything you need at your fingertips” and is one of the most efficient smartphone and tablet 3D animation editors on the market.
It’s easy to export and share your work when it is finished, and the app is compatible with iPhones and iPads.
You can create poses within moments and animate them immediately. Key features include the Full Body Inverse Kinematics Algorithm, the importing of sound data and a HandEditor, Face Editor and SceneEditor.
You can also import your own photos and create characters that can lip-sync to voices. The app allows you to create vertical and horizontal videos.
Pros:
- Customization is good to use
- Easy to use and make your pose
- Various emotions to use
Cons:
- You can’t download your own characters
- Limited combination and they can’t be mixed up
2. Toontastic 3D
This app allows you to draw, animate, and narrate cartoons. Toontastic is the best 3D animation app that can record your voice and animations and store your animations on your device.
Many people are using the app to create photo albums, put together news reports, and create adventures, and much more.
The animation maker has received glowing reviews from many leading media outlets and was even named the Best Kids App of the Year for 2017. Download the app to create pirates, villains, robots, and all sorts of different characters. Built-in songs are available, and there are three Story Arcs to choose from. You can even add yourself to your stories.
Pros:
- It has a Parents’ Choice Gold Award
- You can design your own 3D drawing tools
- Directly upload it to Photos library
Cons:
- Needs more characters in one scene
- More props or extra sound effects are required
Part 2: Best 3D Animation App for Android
1. Maya For 3D Animation
Maya is developed by Autodesk, Inc and can be used to produce interactive 3D applications such as visual effects, animated films, video games, and more.
3D assets created in Maya have been seen in various films, TV series, and games. Those seeking a reliable 3D modeling, animation, rendering, and imaging solution should feel well catered-for by Maya.
Pros:
- This 3D animation maker is easy to make
- You can import your work to Maya
Cons:
- Some bugs appear for many times
2. Animate It!
Animate It! It comes with a host of useful features for the ambitious animators of today. The animation app allows you to create sketches and poses on your tablet and smartphone whenever inspiration strikes.
It offers simple, intuitive controls, and you can perform various actions by finger touching, touching and dragging, and more.
The app can even be used by children to create animations, though it is also a favorite with students, game developers, and professional animators.
There are various skins available for your characters, as well as props and land creation facilities.
Pros:
- You can select your characters easily
- You can add user skins up to 10 PNG images
Cons:
- No tutorial or instruction offers
- Icons are vague
3. Animate Me
This 3D animation app is perfect for kids in particular but is ideal for adults too. Kids across the world have been using Animate Me to create exciting 3D animations and upload them to YouTube.
The app comes with in-built cartoon characters that help kids and those new to the world of animation to get to grips with the basics. It’s possible to make characters perform various actions, including walking, running, jumping, and talking with the app.
There are also video tutorials that will help you get more out of the app. The Everyplay feature enables you to share your work across all kinds of online platforms, including not only YouTube but Facebook and Twitter too.
Pros:
- Make 3D cartoons move quickly and easily
- Include video tutorials for beginners
Cons:
- You have to buy other characters
4. Anim8
If you’re looking for a tool that will let you gain a deeper understanding of 3D and character animation, Anim8 may well be the perfect solution.
You can use the app to pose five existing characters in a 3D environment, with the controls being highly intuitive and efficient. Many people are drawn to this app because of its simplicity.
The app has been designed by leading character animators, and you can start animating within just a few minutes once you have downloaded it. Full body animation is possible thanks to the advanced articulation on offer, and you can sketch out key poses with the drawing tool.
The onion skin feature will help you plan out poses and time in a precise manner, and you can easily upload your work to a plethora of online platforms, including Facebook, Twitter, and YouTube. There are more than 30 points of articulation, and you can also import audio with ease.
Pros:
- Easy to use interface in Anim8
- You can sketch your key poses every time
Cons:
- Sometimes you can share your 3D animation
- Not all characters are free to use
Part 3: FAQ about 3D Animation Apps
1. What is the best app for animation?
For the 3D animation app, we suggest using the Bot3D Editor. It is an easy-to-use anime editor that only needs dragging to complete your editing. If you know how to use keyframes, it will give you more control over animation. For example, you can make poses in many ways by keyframes.
2. How do you animate a 3D object?
The best way to animate a 3D object is by using keyframes and built-in templates. As a beginner, you may not know how to make a 3D object, but with templates, you just need to choose one and start customizing it.
3. Where can I animate for free?
There are so many free-to-use animation software to use. Pencil2D is a reliable tool to make animation easy. You just need to download it on the desktop to animate objects. However, it’d be best if you have a basic understanding of how to make animation. Otherwise, you may need some time to learn it first.
Conclusion
3D animation apps are ideal for those wishing to learn new skills and heighten their creativity. No matter what you’re looking for, we’re confident that you’ll find an app that meets your needs above. You can also use leading tools such as Filmora to edit your video and add extra effects to add an extra touch of magic to your work. Why not get started right now?
Shanoon Cox
Shanoon Cox is a writer and a lover of all things video.
Follow @Shanoon Cox
Aspect Ratio Essentials: How to Choose the Right Fit for Your YouTube Videos
How Different YouTube Aspect Ratio Affect Your Video Style
An easy yet powerful editor
Numerous effects to choose from
Detailed tutorials provided by the official channel
The aspect ratio gets changed for different social media platforms. YouTube aspect ratio is quite different from others and here is all that you must know about it.
In this article
01 [How Different YouTube Aspect Ratio Affect Your Video Style](#Part 1)
02 [How to Make Your Videos Look Their Best?](#Part 2)
Part 1 Is 18:9 the BEST Aspect Ratio for YouTube?
YouTube is considered to be a wider platform than those others are. Moreover, people get each type of video here and this is the reason why it becomes the best platform to make a reach to massive audience and promote your brand. However, it is worth considering having a proper YouTube video size ratio.

01How to Change Aspect Ratio to 18:9 for BETTER Videos

02What Is the Best Size For a YouTube Video/YouTube Image Sizes?
It is important to know that the YouTube ratio for videos and images may vary. However, the size is not only meant by the dimensions. Resolution and aspect ratio are also equally important for having the perfect size of the video and images. When you talk about the videos, the best dimension and resolution is considered to be 1080 by 1920p. Similarly, the aspect ratio for these videos is 16:When you create short video on YouTube then this youtube shorts aspect ratio remains the same because videos in this resolution and aspect ratio perform the best as they are in full HD.
Talking about videos, YouTube images cannot be neglected. If you will not follow the recommended size of YouTube images then you may have to face issues in posting them. YouTube images are at best when they are posted in the perfect size. Banner images on YouTube must be posted in the size of 2560 by 1440 pixels. Size of images may also change depending on the device that you are using. This can be different on desktops and tablets accordingly. On desktops, the size is 2560 by 423 and on tablets, the size becomes 1855 by 423.

03What Is the Best Frame Rate For a YouTube Video?
Frame rate is another important aspect to focus on when you are taking about posting content on YouTube. This is so important because without frame rate your video will not get the desired quality. It is must to know thing that video which you are posting must be in the actual and same frame rate in which it has been recorded. The most common frame rates for YouTube videos are 24, 48, 30, 25 and 60. However you can post the videos in any other frame rate but these are recommended the most.
It is equally important to deinterlace the content before you are posting it. This means if your video has 1080i60p and you want to convert it into 1080i30p then you will need to change the frame rate first.

Part 2 How to Make Your Videos Look Their Best?
01The Right YouTube Dimensions
You can upload videos of so many different dimensions and sizes. These start from 240P to 2160P. The smallest dimension of YouTube videos is 426 by 240 pixels. However, the largest dimensions may go till 3840 by 2160 pixels. YouTube allows all the video dimensions between these ranges. The most accurate YouTube dimension is 1920 by 1080 pixels. The guidelines that are followed on YouTube videos are pretty clear. You can get the quality of 4K if you go for the highest dimension and the quality decreases as you decrease the dimension of your video.

02Ways to Change YouTube Video Sizes
As a YouTube user, you have the option to change the video sizes and resolution so that you can get a vivid viewing experience of your videos. This may also boost the audience number on your videos. To change the video size of YouTube, you will just need to follow some simple steps that are mentioned here:
Step 1: First of all, you will have to open the video whose size you want to change. After this you will have to open the setting option from the icons that are displayed below the video.
Step 2: After opening the settings icon, you will find the option of quality. Choose that option and there you will see a list of dimensions amongst which you have to choose the one in which you wish to put your video. For example it may be 720p or less and more.
Step 3: As soon you choose the dimension or resolution the next step you have to do is go for it and click on save option and your video size is changed.
03How to Record YouTube Videos with the Right Dimensions
As you know the most familiar YouTube video aspect ratio is 16:9, so the videos cannot be created in the vertical mode. Keep in mind that you create the videos in horizontal mode. This will look professional as well as will boost your video quality too. Also it is worth considering that the video dimensions matter a lot when you are creating the videos. Do consider the device that you are using to create the video as many devices can create the videos in the highest resolution possible.
You must also know that videos with higher dimension and resolution need more space so before making the videos do have a check on your storage space too. It is also a good idea to maintain the balance between high quality videos and your storage space.
04How to Create YouTube Thumbnails That Get More Clicks
Every video creator wishes that his videos get more views. This is only possible when you will have excellent and engaging thumbnails so that they get more clicks. Here are some ideas that you can opt for your video thumbnail in order to get it more audience and views:
● Go for video still: It will be an interesting idea to add video still to your YouTube videos. By doing so you can give your audience an excitement about what they are going to experience. Video still can do the work of giving a glance to your audience and afterwards if they will see the similar things then they will be satisfied about what your deliver to them.
● Boost curiosity: sparking curiosity in your audience is another way to get more clicks on your videos thumbnails. Being curious about a particular topic makes the viewer stay up to the end. Suppose that if you pass the same message that they can easily guess then they will lose interest in your video. Try to have some spark of curiosity in the videos which will make them more engaging.
● Perk of using contrasting colors: As far YouTube videos are concerned using colors is neglected but it can be a perk to your videos and thumbnails. You can use colors to make your videos look notable and eye-catching and also suiting the YouTube platform. Colors are powerful to draw your audience’s attention but for making it hold you will have to add other elements also.
● Using the correct tools: Without proper editing, video creation is of no use. You will need to edit your videos wisely and make sure to add sparking elements to them. You may get many tools like Filmora, which can do the desired work for you. Choosing w**Wondershare Filmora Video Editor ** can be beneficial for you as you will get so many extraordinary features in this tool. Features of Filmora tool are as follows:
● This tool allows you to choose amongst several formats with a number of editing options.
● You can get a proper storage for your videos so that you need not to worry about the storage in your device.
● Videos created by this tool are of high quality and also you can create them in highest resolutions.
● You can use the feature of removing background sound and music to make your videos more appreciable.
● There are 100 layers of media to create amazing videos here.
For Win 7 or later (64-bit)
For macOS 10.12 or later
Key Takeaways from This Episode
● YouTube has the second largest audience when it comes to any social media platform. This is the reason why branding your products here is a worth investing idea.
● As each platform have different technical requirements so as YouTube. There are several things to consider while creating video to upload on YouTube. These things include correct size and dimensions, YouTube video ratio, accuratesounds, etc.
● To boost the brand and market value, these technical requirements play an important role. To meet these requirements, various tools like Filmora, etc. are used. These tools make the videos more engaging and impressive so that it can make a reach to larger audience.
The aspect ratio gets changed for different social media platforms. YouTube aspect ratio is quite different from others and here is all that you must know about it.
In this article
01 [How Different YouTube Aspect Ratio Affect Your Video Style](#Part 1)
02 [How to Make Your Videos Look Their Best?](#Part 2)
Part 1 Is 18:9 the BEST Aspect Ratio for YouTube?
YouTube is considered to be a wider platform than those others are. Moreover, people get each type of video here and this is the reason why it becomes the best platform to make a reach to massive audience and promote your brand. However, it is worth considering having a proper YouTube video size ratio.
01How to Change Aspect Ratio to 18:9 for BETTER Videos
02What Is the Best Size For a YouTube Video/YouTube Image Sizes?
It is important to know that the YouTube ratio for videos and images may vary. However, the size is not only meant by the dimensions. Resolution and aspect ratio are also equally important for having the perfect size of the video and images. When you talk about the videos, the best dimension and resolution is considered to be 1080 by 1920p. Similarly, the aspect ratio for these videos is 16:When you create short video on YouTube then this youtube shorts aspect ratio remains the same because videos in this resolution and aspect ratio perform the best as they are in full HD.
Talking about videos, YouTube images cannot be neglected. If you will not follow the recommended size of YouTube images then you may have to face issues in posting them. YouTube images are at best when they are posted in the perfect size. Banner images on YouTube must be posted in the size of 2560 by 1440 pixels. Size of images may also change depending on the device that you are using. This can be different on desktops and tablets accordingly. On desktops, the size is 2560 by 423 and on tablets, the size becomes 1855 by 423.
03What Is the Best Frame Rate For a YouTube Video?
Frame rate is another important aspect to focus on when you are taking about posting content on YouTube. This is so important because without frame rate your video will not get the desired quality. It is must to know thing that video which you are posting must be in the actual and same frame rate in which it has been recorded. The most common frame rates for YouTube videos are 24, 48, 30, 25 and 60. However you can post the videos in any other frame rate but these are recommended the most.
It is equally important to deinterlace the content before you are posting it. This means if your video has 1080i60p and you want to convert it into 1080i30p then you will need to change the frame rate first.
Part 2 How to Make Your Videos Look Their Best?
01The Right YouTube Dimensions
You can upload videos of so many different dimensions and sizes. These start from 240P to 2160P. The smallest dimension of YouTube videos is 426 by 240 pixels. However, the largest dimensions may go till 3840 by 2160 pixels. YouTube allows all the video dimensions between these ranges. The most accurate YouTube dimension is 1920 by 1080 pixels. The guidelines that are followed on YouTube videos are pretty clear. You can get the quality of 4K if you go for the highest dimension and the quality decreases as you decrease the dimension of your video.
02Ways to Change YouTube Video Sizes
As a YouTube user, you have the option to change the video sizes and resolution so that you can get a vivid viewing experience of your videos. This may also boost the audience number on your videos. To change the video size of YouTube, you will just need to follow some simple steps that are mentioned here:
Step 1: First of all, you will have to open the video whose size you want to change. After this you will have to open the setting option from the icons that are displayed below the video.
Step 2: After opening the settings icon, you will find the option of quality. Choose that option and there you will see a list of dimensions amongst which you have to choose the one in which you wish to put your video. For example it may be 720p or less and more.
Step 3: As soon you choose the dimension or resolution the next step you have to do is go for it and click on save option and your video size is changed.
03How to Record YouTube Videos with the Right Dimensions
As you know the most familiar YouTube video aspect ratio is 16:9, so the videos cannot be created in the vertical mode. Keep in mind that you create the videos in horizontal mode. This will look professional as well as will boost your video quality too. Also it is worth considering that the video dimensions matter a lot when you are creating the videos. Do consider the device that you are using to create the video as many devices can create the videos in the highest resolution possible.
You must also know that videos with higher dimension and resolution need more space so before making the videos do have a check on your storage space too. It is also a good idea to maintain the balance between high quality videos and your storage space.
04How to Create YouTube Thumbnails That Get More Clicks
Every video creator wishes that his videos get more views. This is only possible when you will have excellent and engaging thumbnails so that they get more clicks. Here are some ideas that you can opt for your video thumbnail in order to get it more audience and views:
● Go for video still: It will be an interesting idea to add video still to your YouTube videos. By doing so you can give your audience an excitement about what they are going to experience. Video still can do the work of giving a glance to your audience and afterwards if they will see the similar things then they will be satisfied about what your deliver to them.
● Boost curiosity: sparking curiosity in your audience is another way to get more clicks on your videos thumbnails. Being curious about a particular topic makes the viewer stay up to the end. Suppose that if you pass the same message that they can easily guess then they will lose interest in your video. Try to have some spark of curiosity in the videos which will make them more engaging.
● Perk of using contrasting colors: As far YouTube videos are concerned using colors is neglected but it can be a perk to your videos and thumbnails. You can use colors to make your videos look notable and eye-catching and also suiting the YouTube platform. Colors are powerful to draw your audience’s attention but for making it hold you will have to add other elements also.
● Using the correct tools: Without proper editing, video creation is of no use. You will need to edit your videos wisely and make sure to add sparking elements to them. You may get many tools like Filmora, which can do the desired work for you. Choosing w**Wondershare Filmora Video Editor ** can be beneficial for you as you will get so many extraordinary features in this tool. Features of Filmora tool are as follows:
● This tool allows you to choose amongst several formats with a number of editing options.
● You can get a proper storage for your videos so that you need not to worry about the storage in your device.
● Videos created by this tool are of high quality and also you can create them in highest resolutions.
● You can use the feature of removing background sound and music to make your videos more appreciable.
● There are 100 layers of media to create amazing videos here.
For Win 7 or later (64-bit)
For macOS 10.12 or later
Key Takeaways from This Episode
● YouTube has the second largest audience when it comes to any social media platform. This is the reason why branding your products here is a worth investing idea.
● As each platform have different technical requirements so as YouTube. There are several things to consider while creating video to upload on YouTube. These things include correct size and dimensions, YouTube video ratio, accuratesounds, etc.
● To boost the brand and market value, these technical requirements play an important role. To meet these requirements, various tools like Filmora, etc. are used. These tools make the videos more engaging and impressive so that it can make a reach to larger audience.
Best Slow-Mo Video Editors for Stunning Visuals
Top 10+ Slow Motion Video Editing Software

Ollie Mattison
Mar 27, 2024• Proven solutions
Slow motion effects can add a “close-up in time”, and introduce a feeling of surreality. If you want to slow down a video to show more details or transfer a kind of atmosphere to a video, you will need video editing software to do it. Here is a list of some of the best video editors to make a video slow down in the market.
Top 10+ Slow Motion Video Editing Software
1. Wondershare Filmora
Pricing: Free trial
Not just for slowing down or speeding up videos, the Filmora can also be used for a wide array of functions, such like slippting, cropping or reversing videos, and other advanced features like green screen, PIP, and face-off. The recent revamping of the user interface supports the easier use of more tools.
Filmora offers two ways to make a slow-motion effect in a video. The quickest way of applying the slow-motion effect to video is by selecting the target clip in the timeline, clicking the Speed icon in the toolbar, and choosing the target slow speed presets from 0.5X, 0.25X, 0.1X, 0.05X and 0.01X. The smaller the preset is, the slower the video will be.

Of course, you can also right-click the video in the timeline, select the Speed and Duration option from the menu and then change the speed by dragging the speed slider or the duration period in the Custom Speed window.

Check the video below to see how to control the video speed and make a fast forward, slow motion or freeze frame video.
For detailed information about how to make a slow-motion video, you can check Tutorial: how to make a slow/fast motion video.
If you’re looking for something more than simple speed change, read this: Ways to Make Smooth Slow-motion and Fast-motion effect.
3. Twixtor
Pricing: Ranges from $82.49 for the upgrades to $595.00 for the full version
Continuously raising the bar for slow motion editing software, Twixtor is probably the most popular and highly praised video editing application that focuses on slow and fast motions in the market. Despite the commendations the software keeps getting, its pricing may be a little too expensive. The full version of Twixtor Pro falls at $595.00.

4. Slomovideo
Pricing: Free
Although its bare and unappealing graphical user interface might turn off some people, Slomovideo does what it was created to do, which is to slow motion in videos down, quite well. To add to that, Slomovideo is an open source program, which means that it is free. A downside, however, is that it seems slower than other software and applications. However, if you are opposed to shelling out hundreds of dollars in order to produce a crisp and smooth slow motion video with expensive software, then this freeware is for you.

5. MotionPerfect
Pricing: $49.95
This cross-platform utility allows the speed and frame rate to be set and the duration of the files to be changed. Motion compensated interpolation and morphing algorithms are used instead of repeating or blending contiguous frames.

6. Apple Motion
Pricing: Bundled with Apple Final Cut Studio
The feature Optical Flow within Apple Motion was once obscure but now many users attest to its quality. Being bundled with the Apple Final Cut Studio already, previous FCS users can use Apple Motion for free.

7. Boris Continuum Time Unit
Pricing: $199.00
Using the retiming effects of Optical Flow along with the automatic keyframe generation of the Beat Reactor, Boris Continuum Time Unit can produce high-quality slow and fast motion videos.

8. ReSpeedr
Pricing: $99
Similar to Slomovideo, Respeedr is also an open source video editing tool. It is a stand-alone application that makes use of a frame-based motion-flow analysis, which means that it uses dynamic frame-blending.It offers an array of time lapse and slow motion tools that are needed to make the transition smooth but the quality of the video crisp. Moreover, its graphical user interface is very easy to understand.

9. AviSynth
Pricing: Free
As a frameserver, AviSynth allows editing and processing without the need for temporary files. Also, this tool relies on a script system instead of a graphical user interface.Operating this can seem challenging at first but it actually is very powerful.

10. TimeWarp
Pricing: $9.95
For either fast or slow motion sequences, Sony offers TimeWarp. Input can be entered in numerical form or adjusted with slider controls.
11. Adobe After Effects
Pricing: $29.99/month when bundled in the creative cloud plan
As a post-processing tool with a very broad range of tools available, Adobe After Effects can successfully create slow motion videos.

You can click here to get more information about how to edit videos in Adobe After Effects.
If you want to create a slow motion video on your iPhone or Android phone, you can try these apps: best free slo-mo video editing apps .
Slow motion video ideas - video tutorial
Check the video tutorial below to get inspired by making slow motion videos.
As we said before, with Filmora, you can change the video speed easily to make a slow motion, fast forward or freeze-frame video. Besides that, Filmora also provides some basic video editing features such as trimming, splitting, cutting, and rotating as well as advanced features like video stabilization and tilt-shift. Download Filmora to get more creative.
Ollie Mattison
Ollie Mattison is a writer and a lover of all things video.
Follow @Ollie Mattison
Ollie Mattison
Mar 27, 2024• Proven solutions
Slow motion effects can add a “close-up in time”, and introduce a feeling of surreality. If you want to slow down a video to show more details or transfer a kind of atmosphere to a video, you will need video editing software to do it. Here is a list of some of the best video editors to make a video slow down in the market.
Top 10+ Slow Motion Video Editing Software
1. Wondershare Filmora
Pricing: Free trial
Not just for slowing down or speeding up videos, the Filmora can also be used for a wide array of functions, such like slippting, cropping or reversing videos, and other advanced features like green screen, PIP, and face-off. The recent revamping of the user interface supports the easier use of more tools.
Filmora offers two ways to make a slow-motion effect in a video. The quickest way of applying the slow-motion effect to video is by selecting the target clip in the timeline, clicking the Speed icon in the toolbar, and choosing the target slow speed presets from 0.5X, 0.25X, 0.1X, 0.05X and 0.01X. The smaller the preset is, the slower the video will be.
Of course, you can also right-click the video in the timeline, select the Speed and Duration option from the menu and then change the speed by dragging the speed slider or the duration period in the Custom Speed window.
Check the video below to see how to control the video speed and make a fast forward, slow motion or freeze frame video.
For detailed information about how to make a slow-motion video, you can check Tutorial: how to make a slow/fast motion video.
If you’re looking for something more than simple speed change, read this: Ways to Make Smooth Slow-motion and Fast-motion effect.
3. Twixtor
Pricing: Ranges from $82.49 for the upgrades to $595.00 for the full version
Continuously raising the bar for slow motion editing software, Twixtor is probably the most popular and highly praised video editing application that focuses on slow and fast motions in the market. Despite the commendations the software keeps getting, its pricing may be a little too expensive. The full version of Twixtor Pro falls at $595.00.
4. Slomovideo
Pricing: Free
Although its bare and unappealing graphical user interface might turn off some people, Slomovideo does what it was created to do, which is to slow motion in videos down, quite well. To add to that, Slomovideo is an open source program, which means that it is free. A downside, however, is that it seems slower than other software and applications. However, if you are opposed to shelling out hundreds of dollars in order to produce a crisp and smooth slow motion video with expensive software, then this freeware is for you.
5. MotionPerfect
Pricing: $49.95
This cross-platform utility allows the speed and frame rate to be set and the duration of the files to be changed. Motion compensated interpolation and morphing algorithms are used instead of repeating or blending contiguous frames.
6. Apple Motion
Pricing: Bundled with Apple Final Cut Studio
The feature Optical Flow within Apple Motion was once obscure but now many users attest to its quality. Being bundled with the Apple Final Cut Studio already, previous FCS users can use Apple Motion for free.
7. Boris Continuum Time Unit
Pricing: $199.00
Using the retiming effects of Optical Flow along with the automatic keyframe generation of the Beat Reactor, Boris Continuum Time Unit can produce high-quality slow and fast motion videos.
8. ReSpeedr
Pricing: $99
Similar to Slomovideo, Respeedr is also an open source video editing tool. It is a stand-alone application that makes use of a frame-based motion-flow analysis, which means that it uses dynamic frame-blending.It offers an array of time lapse and slow motion tools that are needed to make the transition smooth but the quality of the video crisp. Moreover, its graphical user interface is very easy to understand.
9. AviSynth
Pricing: Free
As a frameserver, AviSynth allows editing and processing without the need for temporary files. Also, this tool relies on a script system instead of a graphical user interface.Operating this can seem challenging at first but it actually is very powerful.
10. TimeWarp
Pricing: $9.95
For either fast or slow motion sequences, Sony offers TimeWarp. Input can be entered in numerical form or adjusted with slider controls.
11. Adobe After Effects
Pricing: $29.99/month when bundled in the creative cloud plan
As a post-processing tool with a very broad range of tools available, Adobe After Effects can successfully create slow motion videos.
You can click here to get more information about how to edit videos in Adobe After Effects.
If you want to create a slow motion video on your iPhone or Android phone, you can try these apps: best free slo-mo video editing apps .
Slow motion video ideas - video tutorial
Check the video tutorial below to get inspired by making slow motion videos.
As we said before, with Filmora, you can change the video speed easily to make a slow motion, fast forward or freeze-frame video. Besides that, Filmora also provides some basic video editing features such as trimming, splitting, cutting, and rotating as well as advanced features like video stabilization and tilt-shift. Download Filmora to get more creative.
Ollie Mattison
Ollie Mattison is a writer and a lover of all things video.
Follow @Ollie Mattison
Also read:
- New Windows Movie Maker Download Link A Quick and Easy Guide
- Updated No-Cost Video Trimming 10 Best Online Editors Reviewed
- Updated 2024 Approved Unleash Your Game Top Gaming Intro Makers
- New Get Splice Video Editing Software for macOS for 2024
- Updated In 2024, OGG Conversion Made Easy Top Tools and Tips
- Updated In 2024, Video Invitation Creators for iPhone and Android A Roundup
- Updated In 2024, Best Video Editing Apps for Windows 11 PCs
- New In 2024, Here Is Best Video Slideshow Maker to Make Video with Still Photos and Music to Share Lifes Memorable Moments in an Unforgettable Way
- New The Ultimate DVD Conversion Guide From Physical to Digital in No Time
- 2024 Approved Top-Rated Movie Making Apps for Windows 10
- In 2024, Ratio Mastery How to Calculate Pixels Like a Pro
- New 2024 Approved Good Tips for Soundcloud to MP3 Converter
- 2024 Approved Mac Slideshow Software Simplify Your Video Editing Experience
- Updated 2024 Approved Produce Professional-Looking Videos with FCPX Stabilization Tools
- Updated Free Video Flipper Software Rotate Your Videos Online for 2024
- Updated In 2024, The Ratio Calculator Can Help You Perform Many Computations of Images More Conveniently. This Article Teaches You Everything About Aspect Ratios for Images and Videos. Read on to Learn More
- New 2024 Approved The Auto-Frame Feature Is Needed to Edit the Videos Professionally and Effectively for Social Sharing. In This Article, I Have Picked up some of the Best Video Editors with AI Smart Reframing and Cropping Features
- New 2024 Approved Create Unforgettable Intros 7 Leading Movie Intro Software
- Updated In 2024, Get Professional Results for Free Top 10 WebM Video Editors
- Updated 2024 Approved Top 10 Free Video Stabilization Tools Online for Smooth Footage
- New 2024 Approved The Ultimate Video Editor Resource Top Picks for Every Device and Platform
- New Free and Fabulous Top 10 MP4 Video Editors for 2024
- The Ultimate Guide to Creating Viral Reaction Videos with Filmora for 2024
- Updated Which Green Screen Software for Mac to Choose for 2024
- New 2024 Approved Effortless Video Editing Microsoft Video Editor for Windows Users
- New 2024 Approved Unleash the Power of Slow Mo Top Video Players
- New 2024 Approved Join MOV Files Together for Free 5 Best Software
- New No-Cost WMV Video Editing The Best Free Software for 2024
- 3uTools Virtual Location Not Working On Samsung Galaxy S24+? Fix Now | Dr.fone
- How To Pause Life360 Location Sharing For Samsung Galaxy S21 FE 5G (2023) | Dr.fone
- In 2024, How To Erase an iPhone 15 Plus Without Apple ID Password?
- 5 Easy Ways to Change Location on YouTube TV On Motorola Moto E13 | Dr.fone
- Best 10 Tools To Make Quiz Videos
- 6 Proven Ways to Unlock Oppo Reno 9A Phone When You Forget the Password
- All You Need To Know About Mega Greninja For Lava Yuva 2 Pro | Dr.fone
- Downloading SamFw FRP Tool 3.0 for Vivo V30 Pro
- How to recover old call logs from your Honor X8b?
- The Best iSpoofer Alternative to Try On Oppo K11 5G | Dr.fone
- How to Exit Android Factory Mode On Honor V Purse? | Dr.fone
- In 2024, Unlocking Apple iPhone 14 Plus Lock Screen 3 Foolproof Methods that Actually Work
- 10 Best Fake GPS Location Spoofers for Honor Magic 6 | Dr.fone
- 10 Fake GPS Location Apps on Android Of your Motorola Razr 40 Ultra | Dr.fone
- Can I use iTools gpx file to catch the rare Pokemon On Apple iPhone 7 Plus | Dr.fone
- Updated 10 Best Sony LUT for Different Purposes for 2024
- Make Movies on the Go 10 Top Android Apps
- In 2024, How can I get more stardust in pokemon go On Poco M6 5G? | Dr.fone
- Here are Some of the Best Pokemon Discord Servers to Join On Oppo F23 5G | Dr.fone
- Useful ways that can help to effectively recover deleted files from Honor
- What Does Enter PUK Code Mean And Why Did The Sim Get PUK Blocked On Lava Storm 5G Device
- How to Remove Apple ID from Apple iPhone 8 Plus without Password?
- Title: Updated 2024 Approved Adding Titles in FCPX A Beginners Guide to Professional Results
- Author: Isabella
- Created at : 2024-06-24 09:06:58
- Updated at : 2024-06-25 09:06:58
- Link: https://video-creation-software.techidaily.com/updated-2024-approved-adding-titles-in-fcpx-a-beginners-guide-to-professional-results/
- License: This work is licensed under CC BY-NC-SA 4.0.
