
:max_bytes(150000):strip_icc():format(webp)/GettyImages-850120538-4d2af54c23a641c8a5f2e00ef7a9aa37.jpg)
Updated In 2024, The Complete Guide to Downloading and Using Windows Movie Maker for Free
The Complete Guide to Downloading and Using Windows Movie Maker for Free
Microsoft produced the movie editing software known as Windows Movie Maker. You can download Movie Maker Windows 10 or even in previous versions. This application can combine video, sound, still photos, and transcripts to make a customized movie. Its functions are simple to use and enjoyable to explore with, and its XML code enables users to create new transitions and effects or change current ones. It’s also simple to upload finished Windows Movie Maker productions to video and social media platforms.
This guide explains everything you need to know about downloading windows movie maker. You can choose to use windows movie maker installation guide as well. With this Windows Movie Maker, you can choose from five different thumb sizes, which is probably plenty, and you can enlarge these clip representations using the zoom button at the bottom. Using the cursor insertion point and edit buttons, you can cut or divide clips. Once you’re used to the app’s distinct editing method, it becomes pretty simple.
Part 1. System Requirements for Windows Movie Maker
Beginners should use Windows Video Maker. Along with fundamental capabilities and workflow components seen in professional video editing systems, it is available for free on Windows PCs. Even inexperienced editors may understand it because to its simple chronology in the form of an understandable interface. Windows Movie Maker allows you to create your own movies. Create professional movies from your still and moving images. To aid in telling your tale, use transitions, sound, subtitles, and special effects.
| Requirements | Compatibility of Windows Movie Maker |
|---|---|
| Support System | Windows Vista, Windows 7, Windows 8, Windows 8.1, and Windows 10 are all versions of Microsoft Windows. |
| Processor | 1GHz Intel/AMD processor or above such as an Intel Pentium III, Advanced Micro Devices (AMD) Athlon, or equivalent processor |
| For Audio | An audio capture device to capture audio from external sources |
| Hardware Memory | 300MB space for installation |
| Graphics Card | Super VGA (800x600) resolution graphics card with at least a 16-bit graphics card |
| Other Requirements | 256MB RAM (512MB or above recommended) |
Part 2. Download and install Windows Movie Maker Windows 10
Anyone who wants to easily modify movies should use Movie Maker. The program offers every fundamental feature you need to create edited videos. Effects, transitions, titles and credits, audio track, timeline narration, and Auto Movie are just a few of the features available in Windows Movie Maker. XML code may be used to create new effects and transitions as well as modify already existing ones. An easy-to-use tool for altering audio tracks is Windows Movie Maker. To audio tracks, Windows Movie Maker can add simple effects like fade-in and fade-out.
Steps to Download and Install Windows Movie Maker on Win 10
Step1 Download the File
You may download Windows Movie Maker to produce videos from photographs. Transitions, a soundtrack, title and credit text, among other things, are simple to add to your video. Complete the necessary file downloads by clicking on the download button(s) below. Depending on your download speed, this might take anything from a few minutes to many hours.
Step2 Run the Downloaded program File
The installation launch screen is given in the following image. To install the program, run “setup.exe” by double-clicking the downloaded setup file that you previously downloaded.

Step3 Set Personalized Installation
Follow the instructions to install Windows Movie Maker. .Net framework is a required for Windows Movie Maker. Launch the Windows Movie Maker Installer program to install Windows Movie Maker on Windows 10.

Step4 Hit Install Button
Press the “Install” button after selecting Messenger, Photo Gallery, and Movie Maker as the apps to be installed. You can now access Windows Movie Maker.

Naturally, Microsoft also offered new video editing tools for Windows users once they ceased upgrading Windows Movie Maker. The complete version of Windows Movie Maker 2022 is now installed on your Windows 10 OS computer without any restrictions.
Part 3. Download and Install Windows Movie Maker Windows 7/8
Windows Movie Maker is a user-friendly and effective movie creation and editing software program created for the most recent versions of Windows 11 and Windows 7/8/10. Windows XP and Vista are compatible with the previous version. Only the Essentials package, a free collection of lifestyle and utility software for Windows 7 and Windows 8, which also contains Windows Photo Gallery, allows you to install Movie Maker. The single installer for all the Essentials applications gives you the choice to install all of them at once or just some of them.
Steps to Download and Install Windows Movie Maker on Win 7/8
Step1 Download the Installer
Start downloading Windows Live Essentials Movie Maker 12 by clicking on one of the links below. Windows Live Essentials Movie Maker has a standalone, complete offline installation available here. Windows XP, Vista, 7, 8, 8.1, and 64-bit versions of Windows are all supported by this offline installation solution for Windows Movie Maker.
Download Installer
Step2 Open and Customize the File
Access the “Patch” folder. Apply the fix by running “windows.movie.maker-patch.exe”. Although Windows Essentials installation is requested by the Windows Movie Maker installer, it is not required. You may click “Choose the programs you wish to install” instead to bypass it. You may now view your selections. We just need the picture gallery and the movie creator, so uncheck the boxes next to Writer, Messenger, and Mail. Click the “Choose the apps you wish to install” button after that.
Step3 Hit Install Button
Following this, the installation of Windows Movie Maker will begin when you click the install button. The installation is finished in a short while. After a successful installation, Windows Movie Maker can be added to your taskbar and a desktop shortcut can be made.

Step4 Launch the Editor
Free video editing software with a simple UI is called Windows Movie Maker. Click the provided download button to start the Windows movie maker download. The Windows Movie Maker utility download is completely secure and virus-free.

Part 4. Best Windows Movie Maker Alternative to Use
While there are now several excellent video editors available on the market, we will here suggest Filmora by Wondershare as the best replacement for Windows Movie Maker. Filmora is an extremely user-friendly video editor in terms of UI. It offers a simple user interface that even beginners may quickly grasp. By holding the mouse over any clip in the Media view, you can navigate through it thanks to a handy UX touch.
You may download Filmora for free on your computer running Windows 10 or Windows 11 and it is a very user-friendly movie editor. For novices who want to create explainer videos, training videos, demo videos, and more rapidly, Filmora is a simple yet advanced feature-packed tool. The great video templates make screen recording more alluring. You can make use of annotation tools like callouts, arrows, and drawing gestures to attract attention to essential information. Its structure is quite straightforward and easy to understand since it utilizes the timeline as the editing UI.
How to Edit Videos with Filmora:
Free Download For Win 7 or later(64-bit)
Free Download For macOS 10.14 or later
Step1 Install Filmora on your Windows PC
You must to download and install Wondershare Filmora on your computer before using it. This TV recorder on the fly may be used for your requirements. You can find every version of the Filmora software, including Windows and Mac versions, as well as the most current version.
You can now install it on your computer once you’ve done downloading it before you can use it with your laptop. It will bring you to the user-friendly UI of Filmora, where you may use the documentation function right away, as illustrated in the following figure:

Step2 Import the Content
A significant component of managing your raw footages is the Media library. All of the imported material, including the images, audio files, and movies, are now kept in Import Window. The media files are also included in the Music, Pictures, and Videos sections. This top free video editing program has new built-in sound tracks to simplify your job. As the video backdrop music, you can either choose the built-in music or local audio files.

Step3 Create the Movies
Finally, you may edit your audio recordings using tools that are completely customizable. Use the editor in Filmora to edit your recorded audio files, using simple to advanced editing techniques. Your recorded video can be improved using Filmora’s Editor by adding animated titles, spectacular effects, audio enhancements, and more.

Step4 Add Special Effects to Your Video
Wondershare Filmora was created primarily to give your films a polished appearance. You may utilize a variety of its eye-catching and adjustable effects to make your video productions stand out from the competition. In this area, we’ve covered some of the best effects for bringing life to your dull, unprofessional films.

Step5 Save or Share the Videos
Finally, you can use the complete Filmora editor as previously mentioned when you’ve done editing the recorded video. When you want to submit your creative work right away to YouTube or another well-known website, click the Export option and choose the platform where you want to share your video clip. If you like, you may even make changes to the video before uploading it.
The Bottom Line
Looking to create captivating movies from video clips? The best tool for the purpose can be Windows Movie Maker. While Windows Movie Maker allows for basic track editing, such as the addition of fade-in and fade-out effects for audio tracks, yet, using Filmora program gives you a variety of tools to create professional-looking films, including timeline narration, transition overlays, animations, and audio choices. This way, you might use the suggested movie maker to make movies with a professional tool and sharing it with others.
Part 2. Download and install Windows Movie Maker Windows 10
Anyone who wants to easily modify movies should use Movie Maker. The program offers every fundamental feature you need to create edited videos. Effects, transitions, titles and credits, audio track, timeline narration, and Auto Movie are just a few of the features available in Windows Movie Maker. XML code may be used to create new effects and transitions as well as modify already existing ones. An easy-to-use tool for altering audio tracks is Windows Movie Maker. To audio tracks, Windows Movie Maker can add simple effects like fade-in and fade-out.
Steps to Download and Install Windows Movie Maker on Win 10
Step1 Download the File
You may download Windows Movie Maker to produce videos from photographs. Transitions, a soundtrack, title and credit text, among other things, are simple to add to your video. Complete the necessary file downloads by clicking on the download button(s) below. Depending on your download speed, this might take anything from a few minutes to many hours.
Step2 Run the Downloaded program File
The installation launch screen is given in the following image. To install the program, run “setup.exe” by double-clicking the downloaded setup file that you previously downloaded.
Step3 Set Personalized Installation
Follow the instructions to install Windows Movie Maker. .Net framework is a required for Windows Movie Maker. Launch the Windows Movie Maker Installer program to install Windows Movie Maker on Windows 10.
Step4 Hit Install Button
Press the “Install” button after selecting Messenger, Photo Gallery, and Movie Maker as the apps to be installed. You can now access Windows Movie Maker.
Naturally, Microsoft also offered new video editing tools for Windows users once they ceased upgrading Windows Movie Maker. The complete version of Windows Movie Maker 2022 is now installed on your Windows 10 OS computer without any restrictions.
Part 3. Download and Install Windows Movie Maker Windows 7/8
Windows Movie Maker is a user-friendly and effective movie creation and editing software program created for the most recent versions of Windows 11 and Windows 7/8/10. Windows XP and Vista are compatible with the previous version. Only the Essentials package, a free collection of lifestyle and utility software for Windows 7 and Windows 8, which also contains Windows Photo Gallery, allows you to install Movie Maker. The single installer for all the Essentials applications gives you the choice to install all of them at once or just some of them.
Steps to Download and Install Windows Movie Maker on Win 7/8
Step1 Download the Installer
Start downloading Windows Live Essentials Movie Maker 12 by clicking on one of the links below. Windows Live Essentials Movie Maker has a standalone, complete offline installation available here. Windows XP, Vista, 7, 8, 8.1, and 64-bit versions of Windows are all supported by this offline installation solution for Windows Movie Maker.
Download Installer
Step2 Open and Customize the File
Access the “Patch” folder. Apply the fix by running “windows.movie.maker-patch.exe”. Although Windows Essentials installation is requested by the Windows Movie Maker installer, it is not required. You may click “Choose the programs you wish to install” instead to bypass it. You may now view your selections. We just need the picture gallery and the movie creator, so uncheck the boxes next to Writer, Messenger, and Mail. Click the “Choose the apps you wish to install” button after that.
Step3 Hit Install Button
Following this, the installation of Windows Movie Maker will begin when you click the install button. The installation is finished in a short while. After a successful installation, Windows Movie Maker can be added to your taskbar and a desktop shortcut can be made.
Step4 Launch the Editor
Free video editing software with a simple UI is called Windows Movie Maker. Click the provided download button to start the Windows movie maker download. The Windows Movie Maker utility download is completely secure and virus-free.
Part 4. Best Windows Movie Maker Alternative to Use
While there are now several excellent video editors available on the market, we will here suggest Filmora by Wondershare as the best replacement for Windows Movie Maker. Filmora is an extremely user-friendly video editor in terms of UI. It offers a simple user interface that even beginners may quickly grasp. By holding the mouse over any clip in the Media view, you can navigate through it thanks to a handy UX touch.
You may download Filmora for free on your computer running Windows 10 or Windows 11 and it is a very user-friendly movie editor. For novices who want to create explainer videos, training videos, demo videos, and more rapidly, Filmora is a simple yet advanced feature-packed tool. The great video templates make screen recording more alluring. You can make use of annotation tools like callouts, arrows, and drawing gestures to attract attention to essential information. Its structure is quite straightforward and easy to understand since it utilizes the timeline as the editing UI.
How to Edit Videos with Filmora:
Free Download For Win 7 or later(64-bit)
Free Download For macOS 10.14 or later
Step1 Install Filmora on your Windows PC
You must to download and install Wondershare Filmora on your computer before using it. This TV recorder on the fly may be used for your requirements. You can find every version of the Filmora software, including Windows and Mac versions, as well as the most current version.
You can now install it on your computer once you’ve done downloading it before you can use it with your laptop. It will bring you to the user-friendly UI of Filmora, where you may use the documentation function right away, as illustrated in the following figure:
Step2 Import the Content
A significant component of managing your raw footages is the Media library. All of the imported material, including the images, audio files, and movies, are now kept in Import Window. The media files are also included in the Music, Pictures, and Videos sections. This top free video editing program has new built-in sound tracks to simplify your job. As the video backdrop music, you can either choose the built-in music or local audio files.
Step3 Create the Movies
Finally, you may edit your audio recordings using tools that are completely customizable. Use the editor in Filmora to edit your recorded audio files, using simple to advanced editing techniques. Your recorded video can be improved using Filmora’s Editor by adding animated titles, spectacular effects, audio enhancements, and more.
Step4 Add Special Effects to Your Video
Wondershare Filmora was created primarily to give your films a polished appearance. You may utilize a variety of its eye-catching and adjustable effects to make your video productions stand out from the competition. In this area, we’ve covered some of the best effects for bringing life to your dull, unprofessional films.
Step5 Save or Share the Videos
Finally, you can use the complete Filmora editor as previously mentioned when you’ve done editing the recorded video. When you want to submit your creative work right away to YouTube or another well-known website, click the Export option and choose the platform where you want to share your video clip. If you like, you may even make changes to the video before uploading it.
The Bottom Line
Looking to create captivating movies from video clips? The best tool for the purpose can be Windows Movie Maker. While Windows Movie Maker allows for basic track editing, such as the addition of fade-in and fade-out effects for audio tracks, yet, using Filmora program gives you a variety of tools to create professional-looking films, including timeline narration, transition overlays, animations, and audio choices. This way, you might use the suggested movie maker to make movies with a professional tool and sharing it with others.
AVI Video Rotation Made Easy: 16 Free Solutions for Windows, MAC, Android, iPhone, and Online Users
Did you rush to record a video in a mistaken direction? Or were you just excited to film the moments without noticing the position of your camera? Whatever the case, if you regret recording the clip at the incorrect angle, here’s your chance to do the alteration. The article includes the top 16 best free AVI video rotators you can use on MAC, Windows, iPhone, Android, and online. Plus, if you’re looking for a single platform to rotate or flip videos, you can learn the complete process by following the step-by-step Filmora Video Editor tutorial that works on MAC and Windows.
In this Article
Part 1: Best AVI Video Rotators to Rotate AVI Video on Windows and MAC – Filmora Video Editor [with steps]
Part 2: Top 3 Free Video Rotators on Windows
Part 3: Top 3 Free Video Rotators on MAC
Part 4: Top 3 Free Video Rotators on Android
Part 5: Top 3 Free Video Rotators on iPhone
Part 6: Top 3 Free Video Rotators Online
Part 7: Bottom Line
Part 8: FAQs
Part 1: Best AVI Video Rotators to Rotate AVI Video on Windows and MAC – Filmora Video Editor [with steps]
Heard about Filmora but never used it? Surely, you’re missing great fun if you’re a video professional or a beginner video editor.
Filmora is an award-winning video editing software that works for both PC and MAC users. While the tool comes at an affordable price, you can still download the free setup to start showing your creativity.
This video editor has dozens of new effects, transitions, and many more features, which can help you create engaging videos. You can also enjoy some more key features, including audio ducking, color matching, motion tracking, split screen, video filters and transitions, speed control, and multiple exporting formats.
And, of course, video rotation is as easy as ABC! You can follow this step-by-step tutorial to rotate or flip your videos using Filmora 10. You can apply the same procedure if you have a different version.
Step 1: Download and Install Filmora
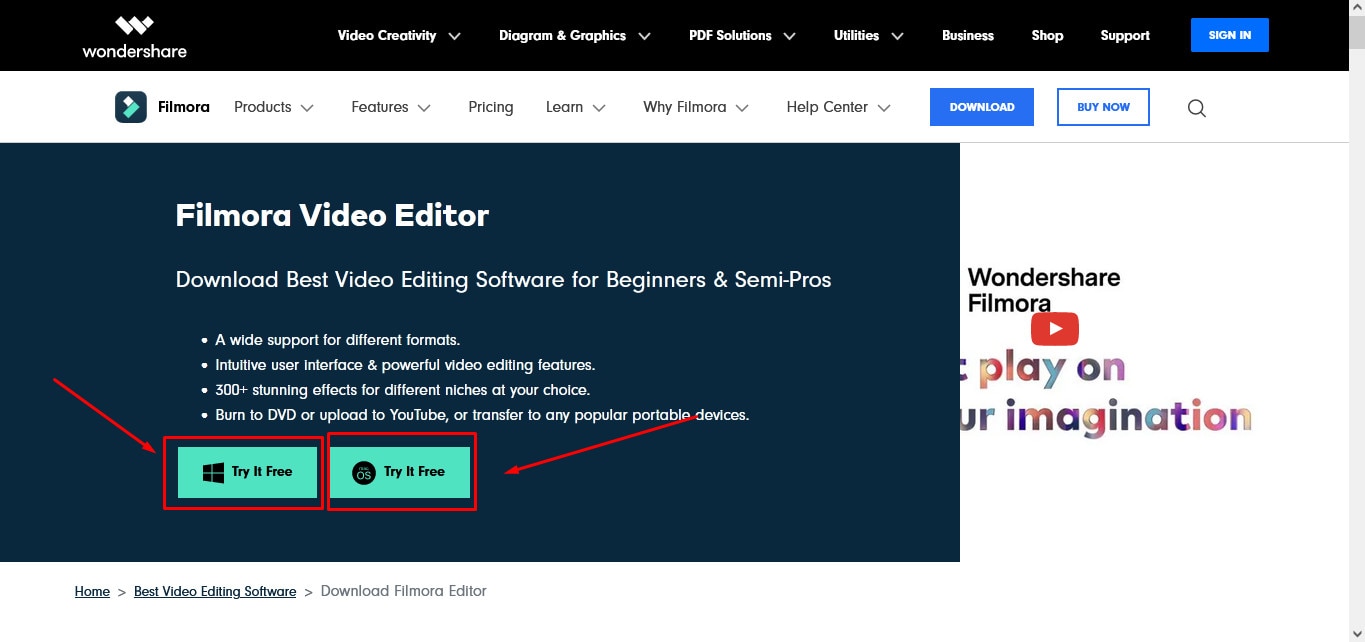
Visit Filmora Video Editor’s official website to download the newest version. Click on the “Try it Free” button according to your operating system (look at the icons on the button to identify the OS).
After downloading the setup, double-click the file to install the video editor. Then, open the program.
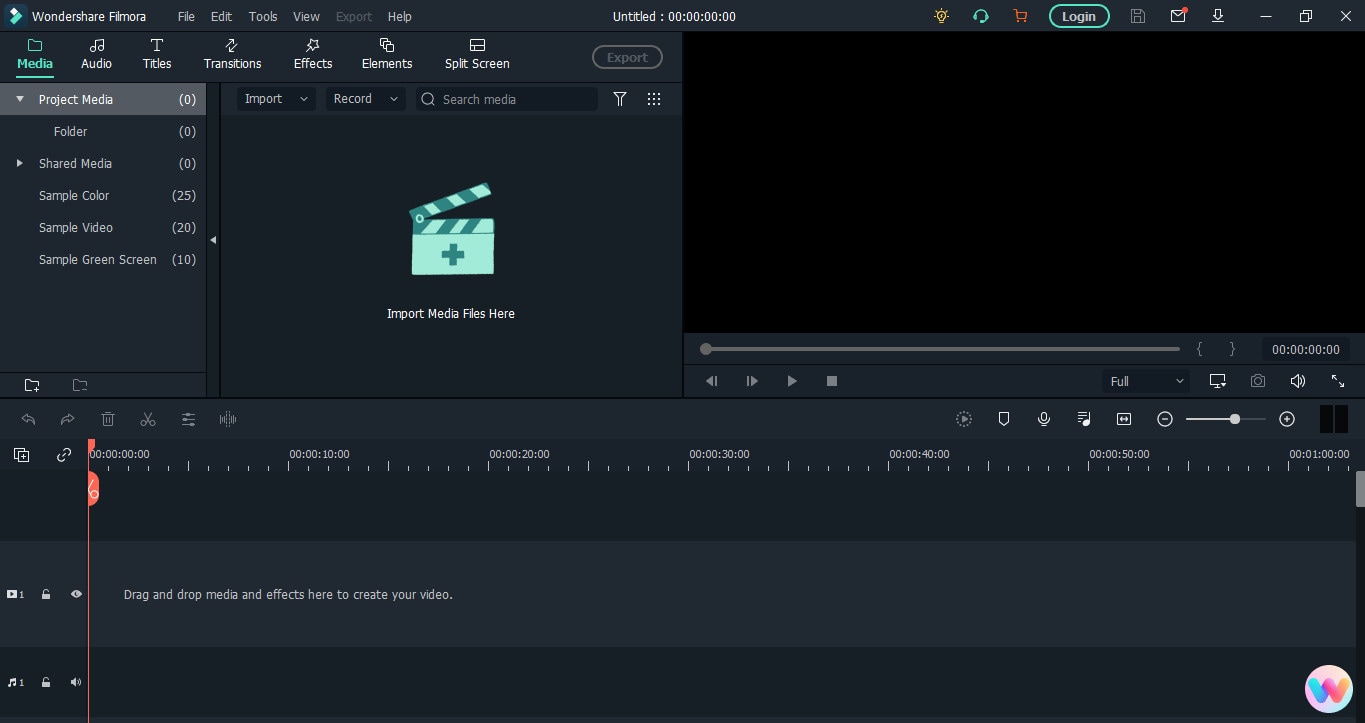
Feel free to judge the interface (see the image below), as it is pretty simple to understand. So, even if you’re a beginner, you can learn this tool within a few minutes of practice.
Step 2: Import the Video You Want to Rotate
The next is to bring the video file to Filmora’s library before proceeding. To do that, click on the “Movie Clip” icon in the center of the interface to select the clip from your computer’s hard drive.

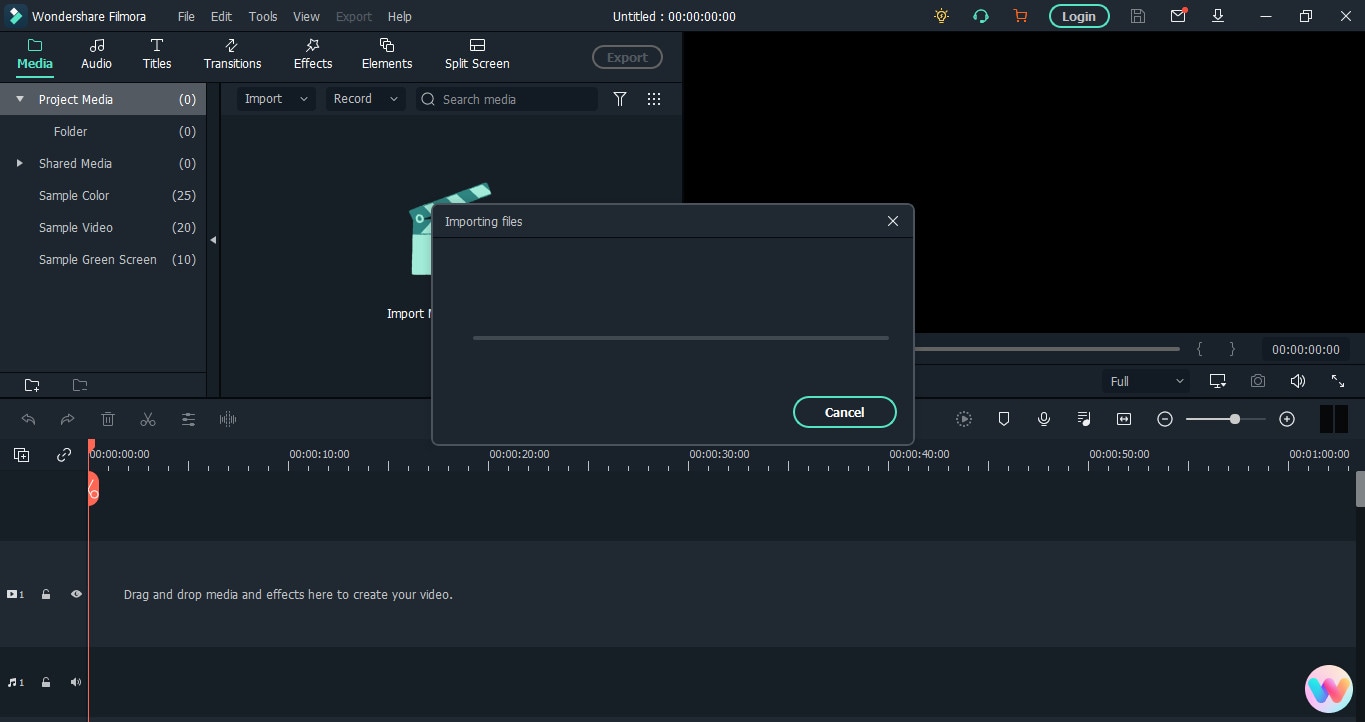
Double-click or select the video and click the “Open” button to import files. The importing process may take several seconds or a few minutes, depending on the video size.
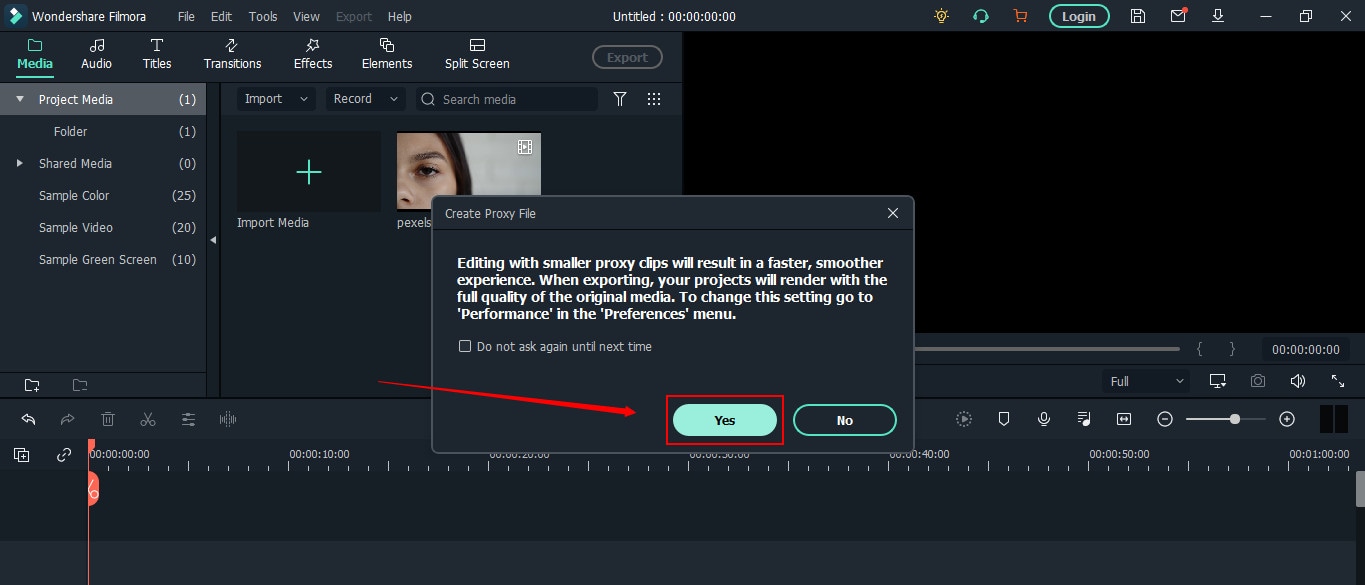
If you’re using Filmora for the first time, you might see the “Create Proxy File” message popping up right after the video import. So, simply click on the “Yes” button to go ahead.
Your video will be stored in the “Project Media” tab and will be visible next to the preview window.
Step 3: Drag and Drop the Video on Filmora’s Timeline
To rotate the video, first, you need to add it to the track. For that, take your mouse on the video, and select it by clicking the right button on your mouse. Keep holding the button to drag the video on the timeline. Remove your finger from the button after placing the clip on the track.

Right after the above step, you will get another message to help you decide whether you want to keep the resolution of the video to its original settings or match the media. Choose “Match to Media” for fast rendering.
However, if you’re a professional video editor, feel free to select the option that suits you the most.
Step 4: Rotate Your Video with Filmora
Double-click anywhere on the video that is already on the timeline.

You will see three tabs – “Video,” “Color,” and “Animation.” So choose the “Video” tab and click on the “Transform” option.
Once done, you will see three important options, which will help you rotate the video.
First, you will notice the “Rotate” option with an adjustment bar. This option will turn your video to different angles of your choice.
All you need to do is play with the adjustments by grabbing the “Round” knob-like button while keeping an eye on the preview window to see the results.
Just below “Rotate,” you will see the “Flip” option with “Horizontal” and “Vertical” mirror icons. Choosing any one of the icons will make your video mirror flip in horizontal or vertical directions.
The third option is “Scale” beneath the “Flip” option. Similar to the rotate option, this tool also has an adjustment bar. You can make adjustments to magnify or de-magnify the clip to fit the screen. Although this option isn’t mandatory, you can still use it if you find the need.

Now, click the “OK” button to apply rotation and return to the timeline.
Step 5: Save and Export Rotated Video to Your Widows or MAC
Here you will learn how to save the project and then export it. If you have already saved the project in the beginning, skip reading this part and directly hit the “Export” button.
Contrarily, you can also directly export your files without saving the project. But you won’t be able to make changes to the same project in the future as all source files will be lost. Therefore, saving the project and then exporting files is recommended.
So, if you’re done with step 4, save your project before going further.
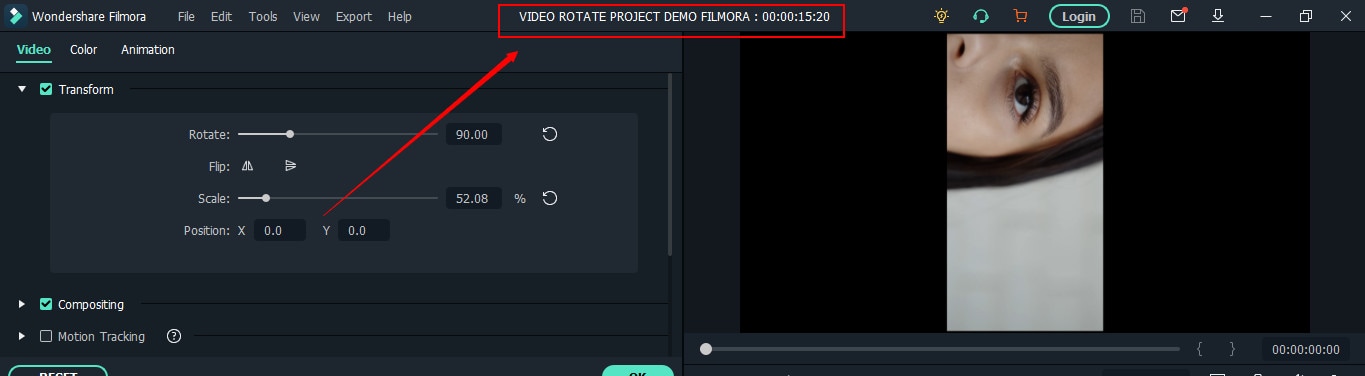
You can go to the “File” tab, choose “Save Project,” and rename the video.
Rename your file and click on the “Save” button.
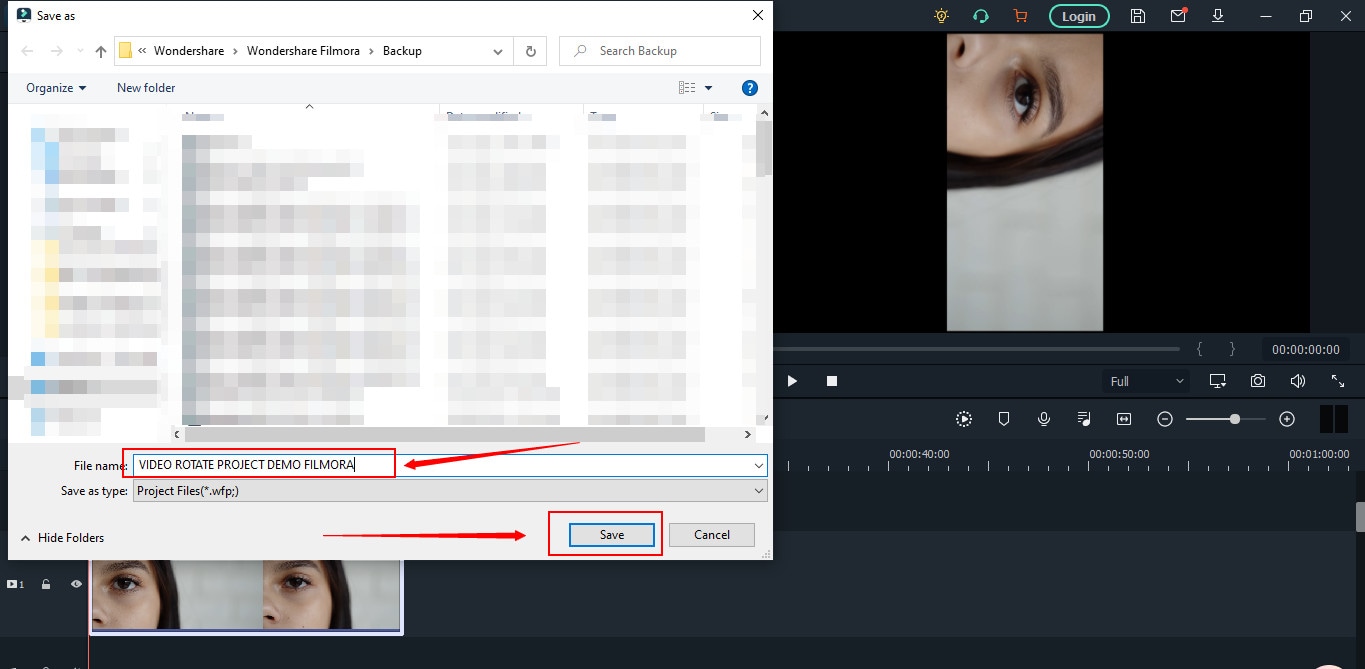
The new name will appear at the top of Filmora’s interface.
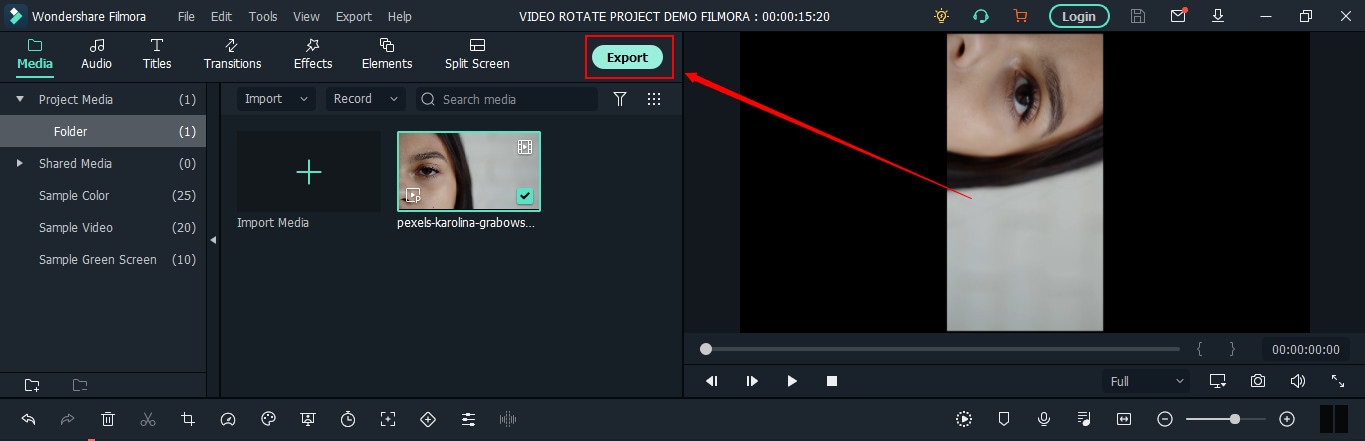
Lastly, click the “Export” button to save the file on your computer.
F 17
Part 2: Top 3 Free Video Rotators on Windows
No luck with finding free movie rotators for your Windows operating system? Don’t stress! These three AVI video rotators will solve your problem.
Free Video Flip and Rotate
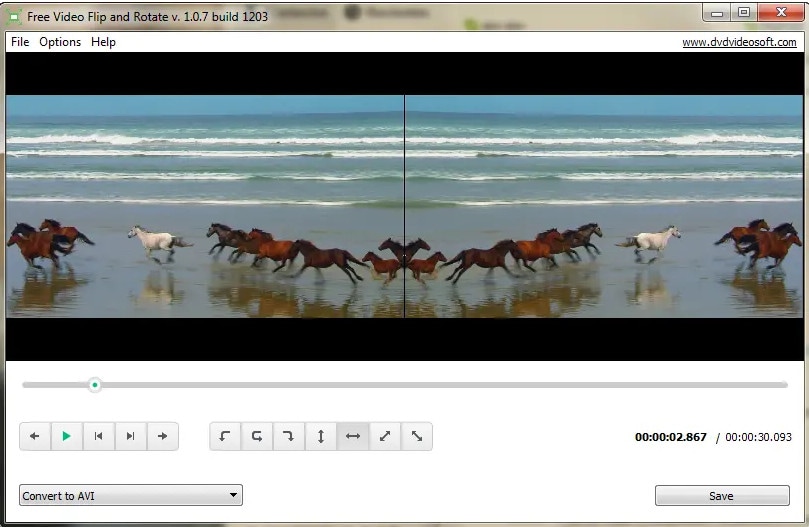
This tool could satisfy your requirements if you’re looking for a core video rotator. As the name sounds, the Free Video Flip and Rotate is software by DVD Video Soft that allows you to modify the orientation of your videos easily. In other words, this is one of the easiest video rotators for Windows users, which is also free to download and use.
It has a simple interface with user-friendly options, which permits you to rotate your videos from different angles. Besides, you can also use this software for mirroring your clips. Moreover, you can save your project in various video formats, such as AVI.
Features
- Vertical flip
- Horizontal flip
- 180° video rotation
- 90° clockwise video rotation
- 90° counter-clockwise video rotation
- Vertical flip with 90° clockwise video rotation
- Horizontal flip with 90° counter-clockwise video rotation
Pros
- One-click results
- Easy to install and run
- Free and user-friendly software
- Does not contain ads or spyware
- Requires 40.50 MB of hard disk space
- Supports AVI and other video formats
- Supports XP, Windows 7, 8, 10, and 11 versions
Cons
- Unavailable for MAC users
- Lack of additional features, such as color correction, cropping, etc.
XMedia Recode
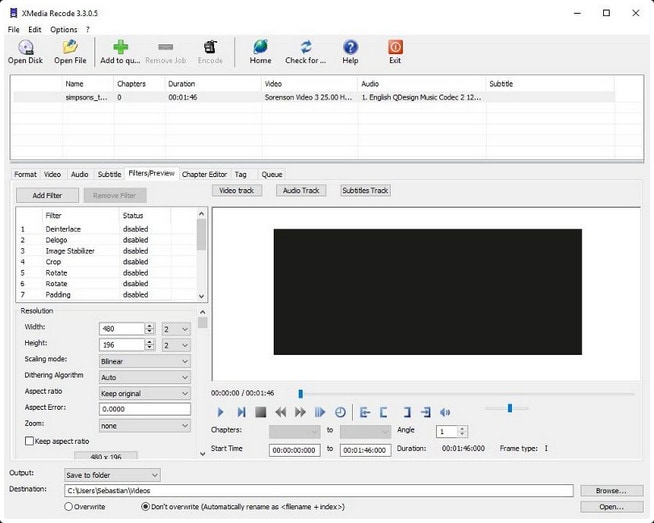
XMedia Recode is a free tool for Windows users. While the software is meant to convert videos into different formats, you can also use it for video rotation. Nevertheless, XMedia Recode has various other options, making it perfect for basic video editing.
Moreover, this software can convert unprotected Blue-rays/DVDs, create different chapters, import subtitle tracks, and many more. However, one of the best features of this video converter-cum-rotator is the video remux. That means you can convert the video container format without changing the original size.
Contrarily, XMedia Recode allows you to rotate and convert videos for countless devices, such as iPhone, iPad, Android, Xbox360, and more. But all this can be done only through Windows operating system. You can download this tool without any paid subscription. However, choose suitable processing for smooth installation, such as Windows 64bit, Windows 32bit, Vista, or XP SP3.
Features
- Blur
- Delogo
- Rotation
- Padding
- Denoise
- Cropping
- Image flip
- Swap U/V
- Clip speed
- Color curves
- Video fading
- Mirror effect
- Image stabilization
- Custom resolution
- Import 32 subtitle tracks
- Direct copy of video and audio stream into your desired format
Pros
- Free software
- Speedy conversion
- Fast batch processing
- Variety of video and audio features
- Works on Windows XP to Windows 10
- Supports 40+ video formats, including AVI
Cons
- A bit complex interface for new users
Altrasoft

Altrasoft is a small software for Windows to help rotate and convert your videos. The total size of the setup is just 971 KB.
This software is best for small video clips, which need to be rotated without wasting time. The program is free to download and use. However, the interface appears a bit old compared to new tools.
Also, unlike XMedia Recode, Altrasoft comes with limited options. So, if you only desire to rotate or flip your video and save it in the AVI or any other format, go ahead and download it.
Features
- Borders
- Zooming
- Rotation
- Color settings
- Audio formatting
- Video codec settings
- Audio codec settings
Pros
- Free to use
- Ideal for short videos
- Extremely light software
- Simple rotation options
- Rotation angle adjustments
Cons
- Outdated interface
- Lack of customer support
Part 3: Top 3 Free Video Rotators on MAC
Have you already lost your MAC storage on downloading some incompetent video rotators which claim to support AVI files? You can try these three video rotators for MAC, which are free and compatible with AVI video formats.
Kdenlive
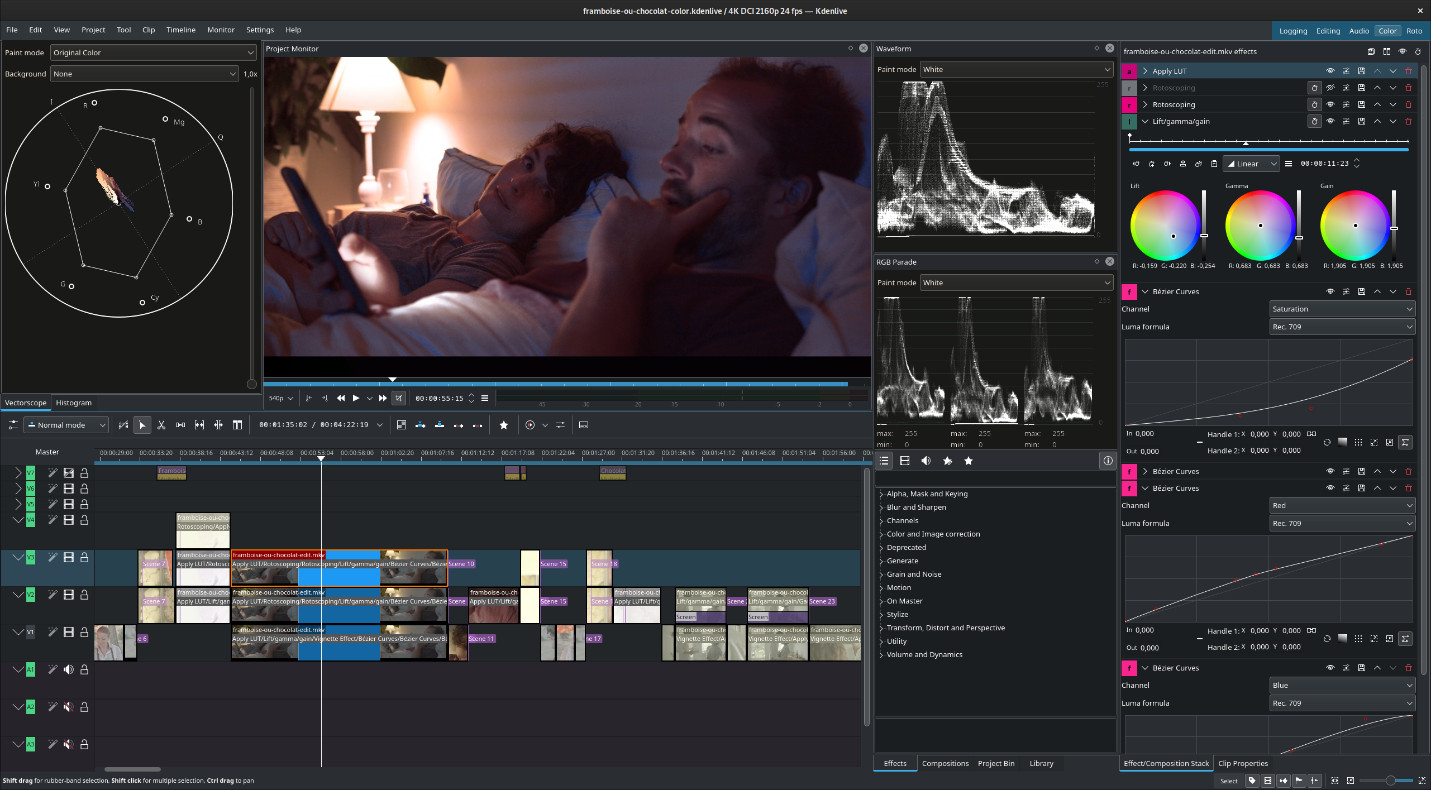
When it comes to free video rotators for MAC, it gets quite challenging to find the right tool. As a MAC OS user, you are left with limited options, especially when trying to rotate videos and save them in AVI format. However, Kdenlive appears to be a problem-solver.
Technically, Kdenlive is a free open source, cross-platform, non-linear video editor with a variety of features. Nevertheless, its Mac version works excellent compared to Windows or Linux.
You can use this software to rotate videos and save them in AVI or any other available format. Also, this program has an attractive interface with a rich library of transition templates and fonts.
Besides, from the video rotation point of view, Kdenlive allows you to turn your videos at any angle.
Features
- Rotate and zoom
- Waveform
- Histogram
- Audio meter
- Vectorscope
- Proxy editing
- Text animation
- Keyframe interpolation
- Color grading and correction
- RGB parade Multi-track video editing
- Custom shortcuts and interface layouts
- Easy line-spacing and letter-spacing adjustment
- Supports seven video formats, including AVI, MOV, HD, UHD, HDV, WEBM, and MP4
Pros
- Free to use
- Fast rendering
- Automatic backup
- Easy video rotation
- Regular bugs fixation
- Cross-platform availability
- Dozens of professional effects and transitions
Cons
- Extremely unstable on Windows OS
IMovie
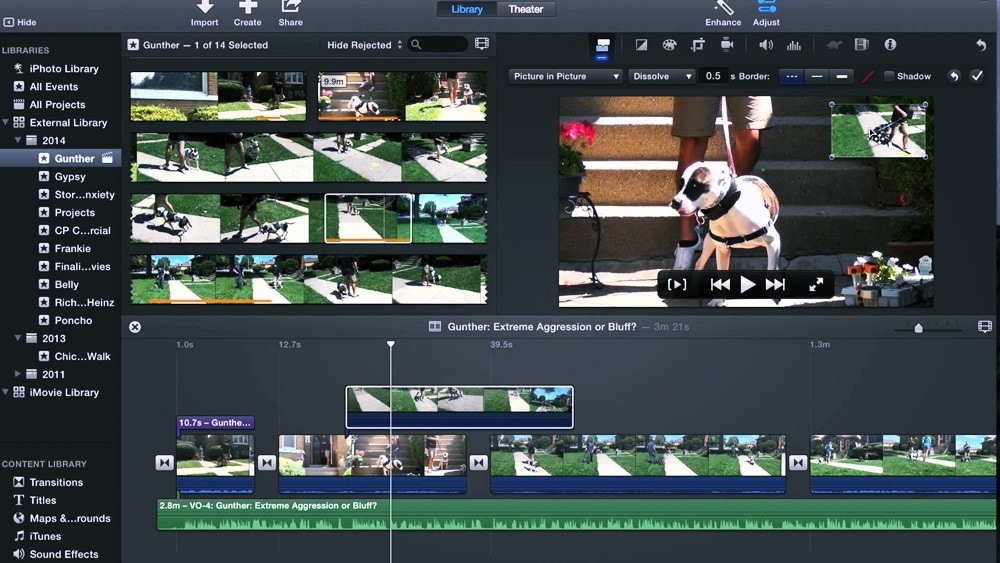
Want to get the job done quickly? Try iMovie in your MAC!
iMovie is a built-in video editing software to help create professional-level videos from your system. But you can also download iMovie if you can’t find it in the system.
Not just videos, but this software also allows you to cut and edit music without changing the files. Many filmmakers also love the tool, as they can add graphics to their projects to get remarkable results.
But that doesn’t stop new users from getting all the benefits the pros get with this software. How? Because it has a pretty straightforward look. You don’t need to click a hundred times to apply a simple effect, as all the options are right in front of you.
And when it’s about rotating a video in AVI format, feel free to rely on iMovie, as it supports several video file formats.
Features
- Video rotation and cropping
- Music and photo import
- 4K and HD video support
- Video transitions and effects
- Pre-installed backdrops and themes
- Supports working on multiple projects
Pros
- Free for MAC users
- Easy to learn
- User-friendly tools
- Extensive audio library
- Excellent movie templates
- Ideal Chroma-keying options
Cons
- Requires high storage space
- Lacks tagging and motion tracking
OpenShot
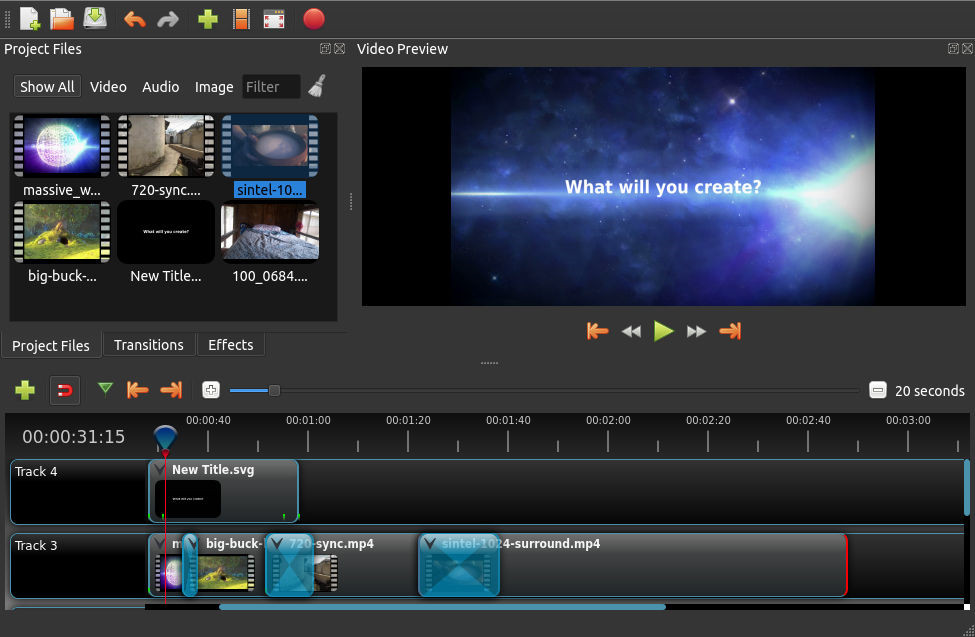
If complex video rotators make you ill, give OpenShot a shot!
It’s a free video editor which is incredibly simple to use. Most professionals around the world appreciate this powerful editing tool. Also, new users can do wonders by simply playing and understanding the options for a few minutes.
So if you plan to use OpenShot Video Editor , you would be glad to know that you can add animations, watermarks, and numerous other effects through this program. Plus, you can also enjoy audio editing within the same platform.
Although OpenShot can be installed for free on multiple operating systems, it still works best on MAC. So there’s no way to ignore this tool for rotating videos in MAC, especially when the options are limited.
Features
- Video rotation and resizing
- Drag and drop support
- Unlimited layers/tracks
- Color correction and settings
- 3D animated effects and titles
- Robust curve-based animations
- Video transitions and real-time previews
- Clip scaling, snapping, cutting, and trimming
- Image overlays, compositing, and watermarks
- Supports AVI and other audio, video, and image formats
Pros
- Free to use
- Easy editing
- No watermarking
- Available in 70+ languages
- Regular updates for improvement
- Stable performance on MAC systems
Cons
- Limited editing options for professionals
- Not suitable for old Windows OS versions
Part 4: Top 3 Free Video Rotators for Android
If using a PC to rotate your videos makes you lazy, you can change the angles of your clips through your Android phone.
So here are the three best video editing apps for Android lovers, which are free to use.
Rotate Video FX
Rotate Video FX is developed by Bizo Mobile. Despite being a small company, it has proven its mettle by offering several apps to its users in more than 100 countries. The firm is also specialized in developing mobile games for multiple platforms.
However, Rotate Video FX is one of its best creations in the world of video rotating mobile applications. This app allows you to choose the video you want to turn directly from your phone’s gallery.
And once the clip has been uploaded, you can rotate it to three different degrees by just touching the “Rotate” button.
Features
- Video rotation to 90, 180, and 270-degree angles
- Clear preview screen with no overlapping options
- Simple play, rotate, and import in a single attempt
- Social media sharing button for quick sending of media
- Automatically saves the rotated video to your phone’s gallery
Pros
- The app is free to use
- More than 1 million downloads
- Works on all android versions
Cons
- No frequent updates
- Not a user-friendly app
- Changes video resolution without permission
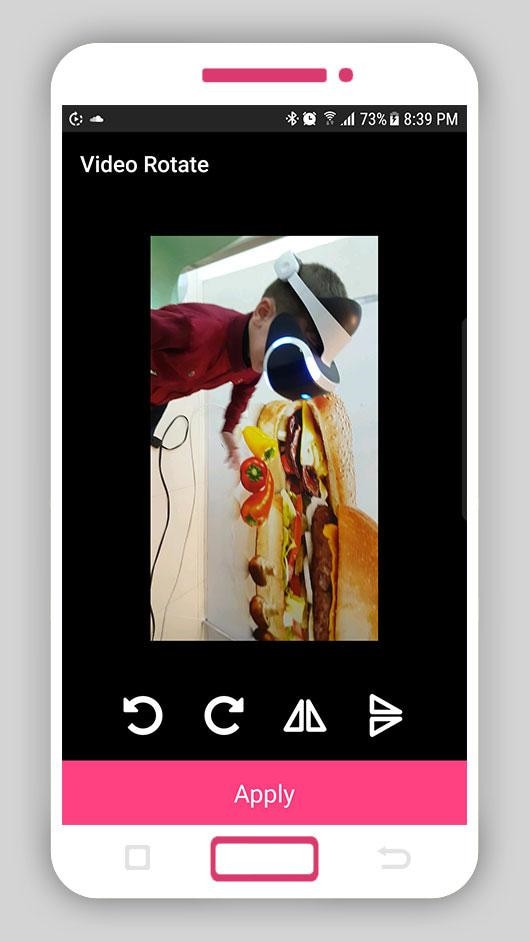
Smart Video Rotate and Flip
Clogica is the brainchild behind Smart Video Rotate and Flip video rotator for android. The company has been actively working in app development since 2014. And currently, it has more than 25 apps on the list, with 50 million total users.
Smart Video Rotate and Flip is a simple and smart tool to flip and rotate videos directly from your android device. So if you’re no longer interested in using desktop applications to do the job, here’s your chance to rotate your clips through your mobile phone or tablet.
This app offers a simple way to perform multiple flips and rotations simultaneously. The application works by re-encoding the media or by using the fast mode.
Features
- Allows video rotation and flips on different angles
- The output folder and renaming options
- Big preview screen and fast rendering
- Video recording directly from the application
- Permits you to make a video library within the app
Pros
- Free application
- Easy interface
- The app doesn’t change the video quality
- Allows you to mirror flip and rotate videos
- The latest update makes the app work faster
Cons
- The app contains ads
- Files become large after rotation
- Videos can only be saved to the phone’s internal memory
Rotate Video FREE
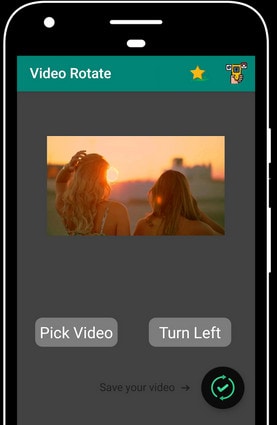
Rotate Video FREE is designed by LKR Studio. From 2014 till now, this app development company has produced seven mobile applications in the “Tools” category. And among its entire portfolio, the Rotate Video FREE app is one of the most popular creations.
Rotate Video FREE is a highly light and easy video rotator for Android devices. It has a simple interface with two main options: ‘ Pick Video’ to select the clip from your phone’s gallery. Then, the “Turn Left” button helps you rotate the video in multiple directions.
Features
- Rotates video to 90, 180, and 270 degrees
- HD video export quality
- Hassle-free rotate options
Pros
- Free of cost app
- Speedy video rotation process on large files
- Saves video directly to your phone’s memory
- Video rotation without affecting the resolution
Cons
- No mirror flipping
- The free version contains advertisements
- Hard to find the location of the saved videos
Part 5: Top 3 Free Video Rotators for iPhone
Are you struggling to find a good video rotator for iPhone? Here’s the list of three best iPhone apps to help you rotate your movies using your smartphone in AVI format.
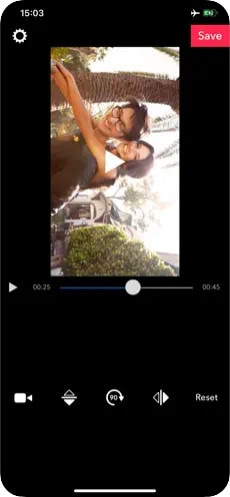
Video Rotate + Flip Video Easy
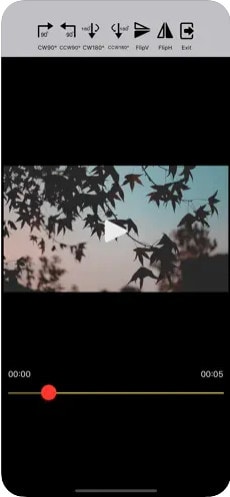
Finding a video rotator for iPhone is a bit difficult, as most valuable applications comes after paying the price. But Video Rotate + Flip Video Easy app is totally free to download and use.
The app includes all the basic functions to rotate and flip videos in different angles. After downloading the app, you will notice a simple interface with seven options. So all you need to do is to import your video from the phone’s gallery, use the options to rotate the video, and save the rotated video in your phone.
The app is also available in different languages, including German, French, Japanese, English, Portuguese, Simplified Chinese, Spanish, and Russian.
Features
- Vertical mirror flipping
- Horizontal mirror flipping
- Frame wise video rotation
- 90° degrees clockwise and counter clockwise rotations
- 180° degrees clockwise and counter clockwise rotations
Pros
- Fast video conversion
- Small app size (only 16.1 MB)
- Available in multiple languages
- Supports iOS 11.0 or later versions
- The app is free with no watermarks
- You can install the app on your iPad
- Rotated videos can be played on all media players
- It exports the rotated video directly to your camera roll
Cons
- You need to purchase the app to remove advertisements
RFV
Here’s another free app to rotate and flip your videos. You can download RFV on both Android and iPhone smartphones. However, the iPhone version of the app works flawlessly. In fact, the ratings on both platforms also confirm that there are more happy iPhone users of this app than Android users.
RFV is a quick solution to correct your video orientation. So, if you have recorded the video through your iPhone at the wrong angle, you can use the app to flip and turn the clip’s position without much trouble. And you can do all of this just by selecting the options at the bottom of the app’s interface.
Features
- 90° degrees rotations
- Quick resetting
- Horizontal and vertical mirror flipping
- Turn photos into videos
- Video podcast
Pros
- RFV is a free video rotating app
- Easy installation on iPad
- Supports iOS 12.0 or later versions
- Direct loading of clip on the app from camera roll
Cons
- Large app size (41.7 MB)
- Unavailable for older iPhone versions
- It does not support file sizes above 200 MB
- Problems with saving the video on Android phones
Video Rotate – Flip Video
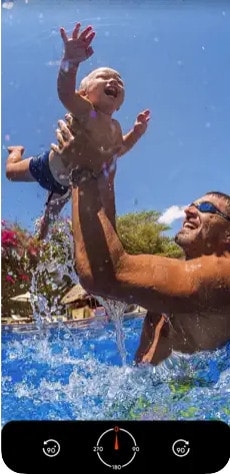
Video Rotate – Flip Video is the third in line when it comes to free video rotators for iPhones. The tool has pretty straightforward options regarding 90-degree clockwise and counter-clockwise rotations. Moreover, you can also play with different angles to adjust the orientation from 0 to 270 degrees.
Once you’re done rotating your video, you can save the new clip directly to your iPhone’s camera roll. At the same time, this app also allows you to share the rotated video on various social and communication platforms.
Features
- The app is specifically designed to rotate videos
- Uncomplicated app interface
- Live video preview
Pros
- Free and fast video rotator app for iPhone
- You can also install the app on an iPad
- Compatible with iOS 10.0 or later versions
Cons
- The app shows advertisements until you buy it
- No reset option – you have to start all over again
Part 6: Top 3 Free Video Rotators Online
Don’t want to fill your device’s storage with software? Well! You can rotate videos online for free in AVI format with ease. Here are the 3 best online video rotating tools.
Flixier
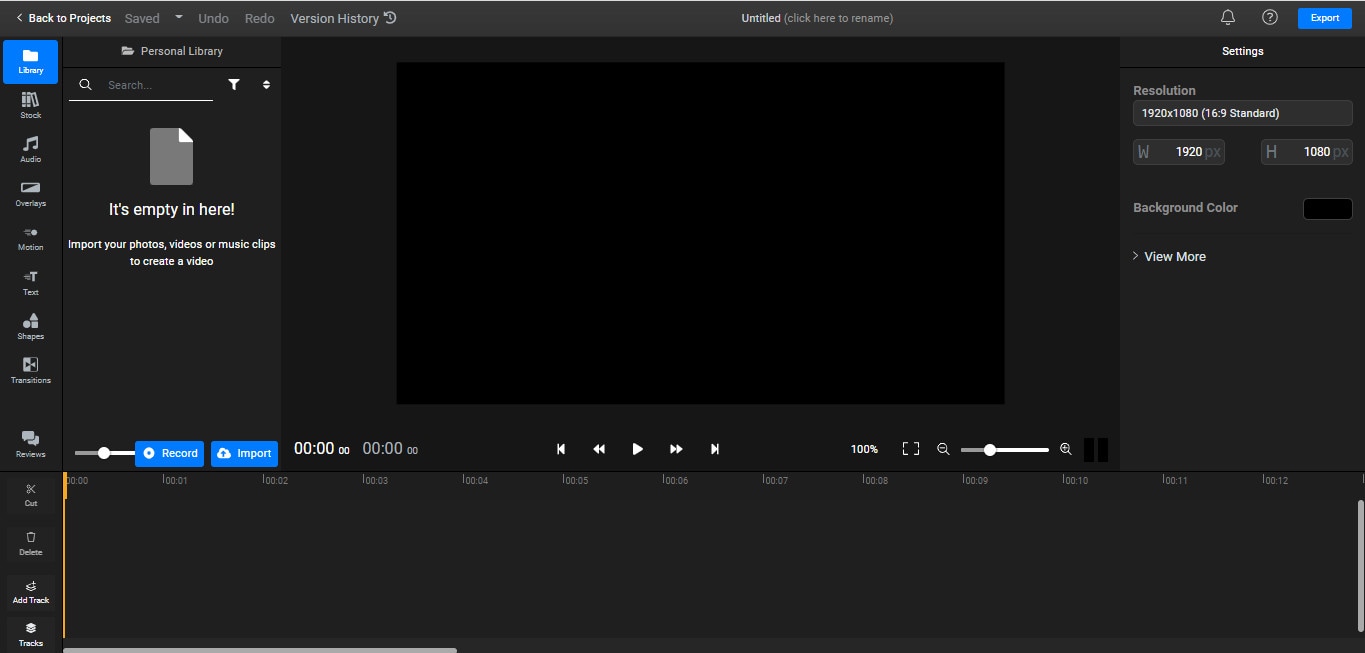
Flixier is a website that helps you create and edit videos through your internet browser. You can upload multiple videos or photos to add effects, text, and many more characteristics. This online platform allows you to add keyframes and transitions to your clips. Likewise, you can adjust your videos’ positioning, scaling, and resizing.
So can you rotate videos on Flixier?
Yes, you can and without paying a cent. The website offers a variety of options to rotate your clips. All you need to do is select the transform option and choose the rotation or flip option to see the results. And when you’re done rotating the video, simply export the file to your computer.
On the other hand, if you think you want to use Flixier frequently, you are required to buy a premium monthly or annual subscription. But until then, you can enjoy all the great traits for free.
Features
- Video rotation (90 degrees left and right)
- Video flipping (horizontal and vertical)
- Robust timeline
- 50+ transitions
- Green screen
- Live collaboration
- Screen recording
- Webcam recording
- Video effects
- Color correction
- Built-in media stock libraries
Pros
- Flixier is free
- No sign-up required
- Superfast rendering
- Variety of video templates
- Unlimited audio and video tracks
- Allows AVI media import and export
- Live video, microphone, and screen recording
Cons
- You need to purchase paid plans for team collaboration
- The free plan comes with limited projects, downloads, and storage
Clideo
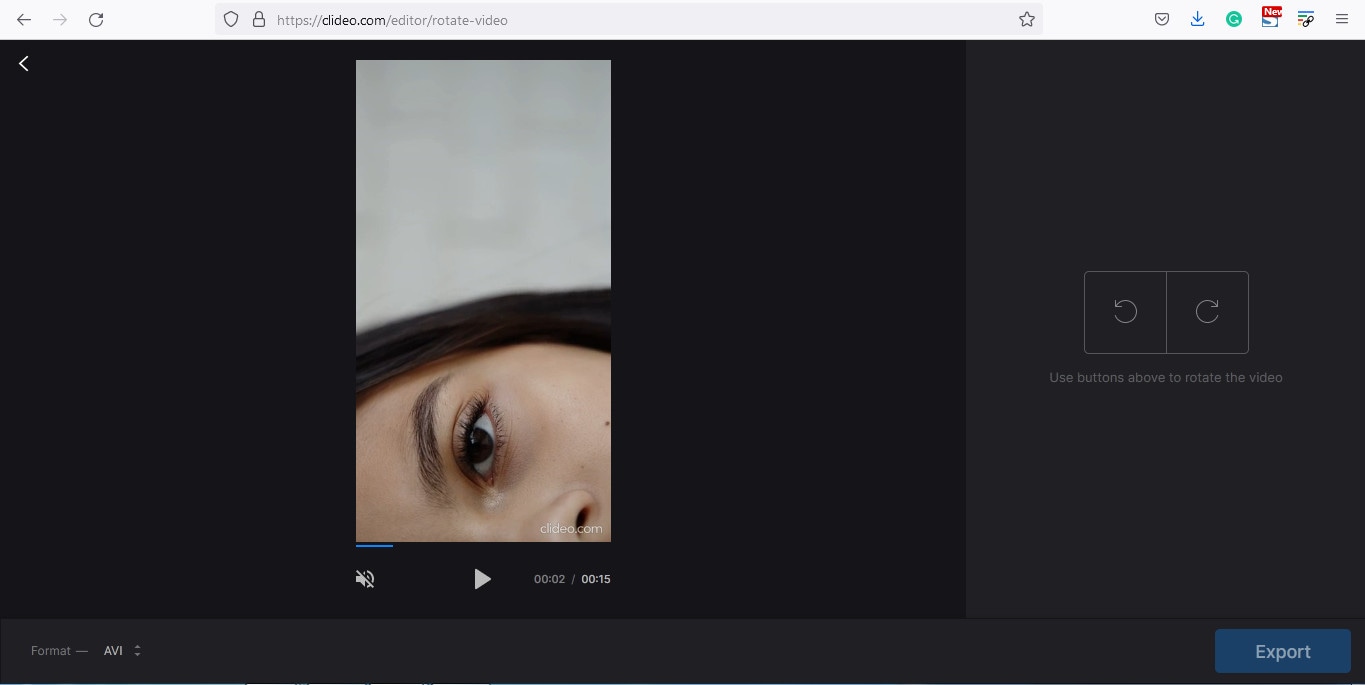
Clideo is a great online tool that allows you to create and edit images and videos in one place. This web-based program comes with a variety of features, including video rotation and flipping.
To make your videos unique, Clideo permits you to add text and music to attract the audience. Moreover, the program supports different video formats, like AVI, MPG, MP4, WMC, MOV, VOB, and more.
You can do everything right from your internet browser without installing the application on your computer. All video files that you import and export on Clideo are well-protected.
As a user, you can select different resolutions, formats, and other features to make exciting videos within a few clicks. And apart from video rotation, the tool offers numerous beneficial options, such as reverse, speed, flip, loop, stop motion, and even memes creation.
Features
- Easy video flipping and rotation
- DPI conversion
- Video compressing
- Speed adjustment
- Slideshow creation
- Filters and presets
- Audio and video cutting
- Video and audio merging
- Subtitles and personalized text
- Color correction and fading effects
Pros
- All basic features are free to use
- Best for beginners
- Non-technical interface
- Supports various video formats (including AVI)
Cons
- This online tool lacks design elements and themes
- You need to buy the premium version to use Clideo daily
Rotate My Video.Net
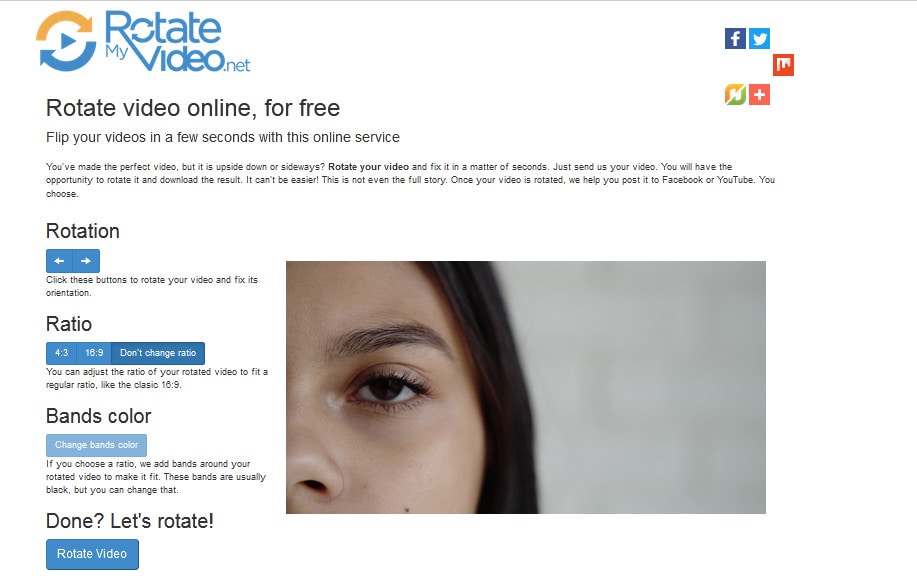
Last but not the least, the Rotate My Video.Net is a free online tool designed for video rotation only. So, if your video is upside down or shot in the wrong direction, feel free to use this tool.
This web-based video rotator allows you to share the video to different social platforms directly from the website. Contrarily, you also save the rotated clips on your system.
Another interesting fact about this tool is that it has no limit. That means you can upload videos on the interface and rotate them as often as possible. However, the tool does not offer other features to groom your videos.
Moreover, the developers claim that the videos are deleted automatically from the server in a few hours. Therefore, your videos stay private and safe.
Features
- 90 degrees clockwise and counter-clockwise rotation
- Video ratio adjustment options (4:3 and 16:9)
- Band color option to fill the empty black space with colors
Pros
- Entirely free – no monthly or yearly subscription required
- Easy and quick process
- Supports AVI video files
- Video quality is not disturbed after rotation
Cons
- Lacks video flipping option
- It does not include any other features
Part 7: Bottom Line
Despite a long list of free video editors, finding the right one that simplifies the task without any trouble is hard. But with these top 16 best free AVI video rotators, you can flip and rotate videos in a couple of minutes. You can find the most suitable rotator Windows, MAC, iPhone, and Android. Or, you can use the online platforms to enjoy rotations at different angles. However, regardless of device or operating system, each rotator has pros and cons. So don’t hesitate to opt for the tool that fulfills all your needs.
Part 8: FAQs
Q1. How do I rotate a video for free?
You can rotate a video for free by downloading a free video rotator according to your operating system. You can also look for online tools for video rotation. Likewise, you can also install Android and iPhone apps to rotate clips from your phone.
Q2. What software can rotate video?
There are many software that helps you rotate videos. However, most of them are paid. So, if you’re looking for some free video rotators on MAC or Windows, you can download Filmora. On the other hand, you can download programs like Altrasoft, XMedia Recode, and Free Video Flip and Rotate for Windows.
Q3. How can I rotate a video without losing quality?
Not all video rotators can promise high-quality results. So if you want to rotate your clip without damaging the quality, you must choose top-notch video editors, like Filmora or iMovie.
Q4. How do you rotate an AVI file on a MAC?
You need to download video rotators, such as Kdenlive, iMovie, or OpenShot, to rotate your AVI files for free. But, you can choose Filmora for MAC to flip and turn your AVI videos to different angles for exceptional results.
Q5. How do I rotate a video online?
To rotate an AVI video online, you need to be extremely picky, as even most online tools don’t support AVI files. But online video editors like Flixier, Clideo, and RotateMyVideo.Net allow you to rotate AVI videos easily.
Did you rush to record a video in a mistaken direction? Or were you just excited to film the moments without noticing the position of your camera? Whatever the case, if you regret recording the clip at the incorrect angle, here’s your chance to do the alteration. The article includes the top 16 best free AVI video rotators you can use on MAC, Windows, iPhone, Android, and online. Plus, if you’re looking for a single platform to rotate or flip videos, you can learn the complete process by following the step-by-step Filmora Video Editor tutorial that works on MAC and Windows.
In this Article
Part 1: Best AVI Video Rotators to Rotate AVI Video on Windows and MAC – Filmora Video Editor [with steps]
Part 2: Top 3 Free Video Rotators on Windows
Part 3: Top 3 Free Video Rotators on MAC
Part 4: Top 3 Free Video Rotators on Android
Part 5: Top 3 Free Video Rotators on iPhone
Part 6: Top 3 Free Video Rotators Online
Part 7: Bottom Line
Part 8: FAQs
Part 1: Best AVI Video Rotators to Rotate AVI Video on Windows and MAC – Filmora Video Editor [with steps]
Heard about Filmora but never used it? Surely, you’re missing great fun if you’re a video professional or a beginner video editor.
Filmora is an award-winning video editing software that works for both PC and MAC users. While the tool comes at an affordable price, you can still download the free setup to start showing your creativity.
This video editor has dozens of new effects, transitions, and many more features, which can help you create engaging videos. You can also enjoy some more key features, including audio ducking, color matching, motion tracking, split screen, video filters and transitions, speed control, and multiple exporting formats.
And, of course, video rotation is as easy as ABC! You can follow this step-by-step tutorial to rotate or flip your videos using Filmora 10. You can apply the same procedure if you have a different version.
Step 1: Download and Install Filmora
Visit Filmora Video Editor’s official website to download the newest version. Click on the “Try it Free” button according to your operating system (look at the icons on the button to identify the OS).
After downloading the setup, double-click the file to install the video editor. Then, open the program.
Feel free to judge the interface (see the image below), as it is pretty simple to understand. So, even if you’re a beginner, you can learn this tool within a few minutes of practice.
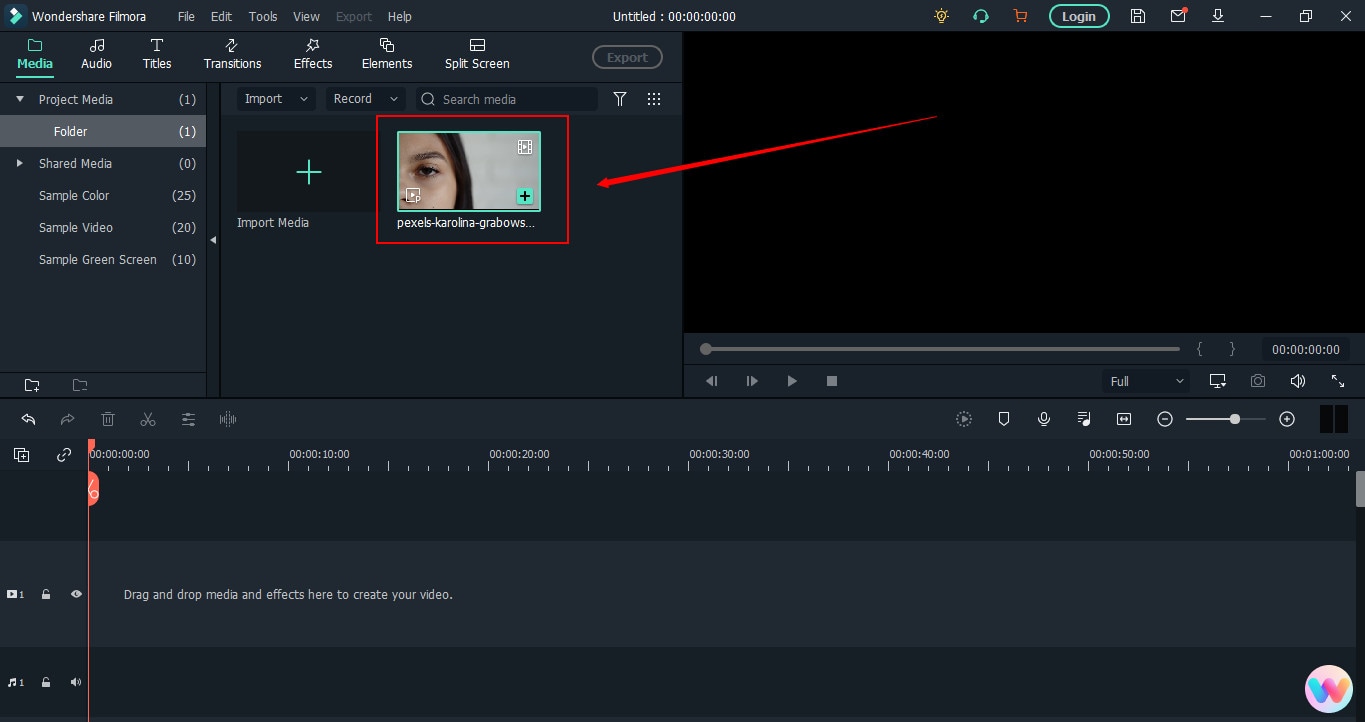
Step 2: Import the Video You Want to Rotate
The next is to bring the video file to Filmora’s library before proceeding. To do that, click on the “Movie Clip” icon in the center of the interface to select the clip from your computer’s hard drive.
Double-click or select the video and click the “Open” button to import files. The importing process may take several seconds or a few minutes, depending on the video size.
If you’re using Filmora for the first time, you might see the “Create Proxy File” message popping up right after the video import. So, simply click on the “Yes” button to go ahead.
Your video will be stored in the “Project Media” tab and will be visible next to the preview window.
Step 3: Drag and Drop the Video on Filmora’s Timeline
To rotate the video, first, you need to add it to the track. For that, take your mouse on the video, and select it by clicking the right button on your mouse. Keep holding the button to drag the video on the timeline. Remove your finger from the button after placing the clip on the track.
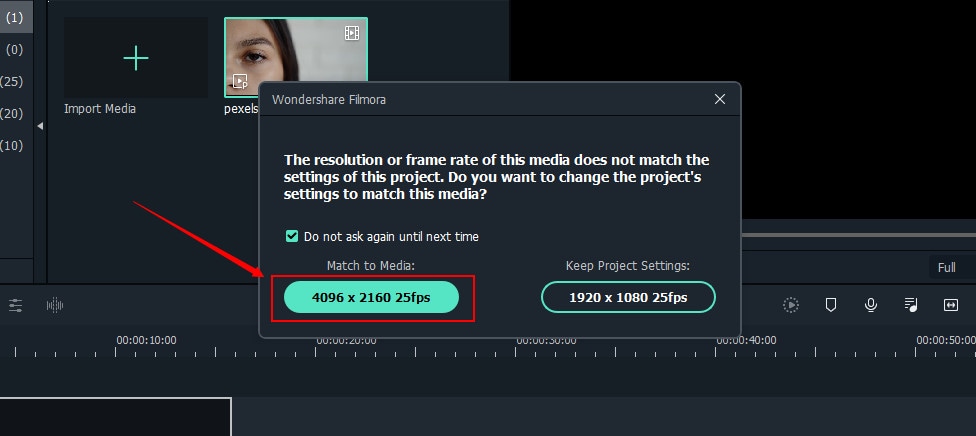
Right after the above step, you will get another message to help you decide whether you want to keep the resolution of the video to its original settings or match the media. Choose “Match to Media” for fast rendering.
However, if you’re a professional video editor, feel free to select the option that suits you the most.
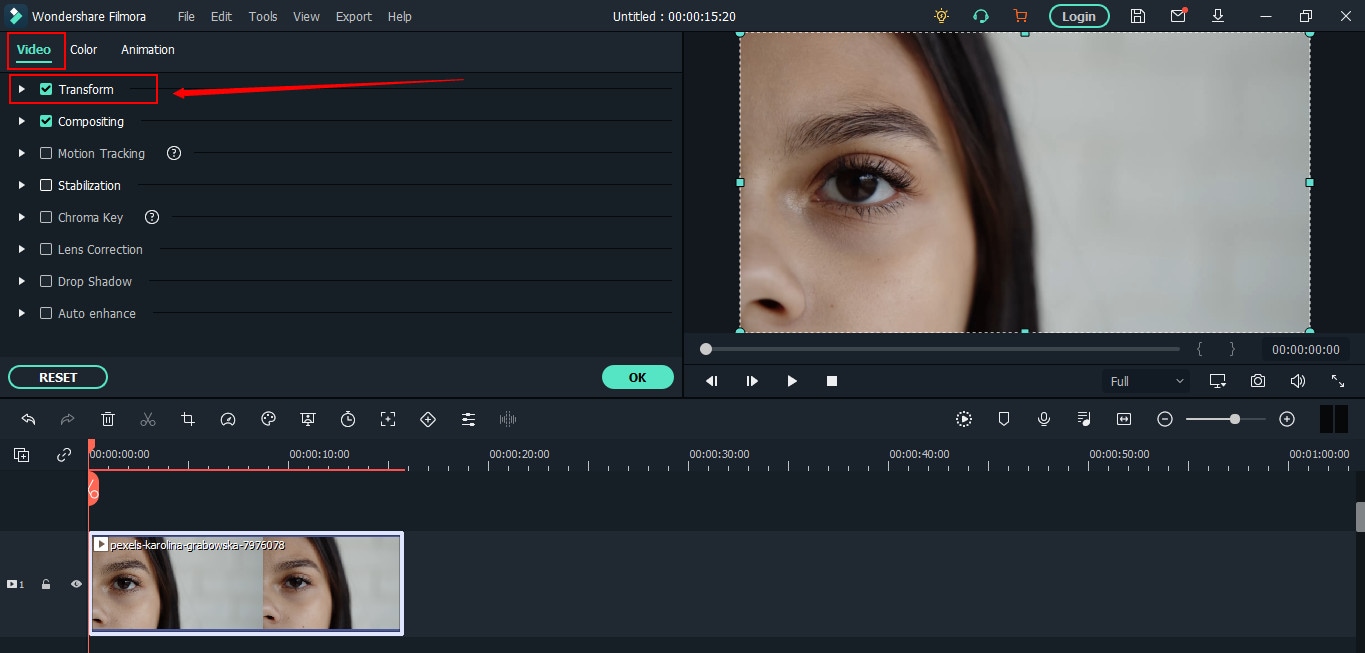
Step 4: Rotate Your Video with Filmora
Double-click anywhere on the video that is already on the timeline.
You will see three tabs – “Video,” “Color,” and “Animation.” So choose the “Video” tab and click on the “Transform” option.
Once done, you will see three important options, which will help you rotate the video.
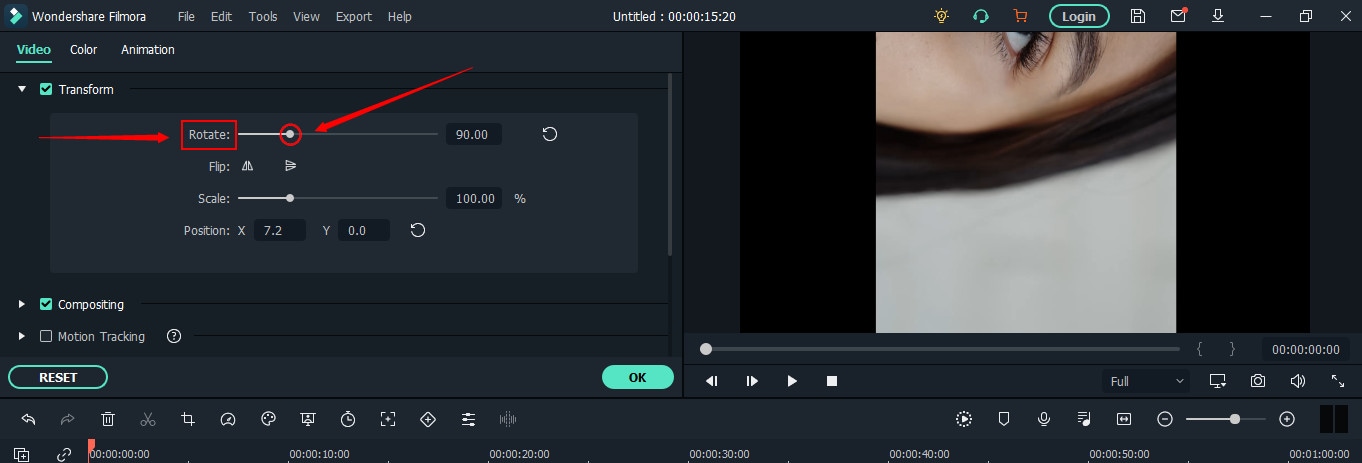
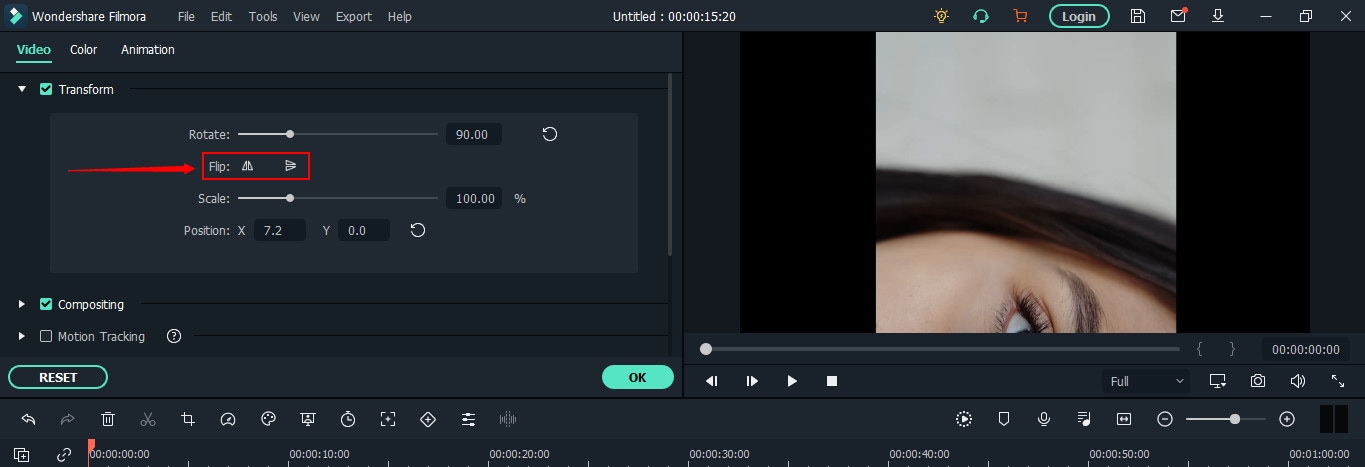
First, you will notice the “Rotate” option with an adjustment bar. This option will turn your video to different angles of your choice.
All you need to do is play with the adjustments by grabbing the “Round” knob-like button while keeping an eye on the preview window to see the results.
Just below “Rotate,” you will see the “Flip” option with “Horizontal” and “Vertical” mirror icons. Choosing any one of the icons will make your video mirror flip in horizontal or vertical directions.
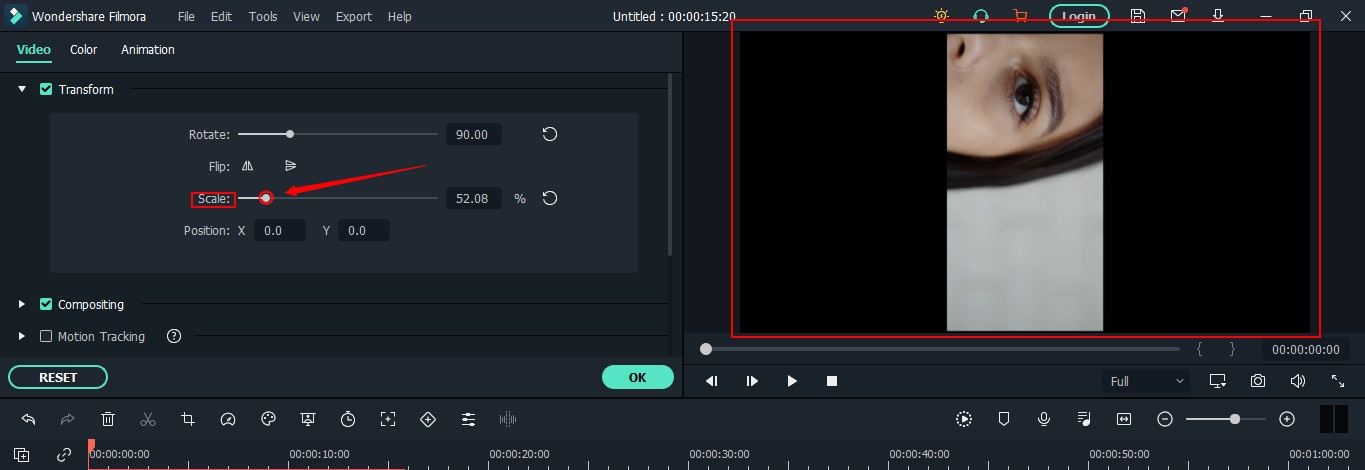
The third option is “Scale” beneath the “Flip” option. Similar to the rotate option, this tool also has an adjustment bar. You can make adjustments to magnify or de-magnify the clip to fit the screen. Although this option isn’t mandatory, you can still use it if you find the need.
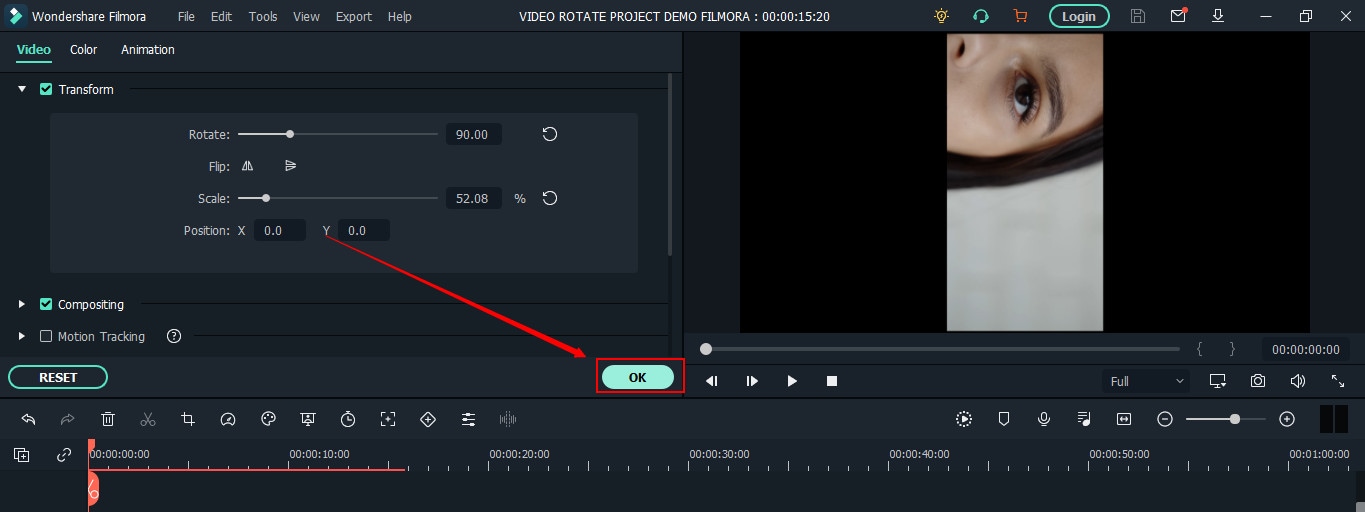
Now, click the “OK” button to apply rotation and return to the timeline.
Step 5: Save and Export Rotated Video to Your Widows or MAC
Here you will learn how to save the project and then export it. If you have already saved the project in the beginning, skip reading this part and directly hit the “Export” button.
Contrarily, you can also directly export your files without saving the project. But you won’t be able to make changes to the same project in the future as all source files will be lost. Therefore, saving the project and then exporting files is recommended.
So, if you’re done with step 4, save your project before going further.
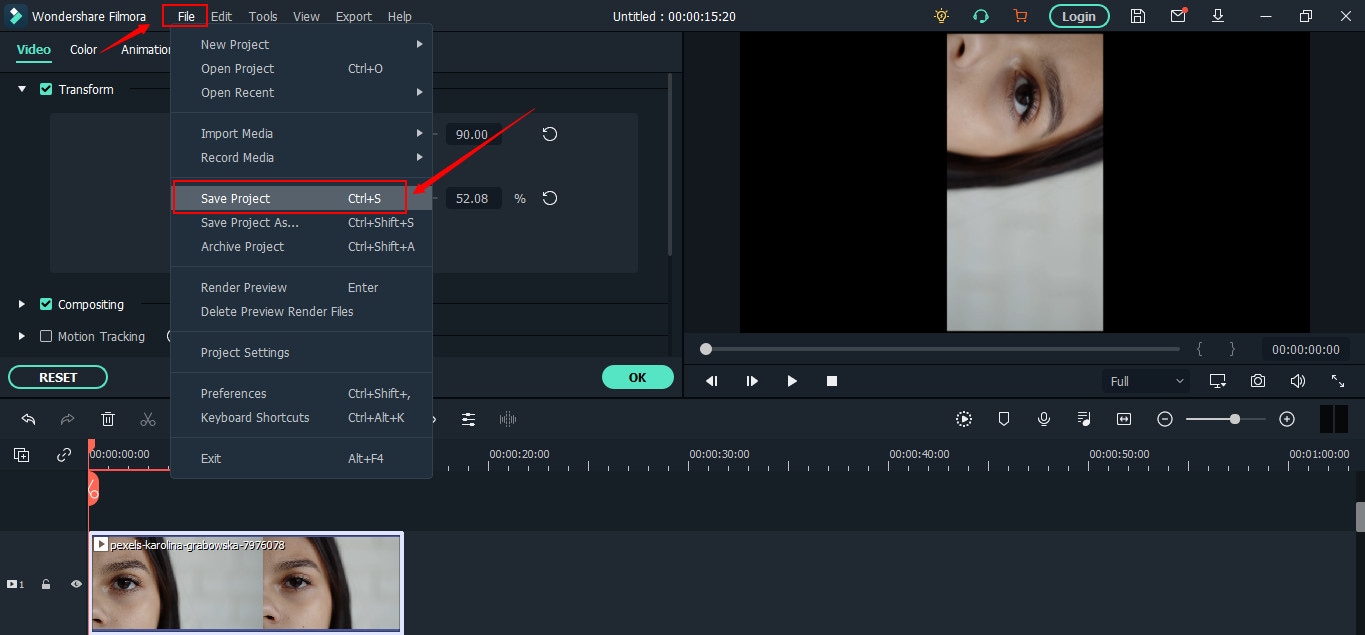
You can go to the “File” tab, choose “Save Project,” and rename the video.
Rename your file and click on the “Save” button.
The new name will appear at the top of Filmora’s interface.
Lastly, click the “Export” button to save the file on your computer.
F 17
Part 2: Top 3 Free Video Rotators on Windows
No luck with finding free movie rotators for your Windows operating system? Don’t stress! These three AVI video rotators will solve your problem.
Free Video Flip and Rotate
This tool could satisfy your requirements if you’re looking for a core video rotator. As the name sounds, the Free Video Flip and Rotate is software by DVD Video Soft that allows you to modify the orientation of your videos easily. In other words, this is one of the easiest video rotators for Windows users, which is also free to download and use.
It has a simple interface with user-friendly options, which permits you to rotate your videos from different angles. Besides, you can also use this software for mirroring your clips. Moreover, you can save your project in various video formats, such as AVI.
Features
- Vertical flip
- Horizontal flip
- 180° video rotation
- 90° clockwise video rotation
- 90° counter-clockwise video rotation
- Vertical flip with 90° clockwise video rotation
- Horizontal flip with 90° counter-clockwise video rotation
Pros
- One-click results
- Easy to install and run
- Free and user-friendly software
- Does not contain ads or spyware
- Requires 40.50 MB of hard disk space
- Supports AVI and other video formats
- Supports XP, Windows 7, 8, 10, and 11 versions
Cons
- Unavailable for MAC users
- Lack of additional features, such as color correction, cropping, etc.
XMedia Recode
XMedia Recode is a free tool for Windows users. While the software is meant to convert videos into different formats, you can also use it for video rotation. Nevertheless, XMedia Recode has various other options, making it perfect for basic video editing.
Moreover, this software can convert unprotected Blue-rays/DVDs, create different chapters, import subtitle tracks, and many more. However, one of the best features of this video converter-cum-rotator is the video remux. That means you can convert the video container format without changing the original size.
Contrarily, XMedia Recode allows you to rotate and convert videos for countless devices, such as iPhone, iPad, Android, Xbox360, and more. But all this can be done only through Windows operating system. You can download this tool without any paid subscription. However, choose suitable processing for smooth installation, such as Windows 64bit, Windows 32bit, Vista, or XP SP3.
Features
- Blur
- Delogo
- Rotation
- Padding
- Denoise
- Cropping
- Image flip
- Swap U/V
- Clip speed
- Color curves
- Video fading
- Mirror effect
- Image stabilization
- Custom resolution
- Import 32 subtitle tracks
- Direct copy of video and audio stream into your desired format
Pros
- Free software
- Speedy conversion
- Fast batch processing
- Variety of video and audio features
- Works on Windows XP to Windows 10
- Supports 40+ video formats, including AVI
Cons
- A bit complex interface for new users
Altrasoft
Altrasoft is a small software for Windows to help rotate and convert your videos. The total size of the setup is just 971 KB.
This software is best for small video clips, which need to be rotated without wasting time. The program is free to download and use. However, the interface appears a bit old compared to new tools.
Also, unlike XMedia Recode, Altrasoft comes with limited options. So, if you only desire to rotate or flip your video and save it in the AVI or any other format, go ahead and download it.
Features
- Borders
- Zooming
- Rotation
- Color settings
- Audio formatting
- Video codec settings
- Audio codec settings
Pros
- Free to use
- Ideal for short videos
- Extremely light software
- Simple rotation options
- Rotation angle adjustments
Cons
- Outdated interface
- Lack of customer support
Part 3: Top 3 Free Video Rotators on MAC
Have you already lost your MAC storage on downloading some incompetent video rotators which claim to support AVI files? You can try these three video rotators for MAC, which are free and compatible with AVI video formats.
Kdenlive
When it comes to free video rotators for MAC, it gets quite challenging to find the right tool. As a MAC OS user, you are left with limited options, especially when trying to rotate videos and save them in AVI format. However, Kdenlive appears to be a problem-solver.
Technically, Kdenlive is a free open source, cross-platform, non-linear video editor with a variety of features. Nevertheless, its Mac version works excellent compared to Windows or Linux.
You can use this software to rotate videos and save them in AVI or any other available format. Also, this program has an attractive interface with a rich library of transition templates and fonts.
Besides, from the video rotation point of view, Kdenlive allows you to turn your videos at any angle.
Features
- Rotate and zoom
- Waveform
- Histogram
- Audio meter
- Vectorscope
- Proxy editing
- Text animation
- Keyframe interpolation
- Color grading and correction
- RGB parade Multi-track video editing
- Custom shortcuts and interface layouts
- Easy line-spacing and letter-spacing adjustment
- Supports seven video formats, including AVI, MOV, HD, UHD, HDV, WEBM, and MP4
Pros
- Free to use
- Fast rendering
- Automatic backup
- Easy video rotation
- Regular bugs fixation
- Cross-platform availability
- Dozens of professional effects and transitions
Cons
- Extremely unstable on Windows OS
IMovie
Want to get the job done quickly? Try iMovie in your MAC!
iMovie is a built-in video editing software to help create professional-level videos from your system. But you can also download iMovie if you can’t find it in the system.
Not just videos, but this software also allows you to cut and edit music without changing the files. Many filmmakers also love the tool, as they can add graphics to their projects to get remarkable results.
But that doesn’t stop new users from getting all the benefits the pros get with this software. How? Because it has a pretty straightforward look. You don’t need to click a hundred times to apply a simple effect, as all the options are right in front of you.
And when it’s about rotating a video in AVI format, feel free to rely on iMovie, as it supports several video file formats.
Features
- Video rotation and cropping
- Music and photo import
- 4K and HD video support
- Video transitions and effects
- Pre-installed backdrops and themes
- Supports working on multiple projects
Pros
- Free for MAC users
- Easy to learn
- User-friendly tools
- Extensive audio library
- Excellent movie templates
- Ideal Chroma-keying options
Cons
- Requires high storage space
- Lacks tagging and motion tracking
OpenShot
If complex video rotators make you ill, give OpenShot a shot!
It’s a free video editor which is incredibly simple to use. Most professionals around the world appreciate this powerful editing tool. Also, new users can do wonders by simply playing and understanding the options for a few minutes.
So if you plan to use OpenShot Video Editor , you would be glad to know that you can add animations, watermarks, and numerous other effects through this program. Plus, you can also enjoy audio editing within the same platform.
Although OpenShot can be installed for free on multiple operating systems, it still works best on MAC. So there’s no way to ignore this tool for rotating videos in MAC, especially when the options are limited.
Features
- Video rotation and resizing
- Drag and drop support
- Unlimited layers/tracks
- Color correction and settings
- 3D animated effects and titles
- Robust curve-based animations
- Video transitions and real-time previews
- Clip scaling, snapping, cutting, and trimming
- Image overlays, compositing, and watermarks
- Supports AVI and other audio, video, and image formats
Pros
- Free to use
- Easy editing
- No watermarking
- Available in 70+ languages
- Regular updates for improvement
- Stable performance on MAC systems
Cons
- Limited editing options for professionals
- Not suitable for old Windows OS versions
Part 4: Top 3 Free Video Rotators for Android
If using a PC to rotate your videos makes you lazy, you can change the angles of your clips through your Android phone.
So here are the three best video editing apps for Android lovers, which are free to use.
Rotate Video FX
Rotate Video FX is developed by Bizo Mobile. Despite being a small company, it has proven its mettle by offering several apps to its users in more than 100 countries. The firm is also specialized in developing mobile games for multiple platforms.
However, Rotate Video FX is one of its best creations in the world of video rotating mobile applications. This app allows you to choose the video you want to turn directly from your phone’s gallery.
And once the clip has been uploaded, you can rotate it to three different degrees by just touching the “Rotate” button.
Features
- Video rotation to 90, 180, and 270-degree angles
- Clear preview screen with no overlapping options
- Simple play, rotate, and import in a single attempt
- Social media sharing button for quick sending of media
- Automatically saves the rotated video to your phone’s gallery
Pros
- The app is free to use
- More than 1 million downloads
- Works on all android versions
Cons
- No frequent updates
- Not a user-friendly app
- Changes video resolution without permission
Smart Video Rotate and Flip
Clogica is the brainchild behind Smart Video Rotate and Flip video rotator for android. The company has been actively working in app development since 2014. And currently, it has more than 25 apps on the list, with 50 million total users.
Smart Video Rotate and Flip is a simple and smart tool to flip and rotate videos directly from your android device. So if you’re no longer interested in using desktop applications to do the job, here’s your chance to rotate your clips through your mobile phone or tablet.
This app offers a simple way to perform multiple flips and rotations simultaneously. The application works by re-encoding the media or by using the fast mode.
Features
- Allows video rotation and flips on different angles
- The output folder and renaming options
- Big preview screen and fast rendering
- Video recording directly from the application
- Permits you to make a video library within the app
Pros
- Free application
- Easy interface
- The app doesn’t change the video quality
- Allows you to mirror flip and rotate videos
- The latest update makes the app work faster
Cons
- The app contains ads
- Files become large after rotation
- Videos can only be saved to the phone’s internal memory
Rotate Video FREE
Rotate Video FREE is designed by LKR Studio. From 2014 till now, this app development company has produced seven mobile applications in the “Tools” category. And among its entire portfolio, the Rotate Video FREE app is one of the most popular creations.
Rotate Video FREE is a highly light and easy video rotator for Android devices. It has a simple interface with two main options: ‘ Pick Video’ to select the clip from your phone’s gallery. Then, the “Turn Left” button helps you rotate the video in multiple directions.
Features
- Rotates video to 90, 180, and 270 degrees
- HD video export quality
- Hassle-free rotate options
Pros
- Free of cost app
- Speedy video rotation process on large files
- Saves video directly to your phone’s memory
- Video rotation without affecting the resolution
Cons
- No mirror flipping
- The free version contains advertisements
- Hard to find the location of the saved videos
Part 5: Top 3 Free Video Rotators for iPhone
Are you struggling to find a good video rotator for iPhone? Here’s the list of three best iPhone apps to help you rotate your movies using your smartphone in AVI format.
Video Rotate + Flip Video Easy
Finding a video rotator for iPhone is a bit difficult, as most valuable applications comes after paying the price. But Video Rotate + Flip Video Easy app is totally free to download and use.
The app includes all the basic functions to rotate and flip videos in different angles. After downloading the app, you will notice a simple interface with seven options. So all you need to do is to import your video from the phone’s gallery, use the options to rotate the video, and save the rotated video in your phone.
The app is also available in different languages, including German, French, Japanese, English, Portuguese, Simplified Chinese, Spanish, and Russian.
Features
- Vertical mirror flipping
- Horizontal mirror flipping
- Frame wise video rotation
- 90° degrees clockwise and counter clockwise rotations
- 180° degrees clockwise and counter clockwise rotations
Pros
- Fast video conversion
- Small app size (only 16.1 MB)
- Available in multiple languages
- Supports iOS 11.0 or later versions
- The app is free with no watermarks
- You can install the app on your iPad
- Rotated videos can be played on all media players
- It exports the rotated video directly to your camera roll
Cons
- You need to purchase the app to remove advertisements
RFV
Here’s another free app to rotate and flip your videos. You can download RFV on both Android and iPhone smartphones. However, the iPhone version of the app works flawlessly. In fact, the ratings on both platforms also confirm that there are more happy iPhone users of this app than Android users.
RFV is a quick solution to correct your video orientation. So, if you have recorded the video through your iPhone at the wrong angle, you can use the app to flip and turn the clip’s position without much trouble. And you can do all of this just by selecting the options at the bottom of the app’s interface.
Features
- 90° degrees rotations
- Quick resetting
- Horizontal and vertical mirror flipping
- Turn photos into videos
- Video podcast
Pros
- RFV is a free video rotating app
- Easy installation on iPad
- Supports iOS 12.0 or later versions
- Direct loading of clip on the app from camera roll
Cons
- Large app size (41.7 MB)
- Unavailable for older iPhone versions
- It does not support file sizes above 200 MB
- Problems with saving the video on Android phones
Video Rotate – Flip Video
Video Rotate – Flip Video is the third in line when it comes to free video rotators for iPhones. The tool has pretty straightforward options regarding 90-degree clockwise and counter-clockwise rotations. Moreover, you can also play with different angles to adjust the orientation from 0 to 270 degrees.
Once you’re done rotating your video, you can save the new clip directly to your iPhone’s camera roll. At the same time, this app also allows you to share the rotated video on various social and communication platforms.
Features
- The app is specifically designed to rotate videos
- Uncomplicated app interface
- Live video preview
Pros
- Free and fast video rotator app for iPhone
- You can also install the app on an iPad
- Compatible with iOS 10.0 or later versions
Cons
- The app shows advertisements until you buy it
- No reset option – you have to start all over again
Part 6: Top 3 Free Video Rotators Online
Don’t want to fill your device’s storage with software? Well! You can rotate videos online for free in AVI format with ease. Here are the 3 best online video rotating tools.
Flixier
Flixier is a website that helps you create and edit videos through your internet browser. You can upload multiple videos or photos to add effects, text, and many more characteristics. This online platform allows you to add keyframes and transitions to your clips. Likewise, you can adjust your videos’ positioning, scaling, and resizing.
So can you rotate videos on Flixier?
Yes, you can and without paying a cent. The website offers a variety of options to rotate your clips. All you need to do is select the transform option and choose the rotation or flip option to see the results. And when you’re done rotating the video, simply export the file to your computer.
On the other hand, if you think you want to use Flixier frequently, you are required to buy a premium monthly or annual subscription. But until then, you can enjoy all the great traits for free.
Features
- Video rotation (90 degrees left and right)
- Video flipping (horizontal and vertical)
- Robust timeline
- 50+ transitions
- Green screen
- Live collaboration
- Screen recording
- Webcam recording
- Video effects
- Color correction
- Built-in media stock libraries
Pros
- Flixier is free
- No sign-up required
- Superfast rendering
- Variety of video templates
- Unlimited audio and video tracks
- Allows AVI media import and export
- Live video, microphone, and screen recording
Cons
- You need to purchase paid plans for team collaboration
- The free plan comes with limited projects, downloads, and storage
Clideo
Clideo is a great online tool that allows you to create and edit images and videos in one place. This web-based program comes with a variety of features, including video rotation and flipping.
To make your videos unique, Clideo permits you to add text and music to attract the audience. Moreover, the program supports different video formats, like AVI, MPG, MP4, WMC, MOV, VOB, and more.
You can do everything right from your internet browser without installing the application on your computer. All video files that you import and export on Clideo are well-protected.
As a user, you can select different resolutions, formats, and other features to make exciting videos within a few clicks. And apart from video rotation, the tool offers numerous beneficial options, such as reverse, speed, flip, loop, stop motion, and even memes creation.
Features
- Easy video flipping and rotation
- DPI conversion
- Video compressing
- Speed adjustment
- Slideshow creation
- Filters and presets
- Audio and video cutting
- Video and audio merging
- Subtitles and personalized text
- Color correction and fading effects
Pros
- All basic features are free to use
- Best for beginners
- Non-technical interface
- Supports various video formats (including AVI)
Cons
- This online tool lacks design elements and themes
- You need to buy the premium version to use Clideo daily
Rotate My Video.Net
Last but not the least, the Rotate My Video.Net is a free online tool designed for video rotation only. So, if your video is upside down or shot in the wrong direction, feel free to use this tool.
This web-based video rotator allows you to share the video to different social platforms directly from the website. Contrarily, you also save the rotated clips on your system.
Another interesting fact about this tool is that it has no limit. That means you can upload videos on the interface and rotate them as often as possible. However, the tool does not offer other features to groom your videos.
Moreover, the developers claim that the videos are deleted automatically from the server in a few hours. Therefore, your videos stay private and safe.
Features
- 90 degrees clockwise and counter-clockwise rotation
- Video ratio adjustment options (4:3 and 16:9)
- Band color option to fill the empty black space with colors
Pros
- Entirely free – no monthly or yearly subscription required
- Easy and quick process
- Supports AVI video files
- Video quality is not disturbed after rotation
Cons
- Lacks video flipping option
- It does not include any other features
Part 7: Bottom Line
Despite a long list of free video editors, finding the right one that simplifies the task without any trouble is hard. But with these top 16 best free AVI video rotators, you can flip and rotate videos in a couple of minutes. You can find the most suitable rotator Windows, MAC, iPhone, and Android. Or, you can use the online platforms to enjoy rotations at different angles. However, regardless of device or operating system, each rotator has pros and cons. So don’t hesitate to opt for the tool that fulfills all your needs.
Part 8: FAQs
Q1. How do I rotate a video for free?
You can rotate a video for free by downloading a free video rotator according to your operating system. You can also look for online tools for video rotation. Likewise, you can also install Android and iPhone apps to rotate clips from your phone.
Q2. What software can rotate video?
There are many software that helps you rotate videos. However, most of them are paid. So, if you’re looking for some free video rotators on MAC or Windows, you can download Filmora. On the other hand, you can download programs like Altrasoft, XMedia Recode, and Free Video Flip and Rotate for Windows.
Q3. How can I rotate a video without losing quality?
Not all video rotators can promise high-quality results. So if you want to rotate your clip without damaging the quality, you must choose top-notch video editors, like Filmora or iMovie.
Q4. How do you rotate an AVI file on a MAC?
You need to download video rotators, such as Kdenlive, iMovie, or OpenShot, to rotate your AVI files for free. But, you can choose Filmora for MAC to flip and turn your AVI videos to different angles for exceptional results.
Q5. How do I rotate a video online?
To rotate an AVI video online, you need to be extremely picky, as even most online tools don’t support AVI files. But online video editors like Flixier, Clideo, and RotateMyVideo.Net allow you to rotate AVI videos easily.
Did you rush to record a video in a mistaken direction? Or were you just excited to film the moments without noticing the position of your camera? Whatever the case, if you regret recording the clip at the incorrect angle, here’s your chance to do the alteration. The article includes the top 16 best free AVI video rotators you can use on MAC, Windows, iPhone, Android, and online. Plus, if you’re looking for a single platform to rotate or flip videos, you can learn the complete process by following the step-by-step Filmora Video Editor tutorial that works on MAC and Windows.
In this Article
Part 1: Best AVI Video Rotators to Rotate AVI Video on Windows and MAC – Filmora Video Editor [with steps]
Part 2: Top 3 Free Video Rotators on Windows
Part 3: Top 3 Free Video Rotators on MAC
Part 4: Top 3 Free Video Rotators on Android
Part 5: Top 3 Free Video Rotators on iPhone
Part 6: Top 3 Free Video Rotators Online
Part 7: Bottom Line
Part 8: FAQs
Part 1: Best AVI Video Rotators to Rotate AVI Video on Windows and MAC – Filmora Video Editor [with steps]
Heard about Filmora but never used it? Surely, you’re missing great fun if you’re a video professional or a beginner video editor.
Filmora is an award-winning video editing software that works for both PC and MAC users. While the tool comes at an affordable price, you can still download the free setup to start showing your creativity.
This video editor has dozens of new effects, transitions, and many more features, which can help you create engaging videos. You can also enjoy some more key features, including audio ducking, color matching, motion tracking, split screen, video filters and transitions, speed control, and multiple exporting formats.
And, of course, video rotation is as easy as ABC! You can follow this step-by-step tutorial to rotate or flip your videos using Filmora 10. You can apply the same procedure if you have a different version.
Step 1: Download and Install Filmora
Visit Filmora Video Editor’s official website to download the newest version. Click on the “Try it Free” button according to your operating system (look at the icons on the button to identify the OS).
After downloading the setup, double-click the file to install the video editor. Then, open the program.
Feel free to judge the interface (see the image below), as it is pretty simple to understand. So, even if you’re a beginner, you can learn this tool within a few minutes of practice.
Step 2: Import the Video You Want to Rotate
The next is to bring the video file to Filmora’s library before proceeding. To do that, click on the “Movie Clip” icon in the center of the interface to select the clip from your computer’s hard drive.
Double-click or select the video and click the “Open” button to import files. The importing process may take several seconds or a few minutes, depending on the video size.
If you’re using Filmora for the first time, you might see the “Create Proxy File” message popping up right after the video import. So, simply click on the “Yes” button to go ahead.
Your video will be stored in the “Project Media” tab and will be visible next to the preview window.
Step 3: Drag and Drop the Video on Filmora’s Timeline
To rotate the video, first, you need to add it to the track. For that, take your mouse on the video, and select it by clicking the right button on your mouse. Keep holding the button to drag the video on the timeline. Remove your finger from the button after placing the clip on the track.
Right after the above step, you will get another message to help you decide whether you want to keep the resolution of the video to its original settings or match the media. Choose “Match to Media” for fast rendering.
However, if you’re a professional video editor, feel free to select the option that suits you the most.
Step 4: Rotate Your Video with Filmora
Double-click anywhere on the video that is already on the timeline.
You will see three tabs – “Video,” “Color,” and “Animation.” So choose the “Video” tab and click on the “Transform” option.
Once done, you will see three important options, which will help you rotate the video.
First, you will notice the “Rotate” option with an adjustment bar. This option will turn your video to different angles of your choice.
All you need to do is play with the adjustments by grabbing the “Round” knob-like button while keeping an eye on the preview window to see the results.
Just below “Rotate,” you will see the “Flip” option with “Horizontal” and “Vertical” mirror icons. Choosing any one of the icons will make your video mirror flip in horizontal or vertical directions.
The third option is “Scale” beneath the “Flip” option. Similar to the rotate option, this tool also has an adjustment bar. You can make adjustments to magnify or de-magnify the clip to fit the screen. Although this option isn’t mandatory, you can still use it if you find the need.
Now, click the “OK” button to apply rotation and return to the timeline.
Step 5: Save and Export Rotated Video to Your Widows or MAC
Here you will learn how to save the project and then export it. If you have already saved the project in the beginning, skip reading this part and directly hit the “Export” button.
Contrarily, you can also directly export your files without saving the project. But you won’t be able to make changes to the same project in the future as all source files will be lost. Therefore, saving the project and then exporting files is recommended.
So, if you’re done with step 4, save your project before going further.
You can go to the “File” tab, choose “Save Project,” and rename the video.
Rename your file and click on the “Save” button.
The new name will appear at the top of Filmora’s interface.
Lastly, click the “Export” button to save the file on your computer.
F 17
Part 2: Top 3 Free Video Rotators on Windows
No luck with finding free movie rotators for your Windows operating system? Don’t stress! These three AVI video rotators will solve your problem.
Free Video Flip and Rotate
This tool could satisfy your requirements if you’re looking for a core video rotator. As the name sounds, the Free Video Flip and Rotate is software by DVD Video Soft that allows you to modify the orientation of your videos easily. In other words, this is one of the easiest video rotators for Windows users, which is also free to download and use.
It has a simple interface with user-friendly options, which permits you to rotate your videos from different angles. Besides, you can also use this software for mirroring your clips. Moreover, you can save your project in various video formats, such as AVI.
Features
- Vertical flip
- Horizontal flip
- 180° video rotation
- 90° clockwise video rotation
- 90° counter-clockwise video rotation
- Vertical flip with 90° clockwise video rotation
- Horizontal flip with 90° counter-clockwise video rotation
Pros
- One-click results
- Easy to install and run
- Free and user-friendly software
- Does not contain ads or spyware
- Requires 40.50 MB of hard disk space
- Supports AVI and other video formats
- Supports XP, Windows 7, 8, 10, and 11 versions
Cons
- Unavailable for MAC users
- Lack of additional features, such as color correction, cropping, etc.
XMedia Recode
XMedia Recode is a free tool for Windows users. While the software is meant to convert videos into different formats, you can also use it for video rotation. Nevertheless, XMedia Recode has various other options, making it perfect for basic video editing.
Moreover, this software can convert unprotected Blue-rays/DVDs, create different chapters, import subtitle tracks, and many more. However, one of the best features of this video converter-cum-rotator is the video remux. That means you can convert the video container format without changing the original size.
Contrarily, XMedia Recode allows you to rotate and convert videos for countless devices, such as iPhone, iPad, Android, Xbox360, and more. But all this can be done only through Windows operating system. You can download this tool without any paid subscription. However, choose suitable processing for smooth installation, such as Windows 64bit, Windows 32bit, Vista, or XP SP3.
Features
- Blur
- Delogo
- Rotation
- Padding
- Denoise
- Cropping
- Image flip
- Swap U/V
- Clip speed
- Color curves
- Video fading
- Mirror effect
- Image stabilization
- Custom resolution
- Import 32 subtitle tracks
- Direct copy of video and audio stream into your desired format
Pros
- Free software
- Speedy conversion
- Fast batch processing
- Variety of video and audio features
- Works on Windows XP to Windows 10
- Supports 40+ video formats, including AVI
Cons
- A bit complex interface for new users
Altrasoft
Altrasoft is a small software for Windows to help rotate and convert your videos. The total size of the setup is just 971 KB.
This software is best for small video clips, which need to be rotated without wasting time. The program is free to download and use. However, the interface appears a bit old compared to new tools.
Also, unlike XMedia Recode, Altrasoft comes with limited options. So, if you only desire to rotate or flip your video and save it in the AVI or any other format, go ahead and download it.
Features
- Borders
- Zooming
- Rotation
- Color settings
- Audio formatting
- Video codec settings
- Audio codec settings
Pros
- Free to use
- Ideal for short videos
- Extremely light software
- Simple rotation options
- Rotation angle adjustments
Cons
- Outdated interface
- Lack of customer support
Part 3: Top 3 Free Video Rotators on MAC
Have you already lost your MAC storage on downloading some incompetent video rotators which claim to support AVI files? You can try these three video rotators for MAC, which are free and compatible with AVI video formats.
Kdenlive
When it comes to free video rotators for MAC, it gets quite challenging to find the right tool. As a MAC OS user, you are left with limited options, especially when trying to rotate videos and save them in AVI format. However, Kdenlive appears to be a problem-solver.
Technically, Kdenlive is a free open source, cross-platform, non-linear video editor with a variety of features. Nevertheless, its Mac version works excellent compared to Windows or Linux.
You can use this software to rotate videos and save them in AVI or any other available format. Also, this program has an attractive interface with a rich library of transition templates and fonts.
Besides, from the video rotation point of view, Kdenlive allows you to turn your videos at any angle.
Features
- Rotate and zoom
- Waveform
- Histogram
- Audio meter
- Vectorscope
- Proxy editing
- Text animation
- Keyframe interpolation
- Color grading and correction
- RGB parade Multi-track video editing
- Custom shortcuts and interface layouts
- Easy line-spacing and letter-spacing adjustment
- Supports seven video formats, including AVI, MOV, HD, UHD, HDV, WEBM, and MP4
Pros
- Free to use
- Fast rendering
- Automatic backup
- Easy video rotation
- Regular bugs fixation
- Cross-platform availability
- Dozens of professional effects and transitions
Cons
- Extremely unstable on Windows OS
IMovie
Want to get the job done quickly? Try iMovie in your MAC!
iMovie is a built-in video editing software to help create professional-level videos from your system. But you can also download iMovie if you can’t find it in the system.
Not just videos, but this software also allows you to cut and edit music without changing the files. Many filmmakers also love the tool, as they can add graphics to their projects to get remarkable results.
But that doesn’t stop new users from getting all the benefits the pros get with this software. How? Because it has a pretty straightforward look. You don’t need to click a hundred times to apply a simple effect, as all the options are right in front of you.
And when it’s about rotating a video in AVI format, feel free to rely on iMovie, as it supports several video file formats.
Features
- Video rotation and cropping
- Music and photo import
- 4K and HD video support
- Video transitions and effects
- Pre-installed backdrops and themes
- Supports working on multiple projects
Pros
- Free for MAC users
- Easy to learn
- User-friendly tools
- Extensive audio library
- Excellent movie templates
- Ideal Chroma-keying options
Cons
- Requires high storage space
- Lacks tagging and motion tracking
OpenShot
If complex video rotators make you ill, give OpenShot a shot!
It’s a free video editor which is incredibly simple to use. Most professionals around the world appreciate this powerful editing tool. Also, new users can do wonders by simply playing and understanding the options for a few minutes.
So if you plan to use OpenShot Video Editor , you would be glad to know that you can add animations, watermarks, and numerous other effects through this program. Plus, you can also enjoy audio editing within the same platform.
Although OpenShot can be installed for free on multiple operating systems, it still works best on MAC. So there’s no way to ignore this tool for rotating videos in MAC, especially when the options are limited.
Features
- Video rotation and resizing
- Drag and drop support
- Unlimited layers/tracks
- Color correction and settings
- 3D animated effects and titles
- Robust curve-based animations
- Video transitions and real-time previews
- Clip scaling, snapping, cutting, and trimming
- Image overlays, compositing, and watermarks
- Supports AVI and other audio, video, and image formats
Pros
- Free to use
- Easy editing
- No watermarking
- Available in 70+ languages
- Regular updates for improvement
- Stable performance on MAC systems
Cons
- Limited editing options for professionals
- Not suitable for old Windows OS versions
Part 4: Top 3 Free Video Rotators for Android
If using a PC to rotate your videos makes you lazy, you can change the angles of your clips through your Android phone.
So here are the three best video editing apps for Android lovers, which are free to use.
Rotate Video FX
Rotate Video FX is developed by Bizo Mobile. Despite being a small company, it has proven its mettle by offering several apps to its users in more than 100 countries. The firm is also specialized in developing mobile games for multiple platforms.
However, Rotate Video FX is one of its best creations in the world of video rotating mobile applications. This app allows you to choose the video you want to turn directly from your phone’s gallery.
And once the clip has been uploaded, you can rotate it to three different degrees by just touching the “Rotate” button.
Features
- Video rotation to 90, 180, and 270-degree angles
- Clear preview screen with no overlapping options
- Simple play, rotate, and import in a single attempt
- Social media sharing button for quick sending of media
- Automatically saves the rotated video to your phone’s gallery
Pros
- The app is free to use
- More than 1 million downloads
- Works on all android versions
Cons
- No frequent updates
- Not a user-friendly app
- Changes video resolution without permission
Smart Video Rotate and Flip
Clogica is the brainchild behind Smart Video Rotate and Flip video rotator for android. The company has been actively working in app development since 2014. And currently, it has more than 25 apps on the list, with 50 million total users.
Smart Video Rotate and Flip is a simple and smart tool to flip and rotate videos directly from your android device. So if you’re no longer interested in using desktop applications to do the job, here’s your chance to rotate your clips through your mobile phone or tablet.
This app offers a simple way to perform multiple flips and rotations simultaneously. The application works by re-encoding the media or by using the fast mode.
Features
- Allows video rotation and flips on different angles
- The output folder and renaming options
- Big preview screen and fast rendering
- Video recording directly from the application
- Permits you to make a video library within the app
Pros
- Free application
- Easy interface
- The app doesn’t change the video quality
- Allows you to mirror flip and rotate videos
- The latest update makes the app work faster
Cons
- The app contains ads
- Files become large after rotation
- Videos can only be saved to the phone’s internal memory
Rotate Video FREE
Rotate Video FREE is designed by LKR Studio. From 2014 till now, this app development company has produced seven mobile applications in the “Tools” category. And among its entire portfolio, the Rotate Video FREE app is one of the most popular creations.
Rotate Video FREE is a highly light and easy video rotator for Android devices. It has a simple interface with two main options: ‘ Pick Video’ to select the clip from your phone’s gallery. Then, the “Turn Left” button helps you rotate the video in multiple directions.
Features
- Rotates video to 90, 180, and 270 degrees
- HD video export quality
- Hassle-free rotate options
Pros
- Free of cost app
- Speedy video rotation process on large files
- Saves video directly to your phone’s memory
- Video rotation without affecting the resolution
Cons
- No mirror flipping
- The free version contains advertisements
- Hard to find the location of the saved videos
Part 5: Top 3 Free Video Rotators for iPhone
Are you struggling to find a good video rotator for iPhone? Here’s the list of three best iPhone apps to help you rotate your movies using your smartphone in AVI format.
Video Rotate + Flip Video Easy
Finding a video rotator for iPhone is a bit difficult, as most valuable applications comes after paying the price. But Video Rotate + Flip Video Easy app is totally free to download and use.
The app includes all the basic functions to rotate and flip videos in different angles. After downloading the app, you will notice a simple interface with seven options. So all you need to do is to import your video from the phone’s gallery, use the options to rotate the video, and save the rotated video in your phone.
The app is also available in different languages, including German, French, Japanese, English, Portuguese, Simplified Chinese, Spanish, and Russian.
Features
- Vertical mirror flipping
- Horizontal mirror flipping
- Frame wise video rotation
- 90° degrees clockwise and counter clockwise rotations
- 180° degrees clockwise and counter clockwise rotations
Pros
- Fast video conversion
- Small app size (only 16.1 MB)
- Available in multiple languages
- Supports iOS 11.0 or later versions
- The app is free with no watermarks
- You can install the app on your iPad
- Rotated videos can be played on all media players
- It exports the rotated video directly to your camera roll
Cons
- You need to purchase the app to remove advertisements
RFV
Here’s another free app to rotate and flip your videos. You can download RFV on both Android and iPhone smartphones. However, the iPhone version of the app works flawlessly. In fact, the ratings on both platforms also confirm that there are more happy iPhone users of this app than Android users.
RFV is a quick solution to correct your video orientation. So, if you have recorded the video through your iPhone at the wrong angle, you can use the app to flip and turn the clip’s position without much trouble. And you can do all of this just by selecting the options at the bottom of the app’s interface.
Features
- 90° degrees rotations
- Quick resetting
- Horizontal and vertical mirror flipping
- Turn photos into videos
- Video podcast
Pros
- RFV is a free video rotating app
- Easy installation on iPad
- Supports iOS 12.0 or later versions
- Direct loading of clip on the app from camera roll
Cons
- Large app size (41.7 MB)
- Unavailable for older iPhone versions
- It does not support file sizes above 200 MB
- Problems with saving the video on Android phones
Video Rotate – Flip Video
Video Rotate – Flip Video is the third in line when it comes to free video rotators for iPhones. The tool has pretty straightforward options regarding 90-degree clockwise and counter-clockwise rotations. Moreover, you can also play with different angles to adjust the orientation from 0 to 270 degrees.
Once you’re done rotating your video, you can save the new clip directly to your iPhone’s camera roll. At the same time, this app also allows you to share the rotated video on various social and communication platforms.
Features
- The app is specifically designed to rotate videos
- Uncomplicated app interface
- Live video preview
Pros
- Free and fast video rotator app for iPhone
- You can also install the app on an iPad
- Compatible with iOS 10.0 or later versions
Cons
- The app shows advertisements until you buy it
- No reset option – you have to start all over again
Part 6: Top 3 Free Video Rotators Online
Don’t want to fill your device’s storage with software? Well! You can rotate videos online for free in AVI format with ease. Here are the 3 best online video rotating tools.
Flixier
Flixier is a website that helps you create and edit videos through your internet browser. You can upload multiple videos or photos to add effects, text, and many more characteristics. This online platform allows you to add keyframes and transitions to your clips. Likewise, you can adjust your videos’ positioning, scaling, and resizing.
So can you rotate videos on Flixier?
Yes, you can and without paying a cent. The website offers a variety of options to rotate your clips. All you need to do is select the transform option and choose the rotation or flip option to see the results. And when you’re done rotating the video, simply export the file to your computer.
On the other hand, if you think you want to use Flixier frequently, you are required to buy a premium monthly or annual subscription. But until then, you can enjoy all the great traits for free.
Features
- Video rotation (90 degrees left and right)
- Video flipping (horizontal and vertical)
- Robust timeline
- 50+ transitions
- Green screen
- Live collaboration
- Screen recording
- Webcam recording
- Video effects
- Color correction
- Built-in media stock libraries
Pros
- Flixier is free
- No sign-up required
- Superfast rendering
- Variety of video templates
- Unlimited audio and video tracks
- Allows AVI media import and export
- Live video, microphone, and screen recording
Cons
- You need to purchase paid plans for team collaboration
- The free plan comes with limited projects, downloads, and storage
Clideo
Clideo is a great online tool that allows you to create and edit images and videos in one place. This web-based program comes with a variety of features, including video rotation and flipping.
To make your videos unique, Clideo permits you to add text and music to attract the audience. Moreover, the program supports different video formats, like AVI, MPG, MP4, WMC, MOV, VOB, and more.
You can do everything right from your internet browser without installing the application on your computer. All video files that you import and export on Clideo are well-protected.
As a user, you can select different resolutions, formats, and other features to make exciting videos within a few clicks. And apart from video rotation, the tool offers numerous beneficial options, such as reverse, speed, flip, loop, stop motion, and even memes creation.
Features
- Easy video flipping and rotation
- DPI conversion
- Video compressing
- Speed adjustment
- Slideshow creation
- Filters and presets
- Audio and video cutting
- Video and audio merging
- Subtitles and personalized text
- Color correction and fading effects
Pros
- All basic features are free to use
- Best for beginners
- Non-technical interface
- Supports various video formats (including AVI)
Cons
- This online tool lacks design elements and themes
- You need to buy the premium version to use Clideo daily
Rotate My Video.Net
Last but not the least, the Rotate My Video.Net is a free online tool designed for video rotation only. So, if your video is upside down or shot in the wrong direction, feel free to use this tool.
This web-based video rotator allows you to share the video to different social platforms directly from the website. Contrarily, you also save the rotated clips on your system.
Another interesting fact about this tool is that it has no limit. That means you can upload videos on the interface and rotate them as often as possible. However, the tool does not offer other features to groom your videos.
Moreover, the developers claim that the videos are deleted automatically from the server in a few hours. Therefore, your videos stay private and safe.
Features
- 90 degrees clockwise and counter-clockwise rotation
- Video ratio adjustment options (4:3 and 16:9)
- Band color option to fill the empty black space with colors
Pros
- Entirely free – no monthly or yearly subscription required
- Easy and quick process
- Supports AVI video files
- Video quality is not disturbed after rotation
Cons
- Lacks video flipping option
- It does not include any other features
Part 7: Bottom Line
Despite a long list of free video editors, finding the right one that simplifies the task without any trouble is hard. But with these top 16 best free AVI video rotators, you can flip and rotate videos in a couple of minutes. You can find the most suitable rotator Windows, MAC, iPhone, and Android. Or, you can use the online platforms to enjoy rotations at different angles. However, regardless of device or operating system, each rotator has pros and cons. So don’t hesitate to opt for the tool that fulfills all your needs.
Part 8: FAQs
Q1. How do I rotate a video for free?
You can rotate a video for free by downloading a free video rotator according to your operating system. You can also look for online tools for video rotation. Likewise, you can also install Android and iPhone apps to rotate clips from your phone.
Q2. What software can rotate video?
There are many software that helps you rotate videos. However, most of them are paid. So, if you’re looking for some free video rotators on MAC or Windows, you can download Filmora. On the other hand, you can download programs like Altrasoft, XMedia Recode, and Free Video Flip and Rotate for Windows.
Q3. How can I rotate a video without losing quality?
Not all video rotators can promise high-quality results. So if you want to rotate your clip without damaging the quality, you must choose top-notch video editors, like Filmora or iMovie.
Q4. How do you rotate an AVI file on a MAC?
You need to download video rotators, such as Kdenlive, iMovie, or OpenShot, to rotate your AVI files for free. But, you can choose Filmora for MAC to flip and turn your AVI videos to different angles for exceptional results.
Q5. How do I rotate a video online?
To rotate an AVI video online, you need to be extremely picky, as even most online tools don’t support AVI files. But online video editors like Flixier, Clideo, and RotateMyVideo.Net allow you to rotate AVI videos easily.
Elevate Your Storytelling with WeVideo’s Online Video Editor
WeVideo: Easily Create Videos Online

Ollie Mattison
Mar 27, 2024• Proven solutions
If you’re looking for a web application to create and edit your videos, WeVideo is perhaps what you need. This online platform enables you to create videos in the cloud. That is to say, every single feature is accessible online, so you don’t have to download other software. Below is a get-starting guide for WeVideo. Follow it to easily create videos online.
#1 Sign in WeVideo
It’s free to get started with WeVideo. You just need to make an account by providing an email address, and creating a username and password. You can also sign in with your preexisting Facebook, Yahoo or Gmail account.
#2 Import your photos or videos to WeVideo
Then click Upload Media in the _Storyboar_d tab or go to the Upload tab to import the photos and video clips from your computer or media accounts. You can also hit Record and connect your own camera device to record a video clip.
Tip: WeVideo provides three editing modes (Storyboard, Standard Timeline and Advanced Timeline). You can switch between modes by clicking the triangle icon in the upper right corner of the screen in the editor.

#3 Polish your WeVideo creation
After that, drag and drop your contents in any order you want. This will help you to organize your contents. Then you edit the video as you like. For example, you can trim your video clips to focus on some key moments or and cut a long video into smaller ones. You can also add text, effects, music, and graphics to your videos. Or go to the Theme tab to add some creative themes to your creation.

#4 Publish your videos
After finishing your creation, go to Publish to upload your videos directly to YouTube, Google Drive, Facebook, and Twitter. You can even change the video resolution or set your content’s visibility by choosing options like “private or public”.

Although WeVideo provides some basic video editing functions, there are many features present in desktop video editors that WeVideo doesn’t offer, such as slow and fast motion and noise removal, to name a few. If you want to create a more professional video, Wondershare Filmora (originally Wondershare Video Editor) is highly recommended. This user friendly video editing tool has a bunch of special features which allow you to easily put together your video clips, text and music. You can apply different effects like filters, picture-in-picture, transitions and many more to get that professional look out of your videos in mere minutes. Here you can get more details about this Video Editor.
 Download Mac Version ](https://tools.techidaily.com/wondershare/filmora/download/ )
Ollie Mattison
Ollie Mattison is a writer and a lover of all things video.
Follow @Ollie Mattison
Ollie Mattison
Mar 27, 2024• Proven solutions
If you’re looking for a web application to create and edit your videos, WeVideo is perhaps what you need. This online platform enables you to create videos in the cloud. That is to say, every single feature is accessible online, so you don’t have to download other software. Below is a get-starting guide for WeVideo. Follow it to easily create videos online.
#1 Sign in WeVideo
It’s free to get started with WeVideo. You just need to make an account by providing an email address, and creating a username and password. You can also sign in with your preexisting Facebook, Yahoo or Gmail account.
#2 Import your photos or videos to WeVideo
Then click Upload Media in the _Storyboar_d tab or go to the Upload tab to import the photos and video clips from your computer or media accounts. You can also hit Record and connect your own camera device to record a video clip.
Tip: WeVideo provides three editing modes (Storyboard, Standard Timeline and Advanced Timeline). You can switch between modes by clicking the triangle icon in the upper right corner of the screen in the editor.
#3 Polish your WeVideo creation
After that, drag and drop your contents in any order you want. This will help you to organize your contents. Then you edit the video as you like. For example, you can trim your video clips to focus on some key moments or and cut a long video into smaller ones. You can also add text, effects, music, and graphics to your videos. Or go to the Theme tab to add some creative themes to your creation.
#4 Publish your videos
After finishing your creation, go to Publish to upload your videos directly to YouTube, Google Drive, Facebook, and Twitter. You can even change the video resolution or set your content’s visibility by choosing options like “private or public”.
Although WeVideo provides some basic video editing functions, there are many features present in desktop video editors that WeVideo doesn’t offer, such as slow and fast motion and noise removal, to name a few. If you want to create a more professional video, Wondershare Filmora (originally Wondershare Video Editor) is highly recommended. This user friendly video editing tool has a bunch of special features which allow you to easily put together your video clips, text and music. You can apply different effects like filters, picture-in-picture, transitions and many more to get that professional look out of your videos in mere minutes. Here you can get more details about this Video Editor.
Download Mac Version ](https://tools.techidaily.com/wondershare/filmora/download/ )
Ollie Mattison
Ollie Mattison is a writer and a lover of all things video.
Follow @Ollie Mattison
Top 10 Free Video Stabilization Tools for Smooth Footage
8 Best Free Online Video Stabilizers 2024

Liza Brown
Mar 27, 2024• Proven solutions
The time we spend with our families is invaluable, which is why most of us feel the need to capture the best moments from family vacations, birthdays or any other occasions that we want to remember. However, producing steady handheld footage is a challenging task even for experienced cinematographers.
You don’t have to worry if your video clip is shaky, because there are free online tools available that let you stabilize footage in only a few simple steps.
We’ve selected several of the best online video stabilizers that enable its users to fix their videos effortlessly, so let’s see which web-based platforms you can use to stabilize your videos.
If you need more powerful video stabilizers on computer, Filmora will be your best choice. Filmora video editor is a powerful video stabilizing software filled with powerful editing features. Unlike other editing software, Filmora is compatible with both Windows and Mac.
Some of the above video stabilizers are complex and require expertise. On the other hand, Wondershare Filmora video editor provides you with an easy-to-use interface and easy navigation options.
Key features:
- Modern and intuitive interface.
- Video stabilization in one click.
- Powerful edition features.
- Rich effects and templates.
Steps to stabilize videos using Wondershare Filmora video editor
8 Best Free Online Video Stabilizers
Even though fixing shaky footage is possible, you shouldn’t expect miracles because if your footage contains too many cameras shakes these online video stabilizers won’t be able to produce perfectly stable footage in every shot. On the other hand, if your video clips contain only a moderate amount of shaky footage the following video stabilizers will help you create smooth videos.
Let’s have a look at how you can stabilize your videos with these free online video stabilizers.
1. EZGIF Online Video Stabilizer

Besides offering a quick and easy way to stabilize video clips, EZGIF platform also lets you crop, resize or rotate videos. In addition, you can also cut videos, change their playback speed or add subtitles. You simply have to upload a video file to the platform, but you have to keep in mind that EZGIF only lets you upload files smaller than 120 MB.
You don’t have to worry about the video’s format, because the platform supports nearly all popular file formats like MP4, AVI, or MPEG. Here’s how you can stabilize your video with EZGIF Online Video Stabilizer.
Step 1: Once you open the Video Stabilizer option, you will be asked to either upload the video you’d like to stabilize from the hard drive on your computer or paste the video’s URL if the clip you want to stabilize is stored online. Hit the Upload Video button after you perform either of these actions and wait for the upload process to be finalized.
Step 2: To initiate the video stabilization process, you just have to click on the Stabilize button. The process will start automatically and its duration depends on the size of the file you’re stabilizing.
Step 3: Once the process is complete your video will appear in the Stabilized Video box, where you can preview it before downloading it as an MP4 file to your computer. You must click on the Save icon below the video to start the downloading the video.
2. Video Stabilize

If you are looking for an easy way to rotate, crop, slice or stabilize your videos, this free online platform may be one of your best options. There are no size limitations, which means that you can upload video clips of all sizes.
To make things even better, the platform supports all common file formats such as MOV or MP4, so you don’t have to waste time trying to change the video’s file format before you start the video stabilization process.
Step 1: Upon arriving at video-stabilize.com, you can simply drag and drop the video file to the designated box. Alternatively, you can click on the Upload your movie button or you can upload the video using Dropbox, OneDrive or Google Drive. Simply select the file you want to stabilize and the upload process will begin automatically.
Step 2: The size of the video clip and the speed of your Internet connection determines how long the upload is going to last. Once your video is uploaded you should simply click on the Transform Video to start the process of stabilizing your video. Arm yourself with patience, because you might have to spend more than half an hour waiting for the video stabilization process to be completed.
Step 3: Click on the Download Result button after the platform finishes stabilizing your video. You can choose the destination on your hard drive where the video file is going to be stored.
3. YouTube Video Editor
The world’s largest video sharing platform also offers basic video editing options to its users. In order to access the YouTube’s video editor, you must first create an account so you can upload your videos to the platform. You can upload virtually any file format because YouTube supports a wide range of video file formats.
The only downside is that the platform doesn’t allow you to download a video you stabilized directly to your computer, although you can use the video’s URL to share it with your friends online.
Step 1: Head over to your YouTube channel and upload a video by clicking on the Camera icon in the upper right corner of the screen. Before the upload starts you can change the Privacy settings from Public to Private so your video won’t be visible to other YouTube users.
Step 2: After the video is uploaded to your channel, open the Creator Studio and click on the Video Manager option. This action will enable you to see the video you’ve just uploaded. Click on the Edit button that is located below the video and proceed to open the Enhancements tab in the YouTube’s video editor.
Step 3: In the Enhancements tab, you’ll be able to see the Stabilize icon. Click on it to start the video stabilization process, and once the process is complete, you can copy the video’s URL and share it on social media or send it to your friends.
4. Online Converter

Despite being famous for converting videos and audio, Online Converter is a powerful free online video stabilizer. It is best known for correcting shaky videos captured through action cameras. You can also count on this tool for stabilizing clips taken from your mobile phones.
Online Converter helps you fix shaky videos to a certain extent and makes them smoother. You can choose different stabilizing levels according to your current video’s requirements. For example, you can select “Maximum” stability if your clip is extremely shaky. Or, you can leave the option to “Default” if the video is destabilized at certain parts.
The tool supports different video formats” AVI, MP4, MOV, FLV, MKV, 3GP, MV4, WMV, and more. But you can only upload a file that is 200MB in size.
Here’s how you can use Online Converter to stabilize videos:
Step 1: Click the “Choose File” button to upload the video.
Step 2: Select “Stable Level” from the dropdown menu.
Step 3: Click the “Stabilize” button to let the tool upload and stabilize the video.
Step 4: Once the stabilization process is complete, you can click the “Download Now” button to save the video on your PC.
5. Online Video Stabilizer by 123 Apps

123 Apps is a favorite website for many creative heads, and the reasons are quite logical. The website is home to a different video, audio, and photo editing tools. So, if you’re talking specifically about what you can do to your videos with 123 Apps, here’s a little glimpse.
- Trimming
- Merging
- Inserting audio and photos into video
- Adding text to video
And, of course, the free video stabilization.
Online Video Stabilizer by 123 Apps allows you to remove shakiness from videos shot on any device. So be it a drone, GoPro, iPhone, or an Android, this web-based tool welcomes all.
It’s a free online service with 30+ video codecs ensuring support to all prominent video formats, such as MOV, WEBM, MP4, WMV, AVI, and more.
You can follow these steps to stabilize your shaky video without paying a cent:
“ 1: Go to the 123 Apps Online Video Stabilizer website. Click on the “Open File” button to upload your video. Depending on the internet speed and video size, the upload might take a few seconds to several minutes. However, you should remember that this platform only allows uploading 700MB of video.
Step 2: After uploading the video, activate the tool and choose the portion of the video that you need to stabilize. Once selected, click the “Play” button to see the results.
Step 3: Next, choose your output video format from the options by selecting the gear icon. By default, the tool is set to MP4 output, so make sure to change it if you want to download the video in your preferred format.
Step 4: Click the “Save” button to export your video to your Mac or Windows OS.
6. MP4Compress

Don’”get confused by the name, as this online tool is a gateway to numerous video editing solutions. MP4Compress helps you stabilize shaky footage with ease. Plus, it has many more features to help you make the video look more professional.
For example, the core feature is video conversion to different formats. Likewise, you can compress the videos, make them greyscale, and remove the sound. Contrarily, if you want to stabilize the video through MP4Compress, here’s what you need to do:
Step 1: Go to the website, click the “Select file…” button, and choose the video you want that’s troubling you with its shakiness. Keep in mind that you can only upload MP4 files (500MB maximum).
So, if you have a video in other video formats, you will need to convert it into MP4 first.
Step 2: After selecting the video, click the “Upload Video File” button to start the process.
Step 3: Once this tool corrects the shaky video, save it on your computer.
7. Stabilizo

Stabilizo is another pick to stabilize shaky videos online for free. While the software also offers other services like a PDF converter and video compressor, the tool is famous for stabilizing videos recorded on different devices.
Usually, it takes a few minutes to work on the video, but it depends on the size of your footage and internet speed. If the video is recorded at a high resolution or you have slow internet, Stabilizo might take more than 5 minutes to do the job.
This is how the tool works:
Step 1: Go to the website and click the “Browse” button to select the video you want to stabilize.
Step 2: Click the “Upload Video” button to upload the video (500MB max) on the tool and wait until the software stabilizes the video.
Step 3: Once it’s completed, click the “Download File” button to save the video on your computer.
8. VideoUtils

VideoUtils is a complete pack of great tools for online video editing. You can rely on this free web-based program for audio, image, video, and even PDF editing. Nevertheless, you can simply check the “Video Stabilizer” tool to correct the shakiness you’ve got in your video during recording.
It has a simple interface and is also a bit familiar with previous video stabilizing tools mentioned in this list. But unlike most, this online stabilizer supports various video formats, such as AVI, MOV, MP4, WEBM, and MKV.
The developers a
Liza Brown
Liza Brown is a writer and a lover of all things video.
Follow @Liza Brown
Liza Brown
Mar 27, 2024• Proven solutions
The time we spend with our families is invaluable, which is why most of us feel the need to capture the best moments from family vacations, birthdays or any other occasions that we want to remember. However, producing steady handheld footage is a challenging task even for experienced cinematographers.
You don’t have to worry if your video clip is shaky, because there are free online tools available that let you stabilize footage in only a few simple steps.
We’ve selected several of the best online video stabilizers that enable its users to fix their videos effortlessly, so let’s see which web-based platforms you can use to stabilize your videos.
If you need more powerful video stabilizers on computer, Filmora will be your best choice. Filmora video editor is a powerful video stabilizing software filled with powerful editing features. Unlike other editing software, Filmora is compatible with both Windows and Mac.
Some of the above video stabilizers are complex and require expertise. On the other hand, Wondershare Filmora video editor provides you with an easy-to-use interface and easy navigation options.
Key features:
- Modern and intuitive interface.
- Video stabilization in one click.
- Powerful edition features.
- Rich effects and templates.
Steps to stabilize videos using Wondershare Filmora video editor
8 Best Free Online Video Stabilizers
Even though fixing shaky footage is possible, you shouldn’t expect miracles because if your footage contains too many cameras shakes these online video stabilizers won’t be able to produce perfectly stable footage in every shot. On the other hand, if your video clips contain only a moderate amount of shaky footage the following video stabilizers will help you create smooth videos.
Let’s have a look at how you can stabilize your videos with these free online video stabilizers.
1. EZGIF Online Video Stabilizer
Besides offering a quick and easy way to stabilize video clips, EZGIF platform also lets you crop, resize or rotate videos. In addition, you can also cut videos, change their playback speed or add subtitles. You simply have to upload a video file to the platform, but you have to keep in mind that EZGIF only lets you upload files smaller than 120 MB.
You don’t have to worry about the video’s format, because the platform supports nearly all popular file formats like MP4, AVI, or MPEG. Here’s how you can stabilize your video with EZGIF Online Video Stabilizer.
Step 1: Once you open the Video Stabilizer option, you will be asked to either upload the video you’d like to stabilize from the hard drive on your computer or paste the video’s URL if the clip you want to stabilize is stored online. Hit the Upload Video button after you perform either of these actions and wait for the upload process to be finalized.
Step 2: To initiate the video stabilization process, you just have to click on the Stabilize button. The process will start automatically and its duration depends on the size of the file you’re stabilizing.
Step 3: Once the process is complete your video will appear in the Stabilized Video box, where you can preview it before downloading it as an MP4 file to your computer. You must click on the Save icon below the video to start the downloading the video.
2. Video Stabilize
If you are looking for an easy way to rotate, crop, slice or stabilize your videos, this free online platform may be one of your best options. There are no size limitations, which means that you can upload video clips of all sizes.
To make things even better, the platform supports all common file formats such as MOV or MP4, so you don’t have to waste time trying to change the video’s file format before you start the video stabilization process.
Step 1: Upon arriving at video-stabilize.com, you can simply drag and drop the video file to the designated box. Alternatively, you can click on the Upload your movie button or you can upload the video using Dropbox, OneDrive or Google Drive. Simply select the file you want to stabilize and the upload process will begin automatically.
Step 2: The size of the video clip and the speed of your Internet connection determines how long the upload is going to last. Once your video is uploaded you should simply click on the Transform Video to start the process of stabilizing your video. Arm yourself with patience, because you might have to spend more than half an hour waiting for the video stabilization process to be completed.
Step 3: Click on the Download Result button after the platform finishes stabilizing your video. You can choose the destination on your hard drive where the video file is going to be stored.
3. YouTube Video Editor
The world’s largest video sharing platform also offers basic video editing options to its users. In order to access the YouTube’s video editor, you must first create an account so you can upload your videos to the platform. You can upload virtually any file format because YouTube supports a wide range of video file formats.
The only downside is that the platform doesn’t allow you to download a video you stabilized directly to your computer, although you can use the video’s URL to share it with your friends online.
Step 1: Head over to your YouTube channel and upload a video by clicking on the Camera icon in the upper right corner of the screen. Before the upload starts you can change the Privacy settings from Public to Private so your video won’t be visible to other YouTube users.
Step 2: After the video is uploaded to your channel, open the Creator Studio and click on the Video Manager option. This action will enable you to see the video you’ve just uploaded. Click on the Edit button that is located below the video and proceed to open the Enhancements tab in the YouTube’s video editor.
Step 3: In the Enhancements tab, you’ll be able to see the Stabilize icon. Click on it to start the video stabilization process, and once the process is complete, you can copy the video’s URL and share it on social media or send it to your friends.
4. Online Converter
Despite being famous for converting videos and audio, Online Converter is a powerful free online video stabilizer. It is best known for correcting shaky videos captured through action cameras. You can also count on this tool for stabilizing clips taken from your mobile phones.
Online Converter helps you fix shaky videos to a certain extent and makes them smoother. You can choose different stabilizing levels according to your current video’s requirements. For example, you can select “Maximum” stability if your clip is extremely shaky. Or, you can leave the option to “Default” if the video is destabilized at certain parts.
The tool supports different video formats” AVI, MP4, MOV, FLV, MKV, 3GP, MV4, WMV, and more. But you can only upload a file that is 200MB in size.
Here’s how you can use Online Converter to stabilize videos:
Step 1: Click the “Choose File” button to upload the video.
Step 2: Select “Stable Level” from the dropdown menu.
Step 3: Click the “Stabilize” button to let the tool upload and stabilize the video.
Step 4: Once the stabilization process is complete, you can click the “Download Now” button to save the video on your PC.
5. Online Video Stabilizer by 123 Apps
123 Apps is a favorite website for many creative heads, and the reasons are quite logical. The website is home to a different video, audio, and photo editing tools. So, if you’re talking specifically about what you can do to your videos with 123 Apps, here’s a little glimpse.
- Trimming
- Merging
- Inserting audio and photos into video
- Adding text to video
And, of course, the free video stabilization.
Online Video Stabilizer by 123 Apps allows you to remove shakiness from videos shot on any device. So be it a drone, GoPro, iPhone, or an Android, this web-based tool welcomes all.
It’s a free online service with 30+ video codecs ensuring support to all prominent video formats, such as MOV, WEBM, MP4, WMV, AVI, and more.
You can follow these steps to stabilize your shaky video without paying a cent:
“ 1: Go to the 123 Apps Online Video Stabilizer website. Click on the “Open File” button to upload your video. Depending on the internet speed and video size, the upload might take a few seconds to several minutes. However, you should remember that this platform only allows uploading 700MB of video.
Step 2: After uploading the video, activate the tool and choose the portion of the video that you need to stabilize. Once selected, click the “Play” button to see the results.
Step 3: Next, choose your output video format from the options by selecting the gear icon. By default, the tool is set to MP4 output, so make sure to change it if you want to download the video in your preferred format.
Step 4: Click the “Save” button to export your video to your Mac or Windows OS.
6. MP4Compress
Don’”get confused by the name, as this online tool is a gateway to numerous video editing solutions. MP4Compress helps you stabilize shaky footage with ease. Plus, it has many more features to help you make the video look more professional.
For example, the core feature is video conversion to different formats. Likewise, you can compress the videos, make them greyscale, and remove the sound. Contrarily, if you want to stabilize the video through MP4Compress, here’s what you need to do:
Step 1: Go to the website, click the “Select file…” button, and choose the video you want that’s troubling you with its shakiness. Keep in mind that you can only upload MP4 files (500MB maximum).
So, if you have a video in other video formats, you will need to convert it into MP4 first.
Step 2: After selecting the video, click the “Upload Video File” button to start the process.
Step 3: Once this tool corrects the shaky video, save it on your computer.
7. Stabilizo
Stabilizo is another pick to stabilize shaky videos online for free. While the software also offers other services like a PDF converter and video compressor, the tool is famous for stabilizing videos recorded on different devices.
Usually, it takes a few minutes to work on the video, but it depends on the size of your footage and internet speed. If the video is recorded at a high resolution or you have slow internet, Stabilizo might take more than 5 minutes to do the job.
This is how the tool works:
Step 1: Go to the website and click the “Browse” button to select the video you want to stabilize.
Step 2: Click the “Upload Video” button to upload the video (500MB max) on the tool and wait until the software stabilizes the video.
Step 3: Once it’s completed, click the “Download File” button to save the video on your computer.
8. VideoUtils
VideoUtils is a complete pack of great tools for online video editing. You can rely on this free web-based program for audio, image, video, and even PDF editing. Nevertheless, you can simply check the “Video Stabilizer” tool to correct the shakiness you’ve got in your video during recording.
It has a simple interface and is also a bit familiar with previous video stabilizing tools mentioned in this list. But unlike most, this online stabilizer supports various video formats, such as AVI, MOV, MP4, WEBM, and MKV.
The developers a
Liza Brown
Liza Brown is a writer and a lover of all things video.
Follow @Liza Brown
Also read:
- Updated In 2024, Edit MP4 Files on Mac The Ultimate Mavericks Solution
- New In 2024, Top 10 Best Free Video Trimmers for Windows 10 Online & Offline
- New Glitch Your Way to Viral Top 10 Video Editing Apps for iOS and Android for 2024
- Updated In 2024, Premiere Pro System Requirement How to Set up Computers
- New 2024 Approved Wav Converter Essentials A Step-by-Step Tutorial
- New Windows 11 Video Editing The Best Tools for the Job
- New 2024 Approved Screen Recording 101 Using Filmora Scrn to Capture Your Desktop
- Updated In 2024, Make Every Moment Epic Add Slow Motion Effects to Your Videos for Free
- New Optimal Video Size for Instagram A Guide for 2024
- Updated In 2024, 10 Exceptional Online Tools for Creating Epic Gaming Intros
- New Streamline Your Workflow Best 4K Proxy Video Editing Software for 2024
- New 2024 Approved S Best Free Video Joiner Websites No Downloads Required
- New The Best Aspect Ratio Calculators Available Online Now for 2024
- Updated 2024 Approved Windows 10 DVD Player Showdown Top 10 Free Options
- New In 2024, Face Generation Made Easy Free Online Tools and Resources
- Asus ROG Phone 8 Screen Unresponsive? Heres How to Fix It | Dr.fone
- In 2024, How Can I Catch the Regional Pokémon without Traveling On Motorola Edge+ (2023) | Dr.fone
- The Best Android SIM Unlock Code Generators Unlock Your Motorola Moto G23 Phone Hassle-Free
- Easy Ways to Manage Your HTC U23 Location Settings | Dr.fone
- In 2024, How Xiaomi Redmi Note 13 5G Mirror Screen to PC? | Dr.fone
- How To Repair Apple iPhone X System? | Dr.fone
- 3 Ways to Track Oppo Find X7 Ultra without Them Knowing | Dr.fone
- In 2024, How to Transfer Contacts from Nubia Red Magic 8S Pro to Other Android Devices Using Bluetooth? | Dr.fone
- New Guide How To Check iCloud Activation Lock Status From Your iPhone 13 mini
- How to Transfer Music from Samsung Galaxy M14 4G to iPod | Dr.fone
- Title: Updated In 2024, The Complete Guide to Downloading and Using Windows Movie Maker for Free
- Author: Isabella
- Created at : 2024-04-29 12:49:33
- Updated at : 2024-04-30 12:49:33
- Link: https://video-creation-software.techidaily.com/updated-in-2024-the-complete-guide-to-downloading-and-using-windows-movie-maker-for-free/
- License: This work is licensed under CC BY-NC-SA 4.0.
