
:max_bytes(150000):strip_icc():format(webp)/TheOscarsStatue-33f6c30d7ffd4694a4dd1d1113de57f5.jpg)
Updated Record Like a Pro Top 10 Webcam Software for Windows 10
Record Like a Pro: Top 10 Webcam Software for Windows 10
10 Best Webcam Recording Software for Windows 10

Richard Bennett
Mar 27, 2024• Proven solutions
Which webcam softwarehave you installed on your laptop or desktop? Using the right webcam software to live stream videos, screen record videos, or chat on Skype results in high-quality images, smooth streaming, and high-quality images and videos.
There is a huge number of free webcam software with advanced features yet free for you to download, and use on your PC.
But how would you determine the best webcam software to use?
Before you mounted that webcam on your desktop or laptop, you had a reason. It’s your webcam features and purpose that should guide you to select the right software for the webcam camera.
In this article, we will show you 10 webcam software for Windows in this guide. Included are the most useful factors to consider as you make your choice – complexity of use, free/paid, integrations, editing tools, and more. You will learn:
- Part 1: The Best Webcam & Screen Recorder for Windows and Mac [Video Tutorial]
- Part 2: Top 10 Best Free Webcam Software for Windows
First take a quick look of the 10 best webcam software that is available on your Windows from a video:
For Win 7 or later (64-bit)
 Secure Download
For macOS 10.14 or later
Secure Download
Part 1: The Best Webcam & Screen Recorder for Computer
You need a sound and webcam recorder to record your video tutorials, streaming videos, presentations, or any other type of video. Wondershare Filmora is the software to use. Other than its most admired friendly intuitive interface, it’s simple and easy to use-suitable for both beginners and professionals.
For Win 7 or later (64-bit)
Secure Download
For macOS 10.14 or later
Secure Download
Among the outstanding features, you’ll find in Filmora include,
- Fast-paced recording speed of up to 120 fps
- Adverse professional editing tools that are easy to use
- Simultaneous recording from both webcam and computer screen
- Compatible with 50+ different file formats
- Rich title text and tutorial features
It’s free to download. Have a try now! Join in the Wondershare Video Community and get some inspiration from other Filomora users.
Part 2: Top 10 Best Free Webcam Software for Windows
To help you evaluate which webcam software best suits your needs, I’ve featured the strengths, shortcomings, and support services in each software review.
This is the list of the best free webcam software for Windows 10.
| 1 - Logitech Capture | 2 - CyberLink Youcam |
|---|---|
| 3 - ManyCam | 4 - SplitCam |
| 5 - Bandicam | 6 - NCH - Video Capture Software |
| 7 - YAWCAM | 8 - Windows Camera |
| 9 - Fake Webcam | 10 - IP Camera Viewer |
1. Logitech Capture
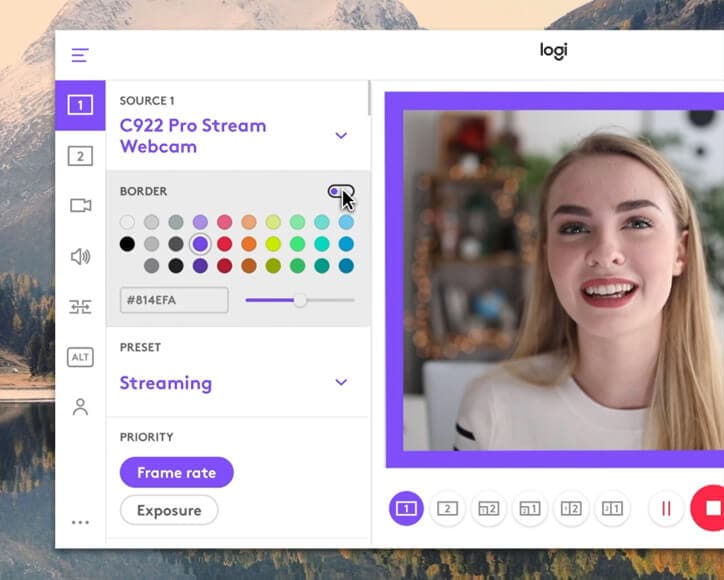
The multiple source recording feature and direct streaming app are the key strengths of this software. According to its mission statement- All-In-One Content Creation- you can use this software to record, edit, customize, and stream to your favorite channel.
Operating systems: Windows 10/8/7
Price: Free
Supported webcams: 1080P PRO STREAM, BRIO STREAM, C920s HD PRO, C922 PRO STREAM
Logitech Capture is among the few free webcam recording software for Windows 10 with studio controls applicable during recording. You can use this feature to adjust your image, create frames, adjust focus and transitions, and enable ChromaKey as you record.
In case you want to create a picture-in-picture presentation, this software allows you to use two webcams simultaneously. With the source switching and the auto-focus features, you can record the best tutorials or guides that show all dimensions and your image.
Pros
- Rich in transitions and effects
- Portrait optimization for mobile devices
- Its Capture app offers direct streaming to YouTube
- You can take passports or still images
Cons
- Limited to YouTube channel
- Account registration is mandatory
2. CyberLink Youcam
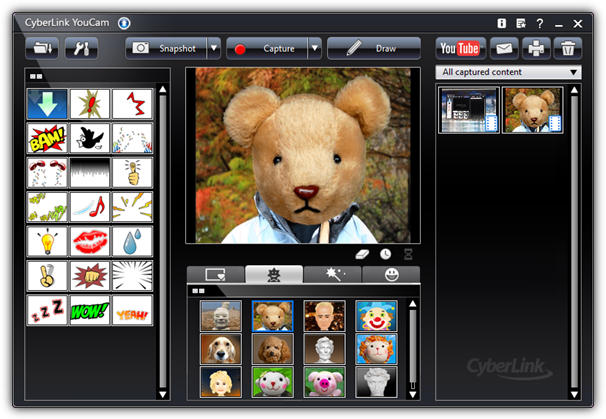
If you are used to video chatting and video recording, then, you’ll have 200+ fun effects to make your real-time videos as interesting as possible. In fact, the seamless app integration feature will keep your live streaming chats without buffering for long.
Operating systems: Windows 10/8/1.8/7
Price: Free/ Paid
Supported file formats: WMV, MP4, AVI
YouCam is the best free webcam software Windows 10 for YouTubers, business professionals, Streamers, home users, and Vloggers. It seamlessly integrates with live streaming media channels like Twitch, Wirecast, OBS Studio, Facebook Live, Xsplit, and YouTube Live.
The YouCam’s AR technology is one of its hidden treasures that will lighten up your skin by applying a natural-looking makeup. If your room is badly light, use the Live Skin Smoothing feature. Just below it is the TrueTheater Enhancement option to help you automatically adjust your facial sharpness and lighting.
Pros
- Hundreds of animated emojis
- Suitable for video conferencing services
- Plenty of interactive colorful particles and distortions
- Availability of face beautification tool
Cons
- Only limited to the Windows operating system
- Very few features for the free plan
3. ManyCam
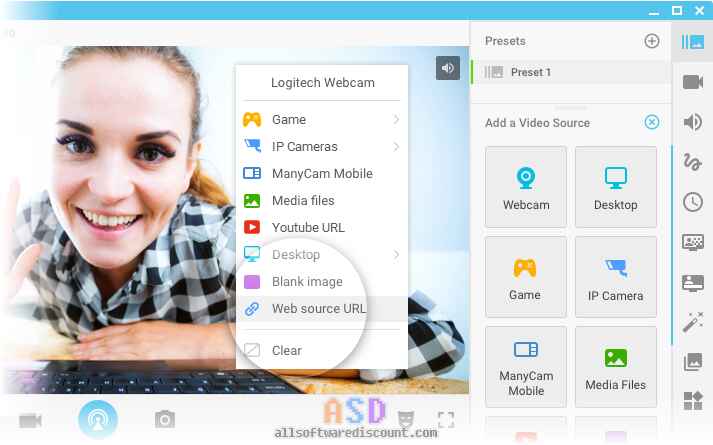
Downloading this webcam software guarantees you smooth streaming and effortless recording of videos. Also, this software will help you during game steaming, online education, mobile live streaming, and live telehealth communication.
Operating systems: Windows 10/8/7 and macOS X
Price: Free /Paid
Supported file formats: MJPEG, IP, MP4, AVI, MPEG, MOV
ManyCam is a free webcam recording software for windows 10 . It’s among the most widely used software internationally-not for many reasons, but because of its friendly intuitive user interface and live streaming tools for lessons and lecturers.
So, if you are a lecturer/teacher, you can use the Software Development Kit (SDK) to integrate the webcam with any online teaching platform. Among the features designed to facilitate better online teaching include the picture in picture, Chroma Key, multiple video sources, and screen sharing.
Pro
- Ability to stream 4K videos
- Real-time camera control settings
- No watermark even on the free plan
- Screencasting and screen recording feature
- Real-time drop and drag effects
Cons
- Expensive business subscription plans
- No Light enhancement features
- Most features are manual as opposed to being automatic

Filmora WebCame & Screen Recorder
Filmora - WebCame & Screen Recorder
• No-time delay to record webcam and screen while live streaming or gaming
• Edit recording video for marketing replay or adding game commentary
• Cross-platform supported - (Windows, Mac, iOS, Android)
Start Webcam & Screen Record Start Webcam & Screen Record Start Webcam & Screen Record Learn More >
4. SplitCam
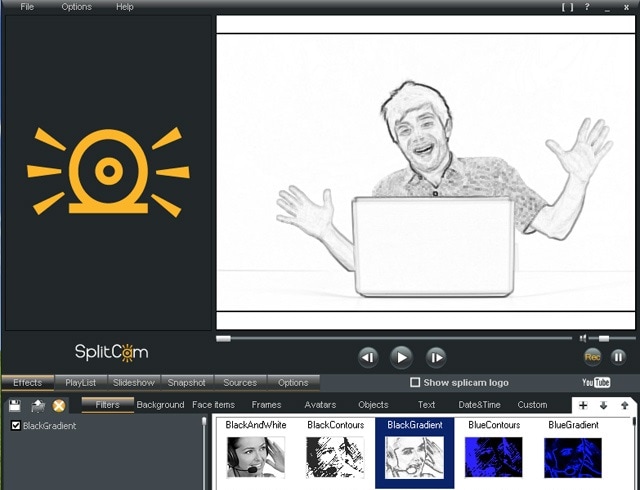
To stream your desktop/laptop screen SplitCam is the most appropriate software. With only the inbuilt virtual webcam, you can share your screen videos to media channels and IMS. Other uses of this software are recording webcam chatting , streaming live videos, and messaging.
Operating systems: Windows 10/8/7
Price: Free
SplitCam is not as popular as the other free webcam software windows 10 like ManyCam and YouCam. This is because it doesn’t integrate with some of the world’s renowned social media platforms- Facebook and Instagram. However, you can use this software to stream, take snapshots, and record videos for YouTube, Skype, Justin.tv, Gtalk, and Windows Live Messenger.
SplitCam is rich in fantastic webcam effects. Haven’t you been surprised to see someone appear to be streaming from the ocean or the Amazon Mountain? This is what you can do with SplitCam. Other cool effects are frames, texts on videos, filters, and facial items like masks and fake face glasses.
Pros
- Open and simple interface
- Integratable with the messaging apps
- Supports a wide range of resolutions ( between 320x180 and 2048x1536)
Cons
- Applicable to a small number of channels
- Supported file formats not defined
5. Bandicam
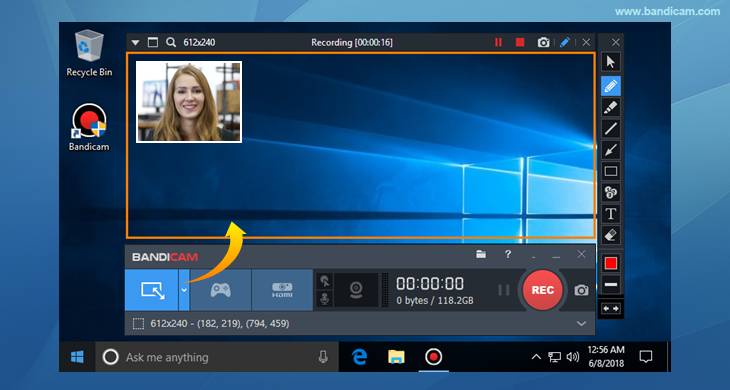
Do you want a recorder for screen recording, recording your gameplay, or capturing videos from devices like smartphones and PlayStation? Look for no other software but BandiCam. You can also merge two or more video files, remove unwanted parts, and select the only part to screen record.
Operating systems: Windows Vista, 10/8/7
Price: Free/paid
Supported file format: AVI, MP4, JPEG, TIF, GIF, PNG
Supported graphics cards: Nvidia NVENC, Nvidia NVENC (),
BandiCam is another HD webcam software Windows 10 with the capability of capturing high compression videos and games on your PC screen videos without compromising the video quality. Don’t forget to record all webinars aired in your niche.
Netflix is becoming more popular each day due to the thrilling videos. With the BandiCam screen recorder, you can record live-streamed videos on Netflix for over 24hrs. These are the tools to edit your recorded video: real-time drawing tool, webcam overlay, sound mixer, and Chroma Key.
Pros
- No hidden features
- Widescreen capture
- Can record 2D/3D videos in HD mode
- Can capture fast-paced videos of up to 144 FPS
Cons
- Not suitable for beginners
- Cannot be used to live stream videos
6. NCH - Video Capture Software

Of all the listed webcam software in this review, this software has the most diverse functions. You can record streaming videos, record your computer screen, record from external devices, and record from a webcam. It’s also perfect for recording audios and simultaneous recording from screen and webcam.
Operating systems: Windows 10, 8, 8.1, 7, XP, Vista 64 bit and Mac OS X 10.5 and above
Price: Free/paid
Supported file formats: MP4, WMV, AVI, MPG, FLV, MOV
Debut Video Capture is the only free webcam recording software for Windows 10 believed to capture or record videos from any external source. It has also preset settings for HD and TV with pre-production enhancement features like color adjustment settings, overlay buttons and frame rate, aspect ratio, and resolution settings.
If you always think of becoming rich, the Express Burn Disc Burner is the tool that will help you make money. Record the most trending videos and use this tool to burn DVDs and CDs.
Pros
- Can record videos for any social media platform
- Supports a wide range of audio and video file formats
- All features are open and easy to use
- Availability of video editing software
Cons
- Only monthly subscriptions for paid plans
- Watermark for the free download
- Difficult to record a full-screen movie
Try Filmora to Smoothly Record WebCame and Screen!
Filmora Web Camera & Screen Recorder can capture any area of the PC screen and webcam. It’s perfect to capture and record while making a live gaming match, marketing promotion, guiding a tour, and more. Plus, you can edit the recording video files in Filmora directly! Worth to have a try!
Start Webcam & Screen Recording Start Webcam & Screen Recording Start Webcam & Screen Recording Learn More >
7. YAWCAM
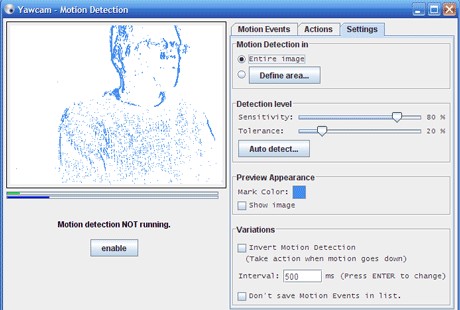
This webcam software can be referred to as the simplest for all beginners with the will to start streaming and recording videos for personal or home use.
Supported file formats: PNG, JPG, MJPEG, GIF, JavaScript
Price: Free
Supported operating systems: Windows 2000/10/8/7/ Vista and XP
YAWCAM is an absolutely free webcam software windows 10. Why is it the simplest software to use? Just download and you will find all features on one page. Simple language commands aligned in a drop-down menu ready to be used with only one click.
Some of the best features include overlay texts and images, scheduler, motion detection, and an inbuilt webserver. For you to use this webcam software, use these supported devices; DirectX compatible webcams, DV-camera, or video capture devices.
Pros
- No watermark
- Easy to use
- Friendly user interface
Cons
- Few transitions and effects
8. Windows Camera
We all trust any app or software by Microsoft over others! If you also do, then you can download Windows Camera and use it to record videos, take snapshots and shoot videos.
Operating system: Windows 10
Price: Free
Supported devices: Xbox One, Windows, mobile
Windows Camera is among the best free webcam software for Windows 10. This is because of the software’s few but easy-to-use and effective features that are expertly designed for PCs and tablets installed with Windows 10.
The automatic photo back combined with the photo-shoot timer makes it perfect for taking selfies and passports. Using the panorama feature, you can take photos of the best scenes and share them on media platforms.
Pros
- Simplicity is its main strength
- Supports resolutions above 1080p
- Good for photographers
Cons
- Has no built-in virtual webcam
- Requires a camera to support 4K videos
9. Fake Webcam

Supported file formats: AVI, MPEG, DVD, VCD, WMV, 3GP, MP4, SVCD, MOV, ASF,
Price: Free /paid
Operating systems: Windows 7/8/10 (32/64 bit)
Fake Webcam is a free webcam software Windows 10 whose name is creatively used to suggest it almost functions like a webcam. This doesn’t fall far from the truth! You can truly use this software to broadcast, add effects and filters, record on full screen, and fake your voice.
To share or stream your photos and videos on Skype, YIM, or Gtalk, using the screen recorder would give the best results. What makes Fake Webcam stand out is the free video converter and the free video toolkit.
Pros
- Free support tools
- Supports all video and audio formats
- Can convert file formats and stream to any channel
- Availability of the screen recorder
- Integratable with almost all instant messengers
Cons
- Major tools not free(Fake Webcam and Screen recorder)
10. IP Camera Viewer
Do you run a supermarket store, mall or you’ve installed security surveillance cameras in your compound? IP Camera Viewer is the most effective webcam software for video monitoring systems.
Supported file formats: JPEG, MPEG-4, MJPEG, and
Price: Free
Operating systems: Windows 10 / 8 / 7 /2012 /Vista and XP
IP Camera Viewer is the most used free webcam recording software for windows 10 as its compatible with almost all IP camera models like Panasonic, Toshiba, Canon, D-Link, Sony, and more the 2000 others. With the capability of viewing and controlling 4 camera feeds at once, you can use this software to monitor your entire compound.
Some of the important advanced IP Camera Viewer functions include listening to webcam audios, adjust image settings, zoom or tilt images, schedule monitoring times, and detect motions.
Pros
- Automatically uploads recorded videos and photos to a server
- Compatible with almost all IP camera models
- Simple and easy to use
Cons
- No inbuilt media player
- Cannot adjust the image or video quality
You may also want to read >>> 10 Best Webcams | A Buyer’s Guide
![]()
A cross-platform for making videos anywhere for all creators

Why your video editing isn’t good enough? How about some creative inspo?
- 100 Million+ Users
- 150+ Countries and Regions
- 4 Million+ Social Media Followers
- 5 Million+ Stock Media for Use
* Secure Download

FAQs about Webcam Software for Windows
1. What is Webcam Software?
A webcam is a video camera that feeds or streams images or video in real-time to or over a computer network. And webcam software enables users to record video or stream video over the Internet.
Webcam software is an application that allows you to capture video from your laptop/desktop webcam and record or stream video over the Internet. You can use them to deliver professional videos, streaming, and online courses easily.
2. Does Windows have built-in webcam software?
Windows 10 has an in-built webcam app called Camera that lets you record videos and take pictures with your webcam. This is definitely better than downloading 3rd party webcam recording software where spyware/malware is rampant.
3. Does a webcam need software?
Yes, if the camera hardware offers depth, low-light support, night vision, etc. If you use any software on the camera, these functions are only available if the driver is installed.
Conclusion
After a keen of all the webcam software above, it’s evident that every developer had an intended purpose. You cannot therefore just randomly wake up and download any without considering its functions, supported devices, file formats, and the auxiliary apps available. All this information is contained herein.
According to some users, there are free webcam software Windows 10 that more often would not show any video images but the audio is absolutely clear. To help your fellow user, what bad experience have you ever had after recording a game using webcam software ? Kindly share your comment or suggestion on our social media platforms.


Richard Bennett
Richard Bennett is a writer and a lover of all things video.
Follow @Richard Bennett
Richard Bennett
Mar 27, 2024• Proven solutions
Which webcam softwarehave you installed on your laptop or desktop? Using the right webcam software to live stream videos, screen record videos, or chat on Skype results in high-quality images, smooth streaming, and high-quality images and videos.
There is a huge number of free webcam software with advanced features yet free for you to download, and use on your PC.
But how would you determine the best webcam software to use?
Before you mounted that webcam on your desktop or laptop, you had a reason. It’s your webcam features and purpose that should guide you to select the right software for the webcam camera.
In this article, we will show you 10 webcam software for Windows in this guide. Included are the most useful factors to consider as you make your choice – complexity of use, free/paid, integrations, editing tools, and more. You will learn:
- Part 1: The Best Webcam & Screen Recorder for Windows and Mac [Video Tutorial]
- Part 2: Top 10 Best Free Webcam Software for Windows
First take a quick look of the 10 best webcam software that is available on your Windows from a video:
For Win 7 or later (64-bit)
Secure Download
For macOS 10.14 or later
Secure Download
Part 1: The Best Webcam & Screen Recorder for Computer
You need a sound and webcam recorder to record your video tutorials, streaming videos, presentations, or any other type of video. Wondershare Filmora is the software to use. Other than its most admired friendly intuitive interface, it’s simple and easy to use-suitable for both beginners and professionals.
For Win 7 or later (64-bit)
Secure Download
For macOS 10.14 or later
Secure Download
Among the outstanding features, you’ll find in Filmora include,
- Fast-paced recording speed of up to 120 fps
- Adverse professional editing tools that are easy to use
- Simultaneous recording from both webcam and computer screen
- Compatible with 50+ different file formats
- Rich title text and tutorial features
It’s free to download. Have a try now! Join in the Wondershare Video Community and get some inspiration from other Filomora users.
Part 2: Top 10 Best Free Webcam Software for Windows
To help you evaluate which webcam software best suits your needs, I’ve featured the strengths, shortcomings, and support services in each software review.
This is the list of the best free webcam software for Windows 10.
| 1 - Logitech Capture | 2 - CyberLink Youcam |
|---|---|
| 3 - ManyCam | 4 - SplitCam |
| 5 - Bandicam | 6 - NCH - Video Capture Software |
| 7 - YAWCAM | 8 - Windows Camera |
| 9 - Fake Webcam | 10 - IP Camera Viewer |
1. Logitech Capture
The multiple source recording feature and direct streaming app are the key strengths of this software. According to its mission statement- All-In-One Content Creation- you can use this software to record, edit, customize, and stream to your favorite channel.
Operating systems: Windows 10/8/7
Price: Free
Supported webcams: 1080P PRO STREAM, BRIO STREAM, C920s HD PRO, C922 PRO STREAM
Logitech Capture is among the few free webcam recording software for Windows 10 with studio controls applicable during recording. You can use this feature to adjust your image, create frames, adjust focus and transitions, and enable ChromaKey as you record.
In case you want to create a picture-in-picture presentation, this software allows you to use two webcams simultaneously. With the source switching and the auto-focus features, you can record the best tutorials or guides that show all dimensions and your image.
Pros
- Rich in transitions and effects
- Portrait optimization for mobile devices
- Its Capture app offers direct streaming to YouTube
- You can take passports or still images
Cons
- Limited to YouTube channel
- Account registration is mandatory
2. CyberLink Youcam
If you are used to video chatting and video recording, then, you’ll have 200+ fun effects to make your real-time videos as interesting as possible. In fact, the seamless app integration feature will keep your live streaming chats without buffering for long.
Operating systems: Windows 10/8/1.8/7
Price: Free/ Paid
Supported file formats: WMV, MP4, AVI
YouCam is the best free webcam software Windows 10 for YouTubers, business professionals, Streamers, home users, and Vloggers. It seamlessly integrates with live streaming media channels like Twitch, Wirecast, OBS Studio, Facebook Live, Xsplit, and YouTube Live.
The YouCam’s AR technology is one of its hidden treasures that will lighten up your skin by applying a natural-looking makeup. If your room is badly light, use the Live Skin Smoothing feature. Just below it is the TrueTheater Enhancement option to help you automatically adjust your facial sharpness and lighting.
Pros
- Hundreds of animated emojis
- Suitable for video conferencing services
- Plenty of interactive colorful particles and distortions
- Availability of face beautification tool
Cons
- Only limited to the Windows operating system
- Very few features for the free plan
3. ManyCam
Downloading this webcam software guarantees you smooth streaming and effortless recording of videos. Also, this software will help you during game steaming, online education, mobile live streaming, and live telehealth communication.
Operating systems: Windows 10/8/7 and macOS X
Price: Free /Paid
Supported file formats: MJPEG, IP, MP4, AVI, MPEG, MOV
ManyCam is a free webcam recording software for windows 10 . It’s among the most widely used software internationally-not for many reasons, but because of its friendly intuitive user interface and live streaming tools for lessons and lecturers.
So, if you are a lecturer/teacher, you can use the Software Development Kit (SDK) to integrate the webcam with any online teaching platform. Among the features designed to facilitate better online teaching include the picture in picture, Chroma Key, multiple video sources, and screen sharing.
Pro
- Ability to stream 4K videos
- Real-time camera control settings
- No watermark even on the free plan
- Screencasting and screen recording feature
- Real-time drop and drag effects
Cons
- Expensive business subscription plans
- No Light enhancement features
- Most features are manual as opposed to being automatic
Filmora WebCame & Screen Recorder
Filmora - WebCame & Screen Recorder
• No-time delay to record webcam and screen while live streaming or gaming
• Edit recording video for marketing replay or adding game commentary
• Cross-platform supported - (Windows, Mac, iOS, Android)
Start Webcam & Screen Record Start Webcam & Screen Record Start Webcam & Screen Record Learn More >
4. SplitCam
To stream your desktop/laptop screen SplitCam is the most appropriate software. With only the inbuilt virtual webcam, you can share your screen videos to media channels and IMS. Other uses of this software are recording webcam chatting , streaming live videos, and messaging.
Operating systems: Windows 10/8/7
Price: Free
SplitCam is not as popular as the other free webcam software windows 10 like ManyCam and YouCam. This is because it doesn’t integrate with some of the world’s renowned social media platforms- Facebook and Instagram. However, you can use this software to stream, take snapshots, and record videos for YouTube, Skype, Justin.tv, Gtalk, and Windows Live Messenger.
SplitCam is rich in fantastic webcam effects. Haven’t you been surprised to see someone appear to be streaming from the ocean or the Amazon Mountain? This is what you can do with SplitCam. Other cool effects are frames, texts on videos, filters, and facial items like masks and fake face glasses.
Pros
- Open and simple interface
- Integratable with the messaging apps
- Supports a wide range of resolutions ( between 320x180 and 2048x1536)
Cons
- Applicable to a small number of channels
- Supported file formats not defined
5. Bandicam
Do you want a recorder for screen recording, recording your gameplay, or capturing videos from devices like smartphones and PlayStation? Look for no other software but BandiCam. You can also merge two or more video files, remove unwanted parts, and select the only part to screen record.
Operating systems: Windows Vista, 10/8/7
Price: Free/paid
Supported file format: AVI, MP4, JPEG, TIF, GIF, PNG
Supported graphics cards: Nvidia NVENC, Nvidia NVENC (),
BandiCam is another HD webcam software Windows 10 with the capability of capturing high compression videos and games on your PC screen videos without compromising the video quality. Don’t forget to record all webinars aired in your niche.
Netflix is becoming more popular each day due to the thrilling videos. With the BandiCam screen recorder, you can record live-streamed videos on Netflix for over 24hrs. These are the tools to edit your recorded video: real-time drawing tool, webcam overlay, sound mixer, and Chroma Key.
Pros
- No hidden features
- Widescreen capture
- Can record 2D/3D videos in HD mode
- Can capture fast-paced videos of up to 144 FPS
Cons
- Not suitable for beginners
- Cannot be used to live stream videos
6. NCH - Video Capture Software
Of all the listed webcam software in this review, this software has the most diverse functions. You can record streaming videos, record your computer screen, record from external devices, and record from a webcam. It’s also perfect for recording audios and simultaneous recording from screen and webcam.
Operating systems: Windows 10, 8, 8.1, 7, XP, Vista 64 bit and Mac OS X 10.5 and above
Price: Free/paid
Supported file formats: MP4, WMV, AVI, MPG, FLV, MOV
Debut Video Capture is the only free webcam recording software for Windows 10 believed to capture or record videos from any external source. It has also preset settings for HD and TV with pre-production enhancement features like color adjustment settings, overlay buttons and frame rate, aspect ratio, and resolution settings.
If you always think of becoming rich, the Express Burn Disc Burner is the tool that will help you make money. Record the most trending videos and use this tool to burn DVDs and CDs.
Pros
- Can record videos for any social media platform
- Supports a wide range of audio and video file formats
- All features are open and easy to use
- Availability of video editing software
Cons
- Only monthly subscriptions for paid plans
- Watermark for the free download
- Difficult to record a full-screen movie
Try Filmora to Smoothly Record WebCame and Screen!
Filmora Web Camera & Screen Recorder can capture any area of the PC screen and webcam. It’s perfect to capture and record while making a live gaming match, marketing promotion, guiding a tour, and more. Plus, you can edit the recording video files in Filmora directly! Worth to have a try!
Start Webcam & Screen Recording Start Webcam & Screen Recording Start Webcam & Screen Recording Learn More >
7. YAWCAM
This webcam software can be referred to as the simplest for all beginners with the will to start streaming and recording videos for personal or home use.
Supported file formats: PNG, JPG, MJPEG, GIF, JavaScript
Price: Free
Supported operating systems: Windows 2000/10/8/7/ Vista and XP
YAWCAM is an absolutely free webcam software windows 10. Why is it the simplest software to use? Just download and you will find all features on one page. Simple language commands aligned in a drop-down menu ready to be used with only one click.
Some of the best features include overlay texts and images, scheduler, motion detection, and an inbuilt webserver. For you to use this webcam software, use these supported devices; DirectX compatible webcams, DV-camera, or video capture devices.
Pros
- No watermark
- Easy to use
- Friendly user interface
Cons
- Few transitions and effects
8. Windows Camera
We all trust any app or software by Microsoft over others! If you also do, then you can download Windows Camera and use it to record videos, take snapshots and shoot videos.
Operating system: Windows 10
Price: Free
Supported devices: Xbox One, Windows, mobile
Windows Camera is among the best free webcam software for Windows 10. This is because of the software’s few but easy-to-use and effective features that are expertly designed for PCs and tablets installed with Windows 10.
The automatic photo back combined with the photo-shoot timer makes it perfect for taking selfies and passports. Using the panorama feature, you can take photos of the best scenes and share them on media platforms.
Pros
- Simplicity is its main strength
- Supports resolutions above 1080p
- Good for photographers
Cons
- Has no built-in virtual webcam
- Requires a camera to support 4K videos
9. Fake Webcam
Supported file formats: AVI, MPEG, DVD, VCD, WMV, 3GP, MP4, SVCD, MOV, ASF,
Price: Free /paid
Operating systems: Windows 7/8/10 (32/64 bit)
Fake Webcam is a free webcam software Windows 10 whose name is creatively used to suggest it almost functions like a webcam. This doesn’t fall far from the truth! You can truly use this software to broadcast, add effects and filters, record on full screen, and fake your voice.
To share or stream your photos and videos on Skype, YIM, or Gtalk, using the screen recorder would give the best results. What makes Fake Webcam stand out is the free video converter and the free video toolkit.
Pros
- Free support tools
- Supports all video and audio formats
- Can convert file formats and stream to any channel
- Availability of the screen recorder
- Integratable with almost all instant messengers
Cons
- Major tools not free(Fake Webcam and Screen recorder)
10. IP Camera Viewer
Do you run a supermarket store, mall or you’ve installed security surveillance cameras in your compound? IP Camera Viewer is the most effective webcam software for video monitoring systems.
Supported file formats: JPEG, MPEG-4, MJPEG, and
Price: Free
Operating systems: Windows 10 / 8 / 7 /2012 /Vista and XP
IP Camera Viewer is the most used free webcam recording software for windows 10 as its compatible with almost all IP camera models like Panasonic, Toshiba, Canon, D-Link, Sony, and more the 2000 others. With the capability of viewing and controlling 4 camera feeds at once, you can use this software to monitor your entire compound.
Some of the important advanced IP Camera Viewer functions include listening to webcam audios, adjust image settings, zoom or tilt images, schedule monitoring times, and detect motions.
Pros
- Automatically uploads recorded videos and photos to a server
- Compatible with almost all IP camera models
- Simple and easy to use
Cons
- No inbuilt media player
- Cannot adjust the image or video quality
You may also want to read >>> 10 Best Webcams | A Buyer’s Guide
![]()
A cross-platform for making videos anywhere for all creators
Why your video editing isn’t good enough? How about some creative inspo?
- 100 Million+ Users
- 150+ Countries and Regions
- 4 Million+ Social Media Followers
- 5 Million+ Stock Media for Use
* Secure Download
FAQs about Webcam Software for Windows
1. What is Webcam Software?
A webcam is a video camera that feeds or streams images or video in real-time to or over a computer network. And webcam software enables users to record video or stream video over the Internet.
Webcam software is an application that allows you to capture video from your laptop/desktop webcam and record or stream video over the Internet. You can use them to deliver professional videos, streaming, and online courses easily.
2. Does Windows have built-in webcam software?
Windows 10 has an in-built webcam app called Camera that lets you record videos and take pictures with your webcam. This is definitely better than downloading 3rd party webcam recording software where spyware/malware is rampant.
3. Does a webcam need software?
Yes, if the camera hardware offers depth, low-light support, night vision, etc. If you use any software on the camera, these functions are only available if the driver is installed.
Conclusion
After a keen of all the webcam software above, it’s evident that every developer had an intended purpose. You cannot therefore just randomly wake up and download any without considering its functions, supported devices, file formats, and the auxiliary apps available. All this information is contained herein.
According to some users, there are free webcam software Windows 10 that more often would not show any video images but the audio is absolutely clear. To help your fellow user, what bad experience have you ever had after recording a game using webcam software ? Kindly share your comment or suggestion on our social media platforms.
Richard Bennett
Richard Bennett is a writer and a lover of all things video.
Follow @Richard Bennett
The Best Mac Video Editors for Beginners: A Step-by-Step Guide
Many video editors will agree that Apple’s Mac computers are perfect for video editing and other creative media arts such as animation. Unlike, Chrome OS, Windows, or Linux, macOS comes with much-noted preferences. This operating system emphasizes on creativity and design and gives the best producing results with top movie maker software.
8 Stunning Movie Creator for Mac
Browsing through the internet, you will find a myriad of movie maker video editors. However, not every tool is compatible with Mac. If you are getting started with video editing on your Mac, the first step is to choose movie maker software that gives high-quality results. Below, you will find some of the best video editing tools to put out short films and movies professionally.
1. Wondershare Filmora - Best Overall
Filmora by Wondershare is a popular video movie maker for Mac with a wide array of transition, trimming, and overlay options. Notable benefits of using Filmora are modern and advanced features. Also, developers in Filmora consistently introduce new updates and features. For instance, they recently introduced a motion tracking feature. Motion tracking maps objects in a frame and enables the video editor to create texts and graphics that follow that motion. Filmora has a straightforward interface, which makes this tool suitable for beginners as well as professional video editors.

For Win 7 or later (64-bit)
For macOS 10.12 or later
The tool supports 4K videos and offers a plethora of options to add effects, styles, and enable editors to customize videos. Filmora is an affordable tool with many elements and animations. With this tool, editors can insert text and add audio to their videos. Here are some top features offered by Wondershare Filmora:
- Layer multiple video clips
- Video stabilization
- Audio equalizer
- Advanced text editing
- Speed control
- Mosaic (blurring)
- Noise removal
- Screen recording
2. Adobe Premiere Pro – Best for Professionals
Adobe Premiere is another popular platform suitable for video editing. Like Filmora, Adobe Premiere also offers a convenient and simple interface. With embedded layouts, you can use this movie video maker for different purposes. Furthermore, Adobe Premiere also offers complete customization. You can arrange and remove windows and tabs according to your preference.

With a great number of presets and codecs, you can easily export videos in different formats. While exporting, you can customize the settings according to your needs, although default settings also offer decent quality. Besides coding formats, Adobe Premiere boasts numerous templates, plug-ins, and scripts to simplify the working process and include professional elements to your video. Exciting features of Adobe Premiere includes:
- Motion graphics templates
- Simultaneous projects
- Transitions
- Effects
- VR rotate sphere
- VR audio editing
- VR editing
- Multiple formats support
3. Shotcut – Best Open Source Software
Shotcut is a simple tool with customized filters that enable you to create collage videos. This movie video maker enables you to adjust video and audio quality and change the volume. Furthermore, you can export videos in different folders such as MJpeg, and WebM.

With Shotcut, you can export videos in Lossless mode. This mode keeps the original quality of the videos after the export, which is suitable for professional tasks. This means that you can save time by downloading high-quality videos on default settings. Using this movie creator, you can add filters and effects to enhance the video quality and color grading. Shotcut movie maker offers the following features:
- Multiple audio features
- Video effects
- Hardware support
- Display and monitoring
- Codec independent
- Cross-platform
4. Adobe Premiere Elements – Best for Beginners
Adobe Premiere Elements is a beginners’ version of Premiere Pro. This doesn’t mean that it is less capable, but the tool offers simple features for high-quality tasks. That’s why this video movie makeris highly suitable for beginners. So, if you are just starting with video editing, you should consider trying Premiere elements.

Premiere elements offers a wide array of tools to compile multiple videos, audio, and images into a single video. There are few tools available to scale video quality. This movie video maker is compatible with Mac as well as PC. Premiere Elements also helps you add fun minor effects to maintain flow and spice up the video. The tool uses Sensei AI technology that automatically keeps the important video elements in the frame through re-framing.
If you edit videos for social media platforms, using Adobe Premiere elements would be ideal. It enables you to create a social-friendly square or vertical format of videos. Furthermore, you can include backgrounds, mattes, and motion titles in the videos. Abode Premiere Elements offers the following features:
- Animated overlays
- Auto reframe
- New slideshow styles
- Compress video output
- Shadow and highlight guided edit
- Ample video effects
- Cross-platform support
5. Final Cut Pro – Best Tool for Timeline
Final Cut is a convenient and powerful movie creator tool produced by Apple Company. This platform gives a new approach to video editing and has a flexible Magnetic Timeline. The interface is quite uncommon with fixed windows. You can conveniently add new videos and organize clips with Final Cut Pro, and the video clips you no longer use will easily disappear.

The Clip Connections feature enables you to join basic clips with other elements. The downside of this tool is that you can’t use the keyboard to enter the parameters for color correction. Instead, you have to use a mouse for every modification. This can be overwhelming sometimes, especially for minimum correction. Some features of Final Cut Pro include:
- Supports 360° VR content
- Supports 4K XAVC-S format
- 3D editing
- Motion tracking
- Exports to video ()
6. Blender – Best for 3D
Blender is an open-source and free-to-use movie maker video editor. A notable feature of this tool is 3D rendering. It offers excellent functions to work with movable objects such as animation, opening UV, training, modeling, interface, and shading. The video movie maker offers a highly-technological interface, unlike other similar programs. Blender is perfect for 3D enthusiasts, designers, and artists, as it offers professional 3D quality. Some popular Blender features are:
- Modeling
- Sculpting
- Rendering
- VFX
- Animation and rigging
- Scripting

7. OpenShot – Best for Open-Source
OpenShot is another open-source movie video maker but the interface and features are quite different than Blender. It offers drag-and-drop options and a simple interface. This Mac video editing tool creates a perfect balance with simplicity and advanced features. With this tool, you can include wide-ranging transition effects and elements and create high-quality videos. OpenShot offers:
- Desktop integration
- Keyframe animation
- Trim and slice
- Slow-motion and time effect
- Audio waveform

8. Lightworks – Best Tool for Fast Rendering
You can download Lightworks for free on your Mac and include unlimited videos and audio tracks in them. The post-promotion video processing feature performed in real-time saves a tremendous amount of time. With the auto-save feature, you don’t have to worry about losing your progress. Lightworks also offers screen capture features to create YouTube tutorial videos. Features of Lightworks movie maker tool are:
- Unlimited sources
- Live cut
- Unique sync group feature.
- Sync with edits.
- Sync to time code or lock frame

Closing Word
Hopefully, now you can easily choose the best movie maker from the above list and scale your editing skills. Our top pick, Wondershare Filmora is budget-friendly movie maker software with an easy-to-use interface and creative features. There are wide-ranging transitions and effects such as speed blur, ripple and dissolve, making this software a unique option.
Versatile Video Editor - Wondershare Filmora
An easy yet powerful editor
Numerous effects to choose from
Detailed tutorials provided by the official channel
For macOS 10.12 or later
The tool supports 4K videos and offers a plethora of options to add effects, styles, and enable editors to customize videos. Filmora is an affordable tool with many elements and animations. With this tool, editors can insert text and add audio to their videos. Here are some top features offered by Wondershare Filmora:
- Layer multiple video clips
- Video stabilization
- Audio equalizer
- Advanced text editing
- Speed control
- Mosaic (blurring)
- Noise removal
- Screen recording
2. Adobe Premiere Pro – Best for Professionals
Adobe Premiere is another popular platform suitable for video editing. Like Filmora, Adobe Premiere also offers a convenient and simple interface. With embedded layouts, you can use this movie video maker for different purposes. Furthermore, Adobe Premiere also offers complete customization. You can arrange and remove windows and tabs according to your preference.
With a great number of presets and codecs, you can easily export videos in different formats. While exporting, you can customize the settings according to your needs, although default settings also offer decent quality. Besides coding formats, Adobe Premiere boasts numerous templates, plug-ins, and scripts to simplify the working process and include professional elements to your video. Exciting features of Adobe Premiere includes:
- Motion graphics templates
- Simultaneous projects
- Transitions
- Effects
- VR rotate sphere
- VR audio editing
- VR editing
- Multiple formats support
3. Shotcut – Best Open Source Software
Shotcut is a simple tool with customized filters that enable you to create collage videos. This movie video maker enables you to adjust video and audio quality and change the volume. Furthermore, you can export videos in different folders such as MJpeg, and WebM.
With Shotcut, you can export videos in Lossless mode. This mode keeps the original quality of the videos after the export, which is suitable for professional tasks. This means that you can save time by downloading high-quality videos on default settings. Using this movie creator, you can add filters and effects to enhance the video quality and color grading. Shotcut movie maker offers the following features:
- Multiple audio features
- Video effects
- Hardware support
- Display and monitoring
- Codec independent
- Cross-platform
4. Adobe Premiere Elements – Best for Beginners
Adobe Premiere Elements is a beginners’ version of Premiere Pro. This doesn’t mean that it is less capable, but the tool offers simple features for high-quality tasks. That’s why this video movie makeris highly suitable for beginners. So, if you are just starting with video editing, you should consider trying Premiere elements.
Premiere elements offers a wide array of tools to compile multiple videos, audio, and images into a single video. There are few tools available to scale video quality. This movie video maker is compatible with Mac as well as PC. Premiere Elements also helps you add fun minor effects to maintain flow and spice up the video. The tool uses Sensei AI technology that automatically keeps the important video elements in the frame through re-framing.
If you edit videos for social media platforms, using Adobe Premiere elements would be ideal. It enables you to create a social-friendly square or vertical format of videos. Furthermore, you can include backgrounds, mattes, and motion titles in the videos. Abode Premiere Elements offers the following features:
- Animated overlays
- Auto reframe
- New slideshow styles
- Compress video output
- Shadow and highlight guided edit
- Ample video effects
- Cross-platform support
5. Final Cut Pro – Best Tool for Timeline
Final Cut is a convenient and powerful movie creator tool produced by Apple Company. This platform gives a new approach to video editing and has a flexible Magnetic Timeline. The interface is quite uncommon with fixed windows. You can conveniently add new videos and organize clips with Final Cut Pro, and the video clips you no longer use will easily disappear.
The Clip Connections feature enables you to join basic clips with other elements. The downside of this tool is that you can’t use the keyboard to enter the parameters for color correction. Instead, you have to use a mouse for every modification. This can be overwhelming sometimes, especially for minimum correction. Some features of Final Cut Pro include:
- Supports 360° VR content
- Supports 4K XAVC-S format
- 3D editing
- Motion tracking
- Exports to video ()
6. Blender – Best for 3D
Blender is an open-source and free-to-use movie maker video editor. A notable feature of this tool is 3D rendering. It offers excellent functions to work with movable objects such as animation, opening UV, training, modeling, interface, and shading. The video movie maker offers a highly-technological interface, unlike other similar programs. Blender is perfect for 3D enthusiasts, designers, and artists, as it offers professional 3D quality. Some popular Blender features are:
- Modeling
- Sculpting
- Rendering
- VFX
- Animation and rigging
- Scripting
7. OpenShot – Best for Open-Source
OpenShot is another open-source movie video maker but the interface and features are quite different than Blender. It offers drag-and-drop options and a simple interface. This Mac video editing tool creates a perfect balance with simplicity and advanced features. With this tool, you can include wide-ranging transition effects and elements and create high-quality videos. OpenShot offers:
- Desktop integration
- Keyframe animation
- Trim and slice
- Slow-motion and time effect
- Audio waveform
8. Lightworks – Best Tool for Fast Rendering
You can download Lightworks for free on your Mac and include unlimited videos and audio tracks in them. The post-promotion video processing feature performed in real-time saves a tremendous amount of time. With the auto-save feature, you don’t have to worry about losing your progress. Lightworks also offers screen capture features to create YouTube tutorial videos. Features of Lightworks movie maker tool are:
- Unlimited sources
- Live cut
- Unique sync group feature.
- Sync with edits.
- Sync to time code or lock frame
Closing Word
Hopefully, now you can easily choose the best movie maker from the above list and scale your editing skills. Our top pick, Wondershare Filmora is budget-friendly movie maker software with an easy-to-use interface and creative features. There are wide-ranging transitions and effects such as speed blur, ripple and dissolve, making this software a unique option.
Versatile Video Editor - Wondershare Filmora
An easy yet powerful editor
Numerous effects to choose from
Detailed tutorials provided by the official channel
Unlock Custom Aspect Ratios in Final Cut Pro: Expert Techniques Revealed
Wondershare Filmora
Create stunning effects with simple clicks.
Most of you must be wondering what is the purpose of changing the aspect ratio of a video. The aspect ratio is the size of the frame occupied by the video during the play mode. In other words, you can refer to it as the shape of the image concerning its width and height. There are surplus ways to change the size of the images but you must search for optimal tools to establish this task. While modifying the width and height values, make a note of the image resolution. You must resize the images without affecting the resolution and quality of the video. Making changes in one image parameter should not affect the other attributes.

The Final Cut Pro app helps to carry out this task professionally without any issues. This video editor works on every detail of the video and implements respective changes on the image size retaining the quality of the file. Quickly scroll down for more details on the efficient utilization of the Final Cut Pro app in modifying the aspect ratio of the video.
In this article
01 How to change the aspect ratio in the Final Cut Pro?
02 Why Can’t I change the aspect ratio of my video?
03 What is the common aspect ratio of videos?
How to change the aspect ratio in the Final Cut Pro?
The Final Cut Pro app is an exclusive program that edits videos professionally. The easy interface encourages the newbie to work on it without any hesitation. This app comprises essential and advanced controls to bring a great impact on the videos as per your requirements. It is enough if you make the right click to accomplish the desired effect on the video. Here, you will learn how to modify the aspect ratio in your video to resize the media file without affecting its quality.
There is a need to reshape the video frame for various reasons. If you want to upload any videos on a social media website, the platform supports only restricted aspect ratio video size. In those scenarios, you must learn to reshape your memorable captures without distorting the crucial factors in the video files. Watch the steps below carefully to study the change in aspect ratio attributes in the videos.
Step1Install the application
Download the Final Cut Pro app and install it in your system. Then, launch the tool and upload the desired video that requires the resize operation. Place the video on the timeline and move the pointer to any area on the video to work on its aspect ratio values.

Step2Modify the values
At the right top of the screen, you will find the property window. Tap the ‘Modify’ option to alter the aspect ratio values according to your needs. In the pop-up window change the Video format to ‘Custom’ and alter the resolution values based on the required video size. To convert the shape to 16:9, enter the values like 1920 and 1080. For a square type frame, type in the values like 1080 and 1080. Ensure that both the values are the same for a square type video size.
The values you enter nearby the ‘Video’ label carries the size of the video image. Based on the requirement, you can alter them optimally.


Finally, save the changes and witness the resize operation on the video. You can further modify the values if you are not convinced with the acquired shape.
The aspect ratio establishes complete control of the video size. Alter the video size and use the files on any platform without any hesitation on its compatibility.
For Win 7 or later (64-bit)
For macOS 10.12 or later
Why Can’t I change the aspect ratio of my video?
There are scenarios you may encounter while changing the aspect ratio of your videos. You can refer below to the common issues that require a better fix to overcome the irregular reframing activities.
Problem: Even after changing the resolution values to 1440 X 1080 using the final cut pro app, the video frame covers the widescreen without modifying the size concerning the assigned values.
Solution 1: In this situation, you must fix the default spatial fit settings to fill the format in the final cut pro app. When you import the videos for editing, automatically the video would have taken this fit option. Before working on the aspect ratio values, modify the fit to fill settings so that you can crop the unwanted areas in the video frames precisely.
Solution 2: Another alternate solution to overcome the above problem is that you must disclose the Video inspector in your Final Cut Pro application. Then, in the ‘Anamorphic Override’ settings change the value to Standard instead of the none or widescreen mode. By altering this value, you can get the desired outcomes without any hesitation.
When you struggle to change the aspect ratio in your videos using the Final Cut Pro app, you must look for alternative solutions to fix them.
What is the common aspect ratio of videos?
The allowable aspect ratio for the videos and images differs with the social media platforms. In the case of the Facebook cover photo, the image size varies with desktop and mobile view. You can go for a horizontal frame with an aspect ratio of 16:9. Here, the width is wider than height.
For Twitter and Facebook posts, set the aspect ratio for the media files to 1200 x 675 pixels. In other terms 16:9, again it looks more or like a horizontal frame. In the YouTube platform, the permitted channel art size is 2560 x 1440 and the thumbnail is 1280 x 720.
The Instagram and Pinterest pins opt for square type video frames like 1200 X 1200 pixels or 500 X 500 pixels. The latter value holds good to set profile pictures for your account. The YouTube channel icon must be 800 X 800 in a square frame to enhance visibility.

The Instagram posts allow the tallest media files like 1080 X 1350. The Snapchat and TikTok go with 1080 X 1920 values. You can find the long Pinterest carrying posts measuring 1000 X 2100. Though this platform does not recommend this size, still the posts are successfully uploaded in this dimension flawlessly.
It is highly recommended to follow the above-discussed guidelines to post the favorite videos on the relevant social media platform without witnessing any compatibility issues. These are the common aspect ratio dimensions supported by the respective platforms. While posting the media files in this environment, you must abide by its standards to get rid of unwanted uploading issues. In certain digital spaces, you may not know the reason for the failure in uploading the image or videos. In those scenarios, read the guidelines provided by that platform and modify the media file dimension according to those values and then try uploading it again. Most video upload failure happens due to the incompatibility of the media file sizes. Watch the dimensions before posting or uploading any media files in the online space.
Most social media platform allows both landscape and portrait video sizes optimally. You can switch to any size format as per your comfort. When you upload larger images or videos either you will receive an error message or it forces you to crop the content to fit perfectly with their guidelines. To overcome such a situation, you can check out the permittable file size before uploading the media files into its environment.
Conclusion
Therefore, you had a better understanding of how to change the aspect ratio using the Final Cut Pro program. You can follow the above-discussed instructions and carry out the task as per your needs.
A short synopsis of the common media file sizes permitted on social media platforms has been listed out in this article and these enlightening facts help you to get rid of file size compatibility issues. Overcome the challenges in modifying the rigid file sizes of the videos using the forceful altering options. Connect with this article to discover exciting performances of the Final Cut Pro tool and its potential utilization in editing a media file. Stay tuned for jaw-dropping information on the video edition functionalities of the incredible application Final Cut Pro.
Wondershare Filmora
Do magic with Filmora. Try it now.
Try It Free Try It Free Try It Free Learn More >

Most of you must be wondering what is the purpose of changing the aspect ratio of a video. The aspect ratio is the size of the frame occupied by the video during the play mode. In other words, you can refer to it as the shape of the image concerning its width and height. There are surplus ways to change the size of the images but you must search for optimal tools to establish this task. While modifying the width and height values, make a note of the image resolution. You must resize the images without affecting the resolution and quality of the video. Making changes in one image parameter should not affect the other attributes.
The Final Cut Pro app helps to carry out this task professionally without any issues. This video editor works on every detail of the video and implements respective changes on the image size retaining the quality of the file. Quickly scroll down for more details on the efficient utilization of the Final Cut Pro app in modifying the aspect ratio of the video.
In this article
01 How to change the aspect ratio in the Final Cut Pro?
02 Why Can’t I change the aspect ratio of my video?
03 What is the common aspect ratio of videos?
How to change the aspect ratio in the Final Cut Pro?
The Final Cut Pro app is an exclusive program that edits videos professionally. The easy interface encourages the newbie to work on it without any hesitation. This app comprises essential and advanced controls to bring a great impact on the videos as per your requirements. It is enough if you make the right click to accomplish the desired effect on the video. Here, you will learn how to modify the aspect ratio in your video to resize the media file without affecting its quality.
There is a need to reshape the video frame for various reasons. If you want to upload any videos on a social media website, the platform supports only restricted aspect ratio video size. In those scenarios, you must learn to reshape your memorable captures without distorting the crucial factors in the video files. Watch the steps below carefully to study the change in aspect ratio attributes in the videos.
Step1Install the application
Download the Final Cut Pro app and install it in your system. Then, launch the tool and upload the desired video that requires the resize operation. Place the video on the timeline and move the pointer to any area on the video to work on its aspect ratio values.
Step2Modify the values
At the right top of the screen, you will find the property window. Tap the ‘Modify’ option to alter the aspect ratio values according to your needs. In the pop-up window change the Video format to ‘Custom’ and alter the resolution values based on the required video size. To convert the shape to 16:9, enter the values like 1920 and 1080. For a square type frame, type in the values like 1080 and 1080. Ensure that both the values are the same for a square type video size.
The values you enter nearby the ‘Video’ label carries the size of the video image. Based on the requirement, you can alter them optimally.
Finally, save the changes and witness the resize operation on the video. You can further modify the values if you are not convinced with the acquired shape.
The aspect ratio establishes complete control of the video size. Alter the video size and use the files on any platform without any hesitation on its compatibility.
For Win 7 or later (64-bit)
For macOS 10.12 or later
Why Can’t I change the aspect ratio of my video?
There are scenarios you may encounter while changing the aspect ratio of your videos. You can refer below to the common issues that require a better fix to overcome the irregular reframing activities.
Problem: Even after changing the resolution values to 1440 X 1080 using the final cut pro app, the video frame covers the widescreen without modifying the size concerning the assigned values.
Solution 1: In this situation, you must fix the default spatial fit settings to fill the format in the final cut pro app. When you import the videos for editing, automatically the video would have taken this fit option. Before working on the aspect ratio values, modify the fit to fill settings so that you can crop the unwanted areas in the video frames precisely.
Solution 2: Another alternate solution to overcome the above problem is that you must disclose the Video inspector in your Final Cut Pro application. Then, in the ‘Anamorphic Override’ settings change the value to Standard instead of the none or widescreen mode. By altering this value, you can get the desired outcomes without any hesitation.
When you struggle to change the aspect ratio in your videos using the Final Cut Pro app, you must look for alternative solutions to fix them.
What is the common aspect ratio of videos?
The allowable aspect ratio for the videos and images differs with the social media platforms. In the case of the Facebook cover photo, the image size varies with desktop and mobile view. You can go for a horizontal frame with an aspect ratio of 16:9. Here, the width is wider than height.
For Twitter and Facebook posts, set the aspect ratio for the media files to 1200 x 675 pixels. In other terms 16:9, again it looks more or like a horizontal frame. In the YouTube platform, the permitted channel art size is 2560 x 1440 and the thumbnail is 1280 x 720.
The Instagram and Pinterest pins opt for square type video frames like 1200 X 1200 pixels or 500 X 500 pixels. The latter value holds good to set profile pictures for your account. The YouTube channel icon must be 800 X 800 in a square frame to enhance visibility.
The Instagram posts allow the tallest media files like 1080 X 1350. The Snapchat and TikTok go with 1080 X 1920 values. You can find the long Pinterest carrying posts measuring 1000 X 2100. Though this platform does not recommend this size, still the posts are successfully uploaded in this dimension flawlessly.
It is highly recommended to follow the above-discussed guidelines to post the favorite videos on the relevant social media platform without witnessing any compatibility issues. These are the common aspect ratio dimensions supported by the respective platforms. While posting the media files in this environment, you must abide by its standards to get rid of unwanted uploading issues. In certain digital spaces, you may not know the reason for the failure in uploading the image or videos. In those scenarios, read the guidelines provided by that platform and modify the media file dimension according to those values and then try uploading it again. Most video upload failure happens due to the incompatibility of the media file sizes. Watch the dimensions before posting or uploading any media files in the online space.
Most social media platform allows both landscape and portrait video sizes optimally. You can switch to any size format as per your comfort. When you upload larger images or videos either you will receive an error message or it forces you to crop the content to fit perfectly with their guidelines. To overcome such a situation, you can check out the permittable file size before uploading the media files into its environment.
Conclusion
Therefore, you had a better understanding of how to change the aspect ratio using the Final Cut Pro program. You can follow the above-discussed instructions and carry out the task as per your needs.
A short synopsis of the common media file sizes permitted on social media platforms has been listed out in this article and these enlightening facts help you to get rid of file size compatibility issues. Overcome the challenges in modifying the rigid file sizes of the videos using the forceful altering options. Connect with this article to discover exciting performances of the Final Cut Pro tool and its potential utilization in editing a media file. Stay tuned for jaw-dropping information on the video edition functionalities of the incredible application Final Cut Pro.
Wondershare Filmora
Do magic with Filmora. Try it now.
Try It Free Try It Free Try It Free Learn More >
FCPX Essentials: How to Achieve Pro-Level Video Stability
How to stabilize your video in the final cut pro?

Liza Brown
Mar 27, 2024• Proven solutions
The quality of the video depends on many factors and the stabilization includes in the list. You might have encountered ample issues in the videos after completing the shoot. During the editing stage, you must stabilize few attributes to obtain the finest outcomes of the clippings.
There are surplus video editors available in the digital market. Grab the perfect tool that meets your requirements without compromising on any factors.
In this article, you will learn how to stabilize the videos using the Final Cut Pro program. Additionally, you will discover a third-party application to sort out the stabilization process of the videos. Quickly surf the content for enlightening facts on it.

Part 1: How to stabilize your footage via final cut pro?
The Final Cut Pro tool is exclusively designed to edit the videos professionally. The built-in features of this program are incredible and it works optimally with different video types. You can alter every detail in the video footage using the functionalities of Final Cut Pro. It is easy to import and export video files irrespective of their length. This app helps you to fix issues in the video footage that cannot be modified during the shoot time. The unexpected interruptions in the videos can be sorted out using the Final Cut Pro tool.
The stabilization feature helps to fix the shaky videos precisely. The Final Cut Pro application enables you to implement this feature in your footage easily. It is enough if you click the right controls to enable this option. This functionality is available to work on the shaky clipping on the video to acquire the desired results. To stabilize the shaky video with the Final Cut Pro app, you can follow the below instructions.
Step 1 You must import your video footage into the Final Cut Pro environment and add them to the working timeline.
Use the add -> media file option to include the video file into the Final Cut Pro ambience. Then, launch the ‘Video Inspector’ option.
Step 2 Enable the Stabilization check box to turn on this feature on the imported video.
In this module, you can find options to choose to fine-tune the stabilization attributes.
By default, the stabilization method is assigned to “Automatic“. This function modifies the stabilizing factors on the shaky clippings. You can modify this method by dragging the sliders below.
There are two more methods available namely inertia Cam and Smooth Cam. In the Inertia Cam, you can work on the zoom options of the videos. The Smooth Cam allows you to perform translation, rotation, and alter the scale parameters to overcome the flaws in the videos.
You can set these parameters by dragging the points on the value sliders simultaneously when you play the videos. Fix the point on the slider, if you feel the shaky parameters are restored to normal position. Use this method to resolve the shaky videos effectively.
You can set the stabilization parameters by the trial-and-error method. Depending on the intensity of interruptions on the video footage, you need to fix a perfect value for each slider namely Translation, Rotation, and scale. Randomly move the pointers on the sliders and identify the best combination to overcome the distortion in the recorded video.

Part 2: What stabilizer can be adopted in the final cut pro?
The stabilizer 2.0 is an outstanding plugin for the Final Cut Pro tool to stabilize the shaky video footage optimally. This program works with the Pixel Film studio motion tracking technology. It helps the users with comfortable shots by assisting in balancing the positions, rotation of the camera captures. You can also cut down the unwanted edges to obtain the required outcomes. This plugin pack costs $29.95.

The automated tracking stabilization feature eases your work when compared to the manual method. It comprises a built-in track editor to improvise the stabilization feature. Simply fix the point on the slider to adjust the stabilization feature on the footage.
It performs efficiently with all resolution types of videos without affecting the pixel values, frame rate, aspect ratio. The on-screen controls are available to make relevant changes to the video’s rotation, translation, and scale parameters. This plugin allows you to delete the keyframes if required according to your needs. You can establish complete control of the video footage by modifying the respective parameters.
You can find this plugin for purchase at the Pixel Film Studio’s store. There are offers to grab the package at reasonable rates. Hurry up and check out its minimal price tag and rush to purchase before the discount ends. An extremely useful stabilizer tool to edit beyond your imagination to fix the issues with the videos.
Part 3: How to stabilize your footage with easier steps?
Another easiest way to stabilize the shaky videos is by using an effective tool Filmora. It is an exclusive video editor application that works optimally with all video types without any compatibility issues. It is a reliable program to edit the videos according to your needs. The working space is comfortable to use and you can import the video files without any issues. You can use this tool to edit videos beyond your imagination. Make effective changes on the video clippings pushing your limitations beyond boundaries. The built-in features of this program are awesome and add value to your memorable shots.
This video stabilization program fixes the shaky clippings in no time. Here are the detailed instructions on how to stabilize the footage using the Filmora application.
Step 1 First download the application according to your system OS and install it. Then, upload the shaky video into the timeline of Filmora to carry out the desired tasks on the shaky clippings.
Step 2 Next, hit the Stabilization icon on the menu to trigger Filmora to analyze and sort out the shaky issues on the video. Then, press the Play button to begin the preview and simultaneously you must work on the Smooth Level slider to adjust the values for the correct position to acquire the desired outcomes.

Finally, save the changes of the modified Smooth level attribute in the Stabilization settings. By modifying this value, you can sort out the shaky and distorted clippings effectively.
You can then proceed with the further editing options by adding filter effects, transition effects and titles to enhance the overall appearance of the videos. Now, the distorted and shaky images on the videos are restored to a stable format in no time using this awesome program.
Part 4: Extensive reading: How to shoot a stabilized video in the first place?
Using the built-in features of the gadgets, you can capture a stabilized videos in no time. Instead of working on the clippings after the shoot, you can set the perfect parameters optimally to overcome the shaky and distorted moves during the shooting stage.
There are ample settings are available with the latest gadgets to work on every detail of the video clips for better results. The optimal image stabilization feature is included with fewer models of iPhone camera lenses.
Use an iPhone
There is a sensor-shift image stabilization is available with three models of iPhone. These features help in shooting videos in a stabilized manner without any shaky effects.

The iPhone 12 Pro Max has an in-built stabilizing technology that alters the camera’s sensors instead of working on its lens. Dual optical image stabilization makes sure that the images are perfectly shot without any distortions. You can implement all these in-built features in the iPhone to capture flawless videos quickly.
Use DJ pocket 2
DJ pocket 2 is designed to settle the problem in filming. Use this single-handed tiny camera to stabilize movement as well as take smooth videos.

After capturing from these gadgets, you do not require any special tools to work on the shaky clippings on your videos. Through effective practice you can excel in taking videos even on your Android gadgets, You must learn to hold the phone steadily and enable the autofocus option to concentrate on a specific event that is happening right at that moment. You can also try different shooting modes to ensure stabilization in the recorded videos.
Conclusion
Thus, this article had given a better understanding of the stabilization concepts on videos. You had an enlightening discussion about the effective methods to handle the shaky clipping precisely and sort out the perfect applications to fix them. Use the Final Cut Pro tool to resolve any camera shooting issues quickly.
This app works on every detail on the shaky clippings and modifies the associated attributes precisely without losing the data. Most video editors help to refine the overall flow of the videos and it does not affect the video story at any cost. The above-discussed applications are reliable and you can use them without any dilemma. Stay tuned to this article to learn more about the Final Cut Pro and the benefits of using its features on multimedia files to obtain the required outcomes.
Liza Brown
Liza Brown is a writer and a lover of all things video.
Follow @Liza Brown
Liza Brown
Mar 27, 2024• Proven solutions
The quality of the video depends on many factors and the stabilization includes in the list. You might have encountered ample issues in the videos after completing the shoot. During the editing stage, you must stabilize few attributes to obtain the finest outcomes of the clippings.
There are surplus video editors available in the digital market. Grab the perfect tool that meets your requirements without compromising on any factors.
In this article, you will learn how to stabilize the videos using the Final Cut Pro program. Additionally, you will discover a third-party application to sort out the stabilization process of the videos. Quickly surf the content for enlightening facts on it.
Part 1: How to stabilize your footage via final cut pro?
The Final Cut Pro tool is exclusively designed to edit the videos professionally. The built-in features of this program are incredible and it works optimally with different video types. You can alter every detail in the video footage using the functionalities of Final Cut Pro. It is easy to import and export video files irrespective of their length. This app helps you to fix issues in the video footage that cannot be modified during the shoot time. The unexpected interruptions in the videos can be sorted out using the Final Cut Pro tool.
The stabilization feature helps to fix the shaky videos precisely. The Final Cut Pro application enables you to implement this feature in your footage easily. It is enough if you click the right controls to enable this option. This functionality is available to work on the shaky clipping on the video to acquire the desired results. To stabilize the shaky video with the Final Cut Pro app, you can follow the below instructions.
Step 1 You must import your video footage into the Final Cut Pro environment and add them to the working timeline.
Use the add -> media file option to include the video file into the Final Cut Pro ambience. Then, launch the ‘Video Inspector’ option.
Step 2 Enable the Stabilization check box to turn on this feature on the imported video.
In this module, you can find options to choose to fine-tune the stabilization attributes.
By default, the stabilization method is assigned to “Automatic“. This function modifies the stabilizing factors on the shaky clippings. You can modify this method by dragging the sliders below.
There are two more methods available namely inertia Cam and Smooth Cam. In the Inertia Cam, you can work on the zoom options of the videos. The Smooth Cam allows you to perform translation, rotation, and alter the scale parameters to overcome the flaws in the videos.
You can set these parameters by dragging the points on the value sliders simultaneously when you play the videos. Fix the point on the slider, if you feel the shaky parameters are restored to normal position. Use this method to resolve the shaky videos effectively.
You can set the stabilization parameters by the trial-and-error method. Depending on the intensity of interruptions on the video footage, you need to fix a perfect value for each slider namely Translation, Rotation, and scale. Randomly move the pointers on the sliders and identify the best combination to overcome the distortion in the recorded video.
Part 2: What stabilizer can be adopted in the final cut pro?
The stabilizer 2.0 is an outstanding plugin for the Final Cut Pro tool to stabilize the shaky video footage optimally. This program works with the Pixel Film studio motion tracking technology. It helps the users with comfortable shots by assisting in balancing the positions, rotation of the camera captures. You can also cut down the unwanted edges to obtain the required outcomes. This plugin pack costs $29.95.
The automated tracking stabilization feature eases your work when compared to the manual method. It comprises a built-in track editor to improvise the stabilization feature. Simply fix the point on the slider to adjust the stabilization feature on the footage.
It performs efficiently with all resolution types of videos without affecting the pixel values, frame rate, aspect ratio. The on-screen controls are available to make relevant changes to the video’s rotation, translation, and scale parameters. This plugin allows you to delete the keyframes if required according to your needs. You can establish complete control of the video footage by modifying the respective parameters.
You can find this plugin for purchase at the Pixel Film Studio’s store. There are offers to grab the package at reasonable rates. Hurry up and check out its minimal price tag and rush to purchase before the discount ends. An extremely useful stabilizer tool to edit beyond your imagination to fix the issues with the videos.
Part 3: How to stabilize your footage with easier steps?
Another easiest way to stabilize the shaky videos is by using an effective tool Filmora. It is an exclusive video editor application that works optimally with all video types without any compatibility issues. It is a reliable program to edit the videos according to your needs. The working space is comfortable to use and you can import the video files without any issues. You can use this tool to edit videos beyond your imagination. Make effective changes on the video clippings pushing your limitations beyond boundaries. The built-in features of this program are awesome and add value to your memorable shots.
This video stabilization program fixes the shaky clippings in no time. Here are the detailed instructions on how to stabilize the footage using the Filmora application.
Step 1 First download the application according to your system OS and install it. Then, upload the shaky video into the timeline of Filmora to carry out the desired tasks on the shaky clippings.
Step 2 Next, hit the Stabilization icon on the menu to trigger Filmora to analyze and sort out the shaky issues on the video. Then, press the Play button to begin the preview and simultaneously you must work on the Smooth Level slider to adjust the values for the correct position to acquire the desired outcomes.
Finally, save the changes of the modified Smooth level attribute in the Stabilization settings. By modifying this value, you can sort out the shaky and distorted clippings effectively.
You can then proceed with the further editing options by adding filter effects, transition effects and titles to enhance the overall appearance of the videos. Now, the distorted and shaky images on the videos are restored to a stable format in no time using this awesome program.
Part 4: Extensive reading: How to shoot a stabilized video in the first place?
Using the built-in features of the gadgets, you can capture a stabilized videos in no time. Instead of working on the clippings after the shoot, you can set the perfect parameters optimally to overcome the shaky and distorted moves during the shooting stage.
There are ample settings are available with the latest gadgets to work on every detail of the video clips for better results. The optimal image stabilization feature is included with fewer models of iPhone camera lenses.
Use an iPhone
There is a sensor-shift image stabilization is available with three models of iPhone. These features help in shooting videos in a stabilized manner without any shaky effects.
The iPhone 12 Pro Max has an in-built stabilizing technology that alters the camera’s sensors instead of working on its lens. Dual optical image stabilization makes sure that the images are perfectly shot without any distortions. You can implement all these in-built features in the iPhone to capture flawless videos quickly.
Use DJ pocket 2
DJ pocket 2 is designed to settle the problem in filming. Use this single-handed tiny camera to stabilize movement as well as take smooth videos.
After capturing from these gadgets, you do not require any special tools to work on the shaky clippings on your videos. Through effective practice you can excel in taking videos even on your Android gadgets, You must learn to hold the phone steadily and enable the autofocus option to concentrate on a specific event that is happening right at that moment. You can also try different shooting modes to ensure stabilization in the recorded videos.
Conclusion
Thus, this article had given a better understanding of the stabilization concepts on videos. You had an enlightening discussion about the effective methods to handle the shaky clipping precisely and sort out the perfect applications to fix them. Use the Final Cut Pro tool to resolve any camera shooting issues quickly.
This app works on every detail on the shaky clippings and modifies the associated attributes precisely without losing the data. Most video editors help to refine the overall flow of the videos and it does not affect the video story at any cost. The above-discussed applications are reliable and you can use them without any dilemma. Stay tuned to this article to learn more about the Final Cut Pro and the benefits of using its features on multimedia files to obtain the required outcomes.
Liza Brown
Liza Brown is a writer and a lover of all things video.
Follow @Liza Brown
Also read:
- 2024 Approved The Ultimate List 10 Best Animated Text Generators for Any Project
- New 2024 Approved Young Filmmakers Unleashed A Kids Guide to Movie Creation
- Updated 2024 Approved Revolutionize Your Workflow Top 10 Must-Have Plugins for Final Cut Pro X
- Updated In 2024, Make Your Memories Shine A Final Cut Pro Slideshow Creation Guide
- No Strings Attached Top 10 Free Online Video Editors with No Watermark for 2024
- New Jaycut 2023 The Ultimate Guide to Free Online Video Editing Software for 2024
- Updated The Ultimate Guide to Video Brightening Top Apps for Android and iOS for 2024
- Updated Take Your Video Editing to the Next Level with 64-Bit Power
- 2024 Approved Xfinity vs TiVo A Comprehensive Comparison of DVR Options
- Updated 2024 Approved Top 10 Music Video Creation Tools for Stunning Visuals
- Updated In 2024, Get iMovie-Like Features on Android with These 10 Alternative Apps
- Updated Vertical Video Victory Tips for Seamless Social Media Sharing for 2024
- New Shaky Video? Fix It for Free 8 Best Online Video Stabilizers for 2024
- Updated In 2024, The Wait Is Over Filmora X Unveils ARM Support
- New From Zero to Hero Beginner-Friendly Video Editors for 2024
- New Mastering Jump Cuts in Final Cut Pro X A Step-by-Step Guide for 2024
- Updated 2024 Approved From Hobbyist to Pro The Best Free and Paid 3D Animation Tools
- 2024 Approved Unlock FCPX Potential 10 Must-Have Plugins
- Updated 2024 Approved The Kids Movie Maker Handbook Tips, Tricks, and Fun
- New Say Goodbye to Clutter How to Convert DVDs to Digital Files for 2024
- 2024 Approved Virtualdub Is It the Best Video Editor? Exploring Top Alternatives
- New Reaction Video Software The Top 5 Picks
- Updated In 2024, Color Correction in Final Cut Pro
- New 2024 Approved From Digital to Physical Burn Videos to DVDs in 3 Simple Steps
- Updated Ultimate Tutorial Mastering Online Video Editing and Downloading
- In 2024, Uncomplicate Your Workflow 5 Free Online Tone Tools
- New Elevate Your LinkedIn Content The Importance of Optimal Video Aspect Ratios for 2024
- Updated In 2024, Fast and Free Top Facebook to MP3 Conversion Tools Online
- In 2024, Split Your MPEG Videos Like a Pro Top 5 Free Tools
- 2024 Approved MOD Video Editing on a Budget The Best Free Options
- New 2024 Approved Instagram Video Resolution How to Choose the Right Size
- Updated In 2024, YouTube to MP3 Conversion Made Easy Top Tools and Tricks
- New In 2024, Pixel Perfect Calculating Aspect Ratios Made Easy
- New In 2024, Best Free VOB Video Editing Software for Beginners
- Mobile Masterpieces Best Video Invitation Creators for iOS and Android for 2024
- New The Ultimate Mp3 Converter Windows Resource Why You Need to Read This for 2024
- Updated Video Pace Control A Beginners Guide to Camtasia Speed Adjustment
- Updated In 2024, Get Noticed on YouTube Effective Thumbnail Sizes and Designs
- Updated In 2024, Live Photo Maker Top Apps and Step-by-Step Instructions
- Planning to Use a Pokemon Go Joystick on Motorola Moto G34 5G? | Dr.fone
- How To Remove Screen Lock PIN On Xiaomi Redmi K70E Like A Pro 5 Easy Ways
- Apple ID Unlock From iPhone 11 Pro Max? How to Fix it?
- In 2024, Top-Notch Solutions for Disabled Apple ID On iPhone 8 Plus Making It Possible
- 2024 Approved Best 15 Female Anime Characters-Who Is Your Favorite?
- Top 4 SIM Location Trackers To Easily Find Your Lost Samsung Galaxy A05s Device
- Repair Video Tool - Repair all your damaged video files of C55 on Mac
- What are Location Permissions Life360 On Realme 11 Pro? | Dr.fone
- Can’t view HEVC H.265 content on Redmi 12 5G
- In 2024, Process of Screen Sharing Xiaomi Redmi 13C 5G to PC- Detailed Steps | Dr.fone
- In 2024, How to Unlock Apple ID On your iPhone 12 without Security Questions?
- How to Show Wi-Fi Password on Vivo Y100i
- In 2024, Dose Life360 Notify Me When Someone Checks My Location On Lava Blaze 2? | Dr.fone
- In 2024, How To Do Infinix Hot 40 Screen Sharing | Dr.fone
- Fixes for Apps Keep Crashing on Vivo X Fold 2 | Dr.fone
- Easy Ways to Manage Your Vivo Y100 5G Location Settings | Dr.fone
- 4 solution to get rid of pokemon fail to detect location On Nokia G22 | Dr.fone
- In 2024, Delete Gmail Account With/Without Password On Samsung Galaxy S23+
- Updated The Ultimate Guide to GoPro Quik and Its PC Counterparts
- In 2024, How To Unlock Any Oppo Find N3 Phone Password Using Emergency Call
- What To Do When Realme Narzo N55 Has Black Screen of Death? | Dr.fone
- How to Change Location on TikTok to See More Content On your Apple iPhone 12 Pro | Dr.fone
- In 2024, Top 12 Prominent Poco X6 Fingerprint Not Working Solutions
- How to Transfer Photos from Samsung Galaxy M14 4G to New Android? | Dr.fone
- How to Exit Android Factory Mode On Xiaomi Redmi 13C 5G? | Dr.fone
- Pokemon Go Error 12 Failed to Detect Location On Nokia C22? | Dr.fone
- Can I Remove the Apple Watch Activation Lock By Apple iPhone 14 Pro Max without the Previous Owner?
- Top 9 Oppo A1 5G Monitoring Apps for Parental Controls | Dr.fone
- Vivo S17 Pro Stuck on Screen – Finding Solutions For Stuck on Boot | Dr.fone
- In 2024, How can I get more stardust in pokemon go On Apple iPhone 15 Pro Max? | Dr.fone
- 3 Best Tools to Hard Reset Nubia Z50S Pro | Dr.fone
- In 2024, How To Remove or Bypass Knox Enrollment Service On Xiaomi
- In 2024, How To Use Allshare Cast To Turn On Screen Mirroring On Nubia Red Magic 8S Pro | Dr.fone
- What You Need To Know To Improve Your Motorola Moto G13 Hard Reset | Dr.fone
- Getting the Pokemon Go GPS Signal Not Found 11 Error in Xiaomi Redmi 12 5G | Dr.fone
- In 2024, How to Unlock Vivo Y78 5G Phone without Any Data Loss
- Reasons why Pokémon GPS does not Work On Nubia Red Magic 9 Pro+? | Dr.fone
- In 2024, Can I Bypass a Forgotten Phone Password Of Vivo T2x 5G?
- Title: Updated Record Like a Pro Top 10 Webcam Software for Windows 10
- Author: Isabella
- Created at : 2024-05-19 13:03:10
- Updated at : 2024-05-20 13:03:10
- Link: https://video-creation-software.techidaily.com/updated-record-like-a-pro-top-10-webcam-software-for-windows-10/
- License: This work is licensed under CC BY-NC-SA 4.0.
