
:max_bytes(150000):strip_icc():format(webp)/Sonyplaystation5-dc53869451d7416cbb32881a35c3fc32.jpg)
Video Editing on a Shoestring Top Software for 2024
Video Editing on a Shoestring: Top Software
Best Cheap Yet Powerful Video Editing Software

Ollie Mattison
Mar 29, 2024• Proven solutions
The demand for video content on social media is at an all-time high. This also means that the quality of videos posted on social media matters a lot. With the right video editing software, you get the creative freedom to make attention-grabbing videos constantly. In this article, we are going to take you through seven of the most affordable video editing apps for Macs and PCs.
In this article
01 Part 1. Need for Video Editing Tools: Industry Statistics
02 Part 2. Video Editing Software for Less Than $100: Top 9 Best Tools
03 Part 3. Best Professional Video Editing Apps That Cost Under $300
Part 1. Need for Video Editing Tools: Industry Statistics
Statistics indicated the continued growth in the consumption of video content. There is also a significant increase in the use of video editing tools. Here are some notable figures:
- Video Editing Software market size was valued at US$4079.1 million in 2022 and is projected to reach US$5198.23 million by 2028
- An average person spends about 100 minutes per day watching online videos
- 54% of people want to see more video content from marketers
- Over 85% of internet users watch online videos each month
- 86% of businesses use video as a marketing too
- 93% of marketers who use video say that it’s an important part of their marketing strategy
- 80% of video marketers say video has directly helped increase sales
- An impressive 93% of companies report to acquire customers through social media
Top Affordable Video Editing Software: A Comparison Table
| Video Editing Tool | Compatibility | Pricing | Main Feature |
|---|---|---|---|
| Filmora (Top Recommend) | macOS, Windows, Android, iOS | Starts US$19.99 | AI-powered features; Supports all video file formats; Fit beginners and intermedia users |
| VideoPad | macOS, Windows | Starts US$24.90 | An impressive collection of transitions, visual effects, and text overlays |
| Adobe Premiere Elements | macOS, Windows | Lifetime license - US$99.99 | Adobe Sensei AI technology automatically creates slideshows and collages from photos and videos |
| Magix Movie Edit Pro | Windows | Lifetime license – Starts US$69.99 | More than 1500 visual effects to manipulate video clips |
| CyberLink PowerDirector Ultra | macOS, Windows | Lifetime license – Starts US$139.99 | Compatible with a number of plug-ins and video effect packs such as Boris FX or proDAD |
| Vegas Pro | Windows | Lifetime license – Starts US$119 | 360-degree and multi-camera video editing |
| Final Cut Pro X | macOS | Lifetime license – US$299 | Arrange video clips on the video editor’s magnetic timeline |
Part 2. Video Editing Software for Less Than $100: Top 9 Best Tools
You no longer need access to professional video editing apps if you want to process the footage recorded in the 4K resolution, apply the Chroma Key effect to a video clip, or color grade a video since there are several options that are available for less than a hundred dollars that allow you to do all these things and much more. Let’s take a look at some of the best video editing apps that are not going to burn a hole in your budget.
Please keep in mind that the list is in no particular order of ranking, and the price may vary over time.
1. Filmora
Thousands of gamers, YouTubers, and social media video creators are already using Filmora because it is loaded with powerful features that are remarkably easy to use. The visual effects, transitions, AI features, or music libraries contain hundreds of different options that enable Filmora’s users to enhance color in their videos, switch between two shots smoothly, or create soundtracks with royalty-free music.


Price:
- Subscription Plan: US$19.99 per month
- Cross-Platform Plan: US$69.99 per year
- Perpetual Plan: US$79.99
Compatibility: macOS, Windows, Android, iOS, iPad, online
What Makes Filmora Unique:
- AI-powered features for automated video creation and editing
- Supports nearly all video file formats
- Processes 4K videos recorded with GoPro cameras or Full HD videos s
- Export projects to YouTube or Vimeo directly
- Low learning curve and user-friendly interface
- Made to fit beginners and intermedia users
- Free to try
You can check the detailed introduction of Filmora to find out why you should choose Filmora to edit videos .
2. VideoPad Video Editor
Working with 3D video footage, applying visual effects to 360-degree videos, or exporting videos in the 4K resolution are only a few reasons why VideoPad is one of the best cross-platform video editing apps on the market. It also comes with a wide range of features to make your video editing experience straightforward. The app doesn’t offer free music, which can slightly limit your options if you don’t have your own music you can use as a soundtrack. However, VideoPad lets you record voice-overs with a push of a button and it features an audio effects library that contains hundreds of professional sound effects.

Price:
- Free demo version available
- Lifetime license - US$24.99 for a Home Edition
- Lifetime license – US$34.99 for a Master’s Edition
Compatibility: macOS, Windows
What Makes VideoPad Unique:
- Better control over transitions and other options.
- Easy to use for beginners
- Editing 360 videos with VideoPad is super easy
3. Adobe Premiere Elements
Adobe Premiere Elements is basically a lighter version of Adobe Premiere Pro that is aimed at social media video creators. Mastering the Adobe Premiere Elements won’t take too much of your time and it will enable you to produce captivating videos with ease.

Price:
- 30-day free trial
- Lifetime license - US$99.99
Compatibility: macOS, Windows
What Makes Adobe Premiere Elements Unique:
- The Adobe Sensei AI technology automatically creates slideshows and collages from photos and videos
- Creates highest quality video content
- Additional features like Face Detection, Shake Reduction, or Smart Trim
4. Magix Movie Edit Pro
Magix Movie Edit Pro provides several automatic program wizards that are designed to shorten the amount of time required to make a video. You can just choose one of the automatic programs, and import the footage you would like to include in a project and Magix Movie Edit Pro will do the rest for you.

Price:
- 30-day free trial
- Movie Studio Platinum - US$69.99 for a lifetime license
- Movie Studio Suite - US$79.99 for a lifetime license
- Movie Studio Ultimate - US$299 for a lifetime license
Compatibility: Windows
What Makes Magix Movie Edit Pro Unique:
- Automatic and manual video editing
- More than 1500 visual effects to manipulate video clips
- Multi-cam video editing option and 360-degree videos are available on the Pro Plus version.
5. CyberLink PowerDirector Ultra
You can hardly go wrong if you decide to purchase this award-winning video editing software, which features hundreds of video templates that enable you to make a new video in just a couple of minutes.

Price:
- 30-day free trial
- Perpetual License: US$139.99
- Annual Plan: US$74.99
Compatibility: Windows
What Makes CyberLink PowerDirector Ultra Unique:
- Automatic and manual video editing
- More than 1500 visual effects to manipulate video clips
- Multi-cam video editing option and 360-degree videos are available on the Pro Plus version.
Part 3. Best Professional Video Editing Apps That Cost Under $300
1. Vegas Pro
It is difficult to imagine a video editing task you can’t perform with Vegas Pro. This video editing software supports nearly all video file formats, so you can edit footage captured with almost all digital video cameras.

Price:
- Vegas Pro Edit – US$ 199-lifetime license
- Vegas Pro Suite – US$ 299-lifetime license
- Vegas Pro Post – US$ 399-lifetime license
Compatibility: Windows
What Makes Vegas Pro Unique:
- HDR color support
- 360-degree and multi-camera video editing
- A broad range of compositing modes
- Quick export directly to YouTube, Facebook, or Vimeo platforms.
2. Final Cut Pro X
There are so many reasons why industry professionals hold Final Cut Pro X in such high esteem. FCPX is undoubtedly an excellent choice for all filmmakers who need a wide spectrum of video editing tools to create movies that sweep audiences off their feet.

Price:
- 90-day free trial
- US$299.99 for a lifetime license
Compatibility: macOS
What Makes Final Cut Pro X Unique:
- Arrange video clips on the video editor’s magnetic timeline
- Organize huge numbers of files easily
- Creates stunning 2D and 3D motion graphics
- Color correction tools with complete control over the hue, saturation, and other color values
Conclusion
Purchasing video editing software is a long-term investment that will enable you to increase the quality of the videos you’re creating over time. This doesn’t mean that the videos you’re producing are going to become better overnight since most video editing apps only offer possibilities that can’t be properly utilized without proper video editing skills.
Well, If you haven’t decided which one to go for so far, I would strongly recommend Filmora to you. It’s free to try, you can download it with the buttons below, and click through to see if it matches your needs.
Ollie Mattison
Ollie Mattison is a writer and a lover of all things video.
Follow @Ollie Mattison
Ollie Mattison
Mar 29, 2024• Proven solutions
The demand for video content on social media is at an all-time high. This also means that the quality of videos posted on social media matters a lot. With the right video editing software, you get the creative freedom to make attention-grabbing videos constantly. In this article, we are going to take you through seven of the most affordable video editing apps for Macs and PCs.
In this article
01 Part 1. Need for Video Editing Tools: Industry Statistics
02 Part 2. Video Editing Software for Less Than $100: Top 9 Best Tools
03 Part 3. Best Professional Video Editing Apps That Cost Under $300
Part 1. Need for Video Editing Tools: Industry Statistics
Statistics indicated the continued growth in the consumption of video content. There is also a significant increase in the use of video editing tools. Here are some notable figures:
- Video Editing Software market size was valued at US$4079.1 million in 2022 and is projected to reach US$5198.23 million by 2028
- An average person spends about 100 minutes per day watching online videos
- 54% of people want to see more video content from marketers
- Over 85% of internet users watch online videos each month
- 86% of businesses use video as a marketing too
- 93% of marketers who use video say that it’s an important part of their marketing strategy
- 80% of video marketers say video has directly helped increase sales
- An impressive 93% of companies report to acquire customers through social media
Top Affordable Video Editing Software: A Comparison Table
| Video Editing Tool | Compatibility | Pricing | Main Feature |
|---|---|---|---|
| Filmora (Top Recommend) | macOS, Windows, Android, iOS | Starts US$19.99 | AI-powered features; Supports all video file formats; Fit beginners and intermedia users |
| VideoPad | macOS, Windows | Starts US$24.90 | An impressive collection of transitions, visual effects, and text overlays |
| Adobe Premiere Elements | macOS, Windows | Lifetime license - US$99.99 | Adobe Sensei AI technology automatically creates slideshows and collages from photos and videos |
| Magix Movie Edit Pro | Windows | Lifetime license – Starts US$69.99 | More than 1500 visual effects to manipulate video clips |
| CyberLink PowerDirector Ultra | macOS, Windows | Lifetime license – Starts US$139.99 | Compatible with a number of plug-ins and video effect packs such as Boris FX or proDAD |
| Vegas Pro | Windows | Lifetime license – Starts US$119 | 360-degree and multi-camera video editing |
| Final Cut Pro X | macOS | Lifetime license – US$299 | Arrange video clips on the video editor’s magnetic timeline |
Part 2. Video Editing Software for Less Than $100: Top 9 Best Tools
You no longer need access to professional video editing apps if you want to process the footage recorded in the 4K resolution, apply the Chroma Key effect to a video clip, or color grade a video since there are several options that are available for less than a hundred dollars that allow you to do all these things and much more. Let’s take a look at some of the best video editing apps that are not going to burn a hole in your budget.
Please keep in mind that the list is in no particular order of ranking, and the price may vary over time.
1. Filmora
Thousands of gamers, YouTubers, and social media video creators are already using Filmora because it is loaded with powerful features that are remarkably easy to use. The visual effects, transitions, AI features, or music libraries contain hundreds of different options that enable Filmora’s users to enhance color in their videos, switch between two shots smoothly, or create soundtracks with royalty-free music.
Price:
- Subscription Plan: US$19.99 per month
- Cross-Platform Plan: US$69.99 per year
- Perpetual Plan: US$79.99
Compatibility: macOS, Windows, Android, iOS, iPad, online
What Makes Filmora Unique:
- AI-powered features for automated video creation and editing
- Supports nearly all video file formats
- Processes 4K videos recorded with GoPro cameras or Full HD videos s
- Export projects to YouTube or Vimeo directly
- Low learning curve and user-friendly interface
- Made to fit beginners and intermedia users
- Free to try
You can check the detailed introduction of Filmora to find out why you should choose Filmora to edit videos .
2. VideoPad Video Editor
Working with 3D video footage, applying visual effects to 360-degree videos, or exporting videos in the 4K resolution are only a few reasons why VideoPad is one of the best cross-platform video editing apps on the market. It also comes with a wide range of features to make your video editing experience straightforward. The app doesn’t offer free music, which can slightly limit your options if you don’t have your own music you can use as a soundtrack. However, VideoPad lets you record voice-overs with a push of a button and it features an audio effects library that contains hundreds of professional sound effects.
Price:
- Free demo version available
- Lifetime license - US$24.99 for a Home Edition
- Lifetime license – US$34.99 for a Master’s Edition
Compatibility: macOS, Windows
What Makes VideoPad Unique:
- Better control over transitions and other options.
- Easy to use for beginners
- Editing 360 videos with VideoPad is super easy
3. Adobe Premiere Elements
Adobe Premiere Elements is basically a lighter version of Adobe Premiere Pro that is aimed at social media video creators. Mastering the Adobe Premiere Elements won’t take too much of your time and it will enable you to produce captivating videos with ease.
Price:
- 30-day free trial
- Lifetime license - US$99.99
Compatibility: macOS, Windows
What Makes Adobe Premiere Elements Unique:
- The Adobe Sensei AI technology automatically creates slideshows and collages from photos and videos
- Creates highest quality video content
- Additional features like Face Detection, Shake Reduction, or Smart Trim
4. Magix Movie Edit Pro
Magix Movie Edit Pro provides several automatic program wizards that are designed to shorten the amount of time required to make a video. You can just choose one of the automatic programs, and import the footage you would like to include in a project and Magix Movie Edit Pro will do the rest for you.
Price:
- 30-day free trial
- Movie Studio Platinum - US$69.99 for a lifetime license
- Movie Studio Suite - US$79.99 for a lifetime license
- Movie Studio Ultimate - US$299 for a lifetime license
Compatibility: Windows
What Makes Magix Movie Edit Pro Unique:
- Automatic and manual video editing
- More than 1500 visual effects to manipulate video clips
- Multi-cam video editing option and 360-degree videos are available on the Pro Plus version.
5. CyberLink PowerDirector Ultra
You can hardly go wrong if you decide to purchase this award-winning video editing software, which features hundreds of video templates that enable you to make a new video in just a couple of minutes.
Price:
- 30-day free trial
- Perpetual License: US$139.99
- Annual Plan: US$74.99
Compatibility: Windows
What Makes CyberLink PowerDirector Ultra Unique:
- Automatic and manual video editing
- More than 1500 visual effects to manipulate video clips
- Multi-cam video editing option and 360-degree videos are available on the Pro Plus version.
Part 3. Best Professional Video Editing Apps That Cost Under $300
1. Vegas Pro
It is difficult to imagine a video editing task you can’t perform with Vegas Pro. This video editing software supports nearly all video file formats, so you can edit footage captured with almost all digital video cameras.
Price:
- Vegas Pro Edit – US$ 199-lifetime license
- Vegas Pro Suite – US$ 299-lifetime license
- Vegas Pro Post – US$ 399-lifetime license
Compatibility: Windows
What Makes Vegas Pro Unique:
- HDR color support
- 360-degree and multi-camera video editing
- A broad range of compositing modes
- Quick export directly to YouTube, Facebook, or Vimeo platforms.
2. Final Cut Pro X
There are so many reasons why industry professionals hold Final Cut Pro X in such high esteem. FCPX is undoubtedly an excellent choice for all filmmakers who need a wide spectrum of video editing tools to create movies that sweep audiences off their feet.
Price:
- 90-day free trial
- US$299.99 for a lifetime license
Compatibility: macOS
What Makes Final Cut Pro X Unique:
- Arrange video clips on the video editor’s magnetic timeline
- Organize huge numbers of files easily
- Creates stunning 2D and 3D motion graphics
- Color correction tools with complete control over the hue, saturation, and other color values
Conclusion
Purchasing video editing software is a long-term investment that will enable you to increase the quality of the videos you’re creating over time. This doesn’t mean that the videos you’re producing are going to become better overnight since most video editing apps only offer possibilities that can’t be properly utilized without proper video editing skills.
Well, If you haven’t decided which one to go for so far, I would strongly recommend Filmora to you. It’s free to try, you can download it with the buttons below, and click through to see if it matches your needs.
Ollie Mattison
Ollie Mattison is a writer and a lover of all things video.
Follow @Ollie Mattison
Get the Job Done with These 10 Reliable Vegas Pro Alternatives for Mac
For creating high-grade dynamic videos, simply shooting or recording a clip is not enough. Finding the best Sony Ve gas alternatives for Mac is essential since the software mainly targets Windows users.
Thanks to developers, there are many free and paid options to start your video editing journey on a Mac. Let’s first have a look at alternative software you could consider.
- Lightworks
- Wondershare Filmora
- Adobe Premiere Pro
- HitFilm Express
- Kdenlive
- OpenShot
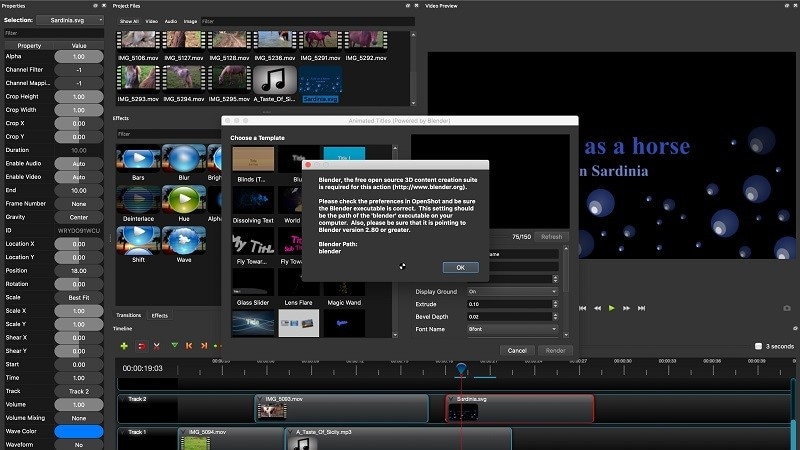
- Blender
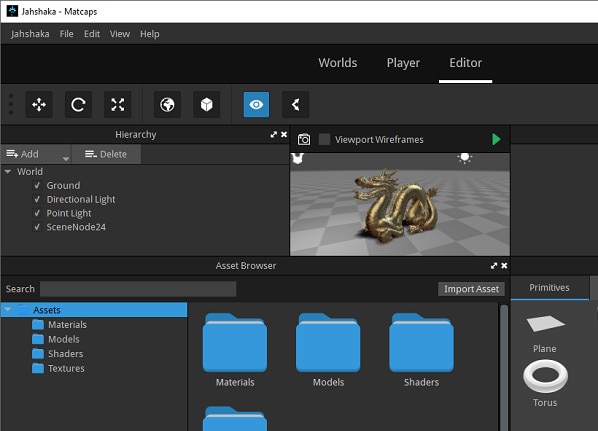
- Jahshaka
- Final Cut Pro
- Cyberlink PowerDirector 365
- What are the limitations when using Sony Vegas (Vegas Pro) on Mac?
- Hot FAQs about Vegas Pro Alternatives
Part 1: Sony Vegas Pro Alternatives & Competitors Overview
Here is a list of the top 10 tools we found after research. For an easier understanding, the following are the essential points of difference between alternative video editing software types for Sony Vegas Pro in a tabular form.
| Software | Supported OS | Price | Editor’s Verdict |
|---|---|---|---|
| Lightworks | Windows, Mac, Linux | Create-$9.99/month, Pro-$23.99/month | Medium-Difficult |
| Wondershare Filmora | Windows, Mac | Annual-$49.99, Perpetual-$79.99 | Easy |
| Adobe Premiere Pro | Windows, Mac | $20.99/month | Easy-Medium |
| HitFilm Express | Windows, Mac | Free | Easy |
| Kdenlive | Windows, Mac, Linux | Free | Medium-Difficult |
| OpenShot | Windows, Mac, Linux, OsX | Free | Medium-Difficult |
| Blender | Windows, Mac, Linux | Free | Easy |
| Jahshaka | Windows, Linux, OsX | Free | Easy-Medium |
| Final Cut Pro | Mac | Lifetime-$299.99 | Easy-Medium |
| Cyberlink PowerDirector 365 | Windows, Mac | Lifetime-$52.50 | Easy-Medium |
Part 2: Top 10 Sony Vegas (Vegas Pro) Alternatives & Competitors
Now that you know the primary differences between the Sony Vegas Pro alternatives. Are you find anything you like? Let’s move on to more details for your further consideration.
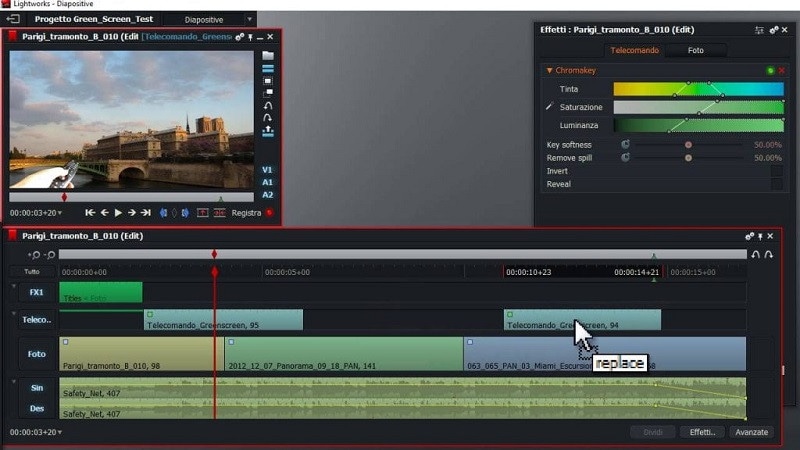
1. Lightworks
With Lightworks, using the independent timeline codec, format, and resolution alteration in videos is extremely simple. In addition, you can use the multi-cam editing feature for real-time, high-quality editing work. Moreover, drag and drop elements into videos for optimized video editing work, including pre-existing Storyboard points.
Main Features:
- Industry-grade features like QC, transcoding, and automated transfer are available.
- Edit files at different FPS limits and use three-point editing for recording/source files.
- Insert files and overwrite on a new project, replace, backfill, and fit to fill your video clips.
- Attach Storyboard tiles and match-frame clips/sub-clips easily.
Pros
- Flexible functionality and speedy transfers
- Edit files with professional movie-like quality
- Auto Sync feature for automatic timeline re-syncing is available
Cons
- Direct X is only available on the Windows version
- TotalFX plugin is not available for free- you have to upgrade to use them
OS Compatibility: Windows , Mac , Linux
Best For: Editing experts creating visually animated and professional-looking short videos can work with Lightworks.
What users say:
For professional-level video editing work, Lightworks brings a lot of resources and elements to users. According to reviews , people who have tried it have experienced better video editing functionality with these resources.
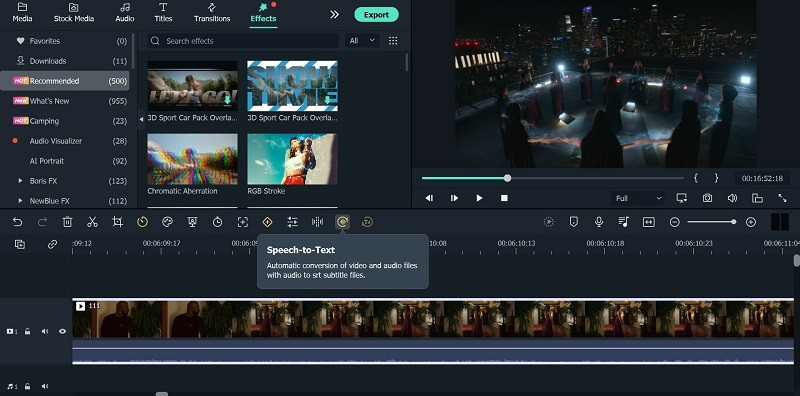
2. Wondershare Filmora
The top Vegas Pro alternative that both Windows and Mac users can opt for is Filmora. The software has advanced AI-incorporated editing functions for automated editing work, including preset effects from FX plugins. Besides that, you can easily add pre-set transitions, audio clips, text, images, and more.
Beginners find it simple to navigate through its interface and can opt for the Instant Mode function for automatic video edits .
Free Download For Win 7 or later(64-bit)
Free Download For macOS 10.14 or later

For a better idea of how this works, you should check out this tutorial video: https://filmora.wondershare.com/get-creative/make-a-video-quickly.html
Main Features:
- Instant Mode is available for automatic video/audio project editing out of 6 shorter clips.
- Support Advanced editing tools like Chroma Key and AI Portrait.
- Record voiceover, apply speech-to-text/text-to-speech functions, and more audio editing features.
- OpenFX plugins like BorisFX and NewBlue FX for a better list of pre-set effects.
Pros
- Simple to use and navigate on the editor timeline, especially with drag-and-drop support
- Output your editing files in different video/audio formats
- Quickly share the file on Vimeo or YouTube, besides downloading it on the local hard drive
Cons
- Free trial users cannot bring their Instant Mode-created videos into the editor timeline
- 4K support only with selected MKV, MOV, M4V (for Mac), and MP4 codecs
OS Compatibility: Windows , Mac
G2 Rating: 4.4 out of 5
Best For: All types of users like educators, students, homeowners, businesses, and video editors for comprehensive video editing tools and uses.
What users say:
Filmora is extremely simple to use, with advanced features available for top-level video editing work. Users mention in reviews how they have benefitted from the simple functionality and dynamic AI-based features available here for video editing.
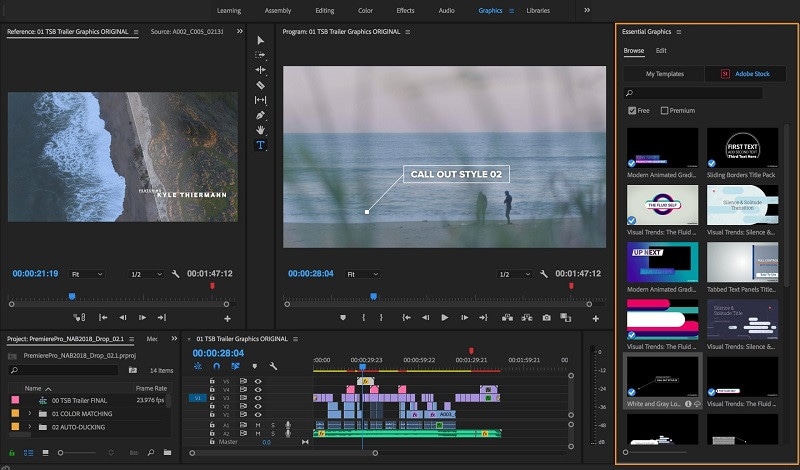
3. Adobe Premiere Pro
If you are looking for high-quality programs like Sony Vegas, Adobe Premiere Pro is a reliable choice. This editing software allows you to easily create, delete, and move big video projects. Moreover, you can work on multiple files simultaneously and use shortcuts for faster editing work.
Preset filters and editing features are also available here, especially if they choose the Adobe Creative Cloud option.
Main Features:
- Multiple pre-set transitions and effects are available for quick thematic changes.
- Add graphics, titles, and captions.
- Color grading and correction tools are available.
- It is possible to add keyframing and animation elements.
Pros
- Opting for group plans for video editing practice and learning using Adobe Premiere Pro is possible
- Aligns audio with videos instantly during editing
- Utilize Quick Export functionality for video files in some taps
Cons
- Windows High Contrast Mode is supported but to a limited extent, like with menus and title bars
- HDR workflows can only be handled on the Windows version with DisplayHDR 400 support
OS Compatibility: Windows , Mac
G2 Rating: 4.5 out of 5
Best For: Professional editors and trainers can use the various plans under Adobe Premiere Pro for video/audio editing.
What users say:
Advertisers and videographers enjoy high-grade video editing features and like the simple effects and interface quality. The motion graphics support in Adobe Premiere Pro is high-grade as well.
4. HitFilm Express
A capable Sony Vegas free alternative that you should check out is HitFilm Express. With this, you can expect many prepared designs for quick video edits. Additionally, you can manually customize the video files you are working on with high-grade personalization features available in the timeline.

Main Features:
- Pre-set customizable designs are available.
- Built-in sound effects and soundtracks are usable for free.
- Cache renders in timelines are optimized.
- The New Grade Clips feature allows users to apply varying effects to many video clips.
Pros
- Stable process of switching between timelines with an active orbit tool
- Easy to switch between 2D/3D timelines while using the text tool
- Simple to use for an unlimited period
Cons
- Does not work on older versions than Windows 10 and macOS 10.14
- Users cannot integrate this with Vegas Pro like before
OS Compatibility: Windows , Mac
TechRadar Rating: 4.5 out of 5
Best For: This software is a high-quality video editor for custom video editing work, fit for beginners and professionals alike.
What users say:
HitFilm Express is easy to use and efficient in the market for professional-level editing. The tutorial is available here for quick learning about the steps, and expandable features are well-admired by users.
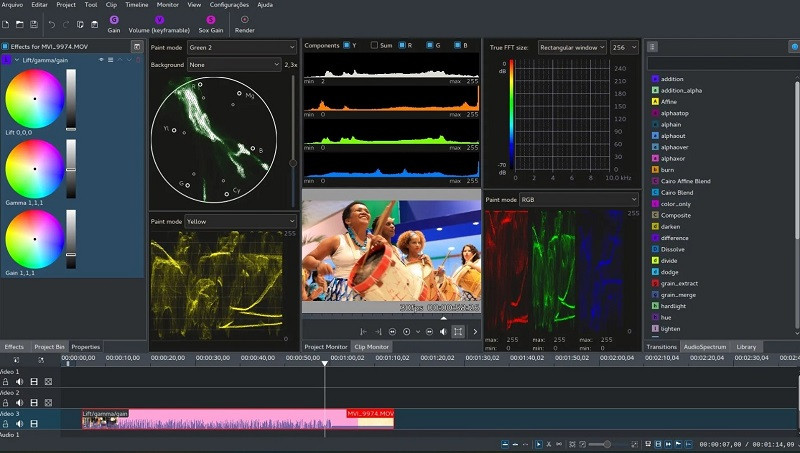
5. Kdenlive
A high-quality Sony Vegas open-source variety that you should seriously consider is Kdenlive. The video editor comes with MLT framework support and holds many tools for optimizing video editing.
To simplify, you can arrange and adjust various video/audio tracks and mute or lock specific ones as needed. Add everything from filters, texts, and transitions using this editor for high-grade video projects.
Main Features:
- Get an automatic backup of your video project while you are editing it.
- Use proxy editing to create low-resolution source clip copies and render them later on computers.
- Multiple video/audio scopes are available for monitoring projects like vectorscope, waveform, and RDB Parade.
- Many transition and effect choices to use.
Pros
- Flexibility with themes to add with multiple options
- Pre-render specific timeline parts for preview
- Effects are simple to use with keyframing quality
Cons
- Complex for completely non-technical users to adapt to
- Only supports 64-bit versions in regards to Windows-based compatibility
Trustpilot Rating: 3.7 out of 5
Best For: High-level editing experts who need strong video editing and monitoring features in an open-source platform.
What users say:
Kdenlive, as an open-source video editing software, assures quick and straightforward usability with projects. Per reviews , users like the ability to make simple video edits without bugs in this editor and quickly export finished projects.
6. OpenShot
OpenShot is a high-quality cross-platform video editor that you can use on different devices for quick but dynamic video project edits. Use keyframing ability here to adjust the animated elements you add to the file.
Moreover, cut the videos with simple steps and add many audio tracks/background videos/watermarks in layers. Also, get several video effects to optimize the video look easily.
Main Features:
- Adjust video speed in reverse motion, fast forward, and slow motion.
- Render effects and 3D animated elements into the video project.
- Get title templates and edit them as needed.
- Visualize the background audio beats with waveform support.
Pros
- Very user-friendly interface with a simple navigation guarantee
- Supports more than 70 languages that you can translate as well using LaunchPad
- Drag-and-drop functionality is supported for adding images, audio, and videos into the OpenShot editor timeline
Cons
- Some bug issues can occur
- Slightly complex learning curve
OS Compatibility: Windows , Linux , OsX
G2 Rating: 4.4 out of 5
Best For: Professional-level video editing experts can opt for this cross-platform free software for high-quality video creations.
What users say:
The OpenShot software is suitable for high-quality video editing across different devices and operating systems. Users like the lack of automated watermarks on all videos, its simple dashboard, and its multi-track editing ability, all available for free.
7. Blender
Blender is free video editing software like Sony Vegas that users can use for video editing, but it is also effective for game development with animations. Indeed, you can create and render dynamic-looking scenes with features like Cycles.
Furthermore, the software has a rich modelling toolset with solutions like curves and sculpting tools.

Main Features:
- Completely customization-friendly UI, shortcuts, and window layout here.
- Customization and scripting are possible to do with this software due to the Python API support.
- Supports access and integration of many pipeline tools for projects.
- Comes with advanced simulation-based features available in MantaFlow and Bullet libraries.
Pros
- Basic and advanced tools for quick video edits
- Strong composition and masking ability with object-based motion tracking benefits
- Easily create short animations with Blender
Cons
- Data under the standalone games created here fall under GPL conditions
- Strict licensing rules are applicable here
OS Compatibility: Windows , Mac , Linux
G2 Rating: 4.5 out of 5
Best For: Game developers and videographers for companies can use this open-source platform for creation and editing.
What users say:
Blender is a capable software for animation-based editing, with high-quality game-based features and interactive elements that make editing simple. As per reviews , users like the simple animation-based tools and fast rendering it offers.
8. Jahshaka
Users of Jahshaka can experience an inclusive, collaborative environment for metaverse-level editing work. This free editing software, like Sony Vegas, focuses mainly on VR-based editing functions and comes with powerful tools for project management and content creation.
Take the help of other team members to collaborate on dynamic virtual world building, editing, and publishing.
Main Features:
- Compatible player for different desktop and mobile devices.
- Create diversified worlds and scenes with one comprehensive platform.
- Immersive software 3D video development.
- Access to pre-built content and libraries of scenes and assets
Pros
- Easily share and distribute your virtual projects
- Deliver final projects offline and online
- An interactive multi-user engine is available
Cons
- Usable for a niche audience and does not include standard video editing tools
- Jahshaka V2 legacy support is no longer active
OS Compatibility: Windows , Linux , OsX
SourceForge Rating: 4.4 out of 5
Best For: Professional video editors who want a collaborative experience in VR-based development and publishing.
What users say:
Jahshaka is a suitable program for optimized VR-based editing with many preset features and themes to choose from. Most users enjoy the new features and worlds and can work with them efficiently.
9. Final Cut Pro
One of the top Sony Vegas alternatives Mac users can safely turn to is Final Cut Pro, which has powerful modern video editing features. With this software, you will access Cinematic Mode, which you can use to create stylish and thematic video scenes.
Similarly, the Object Tracker features utilize ML technology to automatically detect objects and faces in moving videos. It can align effects and titles accurately with the graphical elements in videos.

Main Features:
- Object Tracker feature for using color correction and adding texts into moving videos.
- Accelerated functional for motion tracking with Apple Neural Engine.
- Add high-quality effects and titles into videos with Cinematic Mode support.
- Preset audio tracks and royalty-free sound effects are available for editing.
Pros
- Handle color grading for optimized scene quality
- Adjust the field depth and focus depth in clips
- Share projects across iOS and macOS platforms
Cons
- Not valid for Windows users
- Relatively high cost to avail the paid version with all advanced features
OS Compatibility: Mac
TrustRadius Rating: 4.8 out of 5
Best For: Professional video editors, students, and filmmakers who want to create cinematic-quality video projects.
What users say:
Final Cut Pro is an efficient Mac-based video editing tool with easy sharing and editing capabilities, rich effects/transitions options, and fast rendering ability. Customers enjoy the intuitive non-linear editor, easy accessibility to social media platforms for file exporting, and live scrubbing, as noted in one review .
10. Cyberlink PowerDirector 365
Another Sony Vegas mac alternative for Windows you should give a try is PowerDirector 365 from Cyberlink. This software removes or compiles video clips and uses masking features like image/custom masks.
Preset special effects, blending modes, and sound effects are available here for quick editing. Additionally, the AI-powered Motion Tracking traces objects in clips and adds graphics, animations, and text quickly in line with it.

Main Features:
- You can create and remove videos with masking features.
- Drag and drop the pre-set effects and texts into videos.
- Adjust video clips with tools for border, gradation, and shadowing.
- Multiple animations, callouts, graphics, and stickers to add to videos.
Pros
- Use green screen functionality for quick background removal or editing
- Automatic audio mastering and mixing functionality are available
- Keyframing benefits for customized animations like scaling and positioning
Cons
- Dolby Digital-centric audio codec is not available for users
- Users can try features like Room Echo Removal and NVIDIA A/V Denoise only on Windows 11
OS Compatibility: Windows
TechRadar Rating: 4.5 out of 5
Best For: Professional videographers and regular users who want a Windows-based video editing software for standard video clip editing.
What users say:
Cyberlink PowerDirector is a powerful video editor with standard editing functions many users have tried and benefited from. According to customers , the program has high-quality video and audio editing benefits for presentations, with additional effects/splitting/cropping features.
Part 3: What are the limitations when using Sony Vegas (Vegas Pro) on Mac?
Yes, with the given Sony Vegas alternatives, Mac and Windows users can benefit heavily. But why is it important to try for a replacement when Sony Vegas Pro is relatively efficient software?
To know the answer, you should take the time to understand its limitations, which do exist.
It only works for Windows users
The Sony Vegas Pro software is not available for Mac or other operating systems besides Windows. In addition, it’ll be really complex and time-consuming, even if you opt for virtual machine software or handle dual booting techniques to configure the software on your Mac or Linux.
You need to invest in other hardware
Sony Vegas Pro does do not work within one comprehensive platform like other capable video editing software types, like Wondershare Filmora . You have to acquire a powerful PC and tools to operate it separately. The software works very slowly on older devices.
Not incredibly unique
The functions of Sony Vegas Pro match somewhat with other options in the market. So, users would not expect much value in purchasing this software’s plans that they want to upgrade from their previous system, but on the other hand, the available features are mostly standard-level in functionality as well.
Hot FAQs about Vegas Pro Alternatives
After knowing these details, many users still have specific common queries about opting for a Sony Vegas Pro alternatively. So these are some common FAQs about this- answered.
1. Can Sony Vegas be used on a Mac?
No, it is impossible to directly use Sony Vegas on macOS devices since it does not support it. Instead, you have to separately use a dual boot strategy or virtual machine software to activate the video editor on Mac devices, but the process for that is complex.
2. Is Wondershare Filmora or Vegas Pro better?
Wondershare Filmora and Vegas Pro are top-level options in video and audio editing projects with professional-level editing accuracy. However, Filmora has a cohesive ecosystem with rich AI and standard functions and comes with Mac/Windows support. So, in that sense, Filmora is comparatively a better choice.
Final Words
In place of Sony Vegas Pro, any of these options would also give you a great user experience. Out of them, Filmora is one that we will recommend due to its multi-faceted benefits and features for Mac and Windows users. Ultimately, make your decision based on your particular needs.
Free Download For Win 7 or later(64-bit)
Free Download For macOS 10.14 or later
Part 1: Sony Vegas Pro Alternatives & Competitors Overview
Here is a list of the top 10 tools we found after research. For an easier understanding, the following are the essential points of difference between alternative video editing software types for Sony Vegas Pro in a tabular form.
| Software | Supported OS | Price | Editor’s Verdict |
|---|---|---|---|
| Lightworks | Windows, Mac, Linux | Create-$9.99/month, Pro-$23.99/month | Medium-Difficult |
| Wondershare Filmora | Windows, Mac | Annual-$49.99, Perpetual-$79.99 | Easy |
| Adobe Premiere Pro | Windows, Mac | $20.99/month | Easy-Medium |
| HitFilm Express | Windows, Mac | Free | Easy |
| Kdenlive | Windows, Mac, Linux | Free | Medium-Difficult |
| OpenShot | Windows, Mac, Linux, OsX | Free | Medium-Difficult |
| Blender | Windows, Mac, Linux | Free | Easy |
| Jahshaka | Windows, Linux, OsX | Free | Easy-Medium |
| Final Cut Pro | Mac | Lifetime-$299.99 | Easy-Medium |
| Cyberlink PowerDirector 365 | Windows, Mac | Lifetime-$52.50 | Easy-Medium |
Part 2: Top 10 Sony Vegas (Vegas Pro) Alternatives & Competitors
Now that you know the primary differences between the Sony Vegas Pro alternatives. Are you find anything you like? Let’s move on to more details for your further consideration.
1. Lightworks
With Lightworks, using the independent timeline codec, format, and resolution alteration in videos is extremely simple. In addition, you can use the multi-cam editing feature for real-time, high-quality editing work. Moreover, drag and drop elements into videos for optimized video editing work, including pre-existing Storyboard points.
Main Features:
- Industry-grade features like QC, transcoding, and automated transfer are available.
- Edit files at different FPS limits and use three-point editing for recording/source files.
- Insert files and overwrite on a new project, replace, backfill, and fit to fill your video clips.
- Attach Storyboard tiles and match-frame clips/sub-clips easily.
Pros
- Flexible functionality and speedy transfers
- Edit files with professional movie-like quality
- Auto Sync feature for automatic timeline re-syncing is available
Cons
- Direct X is only available on the Windows version
- TotalFX plugin is not available for free- you have to upgrade to use them
OS Compatibility: Windows , Mac , Linux
Best For: Editing experts creating visually animated and professional-looking short videos can work with Lightworks.
What users say:
For professional-level video editing work, Lightworks brings a lot of resources and elements to users. According to reviews , people who have tried it have experienced better video editing functionality with these resources.
2. Wondershare Filmora
The top Vegas Pro alternative that both Windows and Mac users can opt for is Filmora. The software has advanced AI-incorporated editing functions for automated editing work, including preset effects from FX plugins. Besides that, you can easily add pre-set transitions, audio clips, text, images, and more.
Beginners find it simple to navigate through its interface and can opt for the Instant Mode function for automatic video edits .
Free Download For Win 7 or later(64-bit)
Free Download For macOS 10.14 or later
For a better idea of how this works, you should check out this tutorial video: https://filmora.wondershare.com/get-creative/make-a-video-quickly.html
Main Features:
- Instant Mode is available for automatic video/audio project editing out of 6 shorter clips.
- Support Advanced editing tools like Chroma Key and AI Portrait.
- Record voiceover, apply speech-to-text/text-to-speech functions, and more audio editing features.
- OpenFX plugins like BorisFX and NewBlue FX for a better list of pre-set effects.
Pros
- Simple to use and navigate on the editor timeline, especially with drag-and-drop support
- Output your editing files in different video/audio formats
- Quickly share the file on Vimeo or YouTube, besides downloading it on the local hard drive
Cons
- Free trial users cannot bring their Instant Mode-created videos into the editor timeline
- 4K support only with selected MKV, MOV, M4V (for Mac), and MP4 codecs
OS Compatibility: Windows , Mac
G2 Rating: 4.4 out of 5
Best For: All types of users like educators, students, homeowners, businesses, and video editors for comprehensive video editing tools and uses.
What users say:
Filmora is extremely simple to use, with advanced features available for top-level video editing work. Users mention in reviews how they have benefitted from the simple functionality and dynamic AI-based features available here for video editing.
3. Adobe Premiere Pro
If you are looking for high-quality programs like Sony Vegas, Adobe Premiere Pro is a reliable choice. This editing software allows you to easily create, delete, and move big video projects. Moreover, you can work on multiple files simultaneously and use shortcuts for faster editing work.
Preset filters and editing features are also available here, especially if they choose the Adobe Creative Cloud option.
Main Features:
- Multiple pre-set transitions and effects are available for quick thematic changes.
- Add graphics, titles, and captions.
- Color grading and correction tools are available.
- It is possible to add keyframing and animation elements.
Pros
- Opting for group plans for video editing practice and learning using Adobe Premiere Pro is possible
- Aligns audio with videos instantly during editing
- Utilize Quick Export functionality for video files in some taps
Cons
- Windows High Contrast Mode is supported but to a limited extent, like with menus and title bars
- HDR workflows can only be handled on the Windows version with DisplayHDR 400 support
OS Compatibility: Windows , Mac
G2 Rating: 4.5 out of 5
Best For: Professional editors and trainers can use the various plans under Adobe Premiere Pro for video/audio editing.
What users say:
Advertisers and videographers enjoy high-grade video editing features and like the simple effects and interface quality. The motion graphics support in Adobe Premiere Pro is high-grade as well.
4. HitFilm Express
A capable Sony Vegas free alternative that you should check out is HitFilm Express. With this, you can expect many prepared designs for quick video edits. Additionally, you can manually customize the video files you are working on with high-grade personalization features available in the timeline.
Main Features:
- Pre-set customizable designs are available.
- Built-in sound effects and soundtracks are usable for free.
- Cache renders in timelines are optimized.
- The New Grade Clips feature allows users to apply varying effects to many video clips.
Pros
- Stable process of switching between timelines with an active orbit tool
- Easy to switch between 2D/3D timelines while using the text tool
- Simple to use for an unlimited period
Cons
- Does not work on older versions than Windows 10 and macOS 10.14
- Users cannot integrate this with Vegas Pro like before
OS Compatibility: Windows , Mac
TechRadar Rating: 4.5 out of 5
Best For: This software is a high-quality video editor for custom video editing work, fit for beginners and professionals alike.
What users say:
HitFilm Express is easy to use and efficient in the market for professional-level editing. The tutorial is available here for quick learning about the steps, and expandable features are well-admired by users.
5. Kdenlive
A high-quality Sony Vegas open-source variety that you should seriously consider is Kdenlive. The video editor comes with MLT framework support and holds many tools for optimizing video editing.
To simplify, you can arrange and adjust various video/audio tracks and mute or lock specific ones as needed. Add everything from filters, texts, and transitions using this editor for high-grade video projects.
Main Features:
- Get an automatic backup of your video project while you are editing it.
- Use proxy editing to create low-resolution source clip copies and render them later on computers.
- Multiple video/audio scopes are available for monitoring projects like vectorscope, waveform, and RDB Parade.
- Many transition and effect choices to use.
Pros
- Flexibility with themes to add with multiple options
- Pre-render specific timeline parts for preview
- Effects are simple to use with keyframing quality
Cons
- Complex for completely non-technical users to adapt to
- Only supports 64-bit versions in regards to Windows-based compatibility
Trustpilot Rating: 3.7 out of 5
Best For: High-level editing experts who need strong video editing and monitoring features in an open-source platform.
What users say:
Kdenlive, as an open-source video editing software, assures quick and straightforward usability with projects. Per reviews , users like the ability to make simple video edits without bugs in this editor and quickly export finished projects.
6. OpenShot
OpenShot is a high-quality cross-platform video editor that you can use on different devices for quick but dynamic video project edits. Use keyframing ability here to adjust the animated elements you add to the file.
Moreover, cut the videos with simple steps and add many audio tracks/background videos/watermarks in layers. Also, get several video effects to optimize the video look easily.
Main Features:
- Adjust video speed in reverse motion, fast forward, and slow motion.
- Render effects and 3D animated elements into the video project.
- Get title templates and edit them as needed.
- Visualize the background audio beats with waveform support.
Pros
- Very user-friendly interface with a simple navigation guarantee
- Supports more than 70 languages that you can translate as well using LaunchPad
- Drag-and-drop functionality is supported for adding images, audio, and videos into the OpenShot editor timeline
Cons
- Some bug issues can occur
- Slightly complex learning curve
OS Compatibility: Windows , Linux , OsX
G2 Rating: 4.4 out of 5
Best For: Professional-level video editing experts can opt for this cross-platform free software for high-quality video creations.
What users say:
The OpenShot software is suitable for high-quality video editing across different devices and operating systems. Users like the lack of automated watermarks on all videos, its simple dashboard, and its multi-track editing ability, all available for free.
7. Blender
Blender is free video editing software like Sony Vegas that users can use for video editing, but it is also effective for game development with animations. Indeed, you can create and render dynamic-looking scenes with features like Cycles.
Furthermore, the software has a rich modelling toolset with solutions like curves and sculpting tools.
Main Features:
- Completely customization-friendly UI, shortcuts, and window layout here.
- Customization and scripting are possible to do with this software due to the Python API support.
- Supports access and integration of many pipeline tools for projects.
- Comes with advanced simulation-based features available in MantaFlow and Bullet libraries.
Pros
- Basic and advanced tools for quick video edits
- Strong composition and masking ability with object-based motion tracking benefits
- Easily create short animations with Blender
Cons
- Data under the standalone games created here fall under GPL conditions
- Strict licensing rules are applicable here
OS Compatibility: Windows , Mac , Linux
G2 Rating: 4.5 out of 5
Best For: Game developers and videographers for companies can use this open-source platform for creation and editing.
What users say:
Blender is a capable software for animation-based editing, with high-quality game-based features and interactive elements that make editing simple. As per reviews , users like the simple animation-based tools and fast rendering it offers.
8. Jahshaka
Users of Jahshaka can experience an inclusive, collaborative environment for metaverse-level editing work. This free editing software, like Sony Vegas, focuses mainly on VR-based editing functions and comes with powerful tools for project management and content creation.
Take the help of other team members to collaborate on dynamic virtual world building, editing, and publishing.
Main Features:
- Compatible player for different desktop and mobile devices.
- Create diversified worlds and scenes with one comprehensive platform.
- Immersive software 3D video development.
- Access to pre-built content and libraries of scenes and assets
Pros
- Easily share and distribute your virtual projects
- Deliver final projects offline and online
- An interactive multi-user engine is available
Cons
- Usable for a niche audience and does not include standard video editing tools
- Jahshaka V2 legacy support is no longer active
OS Compatibility: Windows , Linux , OsX
SourceForge Rating: 4.4 out of 5
Best For: Professional video editors who want a collaborative experience in VR-based development and publishing.
What users say:
Jahshaka is a suitable program for optimized VR-based editing with many preset features and themes to choose from. Most users enjoy the new features and worlds and can work with them efficiently.
9. Final Cut Pro
One of the top Sony Vegas alternatives Mac users can safely turn to is Final Cut Pro, which has powerful modern video editing features. With this software, you will access Cinematic Mode, which you can use to create stylish and thematic video scenes.
Similarly, the Object Tracker features utilize ML technology to automatically detect objects and faces in moving videos. It can align effects and titles accurately with the graphical elements in videos.
Main Features:
- Object Tracker feature for using color correction and adding texts into moving videos.
- Accelerated functional for motion tracking with Apple Neural Engine.
- Add high-quality effects and titles into videos with Cinematic Mode support.
- Preset audio tracks and royalty-free sound effects are available for editing.
Pros
- Handle color grading for optimized scene quality
- Adjust the field depth and focus depth in clips
- Share projects across iOS and macOS platforms
Cons
- Not valid for Windows users
- Relatively high cost to avail the paid version with all advanced features
OS Compatibility: Mac
TrustRadius Rating: 4.8 out of 5
Best For: Professional video editors, students, and filmmakers who want to create cinematic-quality video projects.
What users say:
Final Cut Pro is an efficient Mac-based video editing tool with easy sharing and editing capabilities, rich effects/transitions options, and fast rendering ability. Customers enjoy the intuitive non-linear editor, easy accessibility to social media platforms for file exporting, and live scrubbing, as noted in one review .
10. Cyberlink PowerDirector 365
Another Sony Vegas mac alternative for Windows you should give a try is PowerDirector 365 from Cyberlink. This software removes or compiles video clips and uses masking features like image/custom masks.
Preset special effects, blending modes, and sound effects are available here for quick editing. Additionally, the AI-powered Motion Tracking traces objects in clips and adds graphics, animations, and text quickly in line with it.
Main Features:
- You can create and remove videos with masking features.
- Drag and drop the pre-set effects and texts into videos.
- Adjust video clips with tools for border, gradation, and shadowing.
- Multiple animations, callouts, graphics, and stickers to add to videos.
Pros
- Use green screen functionality for quick background removal or editing
- Automatic audio mastering and mixing functionality are available
- Keyframing benefits for customized animations like scaling and positioning
Cons
- Dolby Digital-centric audio codec is not available for users
- Users can try features like Room Echo Removal and NVIDIA A/V Denoise only on Windows 11
OS Compatibility: Windows
TechRadar Rating: 4.5 out of 5
Best For: Professional videographers and regular users who want a Windows-based video editing software for standard video clip editing.
What users say:
Cyberlink PowerDirector is a powerful video editor with standard editing functions many users have tried and benefited from. According to customers , the program has high-quality video and audio editing benefits for presentations, with additional effects/splitting/cropping features.
Part 3: What are the limitations when using Sony Vegas (Vegas Pro) on Mac?
Yes, with the given Sony Vegas alternatives, Mac and Windows users can benefit heavily. But why is it important to try for a replacement when Sony Vegas Pro is relatively efficient software?
To know the answer, you should take the time to understand its limitations, which do exist.
It only works for Windows users
The Sony Vegas Pro software is not available for Mac or other operating systems besides Windows. In addition, it’ll be really complex and time-consuming, even if you opt for virtual machine software or handle dual booting techniques to configure the software on your Mac or Linux.
You need to invest in other hardware
Sony Vegas Pro does do not work within one comprehensive platform like other capable video editing software types, like Wondershare Filmora . You have to acquire a powerful PC and tools to operate it separately. The software works very slowly on older devices.
Not incredibly unique
The functions of Sony Vegas Pro match somewhat with other options in the market. So, users would not expect much value in purchasing this software’s plans that they want to upgrade from their previous system, but on the other hand, the available features are mostly standard-level in functionality as well.
Hot FAQs about Vegas Pro Alternatives
After knowing these details, many users still have specific common queries about opting for a Sony Vegas Pro alternatively. So these are some common FAQs about this- answered.
1. Can Sony Vegas be used on a Mac?
No, it is impossible to directly use Sony Vegas on macOS devices since it does not support it. Instead, you have to separately use a dual boot strategy or virtual machine software to activate the video editor on Mac devices, but the process for that is complex.
2. Is Wondershare Filmora or Vegas Pro better?
Wondershare Filmora and Vegas Pro are top-level options in video and audio editing projects with professional-level editing accuracy. However, Filmora has a cohesive ecosystem with rich AI and standard functions and comes with Mac/Windows support. So, in that sense, Filmora is comparatively a better choice.
Final Words
In place of Sony Vegas Pro, any of these options would also give you a great user experience. Out of them, Filmora is one that we will recommend due to its multi-faceted benefits and features for Mac and Windows users. Ultimately, make your decision based on your particular needs.
Free Download For Win 7 or later(64-bit)
Free Download For macOS 10.14 or later
The Best Glitch Video Editors
The Best Glitch Video Editors
Ollie Mattison
Mar 27, 2024• Proven solutions
We live in the digital age, which is the reason why the topic of malfunctioning electronics is close to us. Most of us have seen TV static, a monitor glitch, or some other fault of a display more than once, and it is hardly surprising that a growing number of filmmakers and video content creators refer to glitches in their work.
Glitches can be used in the opening titles, as transitions or effects that are applied to an entire video, but you need to fit them into the right context since glitches don’t match all styles of videos. You are at the right place if you want to find out more about glitch video editors because in this article we are going to introduce you to some of the best glitch video editors on the market.
The Best Glitch Video Editors [Online & Desktop]
Virtually any video editing software can be used to create a glitch effect, but you should keep in mind that only some video editors feature glitch effects in their effects libraries. Choosing a video editing software that already has preset glitch effects will make it easier for you to use these effects in different projects. Let’s take a look at some of the best glitch video editors.
1. Filmora
Filmora is a versatile video editor that enables you to do much more than just apply glitch effects to videos. In fact, it allows you to manipulate your footage in virtually any way you want by giving you access to huge titles, effects, and transitions libraries and allowing you to use a broad range of video editing tools. Filmora let’s use glitch effects in all of your projects, so here’s how you can use glitch effects in videos you edit in Filmora.
1. How to create a glitch transition with Filmora?
If you are using Filmora X V10.5 and the later versions, you can now find the glitch transitions in the program. To locate the glitch transition, type glitch in the transition search bar and you will find all glitch-related transitions in the library, such as VHS and glitch effect, retro game intro pack transition, and VFX cyberpunk pack transition.

However, there are no glitch transitions in Filmora’s transition library if you are running versions before V10.5, you can use the Chromatic Aberration effect for this purpose.
All you need to do is to place two different video clips onto the timeline and then go to the Effects tab. Expand the Filters menu and click on the Distortion submenu. The Chromatic Aberration effect is located near the top of the tab, so just drag and drop it to the video track that is directly above the one to which you added the footage.

You should then reduce the effect’s duration to six or eight frames, and you can enlarge the timeline to perform this task with more precision. Once you’ve adjusted the duration of the effect, you should place it above the cut, so that it covers the last four frames of the ending video clip and the first two frames of the video clip that is starting.
Adding a sound effect that matches the glitch transition you created is going to draw the viewer’s attention to the transition and make it more realistic.
You can watch the video tutorial below to get the step-by-step video tutorial or read this article to find out how to add glitch effects to video .
Want to make a VHS video including glitch effect? See this article: Easy Ways to Do VHS Effect with Final Cut Pro.
Download Mac Version ](https://tools.techidaily.com/wondershare/filmora/download/ )
2. How to add the glitch effect to text in Filmora?
The process of adding a glitch effect to text is simple, although you need to go through several different steps. You should start by choosing one of the available titles from Filmora’s Title tab and placing it on the timeline.
Double-click on the title you added, then click on the Advanced button and insert the text into the textbox. Proceed to set the text color to white, adjust its size and select a new font and then make sure that the No Animation option is selected in the Animation tab.
Download Mac Version ](https://tools.techidaily.com/wondershare/filmora/download/ )
Click OK to confirm the changes you’ve made, then lock the video track on which the title is located, copy the title to the video track above and unlock the video track you locked. Once you’ve created the second title, you should double-click on the first title and change the text color to black.
Make a cut at two seconds on the title you copied and then head over to the Transition tab to locate the Deposit Up transition. Drag the Deposit Up transition from the Transition tab and drop it over the beginning of the title you copied. Export this title from Filmora as a video and then import it back into your project.
Remove the titles you added to the timeline and proceed to place the footage on the timeline. Afterward, you should place the video clip you created directly above the first video and match their durations. Double-click on the video clip that contains text and change the Blending Mode to Lighten from the Compositing menu.
Proceed to add the Shake, Flip, and Chromatic Aberration effects to the overlaying clip and then go to the Video Effects menu that is located in the Video tab to adjust the settings of the effects you applied.
3. How to apply a glitch effect to a video with Filmora?
The fastest way to apply a glitch effect in Filmora to a video clip is to add the Chromatic Aberration effect to it. Combining the Chromatic Aberration effect with filters, 3D LUTs and audio effects will help you sell the effect better.
Which combination of Filmora’s visual effects you are going to use, ultimately depends on the type of glitch effect you want to create. Optionally, you can also use keyframes to introduce the changes you make more gradually. Filmora offers you plenty of ways to get creative with glitch effects, but it is up to you to find the best way to incorporate glitch effects into your videos.
If you are using the Filmora V10.5 and later version, you can add the Human Glitch effect under AI Portrait category, which will leave the video background without glitch effects.

2. iMovie
Price: Free
Compatibility: macOS
Unfortunately, iMovie doesn’t have any preset glitch effects in its effects library, but you can still use it to create a glitch effect from scratch. The Video Overlay settings, Clip Filter options as well as the Split Screen feature enable you to overlay video clips and simulate the glitch effect.
Creating a glitch effect with iMovie requires you to have excellent video editing skills, and quite a bit of creativity as you have to plan the entire effect in advance. Even so the video editing tools you will have at your disposal are going to be limited so you shouldn’t expect to achieve breathtaking results. Adding an audio effect that accompanies the glitch effect may make this effect look more realistic.
3. Veed.io
Price: Free, pricing options start at $15 per month
Compatibility: web-based
Veed.io is an online photo and video editor aimed at social media content producers that lets you apply preset glitch effects to your videos. You don’t even have to create an account in order to start working on a new project, and you can simply upload a video clip of any length to this platform.
As soon as the upload is completed, you will be taken to the editor window where you can adjust the video’s settings, add text overlays or change the video’s playback speed. Click on the Effects tab that is located in the Filters menu and then proceed to choose between VHS, Glitch, and RGB Split effects. All you need to do in order to apply one of these glitch effects is to click on it and you can see the results immediately in the Preview window. However, all videos you create with the free version of Veed.io are going to be watermarked.
4. Photo Mosh
Price: Free
Compatibility: web-based
This online platform is entirely dedicated to the creation of glitch videos. Besides being incredibly fun to use, Photo Mosh is also completely free, so you just have to upload a video clip and start experimenting with different effects.
Bad TV, Duo Tone, or Pixelate are just a few among numerous glitch effects you can choose from. Simply expand the effect and click on the ON checkbox to apply an effect and then proceed to adjust its settings. Optionally, you can click on the Mosh button that is located below the Preview Screen if you want to combine two or more random glitch effects. The only downside is that you can only save your creations as JPEG, GIF, or WEBM files, and the videos you record in the WEBM format can last for a few seconds.
5. Biteable
Price: Free, pricing plans start at $19.00 per month
Compatibility: web-based
Bitable is an online content creation platform that helps digital marketers and all other types of content creators to edit their videos quickly. The platform features a huge selection of video templates that can be used for a wide variety of purposes that range from employee onboarding to business to customer messages.
Unsurprisingly, Bitable features a Glitch template that is composed out of eight scenes that can be used to promote a concert or a nightclub. This template is customizable which enables you to upload the images you want to use and your tailored promotional message or alter the theme colors. You can also choose the soundtrack for the glitch video by simply uploading the song you want to use. However, if you opt for Biteable’s Starter pack you won’t be able to export more than one video per month.
6. Renderforest
Price: Free, pricing options start at $9.99 per month
Compatibility: web-based
In case you are looking for an online platform that enables you to build websites, edit videos, create animations, and design logos, then Renderforest is the right choice for you. Like Biteable, Renderforest grants you access to a huge collection of video templates you can use to create videos quickly.
The Glitch Slideshow template can be used for video portfolios, party highlights, or virtually any other occasion. You just have to upload the footage you want to include in the glitch slideshow, add the text and choose the song for the soundtrack and Renderforest will generate the new video for you. You can only create three-minute videos at 360p resolution if you decide to use the free version of this platform, and all videos you export from Renderforest are going to be watermarked if you don’t purchase one of the available subscriptions models.
7. Shotcut
Price: Free
Compatibility: Windows, macOS, Linux
Creating glitch videos with Shotcut is easy because this open-source video editor allows you to choose from several different glitch effects. The effect named Glitch is located in the Filters menu and you just have to drag and drop it to the timeline in order to apply it to a video clip. In addition, you can adjust the Frequency, Block height, Shift intensity, and Color intensity options if you want to customize the effect to the project’s demands.
The RGB Shift is yet another effect you can use to create glitches in your videos. After you apply it to a video clip you can adjust the vertical and horizontal values, but keep in mind that setting both of these values to 50 is going to align them perfectly and render them invisible. Moreover, filters such as Shake, Old Film Projector, or Old Film Technicolor can all be used to simulate glitches in a video.
8. VSDC
Price: Free
Compatibility: Windows
PC owners who want to add glitch effects to their videos can install the VSDC video editing software for free. This non-linear editing application supports nearly all common video file formats, so you don’t have to worry about the format in which your video was captured.
After you create a new project and add the footage to the timeline, you should click on the Video Effects button and select the Glitch option from the Special FX submenu. There are eight glitches presets to choose from, and you can either use one of them or create your own glitch presets. You can adjust the Glitch effect’s settings from the Properties Window. Click on the Properties drop-down menu in the Glitch Effect Settings submenu and choose one of the available options or pick the Custom option if you want to create a new glitch effect preset.
FAQ About Glitch Video Editors
1. What is a glitch effect?
A glitch effect can be any intervention you make on a video clip that makes that video look like it was recorded by a faulty camera or displayed on a malfunctioning display device. That’s why you don’t necessarily have to use a glitch effect in order to make the video clip look damaged since a color effect or a camera shake effect can also be used for this purpose. Moreover, combining several effects to create a glitch in a video is also an option, although this task may be overwhelming for inexperienced video editors.
2. How to apply a glitch effect to a video in Filmora
Filmora allows you to use glitches in a variety of ways, so besides adding the Chromatic Aberration effect to a video clip, you can also use it to create a transition or apply it to text. In addition, you can use a camera shake effect or filters to make glitches in your videos. Including the sound effect that accompanies the glitch can help you create a more realistic glitch.
Conclusion
Glitch effects have become very popular in the last few years, which is the reason why a growing number of content creators is using them in their videos. Each of the glitch video editors we featured in this article allows you to create glitches in your videos effortlessly, although using some of them requires you to have advanced video editing skills. Which glitch video editor are you going to choose? Leave a comment and let us know.
Ollie Mattison
Ollie Mattison is a writer and a lover of all things video.
Follow @Ollie Mattison
Ollie Mattison
Mar 27, 2024• Proven solutions
We live in the digital age, which is the reason why the topic of malfunctioning electronics is close to us. Most of us have seen TV static, a monitor glitch, or some other fault of a display more than once, and it is hardly surprising that a growing number of filmmakers and video content creators refer to glitches in their work.
Glitches can be used in the opening titles, as transitions or effects that are applied to an entire video, but you need to fit them into the right context since glitches don’t match all styles of videos. You are at the right place if you want to find out more about glitch video editors because in this article we are going to introduce you to some of the best glitch video editors on the market.
The Best Glitch Video Editors [Online & Desktop]
Virtually any video editing software can be used to create a glitch effect, but you should keep in mind that only some video editors feature glitch effects in their effects libraries. Choosing a video editing software that already has preset glitch effects will make it easier for you to use these effects in different projects. Let’s take a look at some of the best glitch video editors.
1. Filmora
Filmora is a versatile video editor that enables you to do much more than just apply glitch effects to videos. In fact, it allows you to manipulate your footage in virtually any way you want by giving you access to huge titles, effects, and transitions libraries and allowing you to use a broad range of video editing tools. Filmora let’s use glitch effects in all of your projects, so here’s how you can use glitch effects in videos you edit in Filmora.
1. How to create a glitch transition with Filmora?
If you are using Filmora X V10.5 and the later versions, you can now find the glitch transitions in the program. To locate the glitch transition, type glitch in the transition search bar and you will find all glitch-related transitions in the library, such as VHS and glitch effect, retro game intro pack transition, and VFX cyberpunk pack transition.
However, there are no glitch transitions in Filmora’s transition library if you are running versions before V10.5, you can use the Chromatic Aberration effect for this purpose.
All you need to do is to place two different video clips onto the timeline and then go to the Effects tab. Expand the Filters menu and click on the Distortion submenu. The Chromatic Aberration effect is located near the top of the tab, so just drag and drop it to the video track that is directly above the one to which you added the footage.
You should then reduce the effect’s duration to six or eight frames, and you can enlarge the timeline to perform this task with more precision. Once you’ve adjusted the duration of the effect, you should place it above the cut, so that it covers the last four frames of the ending video clip and the first two frames of the video clip that is starting.
Adding a sound effect that matches the glitch transition you created is going to draw the viewer’s attention to the transition and make it more realistic.
You can watch the video tutorial below to get the step-by-step video tutorial or read this article to find out how to add glitch effects to video .
Want to make a VHS video including glitch effect? See this article: Easy Ways to Do VHS Effect with Final Cut Pro.
Download Mac Version ](https://tools.techidaily.com/wondershare/filmora/download/ )
2. How to add the glitch effect to text in Filmora?
The process of adding a glitch effect to text is simple, although you need to go through several different steps. You should start by choosing one of the available titles from Filmora’s Title tab and placing it on the timeline.
Double-click on the title you added, then click on the Advanced button and insert the text into the textbox. Proceed to set the text color to white, adjust its size and select a new font and then make sure that the No Animation option is selected in the Animation tab.
Download Mac Version ](https://tools.techidaily.com/wondershare/filmora/download/ )
Click OK to confirm the changes you’ve made, then lock the video track on which the title is located, copy the title to the video track above and unlock the video track you locked. Once you’ve created the second title, you should double-click on the first title and change the text color to black.
Make a cut at two seconds on the title you copied and then head over to the Transition tab to locate the Deposit Up transition. Drag the Deposit Up transition from the Transition tab and drop it over the beginning of the title you copied. Export this title from Filmora as a video and then import it back into your project.
Remove the titles you added to the timeline and proceed to place the footage on the timeline. Afterward, you should place the video clip you created directly above the first video and match their durations. Double-click on the video clip that contains text and change the Blending Mode to Lighten from the Compositing menu.
Proceed to add the Shake, Flip, and Chromatic Aberration effects to the overlaying clip and then go to the Video Effects menu that is located in the Video tab to adjust the settings of the effects you applied.
3. How to apply a glitch effect to a video with Filmora?
The fastest way to apply a glitch effect in Filmora to a video clip is to add the Chromatic Aberration effect to it. Combining the Chromatic Aberration effect with filters, 3D LUTs and audio effects will help you sell the effect better.
Which combination of Filmora’s visual effects you are going to use, ultimately depends on the type of glitch effect you want to create. Optionally, you can also use keyframes to introduce the changes you make more gradually. Filmora offers you plenty of ways to get creative with glitch effects, but it is up to you to find the best way to incorporate glitch effects into your videos.
If you are using the Filmora V10.5 and later version, you can add the Human Glitch effect under AI Portrait category, which will leave the video background without glitch effects.
2. iMovie
Price: Free
Compatibility: macOS
Unfortunately, iMovie doesn’t have any preset glitch effects in its effects library, but you can still use it to create a glitch effect from scratch. The Video Overlay settings, Clip Filter options as well as the Split Screen feature enable you to overlay video clips and simulate the glitch effect.
Creating a glitch effect with iMovie requires you to have excellent video editing skills, and quite a bit of creativity as you have to plan the entire effect in advance. Even so the video editing tools you will have at your disposal are going to be limited so you shouldn’t expect to achieve breathtaking results. Adding an audio effect that accompanies the glitch effect may make this effect look more realistic.
3. Veed.io
Price: Free, pricing options start at $15 per month
Compatibility: web-based
Veed.io is an online photo and video editor aimed at social media content producers that lets you apply preset glitch effects to your videos. You don’t even have to create an account in order to start working on a new project, and you can simply upload a video clip of any length to this platform.
As soon as the upload is completed, you will be taken to the editor window where you can adjust the video’s settings, add text overlays or change the video’s playback speed. Click on the Effects tab that is located in the Filters menu and then proceed to choose between VHS, Glitch, and RGB Split effects. All you need to do in order to apply one of these glitch effects is to click on it and you can see the results immediately in the Preview window. However, all videos you create with the free version of Veed.io are going to be watermarked.
4. Photo Mosh
Price: Free
Compatibility: web-based
This online platform is entirely dedicated to the creation of glitch videos. Besides being incredibly fun to use, Photo Mosh is also completely free, so you just have to upload a video clip and start experimenting with different effects.
Bad TV, Duo Tone, or Pixelate are just a few among numerous glitch effects you can choose from. Simply expand the effect and click on the ON checkbox to apply an effect and then proceed to adjust its settings. Optionally, you can click on the Mosh button that is located below the Preview Screen if you want to combine two or more random glitch effects. The only downside is that you can only save your creations as JPEG, GIF, or WEBM files, and the videos you record in the WEBM format can last for a few seconds.
5. Biteable
Price: Free, pricing plans start at $19.00 per month
Compatibility: web-based
Bitable is an online content creation platform that helps digital marketers and all other types of content creators to edit their videos quickly. The platform features a huge selection of video templates that can be used for a wide variety of purposes that range from employee onboarding to business to customer messages.
Unsurprisingly, Bitable features a Glitch template that is composed out of eight scenes that can be used to promote a concert or a nightclub. This template is customizable which enables you to upload the images you want to use and your tailored promotional message or alter the theme colors. You can also choose the soundtrack for the glitch video by simply uploading the song you want to use. However, if you opt for Biteable’s Starter pack you won’t be able to export more than one video per month.
6. Renderforest
Price: Free, pricing options start at $9.99 per month
Compatibility: web-based
In case you are looking for an online platform that enables you to build websites, edit videos, create animations, and design logos, then Renderforest is the right choice for you. Like Biteable, Renderforest grants you access to a huge collection of video templates you can use to create videos quickly.
The Glitch Slideshow template can be used for video portfolios, party highlights, or virtually any other occasion. You just have to upload the footage you want to include in the glitch slideshow, add the text and choose the song for the soundtrack and Renderforest will generate the new video for you. You can only create three-minute videos at 360p resolution if you decide to use the free version of this platform, and all videos you export from Renderforest are going to be watermarked if you don’t purchase one of the available subscriptions models.
7. Shotcut
Price: Free
Compatibility: Windows, macOS, Linux
Creating glitch videos with Shotcut is easy because this open-source video editor allows you to choose from several different glitch effects. The effect named Glitch is located in the Filters menu and you just have to drag and drop it to the timeline in order to apply it to a video clip. In addition, you can adjust the Frequency, Block height, Shift intensity, and Color intensity options if you want to customize the effect to the project’s demands.
The RGB Shift is yet another effect you can use to create glitches in your videos. After you apply it to a video clip you can adjust the vertical and horizontal values, but keep in mind that setting both of these values to 50 is going to align them perfectly and render them invisible. Moreover, filters such as Shake, Old Film Projector, or Old Film Technicolor can all be used to simulate glitches in a video.
8. VSDC
Price: Free
Compatibility: Windows
PC owners who want to add glitch effects to their videos can install the VSDC video editing software for free. This non-linear editing application supports nearly all common video file formats, so you don’t have to worry about the format in which your video was captured.
After you create a new project and add the footage to the timeline, you should click on the Video Effects button and select the Glitch option from the Special FX submenu. There are eight glitches presets to choose from, and you can either use one of them or create your own glitch presets. You can adjust the Glitch effect’s settings from the Properties Window. Click on the Properties drop-down menu in the Glitch Effect Settings submenu and choose one of the available options or pick the Custom option if you want to create a new glitch effect preset.
FAQ About Glitch Video Editors
1. What is a glitch effect?
A glitch effect can be any intervention you make on a video clip that makes that video look like it was recorded by a faulty camera or displayed on a malfunctioning display device. That’s why you don’t necessarily have to use a glitch effect in order to make the video clip look damaged since a color effect or a camera shake effect can also be used for this purpose. Moreover, combining several effects to create a glitch in a video is also an option, although this task may be overwhelming for inexperienced video editors.
2. How to apply a glitch effect to a video in Filmora
Filmora allows you to use glitches in a variety of ways, so besides adding the Chromatic Aberration effect to a video clip, you can also use it to create a transition or apply it to text. In addition, you can use a camera shake effect or filters to make glitches in your videos. Including the sound effect that accompanies the glitch can help you create a more realistic glitch.
Conclusion
Glitch effects have become very popular in the last few years, which is the reason why a growing number of content creators is using them in their videos. Each of the glitch video editors we featured in this article allows you to create glitches in your videos effortlessly, although using some of them requires you to have advanced video editing skills. Which glitch video editor are you going to choose? Leave a comment and let us know.
Ollie Mattison
Ollie Mattison is a writer and a lover of all things video.
Follow @Ollie Mattison
Best AVI Video Editor for Windows 8: Latest 2023 Features
AVI Editor for Windows 8: Easily Edit AVI Files on PC

Liza Brown
Mar 27, 2024• Proven solutions
Want to edit your recorded AVI files in Windows 8 but your Windows Movie Maker failed to recognize the AVI codec? That may be a little disappointing. Don’t worry! Whether you’re looking forward to edit the videos for YouTube or edit some family videos, this professional and easy to use AVI editor for Windows 8: Wondershare Filmora will always help you out. It supports all kinds of AVI videos of any size or content and export great video and audio file. See how it can edit your AVI videos instantly below. Check the video tutorial about how to edit AVI videos on Windows 8 first.
Free download the trial version of AVI editor (Windows 10/8/7/XP/Vista all supported):
Download Mac Version ](https://tools.techidaily.com/wondershare/filmora/download/ )
1 Load your AVI videos
Filmora AVI editor for Windows 8 is an easy to use video editing software for windows that comes with a beautiful interface. To add your AVI videos, just click “Import” on the main interface and select files from your computer to add or just simply drag and drop them to the User’s Album. You can also add some music files or photos to use as background music or transition, just go for it cause it supports a wide range of videos, audios, and photos, see its tech spec here.

2Edit AVI in Windows 8 at ease
Drag your videos from the album to the Timeline of AVI video editor for Windows 8, they’ll automatically merge together seamlessly. Now go ahead for editing:
Basic Editing: Crop, Rotate, Trim, Split
Double click on selected video to do basic editing like crop, rotate, adjust brightness, speed, contrast, etc.

Move the slide bar on the timeline to trim, split, copy or paste the video clip as you wish.
Learn more about basic video editing skills

Enhance videos: Titles, Effect, Transition, Intro/Credit
To make your videos more unique and stylish, you may want to add titles, effect and intro/credits to your movie. Just switch to Text, Effect or Intro/Credit tab, and then drag and drop an item to the Timeline. You can preview the new video right away. If necessary, double click the added item to customize it, e.g. Time of duration.
Learn more about advanced video editing skills

3 Export your masterpiece and share with the worldwide
When all effects satisfied, just click Export tab to export your edited AVI videos. You can choose a video format for convenient playback on computer or devices, or upload video to YouTube, as well as an optional message sending to Facebook and Twitter. Or even burn that file to a DVD. Also, you can set the bit rate and frame rate by clicking Settings. After that, click export to finish.

That’s all! Download Filmora video editor for free and edit your AVI videos in Windows 8 now!
Download Mac Version ](https://tools.techidaily.com/wondershare/filmora/download/ )
Liza Brown
Liza Brown is a writer and a lover of all things video.
Follow @Liza Brown
Liza Brown
Mar 27, 2024• Proven solutions
Want to edit your recorded AVI files in Windows 8 but your Windows Movie Maker failed to recognize the AVI codec? That may be a little disappointing. Don’t worry! Whether you’re looking forward to edit the videos for YouTube or edit some family videos, this professional and easy to use AVI editor for Windows 8: Wondershare Filmora will always help you out. It supports all kinds of AVI videos of any size or content and export great video and audio file. See how it can edit your AVI videos instantly below. Check the video tutorial about how to edit AVI videos on Windows 8 first.
Free download the trial version of AVI editor (Windows 10/8/7/XP/Vista all supported):
Download Mac Version ](https://tools.techidaily.com/wondershare/filmora/download/ )
1 Load your AVI videos
Filmora AVI editor for Windows 8 is an easy to use video editing software for windows that comes with a beautiful interface. To add your AVI videos, just click “Import” on the main interface and select files from your computer to add or just simply drag and drop them to the User’s Album. You can also add some music files or photos to use as background music or transition, just go for it cause it supports a wide range of videos, audios, and photos, see its tech spec here.
2Edit AVI in Windows 8 at ease
Drag your videos from the album to the Timeline of AVI video editor for Windows 8, they’ll automatically merge together seamlessly. Now go ahead for editing:
Basic Editing: Crop, Rotate, Trim, Split
Double click on selected video to do basic editing like crop, rotate, adjust brightness, speed, contrast, etc.
Move the slide bar on the timeline to trim, split, copy or paste the video clip as you wish.
Learn more about basic video editing skills
Enhance videos: Titles, Effect, Transition, Intro/Credit
To make your videos more unique and stylish, you may want to add titles, effect and intro/credits to your movie. Just switch to Text, Effect or Intro/Credit tab, and then drag and drop an item to the Timeline. You can preview the new video right away. If necessary, double click the added item to customize it, e.g. Time of duration.
Learn more about advanced video editing skills
3 Export your masterpiece and share with the worldwide
When all effects satisfied, just click Export tab to export your edited AVI videos. You can choose a video format for convenient playback on computer or devices, or upload video to YouTube, as well as an optional message sending to Facebook and Twitter. Or even burn that file to a DVD. Also, you can set the bit rate and frame rate by clicking Settings. After that, click export to finish.
That’s all! Download Filmora video editor for free and edit your AVI videos in Windows 8 now!
Download Mac Version ](https://tools.techidaily.com/wondershare/filmora/download/ )
Liza Brown
Liza Brown is a writer and a lover of all things video.
Follow @Liza Brown
Also read:
- New Level Up Your Videos 20 Best Free Adobe Premiere Title Templates for 2024
- The Text-to-Audio Revolution Essential Conversion Tips and Tricks for 2024
- Updated 2024 Approved Glitch Your Way to Creativity Top Video Editors for Windows and Mac
- Updated Master the Art of Animation Top Tools and Software for Beginners, Pros, and Everyone in Between for 2024
- Updated 2024 Approved Cut, Trim, and Shine Top Free Online Video Editors Revealed
- New 2024 Approved Pro-Grade Videos in Minutes No Experience Required
- New Adjust Video Playback Speed in Camtasia for 2024
- New 2024 Approved No More Blur 5 Free Android Apps to Stabilize Your Videos
- 2024 Approved Take Your Video Editing to the Next Level 6 Advanced Adobe Premiere Techniques
- Unleash Stunning 4K Videos with These Top Editing Tools for 2024
- Updated In 2024, The Ultimate Guide to LinkedIn Video Aspect Ratios for Better Reach
- Updated Editing Videos on Mac? Try VN Video Editor or These Alternatives for 2024
- New In 2024, The Ultimate Guide to Instagram Aspect Ratios Get the Most Out of Your Videos
- Updated Unbranded Video Combining 7 Best Software Options for 2024
- Mastering Photo Dimensions How to Choose the Right Aspect Ratio for 2024
- Updated Mac MP3 Conversion Made Easy Top Software Picks for 2024
- Updated In 2024, Effortless WebM to MP3 Conversion Top 10 Converter Reviews
- Updated The Art of Video Post-Production A Step-by-Step Online Guide for 2024
- Updated 2024 Approved VN Video Editor App Review Pros and Cons
- Updated 2024 Approved The Best Free Audio Recording Software In-Depth Reviews
- Mastering Aspect Ratio in Final Cut Pro A Beginners Guide for 2024
- Updated Transform Your Chromebook How to Install Linux and Unlock New Features
- Updated In 2024, The Ultimate Guide to MKV Trimming on Mac (2023 Edition)
- Updated In 2024, Top Simple Video Editing Tools for Everyone
- New 2024 Approved How Different YouTube Aspect Ratio Affect Video Style
- Updated 2024 Approved The Best Ways to Send Video Invitations From Your iPhone or Android
- New 10 Best Vlog Editor Apps iOS & Android for 2024
- Say Goodbye to Movie Maker 10 Free Video Editing Option for 2024
- New Top-Rated Free Online Video Editing Platforms for 2024
- In 2024, MKV File Trimming Made Easy Free Tools
- Updated The Best Web-Based Video Editors for Adding Music for 2024
- New 2024 Approved Open-Source Video Editing on a Budget Top Free Options
- 2024 Approved The Art of Bokeh Top Mobile Apps for Creating Stunning Blur Effects
- In 2024, Is GSM Flasher ADB Legit? Full Review To Bypass Your Xiaomi 14 Phone FRP Lock
- Cellular Network Not Available for Voice Calls On Lava Blaze 2 5G | Dr.fone
- How To Change Your Apple ID Password On your iPhone 7 | Dr.fone
- 9 Solutions to Fix Oppo Reno 8T System Crash Issue | Dr.fone
- New Guide on How to Enable the Text to Speech Function on iPhone for 2024
- A Guide to Create Your Own LOL Montage Video for 2024
- In 2024, How to Bypass iCloud Lock on Apple iPhone 13 Pro
- In 2024, Does find my friends work on Oppo K11 5G | Dr.fone
- Can I Bypass a Forgotten Phone Password Of Realme 10T 5G?
- How To Fix Unresponsive Touch Screen on Realme Note 50 | Dr.fone
- In 2024, Hassle-Free Ways to Remove FRP Lock from Asus ROG Phone 7 Phones with/without a PC
- How to Mirror Your Poco X6 Pro Screen to PC with Chromecast | Dr.fone
- Pokemon Go No GPS Signal? Heres Every Possible Solution On Tecno Phantom V Fold | Dr.fone
- Preparation to Beat Giovani in Pokemon Go For Oppo Reno 11 5G | Dr.fone
- In 2024, Top 4 SIM Location Trackers To Easily Find Your Lost Infinix Smart 8 HD Device
- In 2024, Pokémon Go Cooldown Chart On Samsung Galaxy F15 5G | Dr.fone
- Can Life360 Track You When Your Samsung Galaxy S23+ is off? | Dr.fone
- Kapwing Video Trimmer Tutorial Edit Your Clips in Minutes
- In 2024, How to Use Life360 on Windows PC For Tecno Spark 10C? | Dr.fone
- In 2024, How To Change Samsung Galaxy XCover 7 Lock Screen Password?
- Hard Reset Nokia C210 in 3 Efficient Ways | Dr.fone
- Bypass Activation Lock From Apple iPhone SE (2020) - 4 Easy Ways
- New To Get Cinematographs of a Music Video, You Need to Understand the Basics of Camera Movement. As Well Framing and Lighting of the Setup Are Illustrated in This Article for 2024
- How To Restore Missing Call Logs from 105 Classic
- New How To Make Your Memoji Talk? Get Creative With Your Messaging
- New In 2024, Full Guide to Discord Boost
- Why Your Samsung Galaxy M14 5G Screen Might be Unresponsive and How to Fix It | Dr.fone
- For People Wanting to Mock GPS on Infinix Smart 8 Plus Devices | Dr.fone
- Asus ROG Phone 8 Not Receiving Texts? 10 Hassle-Free Solutions Here | Dr.fone
- In 2024, How to Bypass Apple iPhone 14 Passcode Easily Video Inside
- How to repair corrupted PDF v1.6 file when manual method fails | Stellar
- How To Bypass Oppo F25 Pro 5G FRP In 3 Different Ways
- In 2024, Fake Android Location without Rooting For Your OnePlus Nord 3 5G | Dr.fone
- Title: Video Editing on a Shoestring Top Software for 2024
- Author: Isabella
- Created at : 2024-05-19 13:03:39
- Updated at : 2024-05-20 13:03:39
- Link: https://video-creation-software.techidaily.com/video-editing-on-a-shoestring-top-software-for-2024/
- License: This work is licensed under CC BY-NC-SA 4.0.
